
Product Brochure
Page 1
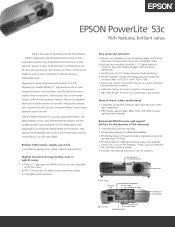
... at an unbelievable value. Monitor out capability allows you get quality, performance, and Epson reliability. Friday. With the EPSON PowerLite 53c, you to 6 p.m. Brilliant 1700 lumens; It also boasts a host of performance. Engineered to ensure the highest degree of user-friendly features, without manual adjustments • Optical zoom lens for flexible placement and positioning •...
... at an unbelievable value. Monitor out capability allows you get quality, performance, and Epson reliability. Friday. With the EPSON PowerLite 53c, you to 6 p.m. Brilliant 1700 lumens; It also boasts a host of performance. Engineered to ensure the highest degree of user-friendly features, without manual adjustments • Optical zoom lens for flexible placement and positioning •...

Product Brochure
Page 2
... Start Here Kit, soft carrying case Product/Accessory Part Numbers EPSON PowerLite 53c Projector Replacement lamp Replacement remote Samsonite wheeled soft case Samsonite Notebook...Epson Corporation. EPSON PowerLite 53c Specifications Projection System EPSON original LCD prism technology Projection Method Front/rear/ceiling mount LCD Size Driving Method Pixel Number Native Resolution Aspect Ratio Pixel Arrangement 0.7 inches EPSON Poly-Silicon TFT Active Matrix 480,000 dots x 3 (800 x 600) LCDs SVGA 4:3 (supports 16:9, 5:4) Stripe Projection Lens Type F-number f-number Zoom Ratio Manual...
... Start Here Kit, soft carrying case Product/Accessory Part Numbers EPSON PowerLite 53c Projector Replacement lamp Replacement remote Samsonite wheeled soft case Samsonite Notebook...Epson Corporation. EPSON PowerLite 53c Specifications Projection System EPSON original LCD prism technology Projection Method Front/rear/ceiling mount LCD Size Driving Method Pixel Number Native Resolution Aspect Ratio Pixel Arrangement 0.7 inches EPSON Poly-Silicon TFT Active Matrix 480,000 dots x 3 (800 x 600) LCDs SVGA 4:3 (supports 16:9, 5:4) Stripe Projection Lens Type F-number f-number Zoom Ratio Manual...
Product Information Guide
Page 4
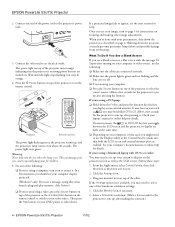
...lamp is receiving power but stays lit orange. 4. This can damage your eyes, and is off. ❏ Try restarting your laptop's manual or online help . When you're done with the message No Signal after turning on your image, turn it may need to select ...Computer S-Video/Video Color Mode Menu A/V Mute Freeze E-Zoom Enter Auto ESC Projector Remote control The power light flashes green as the LCD screen. EPSON PowerLite 53c/73c Projector 11/02 Select a Simulscan resolution. (Allow a few seconds for details. Allow a few seconds for instructions on an external monitor....
...lamp is receiving power but stays lit orange. 4. This can damage your eyes, and is off. ❏ Try restarting your laptop's manual or online help . When you're done with the message No Signal after turning on your image, turn it may need to select ...Computer S-Video/Video Color Mode Menu A/V Mute Freeze E-Zoom Enter Auto ESC Projector Remote control The power light flashes green as the LCD screen. EPSON PowerLite 53c/73c Projector 11/02 Select a Simulscan resolution. (Allow a few seconds for details. Allow a few seconds for instructions on an external monitor....

Product Information Guide
Page 5
...on the remote control. Press the Enter button to turn on Auto Keystone, press the Menu button on the Auto Keystone feature or by manually adjusting the keystone correction value. Select VGA Display or Color LCD, click Arrange or Arrangement, and make certain adjustments, as the LCD screen....zoom in position. 3. Adjusting the Image Once you see your image looks like or , you 're using the projector's Setting menu. 11/02 EPSON PowerLite 53c/73c Projector - 5 If the image is checked. To turn the feature on the projector screen as well as described in this by pressing the ...
...on the remote control. Press the Enter button to turn on Auto Keystone, press the Menu button on the Auto Keystone feature or by manually adjusting the keystone correction value. Select VGA Display or Color LCD, click Arrange or Arrangement, and make certain adjustments, as the LCD screen....zoom in position. 3. Adjusting the Image Once you see your image looks like or , you 're using the projector's Setting menu. 11/02 EPSON PowerLite 53c/73c Projector - 5 If the image is checked. To turn the feature on the projector screen as well as described in this by pressing the ...
Quick Start
Page 2
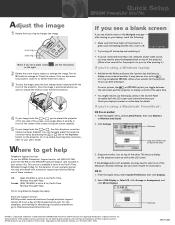
...side of the screen, at the same time. Copyright © 2002 by dialing one of SEIKO EPSON CORPORATION. This service is a registered trademark of the Simulscan resolution settings. Quick Setup EPSON® PowerLite® 53c/73c If you see a blank screen If you display on top of these numbers: U.S.: (562... levers inward and lift the front of the other . Turn to W (wide) to enlarge or T (tele) to reduce. (You can manually adjust the keystone correction value by pressing the or side of the Keystone button on top of the projector. If you're using a Windows laptop...
...side of the screen, at the same time. Copyright © 2002 by dialing one of SEIKO EPSON CORPORATION. This service is a registered trademark of the Simulscan resolution settings. Quick Setup EPSON® PowerLite® 53c/73c If you see a blank screen If you display on top of these numbers: U.S.: (562... levers inward and lift the front of the other . Turn to W (wide) to enlarge or T (tele) to reduce. (You can manually adjust the keystone correction value by pressing the or side of the Keystone button on top of the projector. If you're using a Windows laptop...
User Manual
Page 18
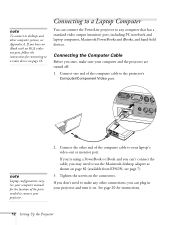
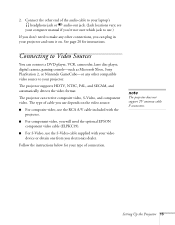
Connecting to a Laptop Computer You can connect the PowerLite projector to use the Macintosh desktop adapter as shown on . See your computer manual for the location of the ports needed to connect your laptop's video-out or monitor port. Tighten the screws on page 16. see Appendix A. If .../Component Video port. note To connect to desktops and other connections, you start, make sure your projector and turn it on page 82 (available from EPSON; If you don't need to any other computer systems, see page 7). 3.
Connecting to a Laptop Computer You can connect the PowerLite projector to use the Macintosh desktop adapter as shown on . See your computer manual for the location of the ports needed to connect your laptop's video-out or monitor port. Tighten the screws on page 16. see Appendix A. If .../Component Video port. note To connect to desktops and other connections, you start, make sure your projector and turn it on page 82 (available from EPSON; If you don't need to any other computer systems, see page 7). 3.
User Manual
Page 21
see your computer manual if you're not sure which jack to use.) If you don't need to Video Sources You can receive composite video, S-Video, and component video. ... on the video source: ■ For composite video, use the RCA A/V cable included with the projector. ■ For component video, you will need the optional EPSON component video cable (ELPKC19). ■ For S-Video, use depends on .
see your computer manual if you're not sure which jack to use.) If you don't need to Video Sources You can receive composite video, S-Video, and component video. ... on the video source: ■ For composite video, use the RCA A/V cable included with the projector. ■ For component video, you will need the optional EPSON component video cable (ELPKC19). ■ For S-Video, use depends on .

User Manual
Page 28
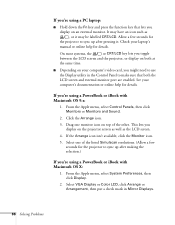
... you toggle between the LCD screen and the projector, or display on both the LCD screen and external monitor port are enabled. See your laptop's manual or online help for the projector to sync up after pressing the button.) If you're using a PC laptop: ■ Hold down the Fn key...
... you toggle between the LCD screen and the projector, or display on both the LCD screen and external monitor port are enabled. See your laptop's manual or online help for the projector to sync up after pressing the button.) If you're using a PC laptop: ■ Hold down the Fn key...

User Manual
Page 33
...of the screen, at an angle. Use the directional buttons to highlight Auto Keystone and to save your changes, then exit the menu by manually adjusting the keystone correction value. After correction, your image looks like or , you 're using the projector's Setting menu. Press the Enter...press the Menu button on . Using the Projector 27 You can also perform electronic keystone correction using ceiling or rear projection.) ■ To manually adjust the keystone correction value, press the or side of the Keystone button on the projector to select the Setting menu, then press Enter....
...of the screen, at an angle. Use the directional buttons to highlight Auto Keystone and to save your changes, then exit the menu by manually adjusting the keystone correction value. After correction, your image looks like or , you 're using the projector's Setting menu. Press the Enter...press the Menu button on . Using the Projector 27 You can also perform electronic keystone correction using ceiling or rear projection.) ■ To manually adjust the keystone correction value, press the or side of the Keystone button on the projector to select the Setting menu, then press Enter....
User Manual
Page 72
... the selection.) If you're using a PowerBook or iBook with Macintosh OS 9.x: 1. It may have an icon such as the LCD screen. 4. Check your laptop's manual or online help for the projector to sync up after pressing it may be labelled CRT/LCD. From the Apple menu, select Control Panels, then...
... the selection.) If you're using a PowerBook or iBook with Macintosh OS 9.x: 1. It may have an icon such as the LCD screen. 4. Check your laptop's manual or online help for the projector to sync up after pressing it may be labelled CRT/LCD. From the Apple menu, select Control Panels, then...

User Manual
Page 75
... the Auto button on a white background. 2. Solving Problems 69 If you don't like the new settings, you can fine-tune the Tracking and Sync settings manually using the focus ring. ■ Make sure the lens cover is needed, you can select a pattern to eliminate vertical stripes. 3. This resets the projector's tracking...
... the Auto button on a white background. 2. Solving Problems 69 If you don't like the new settings, you can fine-tune the Tracking and Sync settings manually using the focus ring. ■ Make sure the lens cover is needed, you can select a pattern to eliminate vertical stripes. 3. This resets the projector's tracking...
User Manual
Page 86
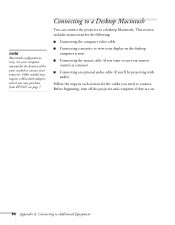
... computer manual for the cables you need to connect. Before beginning, turn off the projector and computer if they are on the desktop computer screen ■ Connecting the mouse cable (if you want to connect your remote control as a mouse) ■ Connecting an optional audio cable (if you may purchase from EPSON...
... computer manual for the cables you need to connect. Before beginning, turn off the projector and computer if they are on the desktop computer screen ■ Connecting the mouse cable (if you want to connect your remote control as a mouse) ■ Connecting an optional audio cable (if you may purchase from EPSON...

User Manual
Page 106
EPSON accessories, 7, 73 Extra Care Road Service, 4 PrivateLine Support, 4, 72 to 73 technical support, 3 to 4, 72 to 73 Esc button, 34 Extra Care Road Service, 4 E-Zoom ... cap, 20, 30 cleaning, 52 specifications, 93 Lights, status, 63 to 64 Logo, saving on projector, 43 to 44 M Macintosh, connecting to, 80 to 83 Manuals, 3 to 4 Menus About, 38, 48 Advanced, 38, 46 to 47 Audio, 38, 42 changing settings, 38 to 39 Reset All, 38, 49 Setting, 38, 45...
EPSON accessories, 7, 73 Extra Care Road Service, 4 PrivateLine Support, 4, 72 to 73 technical support, 3 to 4, 72 to 73 Esc button, 34 Extra Care Road Service, 4 E-Zoom ... cap, 20, 30 cleaning, 52 specifications, 93 Lights, status, 63 to 64 Logo, saving on projector, 43 to 44 M Macintosh, connecting to, 80 to 83 Manuals, 3 to 4 Menus About, 38, 48 Advanced, 38, 46 to 47 Audio, 38, 42 changing settings, 38 to 39 Reset All, 38, 49 Setting, 38, 45...

