
User Manual
Page 4
... a Wired Network ...41 Selecting Wired Network Settings 42 Wireless Network Projection ...45 Installing the Wireless LAN Module 46 Using Quick Wireless Connection (Windows Only 49 Selecting Wireless Network Settings Manually 49 Wireless LAN Menu Settings ...52 Searching for a Wireless Network 53 Selecting Wireless Network Settings in Windows 56 Selecting Wireless Network Settings in Mac OS X 56 Enabling WPA...
... a Wired Network ...41 Selecting Wired Network Settings 42 Wireless Network Projection ...45 Installing the Wireless LAN Module 46 Using Quick Wireless Connection (Windows Only 49 Selecting Wireless Network Settings Manually 49 Wireless LAN Menu Settings ...52 Searching for a Wireless Network 53 Selecting Wireless Network Settings in Windows 56 Selecting Wireless Network Settings in Mac OS X 56 Enabling WPA...
User Manual
Page 5
... Resizing the Image With the Zoom Ring 81 Focusing the Image Using the Focus Ring 81 Remote Control Operation ...82 Using the Remote Control as a Wireless Mouse 83 Using the Remote Control as a Presentation Pointer 84 Selecting an Image Source ...85 Projection Modes ...86 Changing the Projection Mode Using the Remote...
... Resizing the Image With the Zoom Ring 81 Focusing the Image Using the Focus Ring 81 Remote Control Operation ...82 Using the Remote Control as a Wireless Mouse 83 Using the Remote Control as a Presentation Pointer 84 Selecting an Image Source ...85 Projection Modes ...86 Changing the Projection Mode Using the Remote...

User Manual
Page 9
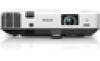
Projector Features Notations Used in -1 USB projection, audio, and mouse control for instant setup • Wired and wireless (PowerLite 1945W/1955/1965) network support for projection, monitoring, and control via remote network computer • HDMI port for computer or video device ... • DisplayPort connector for computer audio and video connection • PC Free slide shows and presentations via connected USB memory devices or EPSON document camera • Dual VGA ports for connections by multiple presenters • Ports for connecting an external monitor and external speakers Easy-...
Projector Features Notations Used in -1 USB projection, audio, and mouse control for instant setup • Wired and wireless (PowerLite 1945W/1955/1965) network support for projection, monitoring, and control via remote network computer • HDMI port for computer or video device ... • DisplayPort connector for computer audio and video connection • PC Free slide shows and presentations via connected USB memory devices or EPSON document camera • Dual VGA ports for connections by multiple presenters • Ports for connecting an external monitor and external speakers Easy-...

User Manual
Page 12
... with your device. PowerLite 1945W/1955/1965) Wireless LAN module (ELPA07; Additional Components Depending on how you plan to use the projector, you may need a commercially available audio cable compatible with audio from an EPSON authorized reseller. To find the nearest reseller, call 800-GO-EPSON (800-463-7766). PowerLite 1945W/1955/1965) EPSON DC-06 document camera...
... with your device. PowerLite 1945W/1955/1965) Wireless LAN module (ELPA07; Additional Components Depending on how you plan to use the projector, you may need a commercially available audio cable compatible with audio from an EPSON authorized reseller. To find the nearest reseller, call 800-GO-EPSON (800-463-7766). PowerLite 1945W/1955/1965) EPSON DC-06 document camera...
User Manual
Page 16
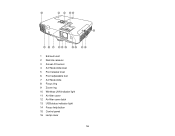
1 Exhaust vent 2 Remote receiver 3 Screen Fit sensor 4 A/V Mute slide lever 5 Foot release lever 6 Front adjustable foot 7 A/V Mute slide 8 Focus ring 9 Zoom ring 10 Wireless LAN indicator light 11 Air filter cover 12 Air filter cover latch 13 USB status indicator light 14 Focus help button 15 Control panel 16 Lamp cover 16
1 Exhaust vent 2 Remote receiver 3 Screen Fit sensor 4 A/V Mute slide lever 5 Foot release lever 6 Front adjustable foot 7 A/V Mute slide 8 Focus ring 9 Zoom ring 10 Wireless LAN indicator light 11 Air filter cover 12 Air filter cover latch 13 USB status indicator light 14 Focus help button 15 Control panel 16 Lamp cover 16

User Manual
Page 23
...9 Menu button (accesses projector menu system) 10 Arrow buttons (move through on -screen pointer) 21 Esc button (cancels/exits functions and controls wireless mouse functions) 22 ID button (selects projector and remote control ID numbers ) 23 Color Mode button (selects display modes) 24 LAN button ...(cycles between network and optional Quick Wireless Connection USB Key sources) 25 USB button (cycles through connected USB sources) 26 Source Search button (searches for different functions) 13 Page...
...9 Menu button (accesses projector menu system) 10 Arrow buttons (move through on -screen pointer) 21 Esc button (cancels/exits functions and controls wireless mouse functions) 22 ID button (selects projector and remote control ID numbers ) 23 Color Mode button (selects display modes) 24 LAN button ...(cycles between network and optional Quick Wireless Connection USB Key sources) 25 USB button (cycles through connected USB sources) 26 Source Search button (searches for different functions) 13 Page...

User Manual
Page 30
...) may not support audio through the HDMI port. 1. Connect the other end to your computer. Parent topic: Connecting to Computer Sources Connecting to act as a wireless mouse. To do this, connect the projector to your computer to a Computer, USB-B, DisplayPort, or HDMI port on the projector, you can set up the...
...) may not support audio through the HDMI port. 1. Connect the other end to your computer. Parent topic: Connecting to Computer Sources Connecting to act as a wireless mouse. To do this, connect the projector to your computer to a Computer, USB-B, DisplayPort, or HDMI port on the projector, you can set up the...

User Manual
Page 31
.... Connect the other end to the Audio port that corresponds to a Computer for details. Just connect an optional 3.5 mm stereo mini-jack audio cable as a Wireless Mouse Connecting to the Computer port you can still play sound through the projector's speaker system. 1. Parent topic: Connecting to the projector's USB-B, DisplayPort, or...
.... Connect the other end to the Audio port that corresponds to a Computer for details. Just connect an optional 3.5 mm stereo mini-jack audio cable as a Wireless Mouse Connecting to the Computer port you can still play sound through the projector's speaker system. 1. Parent topic: Connecting to the projector's USB-B, DisplayPort, or...
User Manual
Page 41
...of the network cable to your projector. See the EasyMP Network Projection Operation Guide for network projection. Go to www.epson.com/support (U.S.) or www.epson.ca/support (Canada) and select your network hub, switch, or router. 41 Note: If your projector through the ...instructions in these sections to set up your projector for network projection. After connecting and setting up your computer. Wired Network Projection Wireless Network Projection Setting Up Projector Network E-Mail Alerts Setting Up Monitoring Using SNMP Controlling a Networked Projector Using a Web Browser Crestron ...
...of the network cable to your projector. See the EasyMP Network Projection Operation Guide for network projection. Go to www.epson.com/support (U.S.) or www.epson.ca/support (Canada) and select your network hub, switch, or router. 41 Note: If your projector through the ...instructions in these sections to set up your projector for network projection. After connecting and setting up your computer. Wired Network Projection Wireless Network Projection Setting Up Projector Network E-Mail Alerts Setting Up Monitoring Using SNMP Controlling a Networked Projector Using a Web Browser Crestron ...

User Manual
Page 45
...Note: To highlight the numbers you must set up your projector and computer for wireless projection. 45 Select your IP Settings as needed. When you must install the optional EPSON 802.11b/g/n wireless LAN module, and then set addresses manually, turn off DHCP and enter the ... settings, select Complete or Setup Complete and follow the on the remote control. Parent topic: Wired Network Projection Wireless Network Projection You can send images to save your projector through a wireless network (PowerLite 1945W/1955/1965). If necessary, select IP Settings and press Enter. 9. 8.
...Note: To highlight the numbers you must set up your projector and computer for wireless projection. 45 Select your IP Settings as needed. When you must install the optional EPSON 802.11b/g/n wireless LAN module, and then set addresses manually, turn off DHCP and enter the ... settings, select Complete or Setup Complete and follow the on the remote control. Parent topic: Wired Network Projection Wireless Network Projection You can send images to save your projector through a wireless network (PowerLite 1945W/1955/1965). If necessary, select IP Settings and press Enter. 9. 8.

User Manual
Page 46
... Software CD on a Network Related references Optional Equipment and Replacement Parts Installing the Wireless LAN Module To use the projector over a wireless network, install the optional EPSON 802.11b/g/n wireless LAN module (PowerLite 1945W/1955/1965). Note: If your projector is green or flashing, or while you are two ways to connect the projector to your...
... Software CD on a Network Related references Optional Equipment and Replacement Parts Installing the Wireless LAN Module To use the projector over a wireless network, install the optional EPSON 802.11b/g/n wireless LAN module (PowerLite 1945W/1955/1965). Note: If your projector is green or flashing, or while you are two ways to connect the projector to your...

User Manual
Page 47
Remove the screw securing the wireless LAN module stopper, then remove the stopper. 47 2. Slide the air filter cover latch and open the air filter cover. 3.
Remove the screw securing the wireless LAN module stopper, then remove the stopper. 47 2. Slide the air filter cover latch and open the air filter cover. 3.

User Manual
Page 48
Insert the wireless LAN module into the port. 5. Parent topic: Wireless Network Projection Related references Optional Equipment and Replacement Parts 48 Close the air filter cover. 7. Plug in and turn on the projector. 4. Replace the wireless LAN module stopper and secure it using the screw you removed. 6.
Insert the wireless LAN module into the port. 5. Parent topic: Wireless Network Projection Related references Optional Equipment and Replacement Parts 48 Close the air filter cover. 7. Plug in and turn on the projector. 4. Replace the wireless LAN module stopper and secure it using the screw you removed. 6.
User Manual
Page 49
..., select Run LaunchU3.exe, then select Allow on the projector. 2. After a few minutes, your computer or notebook. Parent topic: Wireless Network Projection Selecting Wireless Network Settings Manually Before you must select the network settings for the projector using its menu system. 1. Turn on the next screen. ...5. Turn on your computer image is complete. 3. Connect the USB key to install the Quick Wireless Connection driver. Now connect the USB key to disable the firewall. Follow the on your projector remote control or restart your computer. Run ...
..., select Run LaunchU3.exe, then select Allow on the projector. 2. After a few minutes, your computer or notebook. Parent topic: Wireless Network Projection Selecting Wireless Network Settings Manually Before you must select the network settings for the projector using its menu system. 1. Turn on the next screen. ...5. Turn on your computer image is complete. 3. Connect the USB key to install the Quick Wireless Connection driver. Now connect the USB key to disable the firewall. Follow the on your projector remote control or restart your computer. Run ...
User Manual
Page 51
...to select them. 7. When you finish selecting settings, select Setup Complete and follow the on-screen instructions to select the wireless network on the Wireless LAN menu as necessary: • Projector Name lets you enter a name up to 16 alphanumeric characters long to identify the... save your network. 9. Note: Use the displayed keyboard to access the projector. Select the settings on your computer. 51 6. Select the Wireless LAN menu and press Enter. 8. You must enter a displayed, randomized keyword from a computer using the EasyMP Network Projection software to enter the...
...to select them. 7. When you finish selecting settings, select Setup Complete and follow the on-screen instructions to select the wireless network on the Wireless LAN menu as necessary: • Projector Name lets you enter a name up to 16 alphanumeric characters long to identify the... save your network. 9. Note: Use the displayed keyboard to access the projector. Select the settings on your computer. 51 6. Select the Wireless LAN menu and press Enter. 8. You must enter a displayed, randomized keyword from a computer using the EasyMP Network Projection software to enter the...

User Manual
Page 52
...32 alphanumeric characters Description Turns on wireless LAN support Select Setup to start the WPS Connection Setup utility Sets the type of wireless connection: Quick: lets you quickly connect to one computer or use the optional EPSON Quick Wireless Connection USB key to connect Advanced...: lets you connect to 52 Wireless LAN Menu Settings Parent topic: Wireless Network Projection Wireless LAN Menu Settings Note: See your projector's EasyMP Network Projection Operation...
...32 alphanumeric characters Description Turns on wireless LAN support Select Setup to start the WPS Connection Setup utility Sets the type of wireless connection: Quick: lets you quickly connect to one computer or use the optional EPSON Quick Wireless Connection USB key to connect Advanced...: lets you connect to 52 Wireless LAN Menu Settings Parent topic: Wireless Network Projection Wireless LAN Menu Settings Note: See your projector's EasyMP Network Projection Operation...

User Manual
Page 53
... access points in Advanced connection mode In Quick connection mode, selects the frequency band (channel) used by the wireless LAN Selects whether to display the SSID on the network standby screen Turns on the remote control. 53 set to Off to manually enter the ... the IP address on the projector. 2. Press the Menu button on DHCP if your projector's site survey function to quickly locate and connect to available wireless networks. 1. Setting Search Access Point Channel SSID Display DHCP IP Address Display Options To Search View 1ch 6ch 11ch On Off On Off On Off...
... access points in Advanced connection mode In Quick connection mode, selects the frequency band (channel) used by the wireless LAN Selects whether to display the SSID on the network standby screen Turns on the remote control. 53 set to Off to manually enter the ... the IP address on the projector. 2. Press the Menu button on DHCP if your projector's site survey function to quickly locate and connect to available wireless networks. 1. Setting Search Access Point Channel SSID Display DHCP IP Address Display Options To Search View 1ch 6ch 11ch On Off On Off On Off...

User Manual
Page 54
Select the Network menu and press Enter. 4. Select the Wireless LAN menu and press Enter. 6. Select Network Configuration and press Enter. 5. Select Advanced as the Connection mode and press Enter. 54 3.
Select the Network menu and press Enter. 4. Select the Wireless LAN menu and press Enter. 6. Select Network Configuration and press Enter. 5. Select Advanced as the Connection mode and press Enter. 54 3.

User Manual
Page 55
Select the name of the wireless network you want to connect to and press Enter. 55 7. Select To Search View and press Enter. 8.
Select the name of the wireless network you want to connect to and press Enter. 55 7. Select To Search View and press Enter. 8.

User Manual
Page 56
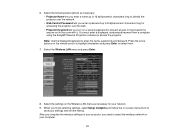
... Windows Before connecting to the projector, select the correct wireless network in Mac OS X Before connecting to the projector, select the correct wireless network on , then do one of the screen. 2. Parent topic: Wireless Network Projection Selecting Wireless Network Settings in Mac OS X. 1. Make sure AirPort... select the SSID you finish selecting settings, select Setup complete and follow the on the Windows taskbar. 2. To access your wireless utility software, double-click the network icon on -screen instructions to match your projector is set up on entering the correct ...
... Windows Before connecting to the projector, select the correct wireless network in Mac OS X Before connecting to the projector, select the correct wireless network on , then do one of the screen. 2. Parent topic: Wireless Network Projection Selecting Wireless Network Settings in Mac OS X. 1. Make sure AirPort... select the SSID you finish selecting settings, select Setup complete and follow the on the Windows taskbar. 2. To access your wireless utility software, double-click the network icon on -screen instructions to match your projector is set up on entering the correct ...


