User's Guide
Page 4
... Projector on a Network ...45 Wireless Network Projection ...45 Installing the Wireless LAN Module 46 Using Quick Wireless Connection (Windows Only 48 Selecting Wireless Network Settings Manually 49 Wireless LAN Menu Settings ...52 Selecting Wireless Network Settings in Windows 53 Selecting Wireless Network Settings in Mac OS 53 Setting Up Wireless Network Security 54 Wireless Security Menu Settings 55 Setting...
... Projector on a Network ...45 Wireless Network Projection ...45 Installing the Wireless LAN Module 46 Using Quick Wireless Connection (Windows Only 48 Selecting Wireless Network Settings Manually 49 Wireless LAN Menu Settings ...52 Selecting Wireless Network Settings in Windows 53 Selecting Wireless Network Settings in Mac OS 53 Setting Up Wireless Network Security 54 Wireless Security Menu Settings 55 Setting...
User's Guide
Page 5
Remote Control Operation ...74 Using the Remote Control as a Wireless Mouse 75 Using the Remote Control as a Presentation Pointer 76 Selecting an Image Source ...77 Projection Modes ...79 Changing the Projection Mode Using the Remote ...
Remote Control Operation ...74 Using the Remote Control as a Wireless Mouse 75 Using the Remote Control as a Presentation Pointer 76 Selecting an Image Source ...77 Projection Modes ...79 Changing the Projection Mode Using the Remote ...
User's Guide
Page 9
... • Powered focus via connected USB memory devices • HDMI port for video devices (PowerLite 1760W/1770W/1775W) • Port for optional Epson document camera Innovative display and operation features • Screen Fit feature automatically resizes images for quick...-and-play USB projection • Wireless network support (PowerLite 1760W/1770W/1775W), including video and audio transfer • Wireless LAN module included (PowerLite 1775W) • PC Free presentations via the projector or remote control (PowerLite 1775W) • Epson Instant Off and Direct Power On features...
... • Powered focus via connected USB memory devices • HDMI port for video devices (PowerLite 1760W/1770W/1775W) • Port for optional Epson document camera Innovative display and operation features • Screen Fit feature automatically resizes images for quick...-and-play USB projection • Wireless network support (PowerLite 1760W/1770W/1775W), including video and audio transfer • Wireless LAN module included (PowerLite 1775W) • PC Free presentations via the projector or remote control (PowerLite 1775W) • Epson Instant Off and Direct Power On features...
User's Guide
Page 12
... replacement parts for your local computer or electronics dealer for purchase information. See your projector: Option or part Genuine Epson replacement lamp Air filter replacement set (2 filters) Wireless LAN module (PowerLite 1760W/1770W/1775W only) Quick Wireless Connection USB key (PowerLite 1760W/1770W/1775W only) Part number V13H010L65 V13H134A31 V12H418P12 V12H005M08 12 You can purchase one from...
... replacement parts for your local computer or electronics dealer for purchase information. See your projector: Option or part Genuine Epson replacement lamp Air filter replacement set (2 filters) Wireless LAN module (PowerLite 1760W/1770W/1775W only) Quick Wireless Connection USB key (PowerLite 1760W/1770W/1775W only) Part number V13H010L65 V13H134A31 V12H418P12 V12H005M08 12 You can purchase one from...

User's Guide
Page 15
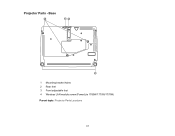
Base Projector Parts - Front/Top 1 Exhaust vent 2 Wireless LAN module indicator light (PowerLite 1760W/1770W/1775W) 3 Wireless LAN module cover (PowerLite 1760W/1770W/1775W) 4 A/V Mute slide lever 5 Foot release lever 6 Front adjustable foot 7 A/V Mute slide (lens cover) 8 Remote receiver 9 Projection distance/shape sensor (PowerLite 1775W) 15 Control Panel Projector Parts - Remote Control Parent topic: Introduction to Your Projector Projector Parts - Projector Parts -
Base Projector Parts - Front/Top 1 Exhaust vent 2 Wireless LAN module indicator light (PowerLite 1760W/1770W/1775W) 3 Wireless LAN module cover (PowerLite 1760W/1770W/1775W) 4 A/V Mute slide lever 5 Foot release lever 6 Front adjustable foot 7 A/V Mute slide (lens cover) 8 Remote receiver 9 Projection distance/shape sensor (PowerLite 1775W) 15 Control Panel Projector Parts - Remote Control Parent topic: Introduction to Your Projector Projector Parts - Projector Parts -
User's Guide
Page 17
Projector Parts - Base 1 Mounting bracket holes 2 Rear feet 3 Front adjustable foot 4 Wireless LAN module screw (PowerLite 1760W/1770W/1775W) Parent topic: Projector Parts Locations 17
Projector Parts - Base 1 Mounting bracket holes 2 Rear feet 3 Front adjustable foot 4 Wireless LAN module screw (PowerLite 1760W/1770W/1775W) Parent topic: Projector Parts Locations 17
User's Guide
Page 20
...adjusts the image focus; functions only on PowerLite 1775W) 24 LAN button (switches to available network source) 25 USB button (cycles through on-screen options and control wireless mouse functions) 14 Enter button (selects options and controls wireless mouse functions) 15 Esc button (cancels/exits... functions and controls wireless mouse functions) 16 Volume up and down buttons (adjust speaker volume)...
...adjusts the image focus; functions only on PowerLite 1775W) 24 LAN button (switches to available network source) 25 USB button (cycles through on-screen options and control wireless mouse functions) 14 Enter button (selects options and controls wireless mouse functions) 15 Esc button (cancels/exits... functions and controls wireless mouse functions) 16 Volume up and down buttons (adjust speaker volume)...
User's Guide
Page 33
... The computer display resolution must be between 640 × 480 and 1600 × 1200 (Windows) or 1680 × 1200 (Macintosh) to install the Epson USB Display software. • Macintosh: The USB Display setup folder appears on -screen instructions to your projector's USB Type B port for presentation display. ... Parent topic: Connecting to the computer. You need to install this software only the first time you use the remote control's wireless mouse function when you connect the projector to Computer Sources 33 • Mac OS X 10.6.x Connect the projector to your presentation contains ...
... The computer display resolution must be between 640 × 480 and 1600 × 1200 (Windows) or 1680 × 1200 (Macintosh) to install the Epson USB Display software. • Macintosh: The USB Display setup folder appears on -screen instructions to your projector's USB Type B port for presentation display. ... Parent topic: Connecting to the computer. You need to install this software only the first time you use the remote control's wireless mouse function when you connect the projector to Computer Sources 33 • Mac OS X 10.6.x Connect the projector to your presentation contains ...
User's Guide
Page 35
... your computer documentation for USB Mouse Control If you connected your computer to a Computer or HDMI port on the projector, you use the remote control's wireless mouse function when you can set the USB Type B setting to your computer using a USB cable. Parent topic: Connecting to act as...
... your computer documentation for USB Mouse Control If you connected your computer to a Computer or HDMI port on the projector, you use the remote control's wireless mouse function when you can set the USB Type B setting to your computer using a USB cable. Parent topic: Connecting to act as...
User's Guide
Page 45
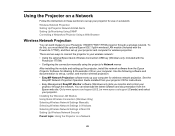
There are two ways to connect the projector to www.epson.com/support (U.S.) or www.epson.ca/support (Canada) and select your projector. You can send images to set up your PowerLite 1760W/1770W/1775W projector through the network. Go to your computer for wireless network projection. Wireless Network Projection Setting Up Projector Network E-Mail Alerts Setting...
There are two ways to connect the projector to www.epson.com/support (U.S.) or www.epson.ca/support (Canada) and select your projector. You can send images to set up your PowerLite 1760W/1770W/1775W projector through the network. Go to your computer for wireless network projection. Wireless Network Projection Setting Up Projector Network E-Mail Alerts Setting...
User's Guide
Page 46
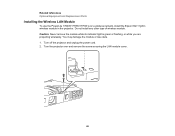
Related references Optional Equipment and Replacement Parts Installing the Wireless LAN Module To use the PowerLite 1760W/1770W/1775W over and remove the screw securing the LAN module cover. 46 You may damage the module or lose data. 1. Caution: Never remove the module while its indicator light is green or flashing, or while you are projecting wirelessly. Turn off the projector and unplug the power cord. 2. Do not install any other type of wireless module. Turn the projector over a wireless network, install the Epson 802.11g/b/n wireless module in the projector.
Related references Optional Equipment and Replacement Parts Installing the Wireless LAN Module To use the PowerLite 1760W/1770W/1775W over and remove the screw securing the LAN module cover. 46 You may damage the module or lose data. 1. Caution: Never remove the module while its indicator light is green or flashing, or while you are projecting wirelessly. Turn off the projector and unplug the power cord. 2. Do not install any other type of wireless module. Turn the projector over a wireless network, install the Epson 802.11g/b/n wireless module in the projector.
User's Guide
Page 47
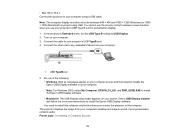
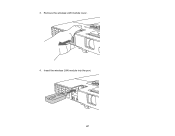
Insert the wireless LAN module into the port. 47 Remove the wireless LAN module cover. 4. 3.
Insert the wireless LAN module into the port. 47 Remove the wireless LAN module cover. 4. 3.
User's Guide
Page 48
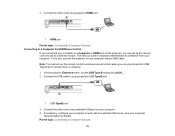
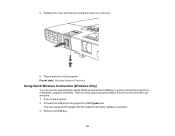
... the USB key. 48 Then you can use the optional Epson Quick Wireless Connection USB key to quickly connect the projector to the projector's USB TypeA port. Turn on the projector. Connect the USB key to a Windows computer wirelessly. Plug in and turn on the projector. 2. You see... a projected message that the network information update is complete. 3. Parent topic: Wireless Network Projection Using Quick Wireless Connection (Windows Only) You can project your presentation and remove the key when you removed. 6. Replace the cover and secure...
... the USB key. 48 Then you can use the optional Epson Quick Wireless Connection USB key to quickly connect the projector to the projector's USB TypeA port. Turn on the projector. Connect the USB key to a Windows computer wirelessly. Plug in and turn on the projector. 2. You see... a projected message that the network information update is complete. 3. Parent topic: Wireless Network Projection Using Quick Wireless Connection (Windows Only) You can project your presentation and remove the key when you removed. 6. Replace the cover and secure...
User's Guide
Page 49
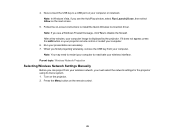
... Note: In Windows Vista, if you must select the network settings for the projector using its menu system. 1. Parent topic: Wireless Network Projection Selecting Wireless Network Settings Manually Before you see the AutoPlay window, select Run LaunchU3.exe, then select Allow on the remote control. 49 Press.... 2. Run your computer image is displayed by the projector. Note: You may need to restart your computer to install the Quick Wireless Connection driver. If it does not appear, press the LAN button on your computer. Now connect the USB key to disable the firewall.
... Note: In Windows Vista, if you must select the network settings for the projector using its menu system. 1. Parent topic: Wireless Network Projection Selecting Wireless Network Settings Manually Before you see the AutoPlay window, select Run LaunchU3.exe, then select Allow on the remote control. 49 Press.... 2. Run your computer image is displayed by the projector. Note: You may need to restart your computer to install the Quick Wireless Connection driver. If it does not appear, press the LAN button on your computer. Now connect the USB key to disable the firewall.
User's Guide
Page 51
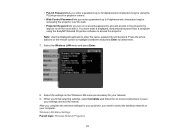
... security password to prevent access to the projector by anyone not in the room with it. Select the Wireless LAN menu and press Enter. 8. Press the arrow buttons on the Wireless LAN menu as necessary for your settings and exit the menus. Note: Use the displayed keyboard to select...password up to 32 alphanumeric characters long for using the EasyMP Network Projection software to save your network. 9. When you need to select the wireless network on -screen instructions to access the projector. Select the settings on the remote control to highlight characters and press Enter to enter the...
... security password to prevent access to the projector by anyone not in the room with it. Select the Wireless LAN menu and press Enter. 8. Press the arrow buttons on the Wireless LAN menu as necessary for your settings and exit the menus. Note: Use the displayed keyboard to select...password up to 32 alphanumeric characters long for using the EasyMP Network Projection software to save your network. 9. When you need to select the wireless network on -screen instructions to access the projector. Select the settings on the remote control to highlight characters and press Enter to enter the...
User's Guide
Page 52
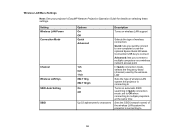
... 802.11b/g/n On Off Up 32 alphanumeric characters Description Turns on wireless LAN support Selects the type of wireless connection: Quick: lets you quickly connect to one computer or use the optional Epson Quick Wireless Connection USB key to connect Advanced: lets you connect to multiple computers... via a wireless network access point In Quick connection mode, selects the frequency band (channel) used by the wireless LAN Sets the type of the wireless LAN system the projector...
... 802.11b/g/n On Off Up 32 alphanumeric characters Description Turns on wireless LAN support Selects the type of wireless connection: Quick: lets you quickly connect to one computer or use the optional Epson Quick Wireless Connection USB key to connect Advanced: lets you connect to multiple computers... via a wireless network access point In Quick connection mode, selects the frequency band (channel) used by the wireless LAN Sets the type of the wireless LAN system the projector...
User's Guide
Page 53
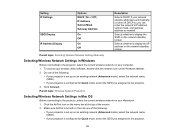
... up on your computer. 1. Click Connect. Do one of the screen. 2. Parent topic: Wireless Network Projection Selecting Wireless Network Settings in Windows Before connecting to the projector, select the correct wireless network on an existing network (Advanced mode), select the network name (SSID). • If...Selects DHCP if your network assigns addresses automatically, or turns off DHCP so you assigned to the projector. 3. To access your wireless utility software, double-click the network icon on your projector is configured for Quick mode, select the SSID you can enter the ...
... up on your computer. 1. Click Connect. Do one of the screen. 2. Parent topic: Wireless Network Projection Selecting Wireless Network Settings in Windows Before connecting to the projector, select the correct wireless network on an existing network (Advanced mode), select the network name (SSID). • If...Selects DHCP if your network assigns addresses automatically, or turns off DHCP so you assigned to the projector. 3. To access your wireless utility software, double-click the network icon on your projector is configured for Quick mode, select the SSID you can enter the ...
User's Guide
Page 54
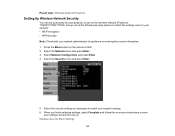
When you finish selecting settings, select Complete and follow the on-screen instructions to match your network settings. 6. Wireless Security Menu Settings 54 Select the Network menu and press Enter. 3. Select the security settings as necessary to save your settings and exit the menus. ... the settings used on your network: • WEP encryption • WPA security Note: Check with your network administrator for your projector to use on the wireless network (PowerLite 1760W/1770W/1775W). Press the Menu button on the remote control. 2. Select the Security menu and press Enter. 5.
When you finish selecting settings, select Complete and follow the on-screen instructions to match your network settings. 6. Wireless Security Menu Settings 54 Select the Network menu and press Enter. 3. Select the security settings as necessary to save your settings and exit the menus. ... the settings used on your network: • WEP encryption • WPA security Note: Check with your network administrator for your projector to use on the wireless network (PowerLite 1760W/1770W/1775W). Press the Menu button on the remote control. 2. Select the Security menu and press Enter. 5.
User's Guide
Page 55
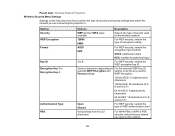
... ID Encryption Key 1 to Encryption Key 4 Authentication Type PSK Options Description WEP and two WPA types available Selects the type of security used on the wireless network 128Bit 64Bit For WEP security, selects the type of encryption coding ASCII HEX For WEP security, selects the encryption input method: ASCII: enables text..., selects the pre-shared key used on the Security menu let you select the type of WEP authentication used Various keys from 8 to . Parent topic: Wireless Network Projection Wireless Security Menu Settings Settings on the network 55
... ID Encryption Key 1 to Encryption Key 4 Authentication Type PSK Options Description WEP and two WPA types available Selects the type of security used on the wireless network 128Bit 64Bit For WEP security, selects the type of encryption coding ASCII HEX For WEP security, selects the encryption input method: ASCII: enables text..., selects the pre-shared key used on the Security menu let you select the type of WEP authentication used Various keys from 8 to . Parent topic: Wireless Network Projection Wireless Security Menu Settings Settings on the network 55
User's Guide
Page 56
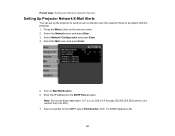
... Server option. Turn on the remote control. 2. Select the Mail menu and press Enter. 5. Select the Network menu and press Enter. 3. Parent topic: Setting Up Wireless Network Security Setting Up Projector Network E-Mail Alerts You can set up the projector to 255). 7.
... Server option. Turn on the remote control. 2. Select the Mail menu and press Enter. 5. Select the Network menu and press Enter. 3. Parent topic: Setting Up Wireless Network Security Setting Up Projector Network E-Mail Alerts You can set up the projector to 255). 7.


