
Technical Brief (Ink Jet Printers)
Page 1
... brief provides detailed information on the core technologies used in Epson ink jet printers work together to produce brilliant Photo Quality color, sharp text, and incredible print speeds Small Ink Droplet Size Small ink droplets produce smoother gradations and greater tonal control Epson Inks Epson innovates ink solutions tailored to the needs of specifi...
... brief provides detailed information on the core technologies used in Epson ink jet printers work together to produce brilliant Photo Quality color, sharp text, and incredible print speeds Small Ink Droplet Size Small ink droplets produce smoother gradations and greater tonal control Epson Inks Epson innovates ink solutions tailored to the needs of specifi...

Technical Brief (Ink Jet Printers)
Page 2
... quality. Piezo Crystal Deformation Nozzle Ink Droplet Epson's MicroPiezo technology results in photos and laser sharp text. Smallest ink droplets produce smooth photos, especially beneficial for smoother gradations Ink Jet Printer Technical Brief Large droplets are increased Epson printers use Variable Size Droplet Technology, where the printers can produce high print quality without sacrifi...
... quality. Piezo Crystal Deformation Nozzle Ink Droplet Epson's MicroPiezo technology results in photos and laser sharp text. Smallest ink droplets produce smooth photos, especially beneficial for smoother gradations Ink Jet Printer Technical Brief Large droplets are increased Epson printers use Variable Size Droplet Technology, where the printers can produce high print quality without sacrifi...

Technical Brief (Ink Jet Printers)
Page 3
... used herein are for the job. Epson, Exceed Your Vision, MicroPiezo, AcuPhoto Halftoning, Claria, Epson UltraChrome K3, Epson UltraChrome Hi-Gloss, and PictureMate are no added costs for applying ink droplets to create printed "dots" in those marks. Ink Jet Printer Technical Brief Page 3 Fine Art Pro Advanced Amateur Photo Enthusiast Chief Memory Officer...
... used herein are for the job. Epson, Exceed Your Vision, MicroPiezo, AcuPhoto Halftoning, Claria, Epson UltraChrome K3, Epson UltraChrome Hi-Gloss, and PictureMate are no added costs for applying ink droplets to create printed "dots" in those marks. Ink Jet Printer Technical Brief Page 3 Fine Art Pro Advanced Amateur Photo Enthusiast Chief Memory Officer...

Product Information Guide
Page 1
... PicureMate Photo Paper and a PictureMate Photo Cartridge PictureMate Deluxe Viewer Edition Rechargeable Battery (part# C12C831074) Enables printing outdoors or in other places without convenient electrical outlets PictureMate Deluxe Viewer Edition Carrying Case Soft case that holds PictureMate, power cable, extra PictureMate Print Pack, and more Epson Bluetooth Photo Print Adapter (part# C12C824142) Allows printing wirelessly from Bluetooth-enabled cell phones, PDAs, or computers to PictureMate Printer Specifications...
... PicureMate Photo Paper and a PictureMate Photo Cartridge PictureMate Deluxe Viewer Edition Rechargeable Battery (part# C12C831074) Enables printing outdoors or in other places without convenient electrical outlets PictureMate Deluxe Viewer Edition Carrying Case Soft case that holds PictureMate, power cable, extra PictureMate Print Pack, and more Epson Bluetooth Photo Print Adapter (part# C12C824142) Allows printing wirelessly from Bluetooth-enabled cell phones, PDAs, or computers to PictureMate Printer Specifications...

Product Information Guide
Page 2
... and gently slide up the photo viewer screen. 2. Loading Paper Follow these steps to heat or direct sunlight. this could damage PictureMate. 1. Place your paper against the paper. Edge guide 4. PictureMate Deluxe Viewer Edition Electrical Normal operation Input voltage ...D × H) * Ink thaws and is bent. 2 - Do not use a genuine PictureMate Photo Cartridge and do not refill it is empty. PictureMate Deluxe Viewer Edition 4/05 Caution: Don't load plain paper; PictureMate calculates the amount of ink remaining using an IC chip on the cartridge has expired. Caution:...
... and gently slide up the photo viewer screen. 2. Loading Paper Follow these steps to heat or direct sunlight. this could damage PictureMate. 1. Place your paper against the paper. Edge guide 4. PictureMate Deluxe Viewer Edition Electrical Normal operation Input voltage ...D × H) * Ink thaws and is bent. 2 - Do not use a genuine PictureMate Photo Cartridge and do not refill it is empty. PictureMate Deluxe Viewer Edition 4/05 Caution: Don't load plain paper; PictureMate calculates the amount of ink remaining using an IC chip on the cartridge has expired. Caution:...
Product Information Guide
Page 3
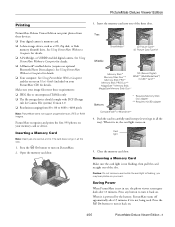
... card light comes on. Inserting a Memory Card Note: Insert just one of the slot. or USBDP-enabled digital camera. PictureMate Deluxe Viewer Edition Printing PictureMate Deluxe Viewer Edition can print photos from 80 × 80 to turn on PictureMate. 2. See Using PictureMate With a Computer and the on-screen User's Guide (included on your image files meet these devices: ❏ Your digital...
... card light comes on. Inserting a Memory Card Note: Insert just one of the slot. or USBDP-enabled digital camera. PictureMate Deluxe Viewer Edition Printing PictureMate Deluxe Viewer Edition can print photos from 80 × 80 to turn on PictureMate. 2. See Using PictureMate With a Computer and the on-screen User's Guide (included on your image files meet these devices: ❏ Your digital...
Product Information Guide
Page 4
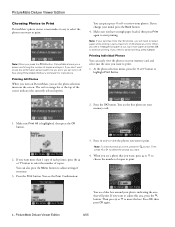
... move the box. Press the OK button. If you want to print. Note: If your card has more than 20 photos, you can easily view the photos on your photos. PictureMate Deluxe Viewer Edition Choosing Photos to Print PictureMate's photo viewer screen makes it off. If you a screen confirming the number of 20 sheets at a time. You can also press the...
... move the box. Press the OK button. If you want to print. Note: If your card has more than 20 photos, you can easily view the photos on your photos. PictureMate Deluxe Viewer Edition Choosing Photos to Print PictureMate's photo viewer screen makes it off. If you a screen confirming the number of 20 sheets at a time. You can also press the...

Product Information Guide
Page 5
... of your mind, press Back. 7. PictureMate Deluxe Viewer Edition If you want to adjust settings for all selected photos. 6. You can choose a range (or sequence) of one photo taken on that date: 3. You can print photos taken on your photos: 2. At the photo selection menu, press the or button to review the photo or photos you have selected. Press the OK...
... of your mind, press Back. 7. PictureMate Deluxe Viewer Edition If you want to adjust settings for all selected photos. 6. You can choose a range (or sequence) of one photo taken on that date: 3. You can print photos taken on your photos: 2. At the photo selection menu, press the or button to review the photo or photos you have selected. Press the OK...
Product Information Guide
Page 6
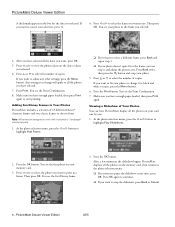
PictureMate Deluxe Viewer Edition A checkmark appears in the box for the date you want to stop the slideshow, press Back or Cancel. 6 - Then press OK. After you have selected. 7. Press or to view the photos taken on the memory card, then returns to pause the slideshow at... "landscape" oriented photos. 1. You see the first photo on your memory card. 3. Press or to start printing. Make sure you have enough paper loaded, then press Print again. Press Back twice, then press the button and crop your selection, press . 4. PictureMate Deluxe Viewer Edition 4/05 Then press...
PictureMate Deluxe Viewer Edition A checkmark appears in the box for the date you want to stop the slideshow, press Back or Cancel. 6 - Then press OK. After you have selected. 7. Press or to view the photos taken on the memory card, then returns to pause the slideshow at... "landscape" oriented photos. 1. You see the first photo on your memory card. 3. Press or to start printing. Make sure you have enough paper loaded, then press Print again. Press Back twice, then press the button and crop your selection, press . 4. PictureMate Deluxe Viewer Edition 4/05 Then press...
Product Information Guide
Page 7
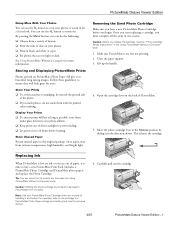
... you beautiful, long lasting images. Move the photo cartridge lever to the original package. Make sure PictureMate is low on your PictureMate Photo Cartridge within six months of direct sunlight to ensure they will give you have a new PictureMate Photo Cartridge before framing. Carefully pull out the cartridge. 4/05 PictureMate Deluxe Viewer Edition - 7 Close the paper support. 3. Note: Use your...
... you beautiful, long lasting images. Move the photo cartridge lever to the original package. Make sure PictureMate is low on your PictureMate Photo Cartridge within six months of direct sunlight to ensure they will give you have a new PictureMate Photo Cartridge before framing. Carefully pull out the cartridge. 4/05 PictureMate Deluxe Viewer Edition - 7 Close the paper support. 3. Note: Use your...

Product Information Guide
Page 8
... cleaning process takes about 40 seconds. Install the photo cartridge immediately after flushing, see this message: Lever 4. Press OK to open the Maintenance menu. 4. Unwrap the cartridge. Lower the handle. 2. Push in all the way. 5. Press to begin cleaning the print head. PictureMate Deluxe Viewer Edition Warning: Keep ink cartridges out of the reach of...
... cleaning process takes about 40 seconds. Install the photo cartridge immediately after flushing, see this message: Lever 4. Press OK to open the Maintenance menu. 4. Unwrap the cartridge. Lower the handle. 2. Push in all the way. 5. Press to begin cleaning the print head. PictureMate Deluxe Viewer Edition Warning: Keep ink cartridges out of the reach of...

Product Information Guide
Page 9
... cleaning the print head again. Aligning the Print Head If you have entered the number for example). Caution: To avoid damaging your PictureMate, keep it out of photo paper, then press OK. Remove paper from the outlet. 3. When you see this message: 4. If thre are no streaks or... (1 to use plain paper; Wait until the LCD screen goes blank, then unplug the power cord from the paper support and output tray. 4/05 PictureMate Deluxe Viewer Edition - 9 Then press to move to select Align Print Head, then press . Check the pattern to see a message asking if you want to 9)...
... cleaning the print head again. Aligning the Print Head If you have entered the number for example). Caution: To avoid damaging your PictureMate, keep it out of photo paper, then press OK. Remove paper from the outlet. 3. When you see this message: 4. If thre are no streaks or... (1 to use plain paper; Wait until the LCD screen goes blank, then unplug the power cord from the paper support and output tray. 4/05 PictureMate Deluxe Viewer Edition - 9 Then press to move to select Align Print Head, then press . Check the pattern to see a message asking if you want to 9)...

Product Information Guide
Page 10
...photos. PictureMate Deluxe Viewer Edition 4/05 Push down , or ink may leak. Disconnect the power cord and any connected USB cable from 50 to charge it clicks into place as good after PictureMate has been moved, try aligning the print head (see page 9). After you install the battery, you can print from the back of the printer... plugging in the printer. Turn the printer off , and longer when it locks into place: 4. Pack PictureMate and its side or upside down the top of the paper support and close the output tray. 3. PictureMate Deluxe Viewer Edition 4. Open the ...
...photos. PictureMate Deluxe Viewer Edition 4/05 Push down , or ink may leak. Disconnect the power cord and any connected USB cable from 50 to charge it clicks into place as good after PictureMate has been moved, try aligning the print head (see page 9). After you install the battery, you can print from the back of the printer... plugging in the printer. Turn the printer off , and longer when it locks into place: 4. Pack PictureMate and its side or upside down the top of the paper support and close the output tray. 3. PictureMate Deluxe Viewer Edition 4. Open the ...
Start Here Card
Page 1
Power adapter PictureMate Photo Paper PictureMate Deluxe Viewer Edition Power cable PictureMate Photo Cartridge Using PictureMate Without a Computer booklet PictureMate Using PictureMate Software + With a Computer CD booklet Note: If you install the photo cartridge and plug in the AC adapter and power cable before installing the battery. Make sure you purchased the optional PictureMate Deluxe Viewer Edition battery, see Using PictureMate With a Computer and your car or other...
Power adapter PictureMate Photo Paper PictureMate Deluxe Viewer Edition Power cable PictureMate Photo Cartridge Using PictureMate Without a Computer booklet PictureMate Using PictureMate Software + With a Computer CD booklet Note: If you install the photo cartridge and plug in the AC adapter and power cable before installing the battery. Make sure you purchased the optional PictureMate Deluxe Viewer Edition battery, see Using PictureMate With a Computer and your car or other...
Start Here Card
Page 2
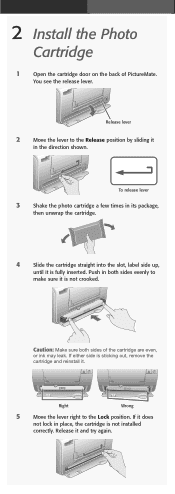
To release lever 3 Shake the photo cartridge a few times in its package, then unwrap the cartridge. 4 Slide the cartridge straight into the slot, label side up, until it does not lock ... again. Caution: Make sure both sides evenly to the Lock position. Release it in both sides of PictureMate. If either side is sticking out, remove the cartridge and reinstall it is fully inserted. 2 Install the Photo Cartridge 1 Open the cartridge door on the back of the cartridge are even, or ink may...
To release lever 3 Shake the photo cartridge a few times in its package, then unwrap the cartridge. 4 Slide the cartridge straight into the slot, label side up, until it does not lock ... again. Caution: Make sure both sides evenly to the Lock position. Release it in both sides of PictureMate. If either side is sticking out, remove the cartridge and reinstall it is fully inserted. 2 Install the Photo Cartridge 1 Open the cartridge door on the back of the cartridge are even, or ink may...
Start Here Card
Page 3
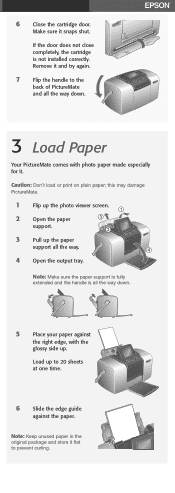
... Note: Keep unused paper in the original package and store it and try again. 7 Flip the handle to prevent curling. this may damage PictureMate. 1 Flip up the photo viewer screen. 2 Open the paper support. 3 Pull up . Note: Make sure the paper support is fully extended and the handle is not ...installed correctly. Remove it flat to the back of PictureMate and all the way. 4 4 Open the output tray. 6 Close the cartridge door. Load up to...
... Note: Keep unused paper in the original package and store it and try again. 7 Flip the handle to prevent curling. this may damage PictureMate. 1 Flip up the photo viewer screen. 2 Open the paper support. 3 Pull up . Note: Make sure the paper support is fully extended and the handle is not ...installed correctly. Remove it flat to the back of PictureMate and all the way. 4 4 Open the output tray. 6 Close the cartridge door. Load up to...
Start Here Card
Page 4
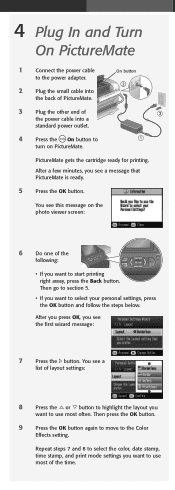
... Color Effects setting. You see a list of the time. Then press the OK button. 9 Press the OK button again to move to turn on the photo viewer screen: 6 Do one of the power cable into a standard power outlet. Then go to section 5. • If you want to use most often. Repeat steps... the power cable to the power adapter. 2 Plug the small cable into the back of PictureMate. 3 Plug the other end of the following: • If you see a message that PictureMate is ready. 5 Press the OK button. After you press OK, you want to use most of layout settings: 8 Press the or button...
... Color Effects setting. You see a list of the time. Then press the OK button. 9 Press the OK button again to move to turn on the photo viewer screen: 6 Do one of the power cable into a standard power outlet. Then go to section 5. • If you want to use most often. Repeat steps... the power cable to the power adapter. 2 Plug the small cable into the back of PictureMate. 3 Plug the other end of the following: • If you see a message that PictureMate is ready. 5 Press the OK button. After you press OK, you want to use most of layout settings: 8 Press the or button...
Start Here Card
Page 5
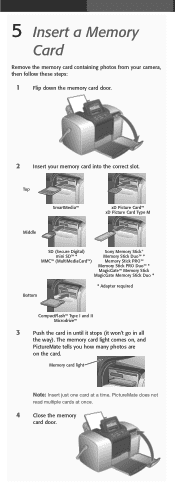
... at once. 4 Close the memory card door. The memory card light comes on, and PictureMate tells you how many photos are on the card. PictureMate does not read multiple cards at a time. 5 Insert a Memory Card Remove the memory card containing photos from your camera, then follow these steps: 1 Flip down the memory card door...
... at once. 4 Close the memory card door. The memory card light comes on, and PictureMate tells you how many photos are on the card. PictureMate does not read multiple cards at a time. 5 Insert a Memory Card Remove the memory card containing photos from your camera, then follow these steps: 1 Flip down the memory card door...
Start Here Card
Page 6
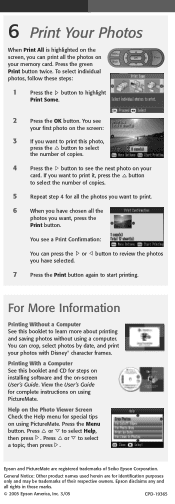
... the User's Guide for complete instructions on using PictureMate. General Notice: Other product names used herein are registered trademarks of Seiko Epson Corporation. Help on the Photo Viewer Screen Check the Help menu for all the photos you want to print. 6 When you have chosen all the photos you have selected. 7 Press the Print button again...
... the User's Guide for complete instructions on using PictureMate. General Notice: Other product names used herein are registered trademarks of Seiko Epson Corporation. Help on the Photo Viewer Screen Check the Help menu for all the photos you want to print. 6 When you have chosen all the photos you have selected. 7 Press the Print button again...

Using PictureMate With a Computer
Page 2
...to your computer, and REMOVE your memory card, if it's inserted. Then: 1. Turn on PictureMate. 3. Slide the edge guide against the right edge of PictureMate Photo Paper, glossy side up, against the paper and open the output tray. 2. Load a ...sheet of the paper feeder. See the inside back cover for details. When you can buy one from your local computer dealer or from Epson®. Installing Software and Connecting PictureMate To connect PictureMate® Deluxe Viewer Edition...
...to your computer, and REMOVE your memory card, if it's inserted. Then: 1. Turn on PictureMate. 3. Slide the edge guide against the right edge of PictureMate Photo Paper, glossy side up, against the paper and open the output tray. 2. Load a ...sheet of the paper feeder. See the inside back cover for details. When you can buy one from your local computer dealer or from Epson®. Installing Software and Connecting PictureMate To connect PictureMate® Deluxe Viewer Edition...


