Product Brochure
Page 2
... AA sized batteries (alkaline, lithium, Ni-Cd and NiMH) Optional AC adapter Contents EPSON PhotoPC 750Z camera, software, serial communications/Direct Print cables, video cable, NiMH batteries and charger, wrist strap, lens cap, Lexar Media 8MB CompactFlash card, ..., Flash Off and Slow Synchronized Sensitivity Equivalent to ISO 90/180/360 Product/Accessory Codes EPSON PhotoPC 750Z Digital Camera EPSON PhotoPC 750Z Adapter EPSON PhotoPC 750Z NiMH Power Pak EPSON PhotoPC 750Z NiMH Batteries (4x AA) B080011F B867038 B818051 B818061 Accessory Removable Storage Cards Optional CompactFlash cards...
... AA sized batteries (alkaline, lithium, Ni-Cd and NiMH) Optional AC adapter Contents EPSON PhotoPC 750Z camera, software, serial communications/Direct Print cables, video cable, NiMH batteries and charger, wrist strap, lens cap, Lexar Media 8MB CompactFlash card, ..., Flash Off and Slow Synchronized Sensitivity Equivalent to ISO 90/180/360 Product/Accessory Codes EPSON PhotoPC 750Z Digital Camera EPSON PhotoPC 750Z Adapter EPSON PhotoPC 750Z NiMH Power Pak EPSON PhotoPC 750Z NiMH Batteries (4x AA) B080011F B867038 B818051 B818061 Accessory Removable Storage Cards Optional CompactFlash cards...

Product Information Guide
Page 3
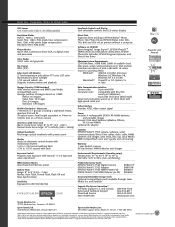
... consumption Approximately 8 W Charging temperature 32 to 95°F (0 to 35°C) EPSON PhotoPC 750Z Optional AC Adapter Specifications Physical Dimensions Width 1.97 inches (50 mm) Height 1.18 inches...cable for Macintosh® and Direct Print t 8MB Lexar Media CompactFlash card t Software on CD-ROM: Sierra Imaging® Image Expert™ with diskette creation utility, EPSON Photo!2™ application and TWAIN driver, EPSON Photo File Uploader, EPSON Photo!2 Program Uploader, Direct Print program (upload onto camera), Image Expert CE (trial version) 1/99 EPSON PhotoPC 750Z...
... consumption Approximately 8 W Charging temperature 32 to 95°F (0 to 35°C) EPSON PhotoPC 750Z Optional AC Adapter Specifications Physical Dimensions Width 1.97 inches (50 mm) Height 1.18 inches...cable for Macintosh® and Direct Print t 8MB Lexar Media CompactFlash card t Software on CD-ROM: Sierra Imaging® Image Expert™ with diskette creation utility, EPSON Photo!2™ application and TWAIN driver, EPSON Photo File Uploader, EPSON Photo!2 Program Uploader, Direct Print program (upload onto camera), Image Expert CE (trial version) 1/99 EPSON PhotoPC 750Z...

Product Information Guide
Page 7
... photo settings) Settings (change the date, time, beep, power setting, and LCD brightness) Information (turn off . 2. EPSON PhotoPC 750Z Monochrome HyPict Produces black and white images at a time or groups of 9 images) Magnification (zoom in sections) Photo Control...cable that came with your pictures to Slide Show. 1. Software Menu (print directly from the camera or remove the Direct Print program) Language (select language for enlarging 8" × 10" prints. Turn on a picture and view it in on the TV (and VCR) and switch to the correct video mode. 1/99 EPSON PhotoPC 750Z...
... photo settings) Settings (change the date, time, beep, power setting, and LCD brightness) Information (turn off . 2. EPSON PhotoPC 750Z Monochrome HyPict Produces black and white images at a time or groups of 9 images) Magnification (zoom in sections) Photo Control...cable that came with your pictures to Slide Show. 1. Software Menu (print directly from the camera or remove the Direct Print program) Language (select language for enlarging 8" × 10" prints. Turn on a picture and view it in on the TV (and VCR) and switch to the correct video mode. 1/99 EPSON PhotoPC 750Z...

Product Information Guide
Page 8
...can be captured, converted, and uploaded. Then tighten the screws. 4. Then insert the connector. 5. Then follow these steps: 1. EPSON PhotoPC 750Z 1/99 Then follow these steps: 1. Turn on the TV screen. Then insert the connector. . 3. Open the connector cover on... of the cable connector with the port icon on the camera's serial port. You can connect your Macintosh. Connecting to a multimedia projector or television and show a presentation without printing overhead transparencies or slides, and without a laptop computer. EPSON PhotoPC 750Z 5. Turn ...
...can be captured, converted, and uploaded. Then tighten the screws. 4. Then insert the connector. 5. Then follow these steps: 1. EPSON PhotoPC 750Z 1/99 Then follow these steps: 1. Turn on the TV screen. Then insert the connector. . 3. Open the connector cover on... of the cable connector with the port icon on the camera's serial port. You can connect your Macintosh. Connecting to a multimedia projector or television and show a presentation without printing overhead transparencies or slides, and without a laptop computer. EPSON PhotoPC 750Z 5. Turn ...

User Manual
Page 3
...harmful interference in a particular installation. However, there is the responsibility of the FCC Rules. WARNING The connection of a non-shielded equipment interface cable to this equipment will not occur in a residential installation. Cet appareil numérique de la classe B est conforme à la ..., which the receiver is encouraged to try to correct the interference by one or more than one interface connector, do not leave cables connected to unused interfaces. FOR CANADIAN USERS This Class B digital apparatus complies with Canadian ICES-003. Changes or modifications not expressly...
...harmful interference in a particular installation. However, there is the responsibility of the FCC Rules. WARNING The connection of a non-shielded equipment interface cable to this equipment will not occur in a residential installation. Cet appareil numérique de la classe B est conforme à la ..., which the receiver is encouraged to try to correct the interference by one or more than one interface connector, do not leave cables connected to unused interfaces. FOR CANADIAN USERS This Class B digital apparatus complies with Canadian ICES-003. Changes or modifications not expressly...
User Manual
Page 10
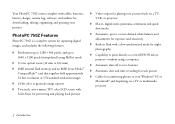
... pixels (interpolated) using a computer Automatic shut-off to your pictures. Your PhotoPC 750Z comes complete with a slow synchronized mode for night photography Capability to print directly to several EPSON ink jet printers-without using HyPict mode 3× true optical zoom (34...modes Automatic, preset, or user-defined white balance and adjustments for exposure and sensitivity Built-in flash with cables, batteries, battery charger, camera bag, software, and utilities for transferring photos to save batteries Automatic date and time recording ...
... pixels (interpolated) using a computer Automatic shut-off to your pictures. Your PhotoPC 750Z comes complete with a slow synchronized mode for night photography Capability to print directly to several EPSON ink jet printers-without using HyPict mode 3× true optical zoom (34...modes Automatic, preset, or user-defined white balance and adjustments for exposure and sensitivity Built-in flash with cables, batteries, battery charger, camera bag, software, and utilities for transferring photos to save batteries Automatic date and time recording ...

User Manual
Page 46
... at the same time, use the or button to display them, then press the SEL button to select them without using the video cable that came with your PhotoPC 750Z. 5 Press the SEL button, then press the or button to move through the images in the camera until you return to unlock, press...
... at the same time, use the or button to display them, then press the SEL button to select them without using the video cable that came with your PhotoPC 750Z. 5 Press the SEL button, then press the or button to move through the images in the camera until you return to unlock, press...

User Manual
Page 47
A B Playing Back Photos 2-13 2 Open the camera's connector cover and connect the 3 Connect the yellow end of the cable to the VIDEO IN black end of the video cable to the Video Out port as port on the television or VCR: 2 shown: 4 Turn on the TV (and VCR) and switch to the correct video mode.
A B Playing Back Photos 2-13 2 Open the camera's connector cover and connect the 3 Connect the yellow end of the cable to the VIDEO IN black end of the video cable to the Video Out port as port on the television or VCR: 2 shown: 4 Turn on the TV (and VCR) and switch to the correct video mode.
User Manual
Page 54
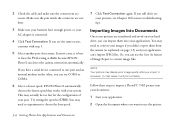
... to choose the best speed. 7 Click Test Connection again. Follow these steps to import a PhotoPC 750Z picture into your applications. If you still don't see your pictures, see the same screen, continue.... You may display poor image quality after you import it will print correctly. 2 Check the cable and make sure the connections are not bent. 3 Make sure your batteries have a serial device... your AC adapter is best to leave the Port setting at Auto because EPSON Photo!2 can detect the camera connection automatically. Try setting the speed to 57600. Make sure the...
... to choose the best speed. 7 Click Test Connection again. Follow these steps to import a PhotoPC 750Z picture into your applications. If you still don't see your pictures, see the same screen, continue.... You may display poor image quality after you import it will print correctly. 2 Check the cable and make sure the connections are not bent. 3 Make sure your batteries have a serial device... your AC adapter is best to leave the Port setting at Auto because EPSON Photo!2 can detect the camera connection automatically. Try setting the speed to 57600. Make sure the...

User Manual
Page 113
... elements. 3 Press the Command, Shift, and 3 keys on your computer keyboard at the same time. Then follow these steps: 1 Open the EPSON Photo File Uploader as possible before you capture it active, then follow the uploading instructions starting with your application. To upload your hard drive (not...7-10 Using Your Camera for Presentations Use the video cable that came with step 3 on your screen shots to the camera, click the EPSON Photo File Uploader window to make as many screen shots as you are finished, close your PhotoPC 750Z. NOTE The entire desktop is captured, not just...
... elements. 3 Press the Command, Shift, and 3 keys on your computer keyboard at the same time. Then follow these steps: 1 Open the EPSON Photo File Uploader as possible before you capture it active, then follow the uploading instructions starting with your application. To upload your hard drive (not...7-10 Using Your Camera for Presentations Use the video cable that came with step 3 on your screen shots to the camera, click the EPSON Photo File Uploader window to make as many screen shots as you are finished, close your PhotoPC 750Z. NOTE The entire desktop is captured, not just...

User Manual
Page 114
... Camera for Presentations 7-11 The last image that you are turned off. 2 Open the camera's connector cover and connect the black end of the video cable to the Video Out port, as shown on the right. 7 4 Turn on the LCD screen. You can use all of the video...
... Camera for Presentations 7-11 The last image that you are turned off. 2 Open the camera's connector cover and connect the black end of the video cable to the Video Out port, as shown on the right. 7 4 Turn on the LCD screen. You can use all of the video...

User Manual
Page 126
Don't use the PC connection cable. Connecting the Camera to the Printer Before you start, make sure you have the Macintosh connection/Direct Print cable that came with your camera to the printer: 1 Make sure both the camera and printer are turned off. 2 Connect either end of the interface cable to connect your camera (or a standard Apple System Serial-8 printer cable). Follow these steps to the serial connector on the back of the printer. . 3 Open the connector cover on the side of the camera. 9-4 Printing Directly From the Camera
Don't use the PC connection cable. Connecting the Camera to the Printer Before you start, make sure you have the Macintosh connection/Direct Print cable that came with your camera to the printer: 1 Make sure both the camera and printer are turned off. 2 Connect either end of the interface cable to connect your camera (or a standard Apple System Serial-8 printer cable). Follow these steps to the serial connector on the back of the printer. . 3 Open the connector cover on the side of the camera. 9-4 Printing Directly From the Camera

User Manual
Page 127
4 Line up the arrow on the cable connector with the mark on the camera's serial port, then insert the connector. 4 Press the or button until you see the Print menu: Starting Direct Print Follow these steps to start Direct Print: 1 Turn on the printer. 2 Turn the camera dial to Play. 3 Press the SEL button. 9 NOTE You can press the ESC button to return to highlight Direct Print and press the SEL button. A B Printing Directly From the Camera 9-5 You see the Software Menu . 5 Press the SEL button. 6 Press the button to the previous screen at any time while using Direct Print.
4 Line up the arrow on the cable connector with the mark on the camera's serial port, then insert the connector. 4 Press the or button until you see the Print menu: Starting Direct Print Follow these steps to start Direct Print: 1 Turn on the printer. 2 Turn the camera dial to Play. 3 Press the SEL button. 9 NOTE You can press the ESC button to return to highlight Direct Print and press the SEL button. A B Printing Directly From the Camera 9-5 You see the Software Menu . 5 Press the SEL button. 6 Press the button to the previous screen at any time while using Direct Print.
User Manual
Page 145
The icon appears on the LCD screen when you try to transfer your pictures to the computer. Make sure the cable is connected correctly as described in Getting Started. Make sure your camera is turned on and the batteries have S-Video on your TV to ... turned on. Make sure your pictures' content. Nothing appears on the television when you connect your camera to it. Make sure the video cable is operating correctly. Recharge or replace the batteries if necessary. You get an error message when you take a picture. Your camera is connected correctly...
The icon appears on the LCD screen when you try to transfer your pictures to the computer. Make sure the cable is connected correctly as described in Getting Started. Make sure your camera is turned on and the batteries have S-Video on your TV to ... turned on. Make sure your pictures' content. Nothing appears on the television when you connect your camera to it. Make sure the video cable is operating correctly. Recharge or replace the batteries if necessary. You get an error message when you take a picture. Your camera is connected correctly...
User Manual
Page 146
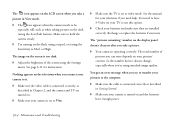
... 're using another device, turn AppleTalk off. You may have trouble Make sure the cable is sharing a port settings. (See your Windows documentation for more information. 10 using a different ... Interrupt Request Number (IRQ) assigned to your computer. If you're using your PhotoPC 750Z software with any other settings on configuration), or adjust the speed in your port to a faster...to set your Image Expert or You get a "Camera Connection Failed" error message when EPSON Photo!2 software. Port and Speed serial connection settings to Auto. you were able to...
... 're using another device, turn AppleTalk off. You may have trouble Make sure the cable is sharing a port settings. (See your Windows documentation for more information. 10 using a different ... Interrupt Request Number (IRQ) assigned to your computer. If you're using your PhotoPC 750Z software with any other settings on configuration), or adjust the speed in your port to a faster...to set your Image Expert or You get a "Camera Connection Failed" error message when EPSON Photo!2 software. Port and Speed serial connection settings to Auto. you were able to...

User Manual
Page 154
This is well-balanced on the power cable, and do not use your PhotoPC 750Z. PSO WARNING Use only the adapter designed for any ...the camera from your computer, or using Direct Print. Turn the camera off before you to connect your PhotoPC 750Z to any other adapter may cause fire, electrical shock, or injury. Do not alter the plug...disconnect the AC adapter. Using an Optional Tripod You can use the adapter for the PhotoPC 750Z. Using any other purpose than powering your PhotoPC 750Z with any images or settings, make sure the camera is finished processing. Then follow...
This is well-balanced on the power cable, and do not use your PhotoPC 750Z. PSO WARNING Use only the adapter designed for any ...the camera from your computer, or using Direct Print. Turn the camera off before you to connect your PhotoPC 750Z to any other adapter may cause fire, electrical shock, or injury. Do not alter the plug...disconnect the AC adapter. Using an Optional Tripod You can use the adapter for the PhotoPC 750Z. Using any other purpose than powering your PhotoPC 750Z with any images or settings, make sure the camera is finished processing. Then follow...

User Manual
Page 161
... buttons, 4-11 Automatic shut-off, 6-2, 6-7, 6-9, 6-12 B Batteries specifications, B-1 Beep, setting, 6-11 Bitmap (BMP) files, 3-4 Brightness correcting images, 5-3 to 5-4 setting LCD, 6-11 C Cable direct print, 9-4 video, 2-12, 7-10 Camera, see PhotoPC 750Z camera Camio Viewer, 3-10 to 3-12 Caring for camera, 10-1 to 10-2 Cleaning camera, 10-1 to 10-2 Clock, setting, 6-10 Close-up...
... buttons, 4-11 Automatic shut-off, 6-2, 6-7, 6-9, 6-12 B Batteries specifications, B-1 Beep, setting, 6-11 Bitmap (BMP) files, 3-4 Brightness correcting images, 5-3 to 5-4 setting LCD, 6-11 C Cable direct print, 9-4 video, 2-12, 7-10 Camera, see PhotoPC 750Z camera Camio Viewer, 3-10 to 3-12 Caring for camera, 10-1 to 10-2 Cleaning camera, 10-1 to 10-2 Clock, setting, 6-10 Close-up...

User Manual
Page 168
...Special effects, 5-7 to 5-8 Specifications, B-1 to B-5 Stitching panoramas, 5-8 to 5-12 Storage cards, see CompactFlash memory cards Storing camera, 10-2 Support EPSON, 4 to 6 software, 6 System requirements, 4 T Taking pictures close-up, 1-2 continuous, 1-7 to 1-9 digital panorama, 1-3 to 1-5 digital ...U Unlocking pictures, 2-11 to 2-12 Uploading Direct Print program, 9-2 to 9-3 pictures, 7-1 to 7-7 V VCR, playing back pictures, 2-12 Video cable, 2-13, 7-11 Videotaping pictures, 2-12 W White balance, 1-11 to 1-14 Windows capturing screens, 7-8 to 7-9 system requirements, 4 uploading pictures,...
...Special effects, 5-7 to 5-8 Specifications, B-1 to B-5 Stitching panoramas, 5-8 to 5-12 Storage cards, see CompactFlash memory cards Storing camera, 10-2 Support EPSON, 4 to 6 software, 6 System requirements, 4 T Taking pictures close-up, 1-2 continuous, 1-7 to 1-9 digital panorama, 1-3 to 1-5 digital ...U Unlocking pictures, 2-11 to 2-12 Uploading Direct Print program, 9-2 to 9-3 pictures, 7-1 to 7-7 V VCR, playing back pictures, 2-12 Video cable, 2-13, 7-11 Videotaping pictures, 2-12 W White balance, 1-11 to 1-14 Windows capturing screens, 7-8 to 7-9 system requirements, 4 uploading pictures,...
User Setup Information
Page 7
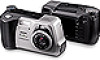
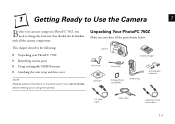
...instructions in this book and in your User's Guide software CompactFlash card (8MB) camera bag before setting up or using your PhotoPC 750Z Identifying camera parts Using rechargeable NiMH batteries Attaching the wrist strap and lens cover lens cover... the camera components. This chapter describes the following: camera Unpacking your PhotoPC 750Z, you have all the parts shown below. A PC serial cable video cable Mac/Direct Print serial cable B 1-1 Unpacking Your PhotoPC 750Z Make sure you need to charge the batteries. 1 Getting Ready to Use the...
...instructions in this book and in your User's Guide software CompactFlash card (8MB) camera bag before setting up or using your PhotoPC 750Z Identifying camera parts Using rechargeable NiMH batteries Attaching the wrist strap and lens cover lens cover... the camera components. This chapter describes the following: camera Unpacking your PhotoPC 750Z, you have all the parts shown below. A PC serial cable video cable Mac/Direct Print serial cable B 1-1 Unpacking Your PhotoPC 750Z Make sure you need to charge the batteries. 1 Getting Ready to Use the...

User Setup Information
Page 42
..., you can connect your camera to your computer and download your photos once you connect the camera to your computer. You may have the serial cable that came with icons. If you have two serial ports labeled COM1 and COM2, or the ports may be labeled with your camera. To turn...
..., you can connect your camera to your computer and download your photos once you connect the camera to your computer. You may have the serial cable that came with icons. If you have two serial ports labeled COM1 and COM2, or the ports may be labeled with your camera. To turn...
