Technical Brief (Digital Cameras)
Page 7
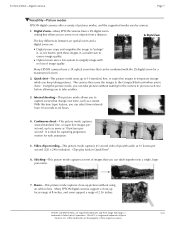
...the image to ensure image quality. It is best to print these images in on lens. With this picture mode, you can be combined with the 2X digital zoom for the... per second, up focus range of 8 inches, and some support a range of 2.36 inches. Macro-This picture mode captures close -up to zoom in a smaller size to "enlarge" it, so ...with audio at 15 frames per second. PhotoPC is a 5/01 trademark of images that can take another. 3. Stitching-This picture mode captures a series of Seiko Epson Corporation. Many EPSON digital cameras support a close -up to...
...the image to ensure image quality. It is best to print these images in on lens. With this picture mode, you can be combined with the 2X digital zoom for the... per second, up focus range of 8 inches, and some support a range of 2.36 inches. Macro-This picture mode captures close -up to zoom in a smaller size to "enlarge" it, so ...with audio at 15 frames per second. PhotoPC is a 5/01 trademark of images that can take another. 3. Stitching-This picture mode captures a series of Seiko Epson Corporation. Many EPSON digital cameras support a close -up to...

Product Brochure
Page 2
... 2048 x 1536 pixels 1600 x 1200 pixels 640 x 480 pixels Color Modes 24-bit color and monochrome Lens Focal length 7 - 21mm (equivalent to 34mm to 102mm lens on a 35mm film camera) 7 elements in Microphone and Speaker Capable of images (standard compression) stored on...10', 50' Capture Modes Full Auto, program (sports, landscape, portrait, normal), manual, macro, continuous shoot, interval shooting, stitching, and 2x digital zoom Built-in 8 group construction (2 aspherical lenses) Lens adapter included for optional add on lenses Auto-Focus Range (Automatic and Manual) Normal mode ...
... 2048 x 1536 pixels 1600 x 1200 pixels 640 x 480 pixels Color Modes 24-bit color and monochrome Lens Focal length 7 - 21mm (equivalent to 34mm to 102mm lens on a 35mm film camera) 7 elements in Microphone and Speaker Capable of images (standard compression) stored on...10', 50' Capture Modes Full Auto, program (sports, landscape, portrait, normal), manual, macro, continuous shoot, interval shooting, stitching, and 2x digital zoom Built-in 8 group construction (2 aspherical lenses) Lens adapter included for optional add on lenses Auto-Focus Range (Automatic and Manual) Normal mode ...
Product Brochure
Page 3
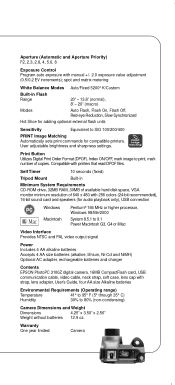
...alkaline, lithium, Ni-Cd and NiMH) Optional AC adapter, rechargeable batteries and charger Contents EPSON PhotoPC 3100Z digital camera, 16MB CompactFlash card, USB communication cable, video cable, neck strap, soft case, lens cap with 256 colors (24-bit recommended), 16-bit sound card and speakers (for ... of copies. Self Timer 10 seconds (fixed) Tripod Mount Built-in Flash Range 20" - 13.8' (normal), 8" - 20" (macro) Modes Auto Flash, Flash On, Flash Off, Red-eye Reduction, Slow Synchronized Hot Shoe for adding optional external flash units Sensitivity Equivalent to...
...alkaline, lithium, Ni-Cd and NiMH) Optional AC adapter, rechargeable batteries and charger Contents EPSON PhotoPC 3100Z digital camera, 16MB CompactFlash card, USB communication cable, video cable, neck strap, soft case, lens cap with 256 colors (24-bit recommended), 16-bit sound card and speakers (for ... of copies. Self Timer 10 seconds (fixed) Tripod Mount Built-in Flash Range 20" - 13.8' (normal), 8" - 20" (macro) Modes Auto Flash, Flash On, Flash Off, Red-eye Reduction, Slow Synchronized Hot Shoe for adding optional external flash units Sensitivity Equivalent to...
Product Information Guide
Page 2
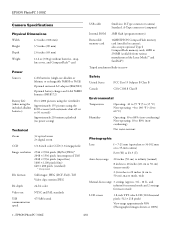
EPSON PhotoPC 3100Z 4/01 EPSON PhotoPC 3100Z Camera Specifications Physical Dimensions Width 4.3 inches (108 mm) Height 3.5 inches (89 mm) Depth 2.6 inches (65 mm) Weight 12.6 oz (358 g) without batteries, strap, lens cover, and CompactFlash™ card Power Sources 4 AA batteries (single-use alkaline or lithium, or ...F2.5 (T) Auto-focus range 20 inches (50 cm) to infinity (normal) 8 inches to 20 inches (20 cm to 50 cm) (macro mode) 2.36 inches to 20 inches (6 cm to 256MB (available from various manufacturers like Lexar Media™ and SanDisk) Tripod attachment...
EPSON PhotoPC 3100Z 4/01 EPSON PhotoPC 3100Z Camera Specifications Physical Dimensions Width 4.3 inches (108 mm) Height 3.5 inches (89 mm) Depth 2.6 inches (65 mm) Weight 12.6 oz (358 g) without batteries, strap, lens cover, and CompactFlash™ card Power Sources 4 AA batteries (single-use alkaline or lithium, or ...F2.5 (T) Auto-focus range 20 inches (50 cm) to infinity (normal) 8 inches to 20 inches (20 cm to 50 cm) (macro mode) 2.36 inches to 20 inches (6 cm to 256MB (available from various manufacturers like Lexar Media™ and SanDisk) Tripod attachment...

Product Information Guide
Page 10
...power off time, the camera shuts down to turn the confirmation screen on the screen when the lens locks in yellow. 5. You can also use the camera's control buttons to make changes to ...down to take pictures with the LCD Screen Once you've made any changes you can use Macro mode.) 2. photo capture light microphone 6. You see the SETUP menu: user mode This example ...on , press the shutter button. Push the T (telephoto) button to zoom in Program user mode. EPSON PhotoPC 3100Z 4/01 The photo capture light stops flashing and you want to the Camera SETUP menu, turn it back ...
...power off time, the camera shuts down to turn the confirmation screen on the screen when the lens locks in yellow. 5. You can also use the camera's control buttons to make changes to ...down to take pictures with the LCD Screen Once you've made any changes you can use Macro mode.) 2. photo capture light microphone 6. You see the SETUP menu: user mode This example ...on , press the shutter button. Push the T (telephoto) button to zoom in Program user mode. EPSON PhotoPC 3100Z 4/01 The photo capture light stops flashing and you want to the Camera SETUP menu, turn it back ...

Quick Reference Guide
Page 7
This setting uses less battery power than taking pictures with the LCD screen. Play back or delete your computer to take macro and digital zoom pictures. See your User's Guide for continuous shooting mode to capture pictures in the center of the dial. (Press it to create ..., for interval mode to photograph scenes that change over time, for panoramic images that can use it again to turn on the camera, remove the lens cap, then press the POWER button in rapid succession. Camera Dial Settings To turn the camera off.) The following table describes the camera dial settings...
This setting uses less battery power than taking pictures with the LCD screen. Play back or delete your computer to take macro and digital zoom pictures. See your User's Guide for continuous shooting mode to capture pictures in the center of the dial. (Press it to create ..., for interval mode to photograph scenes that change over time, for panoramic images that can use it again to turn on the camera, remove the lens cap, then press the POWER button in rapid succession. Camera Dial Settings To turn the camera off.) The following table describes the camera dial settings...

Quick Reference Guide
Page 17
... settings. 13 control buttons shutter button microphone LCD screen telephoto button wide angle button Make sure the lens cap is not on the camera. 1 Make sure you see a live preview of what the camera's lens sees at least 20 inches (50 cm) away from your User's Guide for instructions. 2 Press the POWER... button and turn the camera dial to to get as close as 2.36 inches (6 cm) in macro mode. See your subject. Taking Pictures With the LCD...
... settings. 13 control buttons shutter button microphone LCD screen telephoto button wide angle button Make sure the lens cap is not on the camera. 1 Make sure you see a live preview of what the camera's lens sees at least 20 inches (50 cm) away from your User's Guide for instructions. 2 Press the POWER... button and turn the camera dial to to get as close as 2.36 inches (6 cm) in macro mode. See your subject. Taking Pictures With the LCD...

Quick Reference Guide
Page 23
NOTE If you want to adjust any camera settings, such as white balance, sensitivity, or macro mode, turn the camera dial to to see the View menu and adjust the settings, then turn the camera dial back to . (See your subject, ... sound or 35-second video clips with green zoom steps and the current zoom position in on the camera. Capturing Video Clips Make sure the lens cap is not on your User's Guide for instructions on using camera settings.) You see the video clip capture screen: 2 Press the button next to...
NOTE If you want to adjust any camera settings, such as white balance, sensitivity, or macro mode, turn the camera dial to to see the View menu and adjust the settings, then turn the camera dial back to . (See your subject, ... sound or 35-second video clips with green zoom steps and the current zoom position in on the camera. Capturing Video Clips Make sure the lens cap is not on your User's Guide for instructions on using camera settings.) You see the video clip capture screen: 2 Press the button next to...

User Manual
Page 26
B Taking Pictures 2-1 A 2 Remove the lens cap, press the POWER button to turn on page 4-4.) NOTE You need to use the LCD screen to make audio recordings or use macro mode with the PhotoPC 3100Z is easy and gives you are at least 20 inches (50 cm) away from your subject. (To get closer, use the... macro and digital zoom features. Using Your Camera 2 Taking Pictures Sections in this ...
B Taking Pictures 2-1 A 2 Remove the lens cap, press the POWER button to turn on page 4-4.) NOTE You need to use the LCD screen to make audio recordings or use macro mode with the PhotoPC 3100Z is easy and gives you are at least 20 inches (50 cm) away from your subject. (To get closer, use the... macro and digital zoom features. Using Your Camera 2 Taking Pictures Sections in this ...
User Manual
Page 28
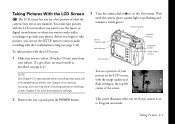
... digital zoom features or when you want to make audio recordings to go with the LCD screen: 1 Make sure you can use macro mode as described on page 4-4.) NOTE See Chapter 3 to take special shots (including video clips and time lapse/interval shots), see Chapter 4 for framing, focusing, ... recording with the image quality and flash settings in the top left corner of the screen. 2 Remove the lens cap and press the POWER button. Taking Pictures 2-3 This screen illustrates what the camera's lens sees at least 20 inches (50 cm) away from your subject. (To get closer, use the SETUP menu...
... digital zoom features or when you want to make audio recordings to go with the LCD screen: 1 Make sure you can use macro mode as described on page 4-4.) NOTE See Chapter 3 to take special shots (including video clips and time lapse/interval shots), see Chapter 4 for framing, focusing, ... recording with the image quality and flash settings in the top left corner of the screen. 2 Remove the lens cap and press the POWER button. Taking Pictures 2-3 This screen illustrates what the camera's lens sees at least 20 inches (50 cm) away from your subject. (To get closer, use the SETUP menu...

User Manual
Page 149
...8 inches and 20 inches when the camera is not set to flash off . The lens may appear blurry. If you are shooting areas with the flash. ◗ If you are taking a picture in macro mode, the camera can use your subject isn't moving subject, try increasing the shutter ...wall, the camera focuses at infinity. Using a tripod will help you capture sharp pictures. ◗ Make sure that your Image Expert software to take macro close as 2.36 inches), make sure the camera is within the camera's range. Maintenance and Troubleshooting A-12 See Chapter 5 for a telephoto shot (...
...8 inches and 20 inches when the camera is not set to flash off . The lens may appear blurry. If you are shooting areas with the flash. ◗ If you are taking a picture in macro mode, the camera can use your subject isn't moving subject, try increasing the shutter ...wall, the camera focuses at infinity. Using a tripod will help you capture sharp pictures. ◗ Make sure that your Image Expert software to take macro close as 2.36 inches), make sure the camera is within the camera's range. Maintenance and Troubleshooting A-12 See Chapter 5 for a telephoto shot (...

User Manual
Page 151
...Your pictures don't look straight through the viewfinder. ◗ If you 're not blocking the lens with the camera turned upright. A horizontal or vertical red line appears on page A-2. Red ...or other object. Your camera's lens may need to preview your picture. Try cleaning it by glare. Make sure you 're taking a close-up or macro mode picture, turn the camera dial... to and use your LCD screen to reset the clock in your camera, you may be dirty or dusty. When you change the batteries in the SETUP menu. Part of light into your lens...
...Your pictures don't look straight through the viewfinder. ◗ If you 're not blocking the lens with the camera turned upright. A horizontal or vertical red line appears on page A-2. Red ...or other object. Your camera's lens may need to preview your picture. Try cleaning it by glare. Make sure you 're taking a close-up or macro mode picture, turn the camera dial... to and use your LCD screen to reset the clock in your camera, you may be dirty or dusty. When you change the batteries in the SETUP menu. Part of light into your lens...

User Manual
Page 164
...) Non-operating: 10 to 80% (non-condensing) Safety United States Canada FCC Part 15 Subpart B Class B CSA C108.8 Class B Photographic Lens f = 7 to 21 mm (equivalent to a 34 to 102 mm lens on a 35 mm camera) Brightness: F2.0 (W) to 2.5 (T) Auto-focus range 20 inches (50 cm) to infinity (normal) 8 to... 20 inches (20 to 50 cm) (macro mode) 2.36 to 20 inches (6 to 50 cm) (macro mode, wide angle) Manual-focus range Three settings (...
...) Non-operating: 10 to 80% (non-condensing) Safety United States Canada FCC Part 15 Subpart B Class B CSA C108.8 Class B Photographic Lens f = 7 to 21 mm (equivalent to a 34 to 102 mm lens on a 35 mm camera) Brightness: F2.0 (W) to 2.5 (T) Auto-focus range 20 inches (50 cm) to infinity (normal) 8 to... 20 inches (20 to 50 cm) (macro mode) 2.36 to 20 inches (6 to 50 cm) (macro mode, wide angle) Manual-focus range Three settings (...

User Manual
Page 176
...case, 1-6 cleaning, A-2 connecting to computer, 9-6 dial settings, 1-7 features, Intro-1 to Intro-2 flash settings, 2-9 to 2-11 language setting, 7-4 lens, 5-5, A-5 maintenance, A-1 to A-2 microphone, 2-14 POWER button, 1-7 power problems, A-3 safety instructions, D-1 to D-2 setting up, 1-1 to 7-5..., 14-6 volume setting, 7-4 waking, 2-4 warranty, D-5 Camera mode continuous shooting, 3-3 to 3-4 Full Auto, 1-10 interval shooting, 3-5 to 3-6 macro, 4-4 Manual, 1-10 manual focus, 4-5 monochrome, 2-11 panorama stitching, 4-6 to 4-8 Program, 1-10 sleep, 2-4 Tiff, 2-8 viewfinder, 2-1 to...
...case, 1-6 cleaning, A-2 connecting to computer, 9-6 dial settings, 1-7 features, Intro-1 to Intro-2 flash settings, 2-9 to 2-11 language setting, 7-4 lens, 5-5, A-5 maintenance, A-1 to A-2 microphone, 2-14 POWER button, 1-7 power problems, A-3 safety instructions, D-1 to D-2 setting up, 1-1 to 7-5..., 14-6 volume setting, 7-4 waking, 2-4 warranty, D-5 Camera mode continuous shooting, 3-3 to 3-4 Full Auto, 1-10 interval shooting, 3-5 to 3-6 macro, 4-4 Manual, 1-10 manual focus, 4-5 monochrome, 2-11 panorama stitching, 4-6 to 4-8 Program, 1-10 sleep, 2-4 Tiff, 2-8 viewfinder, 2-1 to...