Technical Brief (Digital Cameras)
Page 8
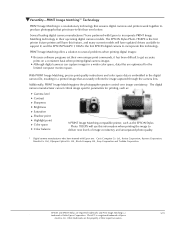
...the EPSON PhotoPC 3100Z is the first EPSON digital camera to incorporate this information when printing the image to deliver new levels of their upcoming digital camera models. Additionally, PRINT Image Matching gives the photographer greater control over image consistency. EPSON Sales Training EPSON and EPSON ... lens. Ltd., Ricoh Company Ltd., Sony Corporation and Toshiba Corporation. L L With PRINT Image Matching, precise print quality instructions and color space data is embedded in the digital camera file, resulting in a wider color space, data files are registered...
...the EPSON PhotoPC 3100Z is the first EPSON digital camera to incorporate this information when printing the image to deliver new levels of their upcoming digital camera models. Additionally, PRINT Image Matching gives the photographer greater control over image consistency. EPSON Sales Training EPSON and EPSON ... lens. Ltd., Ricoh Company Ltd., Sony Corporation and Toshiba Corporation. L L With PRINT Image Matching, precise print quality instructions and color space data is embedded in the digital camera file, resulting in a wider color space, data files are registered...

Product Information Guide
Page 5
EPSON PhotoPC 3100Z Installing Batteries The EPSON PhotoPC 3100Z accepts these battery types: ❏ Single-use batteries that ...upside down and slide the cover out to open it closed. 4/01 EPSON PhotoPC 3100Z - 5 this can cause fire or explosion. ❏ Replace all safety and handling instructions before using batteries. When the battery power is almost out, a ...objects such as shown below. battery cover lock 3. Do not allow the battery contacts to the manufacturer's instructions and in a dry location. Read all four batteries at the same time. Do not get them wet...
EPSON PhotoPC 3100Z Installing Batteries The EPSON PhotoPC 3100Z accepts these battery types: ❏ Single-use batteries that ...upside down and slide the cover out to open it closed. 4/01 EPSON PhotoPC 3100Z - 5 this can cause fire or explosion. ❏ Replace all safety and handling instructions before using batteries. When the battery power is almost out, a ...objects such as shown below. battery cover lock 3. Do not allow the battery contacts to the manufacturer's instructions and in a dry location. Read all four batteries at the same time. Do not get them wet...

Product Information Guide
Page 6
... to Yes to MEMORY CARD FORMAT. Press the button under Memory SETUP. Follow these steps to change the date and time settings. (For detailed instructions, see the SETUP menu. 5. When you see a warning message. Press down , right, and left arrows to remove and insert the memory ... haven't set the clock yet, you 're finished, press the button under BACK. You see your thumb or fingernail to a computer. EPSON PhotoPC 3100Z Using Your CompactFlash Memory Card Your camera comes with the year highlighted in red. When the card is pointing in. 5. Make sure the front...
... to Yes to MEMORY CARD FORMAT. Press the button under Memory SETUP. Follow these steps to change the date and time settings. (For detailed instructions, see the SETUP menu. 5. When you see a warning message. Press down , right, and left arrows to remove and insert the memory ... haven't set the clock yet, you 're finished, press the button under BACK. You see your thumb or fingernail to a computer. EPSON PhotoPC 3100Z Using Your CompactFlash Memory Card Your camera comes with the year highlighted in red. When the card is pointing in. 5. Make sure the front...

Product Information Guide
Page 9
... program, or to adjust brightness and sharpness with the viewfinder, which uses less battery power than 9.1MB of free space, the camera instructs you take pictures using batteries, the camera automatically shuts off after a designated period of the following: ❏ If the camera dial ... LCD screen. Full Auto Simply point and shoot. This mode is recommended for video clips, continuous shooting, interval shooting, or stitching mode. EPSON PhotoPC 3100Z Use the Shot Setup menu to switch between these steps: 1. You can adjust the shutter speed and aperture, choose a spot or matrix ...
... program, or to adjust brightness and sharpness with the viewfinder, which uses less battery power than 9.1MB of free space, the camera instructs you take pictures using batteries, the camera automatically shuts off after a designated period of the following: ❏ If the camera dial ... LCD screen. Full Auto Simply point and shoot. This mode is recommended for video clips, continuous shooting, interval shooting, or stitching mode. EPSON PhotoPC 3100Z Use the Shot Setup menu to switch between these steps: 1. You can adjust the shutter speed and aperture, choose a spot or matrix ...

Quick Reference Guide
Page 5
battery cover lock 1 Installing Batteries Your camera includes a set of new alkaline batteries. See your User's Guide for safety instructions, then install the batteries. 1 Hold the camera upside-down. 2 Press and hold the battery cover lock down and slide the cover out to open it.
battery cover lock 1 Installing Batteries Your camera includes a set of new alkaline batteries. See your User's Guide for safety instructions, then install the batteries. 1 Hold the camera upside-down. 2 Press and hold the battery cover lock down and slide the cover out to open it.

Quick Reference Guide
Page 9
... are low. Monochrome Indicator*** Indicates that the camera batteries are only available in the SETUP menu. See "Using the LCD SETUP and View Screens" for instructions on . Status Display Panel Settings (continued) Low Battery Icon Indicates that the camera is 10 seconds. Sensitivity Settings** Standard (ISO 100) High (ISO 200) Super...
... are low. Monochrome Indicator*** Indicates that the camera batteries are only available in the SETUP menu. See "Using the LCD SETUP and View Screens" for instructions on . Status Display Panel Settings (continued) Low Battery Icon Indicates that the camera is 10 seconds. Sensitivity Settings** Standard (ISO 100) High (ISO 200) Super...

Quick Reference Guide
Page 10
... the clock setting screen. 3 Press the buttons next to the up, down, right, and left arrows to change the date and time settings. (For detailed instructions, see the SETUP menu. 5 Press the button under BACK. Your camera comes with a preinstalled 16MB memory card. 1 Press the POWER button to turn on the...
... the clock setting screen. 3 Press the buttons next to the up, down, right, and left arrows to change the date and time settings. (For detailed instructions, see the SETUP menu. 5 Press the button under BACK. Your camera comes with a preinstalled 16MB memory card. 1 Press the POWER button to turn on the...

Quick Reference Guide
Page 14
..., you will appear. You should also choose your user mode. (See "Using the LCD SETUP and View Screens" for details.) See your User's Guide for instructions on using the viewfinder or you can take pictures with the LCD screen to see a preview of how your camera and its settings. Your camera... are installed, and the CompactFlash memory card is installed and formatted, as described earlier in processing time of free space on your User's Guide for instructions on enabling Uncompressed Tiff mode.) 10 When taking pictures, you take Uncompressed Tiff mode pictures.
..., you will appear. You should also choose your user mode. (See "Using the LCD SETUP and View Screens" for details.) See your User's Guide for instructions on using the viewfinder or you can take pictures with the LCD screen to see a preview of how your camera and its settings. Your camera... are installed, and the CompactFlash memory card is installed and formatted, as described earlier in processing time of free space on your User's Guide for instructions on enabling Uncompressed Tiff mode.) 10 When taking pictures, you take Uncompressed Tiff mode pictures.

Quick Reference Guide
Page 17
... camera. 1 Make sure you see a live preview of what the camera's lens sees at least 20 inches (50 cm) away from your User's Guide for instructions. 2 Press the POWER button and turn the camera dial to to get as close as 2.36 inches (6 cm) in macro mode.
... camera. 1 Make sure you see a live preview of what the camera's lens sees at least 20 inches (50 cm) away from your User's Guide for instructions. 2 Press the POWER button and turn the camera dial to to get as close as 2.36 inches (6 cm) in macro mode.

Quick Reference Guide
Page 19
... release the shutter button. If the confirmation setting is off, you see a confirmation screen after a few seconds. To play back your User's Guide for detailed instructions. 15 You see page 17. See your pictures, see page 16. If the confirmation setting is on the screen, then press the shutter button halfway...
... release the shutter button. If the confirmation setting is off, you see a confirmation screen after a few seconds. To play back your User's Guide for detailed instructions. 15 You see page 17. See your pictures, see page 16. If the confirmation setting is on the screen, then press the shutter button halfway...

Quick Reference Guide
Page 20
... time, you don't want to save the picture. ◗ Press the button next to Rec Sound to the View menu.) For more detailed instructions on the screen. You see your pictures in the camera's playback menu. Playing Back Pictures You can record a message into the camera's microphone.... ◗ Press the button next to to instantly play back your User's Guide. 16 NOTE For detailed instructions on options such as displaying a slide show, locking and unlocking photos, and recording and deleting sounds, see a countdown on using the confirmation screen...
... time, you don't want to save the picture. ◗ Press the button next to Rec Sound to the View menu.) For more detailed instructions on the screen. You see your pictures in the camera's playback menu. Playing Back Pictures You can record a message into the camera's microphone.... ◗ Press the button next to to instantly play back your User's Guide. 16 NOTE For detailed instructions on options such as displaying a slide show, locking and unlocking photos, and recording and deleting sounds, see a countdown on using the confirmation screen...

Quick Reference Guide
Page 22
... the camera dial to and press the POWER button. 2 Select a photo and press the green t print button on the screen. See your User's Guide for instructions. 18 When you are done selecting images, you can select up other printing information from the print menu.
... the camera dial to and press the POWER button. 2 Select a photo and press the green t print button on the screen. See your User's Guide for instructions. 18 When you are done selecting images, you can select up other printing information from the print menu.

Quick Reference Guide
Page 23
... out. 4 You see the video clip capture screen: 2 Press the button next to Sound to turn the camera dial to . (See your User's Guide for instructions on the camera. NOTE If you want to adjust any camera settings, such as white balance, sensitivity, or macro mode, turn the camera dial to...
... out. 4 You see the video clip capture screen: 2 Press the button next to Sound to turn the camera dial to . (See your User's Guide for instructions on the camera. NOTE If you want to adjust any camera settings, such as white balance, sensitivity, or macro mode, turn the camera dial to...

User Manual
Page 9
... A-2 Storing the Camera A-2 Solving Camera Problems A-3 Solving Connection and Software Problems A-7 Solving Picture Problems A-11 Where To Get Help A-15 EPSON Accessories A-16 Software Licensing A-16 B Optional Accessories Using the Optional AC Adapter B-2 Using a Tripod B-4 Attaching an Optional Converter Lens or ... NiMH Batteries Optional Universal AC Adapter Minimum System Requirements Windows Systems Macintosh Systems D Notices Safety Instructions Declaration of Conformity FCC Compliance Statement Warranty Index C-1 C-5 C-5 C-6 C-6 C-7 C-7 C-7 D-1 D-3 D-4 D-5 A B xvii
... A-2 Storing the Camera A-2 Solving Camera Problems A-3 Solving Connection and Software Problems A-7 Solving Picture Problems A-11 Where To Get Help A-15 EPSON Accessories A-16 Software Licensing A-16 B Optional Accessories Using the Optional AC Adapter B-2 Using a Tripod B-4 Attaching an Optional Converter Lens or ... NiMH Batteries Optional Universal AC Adapter Minimum System Requirements Windows Systems Macintosh Systems D Notices Safety Instructions Declaration of Conformity FCC Compliance Statement Warranty Index C-1 C-5 C-5 C-6 C-6 C-7 C-7 C-7 D-1 D-3 D-4 D-5 A B xvii

User Manual
Page 12
..., Index safety, and maintenance information. with a range of the information you'll need to take pictures. You can find instructions for using Image Expert in places that are dimly lit. You can enhance your camera, and Taking Pictures taking pictures and ... suppliers, such as Lexar Media,™ Delkin Devices,™ and SanDisk®. Optional Accessories Using Your Documentation EPSON offers these accessories for the PhotoPC 3100Z: Your EPSON PhotoPC 3100Z documentation gives you all ◗ Universal AC adapter (part number B867081) for use your computer, download photos...
..., Index safety, and maintenance information. with a range of the information you'll need to take pictures. You can find instructions for using Image Expert in places that are dimly lit. You can enhance your camera, and Taking Pictures taking pictures and ... suppliers, such as Lexar Media,™ Delkin Devices,™ and SanDisk®. Optional Accessories Using Your Documentation EPSON offers these accessories for the PhotoPC 3100Z: Your EPSON PhotoPC 3100Z documentation gives you all ◗ Universal AC adapter (part number B867081) for use your computer, download photos...

User Manual
Page 16
...old and new batteries. ◗ Do not drop, puncture, disassemble, or mutilate batteries. Battery Options The PhotoPC 3100Z camera includes 4 AA alkaline batteries. Follow these safety instructions when handling batteries: ◗ Do not use only, Duracell® Ultra recommended) WARNING To avoid the ...local government agency for long periods of batteries; Setting Up Your Camera 1-3 Do not allow the battery contacts to the manufacturer's instructions and in a dry location. Read all applicable laws. If a battery is not used batteries according to touch metal objects such...
...old and new batteries. ◗ Do not drop, puncture, disassemble, or mutilate batteries. Battery Options The PhotoPC 3100Z camera includes 4 AA alkaline batteries. Follow these safety instructions when handling batteries: ◗ Do not use only, Duracell® Ultra recommended) WARNING To avoid the ...local government agency for long periods of batteries; Setting Up Your Camera 1-3 Do not allow the battery contacts to the manufacturer's instructions and in a dry location. Read all applicable laws. If a battery is not used batteries according to touch metal objects such...

User Manual
Page 27
... shutter button. CAUTION Handle the camera carefully while it is set to Program), or to make changes to exposure, white balance, or other basic settings. (Instructions for changing basic settings start on your image, and don't set it down to zoom out. 8 Hold the shutter button halfway down too hard. viewfinder...
... shutter button. CAUTION Handle the camera carefully while it is set to Program), or to make changes to exposure, white balance, or other basic settings. (Instructions for changing basic settings start on your image, and don't set it down to zoom out. 8 Hold the shutter button halfway down too hard. viewfinder...

User Manual
Page 30
8 When the shutter snaps, release the shutter button. See page 2-14 for detailed instructions. When the camera stops processing the image, you're ready to the View menu.) NOTE You enable the confirmation screen in the Shot SETUP menu. ...
8 When the shutter snaps, release the shutter button. See page 2-14 for detailed instructions. When the camera stops processing the image, you're ready to the View menu.) NOTE You enable the confirmation screen in the Shot SETUP menu. ...

User Manual
Page 35
... it's needed for backlighting (when you take. Forced Flash The flash goes off with every picture you are using the leading setting. (See Appendix B for instructions on the status display panel, as shown below: Auto The flash goes off the flash first, then exposes the subject and takes the picture.
... it's needed for backlighting (when you take. Forced Flash The flash goes off with every picture you are using the leading setting. (See Appendix B for instructions on the status display panel, as shown below: Auto The flash goes off the flash first, then exposes the subject and takes the picture.

User Manual
Page 39
... adding a recording when playing back photos, see page 6-6. For instructions on or off: 1 Turn the camera dial to menu. To turn the confirmation screen on playing back recordings with the current confirmation setting. 3 Press the ...
... adding a recording when playing back photos, see page 6-6. For instructions on or off: 1 Turn the camera dial to menu. To turn the confirmation screen on playing back recordings with the current confirmation setting. 3 Press the ...