
User Manual
Page 3
...Scan Area - Home Mode 42 Scanning in Home Mode ...37 Selecting a Scan Area - Contents Perfection V19/V39 User's Guide ...7 Scanner Basics...8 Scanner Parts ...8 Scanner Buttons and Lights ...11 Using the Scanner Stand ...11 Placing Originals on the Scanner ...16 Placing Originals on the Scanner Glass...Scanner Button 24 Changing Default Scan Button Settings 26 Starting a Scan Using the Epson Scan Icon 27 Scanning with Document Capture Pro and Document Capture 28 Starting a Scan from a Scanning Program 31 Selecting Epson Scan Settings ...33 Scan Modes...33 Selecting the Scan Mode...34 ...
...Scan Area - Home Mode 42 Scanning in Home Mode ...37 Selecting a Scan Area - Contents Perfection V19/V39 User's Guide ...7 Scanner Basics...8 Scanner Parts ...8 Scanner Buttons and Lights ...11 Using the Scanner Stand ...11 Placing Originals on the Scanner ...16 Placing Originals on the Scanner Glass...Scanner Button 24 Changing Default Scan Button Settings 26 Starting a Scan Using the Epson Scan Icon 27 Scanning with Document Capture Pro and Document Capture 28 Starting a Scan from a Scanning Program 31 Selecting Epson Scan Settings ...33 Scan Modes...33 Selecting the Scan Mode...34 ...
User Manual
Page 4
... File Settings...75 Epson TIFF and Multi-TIFF File Settings 77 Restoring Photo Colors as You Scan 78 Scanning to a SharePoint Server or Cloud Service 78 Scanning Multi-Page Originals as Expected 96 Scanning Software Does Not Operate Correctly 96 4 Scan to a PDF File Using a Scanner Button 83 Available Image Adjustments - Selecting...
... File Settings...75 Epson TIFF and Multi-TIFF File Settings 77 Restoring Photo Colors as You Scan 78 Scanning to a SharePoint Server or Cloud Service 78 Scanning Multi-Page Originals as Expected 96 Scanning Software Does Not Operate Correctly 96 4 Scan to a PDF File Using a Scanner Button 83 Available Image Adjustments - Selecting...
User Manual
Page 5
OS X 103 Where to Uninstall Your Scanner Software 102 Uninstalling Scanner Software - Cannot Start Epson Scan ...97 Scanning is Slow ...97 Cannot Scan Using Thumbnail Preview 98 Solving Scanned Image Quality Problems 98 Image Consists of a Few Dots Only 98 Line of Dots Appears in All Scanned Images 99 ... Environmental Specifications ...107 USB Interface Specifications...107 Safety and Approvals Specifications 108 Notices ...109 Important Safety Instructions...109 Default Delay Times for Power Management for Epson Products 110 5 Windows 102 Uninstalling Scanner Software -
OS X 103 Where to Uninstall Your Scanner Software 102 Uninstalling Scanner Software - Cannot Start Epson Scan ...97 Scanning is Slow ...97 Cannot Scan Using Thumbnail Preview 98 Solving Scanned Image Quality Problems 98 Image Consists of a Few Dots Only 98 Line of Dots Appears in All Scanned Images 99 ... Environmental Specifications ...107 USB Interface Specifications...107 Safety and Approvals Specifications 108 Notices ...109 Important Safety Instructions...109 Default Delay Times for Power Management for Epson Products 110 5 Windows 102 Uninstalling Scanner Software -

User Manual
Page 6
Restrictions on Copying ...110 Trademarks ...111 Copyright Notice...111 libTIFF Software Acknowledgment 112 A Note Concerning Responsible Use of Copyrighted Materials 112 Copyright Attribution ...113 6
Restrictions on Copying ...110 Trademarks ...111 Copyright Notice...111 libTIFF Software Acknowledgment 112 A Note Concerning Responsible Use of Copyrighted Materials 112 Copyright Attribution ...113 6
User Manual
Page 8
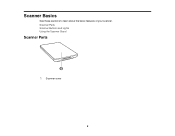
Scanner Basics See these sections to learn about the basic features of your scanner. Scanner Parts Scanner Buttons and Lights Using the Scanner Stand Scanner Parts 1 Scanner cover 8
Scanner Basics See these sections to learn about the basic features of your scanner. Scanner Parts Scanner Buttons and Lights Using the Scanner Stand Scanner Parts 1 Scanner cover 8
User Manual
Page 11
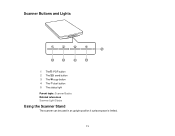
Scanner Buttons and Lights 1 The PDF button 2 The send button 3 The copy button 4 The start button 5 The status light Parent topic: Scanner Basics Related references Scanner Light Status Using the Scanner Stand The scanner can be used in an upright position if surface space is limited. 11
Scanner Buttons and Lights 1 The PDF button 2 The send button 3 The copy button 4 The start button 5 The status light Parent topic: Scanner Basics Related references Scanner Light Status Using the Scanner Stand The scanner can be used in an upright position if surface space is limited. 11
User Manual
Page 16
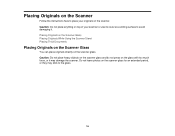
Placing Originals on the Scanner Follow the instructions here to place your scanner or use its cover as a writing surface to avoid damaging it may stick to the glass. 16 Do not leave photos on the scanner glass. Caution: Do ... place anything on top of your originals on the glass with too much force, or it . Placing Originals on the Scanner Glass Placing Originals While Using the Scanner Stand Placing Thick Documents Placing Originals on the Scanner Glass You can place originals directly on the scanner glass for an extended period...
Placing Originals on the Scanner Follow the instructions here to place your scanner or use its cover as a writing surface to avoid damaging it may stick to the glass. 16 Do not leave photos on the scanner glass. Caution: Do ... place anything on top of your originals on the glass with too much force, or it . Placing Originals on the Scanner Glass Placing Originals While Using the Scanner Stand Placing Thick Documents Placing Originals on the Scanner Glass You can place originals directly on the scanner glass for an extended period...
User Manual
Page 18
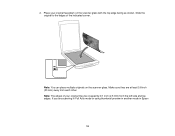
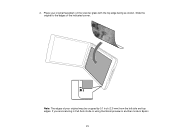
Place your original may be cropped by 0.1 inch (2.5 mm) from each other. If you are at least 0.8 inch (20 mm) away from the left side and top edges. 2. Make sure they are scanning in Full Auto mode or using thumbnail preview in another mode in Epson 18 Slide the original to the edges of your original facedown on the scanner glass. Note: The edges of the indicated corner. Note: You can place multiple originals on the scanner glass with the top edge facing as shown.
Place your original may be cropped by 0.1 inch (2.5 mm) from each other. If you are at least 0.8 inch (20 mm) away from the left side and top edges. 2. Make sure they are scanning in Full Auto mode or using thumbnail preview in another mode in Epson 18 Slide the original to the edges of your original facedown on the scanner glass. Note: The edges of the indicated corner. Note: You can place multiple originals on the scanner glass with the top edge facing as shown.
User Manual
Page 19
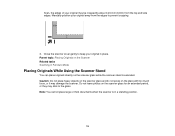
... Scanning in a standing position. 19 Do not leave photos on the scanner glass while the scanner stand is in Full Auto Mode Placing Originals While Using the Scanner Stand You can place originals directly on the scanner glass for an extended period, or they may stick to prevent cropping. 3. Note: You...
... Scanning in a standing position. 19 Do not leave photos on the scanner glass while the scanner stand is in Full Auto Mode Placing Originals While Using the Scanner Stand You can place originals directly on the scanner glass for an extended period, or they may stick to prevent cropping. 3. Note: You...
User Manual
Page 21
2. Place your original may be cropped by 0.1 inch (2.5 mm) from the left side and top edges. Slide the original to the edges of your original facedown on the scanner glass with the top edge facing as shown. Note: The edges of the indicated corner. If you are scanning in Full Auto mode or using thumbnail preview in another mode in Epson 21
2. Place your original may be cropped by 0.1 inch (2.5 mm) from the left side and top edges. Slide the original to the edges of your original facedown on the scanner glass with the top edge facing as shown. Note: The edges of the indicated corner. If you are scanning in Full Auto mode or using thumbnail preview in another mode in Epson 21
User Manual
Page 22
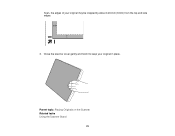
Scan, the edges of your original in place. Parent topic: Placing Originals on the Scanner Related tasks Using the Scanner Stand 22 Close the scanner cover gently and hold it to keep your original may be cropped by about 0.24 inch (6 mm) from the top and side edges. 3.
Scan, the edges of your original in place. Parent topic: Placing Originals on the Scanner Related tasks Using the Scanner Stand 22 Close the scanner cover gently and hold it to keep your original may be cropped by about 0.24 inch (6 mm) from the top and side edges. 3.

User Manual
Page 24
Place the original on your product for scanning, start scanning using a button on your scanner. 24 Starting a Scan Selecting Epson Scan Settings Scanning Special Projects Starting a Scan After placing your original documents or photos on your computer or network. ... starts a default scanning program, but you can view or change them as necessary. 1. Starting a Scan from a Scanner Button Starting a Scan Using the Epson Scan Icon Scanning with Document Capture Pro and Document Capture Starting a Scan from a Scanning Program Parent topic: Scanning Starting a Scan from a Scanner...
Place the original on your product for scanning, start scanning using a button on your scanner. 24 Starting a Scan Selecting Epson Scan Settings Scanning Special Projects Starting a Scan After placing your original documents or photos on your computer or network. ... starts a default scanning program, but you can view or change them as necessary. 1. Starting a Scan from a Scanner Button Starting a Scan Using the Epson Scan Icon Scanning with Document Capture Pro and Document Capture Starting a Scan from a Scanning Program Parent topic: Scanning Starting a Scan from a Scanner...

User Manual
Page 25
... copy button starts the Copy Utility so you can scan your original and print it on a printer connected to your computer 4 The start button starts Epson Scan so you can select your scan mode, settings, and scanned file destination on the Scanner Glass Placing Originals While...
... copy button starts the Copy Utility so you can scan your original and print it on a printer connected to your computer 4 The start button starts Epson Scan so you can select your scan mode, settings, and scanned file destination on the Scanner Glass Placing Originals While...
User Manual
Page 26
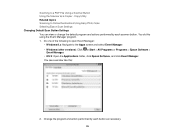
... Scanner as necessary. 26 Do one of the following to open Event Manager: • Windows 8.x: Navigate to Online Destinations Using Easy Photo Scan Selecting Epson Scan Settings Changing Default Scan Button Settings You can view or change the default program and actions performed by each scanner button. You see a window ...
... Scanner as necessary. 26 Do one of the following to open Event Manager: • Windows 8.x: Navigate to Online Destinations Using Easy Photo Scan Selecting Epson Scan Settings Changing Default Scan Button Settings You can view or change the default program and actions performed by each scanner button. You see a window ...
User Manual
Page 27
.... • OS X: Open the Applications folder, open the Epson Software folder, and double-click the EPSON Scan icon. Parent topic: Starting a Scan from a Scanner Button Starting a Scan Using the Epson Scan Icon You can download and install Epson Scan scanning software. To download Epson Scan, visit Epson's driver download site (U.S. downloads or Canadian downloads). 27 Note: With...
.... • OS X: Open the Applications folder, open the Epson Software folder, and double-click the EPSON Scan icon. Parent topic: Starting a Scan from a Scanner Button Starting a Scan Using the Epson Scan Icon You can download and install Epson Scan scanning software. To download Epson Scan, visit Epson's driver download site (U.S. downloads or Canadian downloads). 27 Note: With...
User Manual
Page 29
... select Document Capture Pro. • Windows (other versions): Click or Start, and select All Programs or Programs. Select EPSON Software, then select Document Capture Pro. • OS X: Open the Applications folder, select the Epson Software folder, and select Document Capture. You see a window like this: 2. Note: The settings may vary, depending on...
... select Document Capture Pro. • Windows (other versions): Click or Start, and select All Programs or Programs. Select EPSON Software, then select Document Capture Pro. • OS X: Open the Applications folder, select the Epson Software folder, and select Document Capture. You see a window like this: 2. Note: The settings may vary, depending on...
User Manual
Page 30
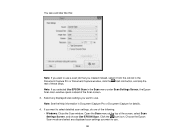
...Document Capture window, click the Start Job button, and skip the rest of the following: • Windows: Close the Scan window. Note: If you selected Use EPSON Scan in Document Capture Pro or Document Capture for details. 4. Open the Scan menu at the top of the Scan screen. 3. If you want to... to select detailed scan settings, do one of these steps. Note: See the Help information in the Scan menu under Scan Settings Screen, the Epson Scan main window opens instead of the screen, select Scan Settings Screen, and choose Use EPSON Scan. You see a window like this: Note: If you want to...
...Document Capture window, click the Start Job button, and skip the rest of the following: • Windows: Close the Scan window. Note: If you selected Use EPSON Scan in Document Capture Pro or Document Capture for details. 4. Open the Scan menu at the top of the Scan screen. 3. If you want to... to select detailed scan settings, do one of these steps. Note: See the Help information in the Scan menu under Scan Settings Screen, the Epson Scan main window opens instead of the screen, select Scan Settings Screen, and choose Use EPSON Scan. You see a window like this: Note: If you want to...
User Manual
Page 31
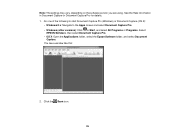
... one of the Destination icons to choose where to send your scanned files. (If you cannot see all of the screen and select Displays the EPSON Scan Setup Screen. Open your scanning program and select its scanning option. (See your scan in the program. 1. Parent topic: Starting a Scan Starting a Scan .... If you chose, click OK or Send to the current captured images, click the Add Page button, select Acquire from a TWAIN-compliant scanning program to use and click OK. 5. Note: You may have to close the Epson Scan window to the icons.) 10. You see a preview of your scan in the...
... one of the Destination icons to choose where to send your scanned files. (If you cannot see all of the screen and select Displays the EPSON Scan Setup Screen. Open your scanning program and select its scanning option. (See your scan in the program. 1. Parent topic: Starting a Scan Starting a Scan .... If you chose, click OK or Send to the current captured images, click the Add Page button, select Acquire from a TWAIN-compliant scanning program to use and click OK. 5. Note: You may have to close the Epson Scan window to the icons.) 10. You see a preview of your scan in the...
User Manual
Page 34
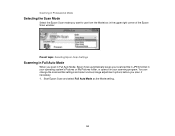
Scanning in Professional Mode Selecting the Scan Mode Select the Epson Scan mode you want to use from the Mode box in the upper right corner of the Epson Scan window: Parent topic: Selecting Epson Scan Settings Scanning in Full Auto Mode When you scan, if necessary. 1. You can change the scanned file settings and...
Scanning in Professional Mode Selecting the Scan Mode Select the Epson Scan mode you want to use from the Mode box in the upper right corner of the Epson Scan window: Parent topic: Selecting Epson Scan Settings Scanning in Full Auto Mode When you scan, if necessary. 1. You can change the scanned file settings and...

User Manual
Page 37
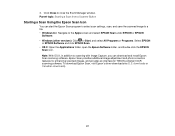
... faces, the sky, and other features, and then correctly rotates the photo when it is scanned, if necessary. (If your photo is not oriented correctly using this option, deselect this option and scan again.) Parent topic: Scanning in Full Auto Mode Scanning in Home Mode When you scan in Home Mode..., Epson Scan automatically saves your scanned file in JPEG format in your operating system's Pictures or My Pictures folder, or opens it in faded photos automatically. ...
... faces, the sky, and other features, and then correctly rotates the photo when it is scanned, if necessary. (If your photo is not oriented correctly using this option, deselect this option and scan again.) Parent topic: Scanning in Full Auto Mode Scanning in Home Mode When you scan in Home Mode..., Epson Scan automatically saves your scanned file in JPEG format in your operating system's Pictures or My Pictures folder, or opens it in faded photos automatically. ...


