

User Manual
Page 4
... ...94 Scanner Light Status ...94 Solving Scanning Problems ...95 Scanner Does Not Turn On or Turns Off Unexpectedly 95 Scanner Buttons Do Not Work as a Copier - Professional Mode 53 Image Preview Guidelines...56 Scan Resolution Guidelines ...56 Selecting Scan File Settings ...58 Available Scanned File Types... 69 Uploading Scanned Images to a Web Folder 71 Uploading Scanned Images to Email 73 Saving Scanned Images to a Folder 74 Epson JPEG File Settings...75 Epson TIFF and Multi-TIFF File Settings 77 Restoring Photo Colors as You Scan 78 Scanning to a PDF File Using a Scanner ...
... ...94 Scanner Light Status ...94 Solving Scanning Problems ...95 Scanner Does Not Turn On or Turns Off Unexpectedly 95 Scanner Buttons Do Not Work as a Copier - Professional Mode 53 Image Preview Guidelines...56 Scan Resolution Guidelines ...56 Selecting Scan File Settings ...58 Available Scanned File Types... 69 Uploading Scanned Images to a Web Folder 71 Uploading Scanned Images to Email 73 Saving Scanned Images to a Folder 74 Epson JPEG File Settings...75 Epson TIFF and Multi-TIFF File Settings 77 Restoring Photo Colors as You Scan 78 Scanning to a PDF File Using a Scanner ...
User Manual
Page 41
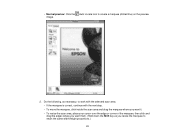
Do the following, as necessary, to work with the selected scan area: • If the marquee is correct, continue with the next step. • To move the marquee, click inside the scan area and drag the marquee where you want it. • To resize the scan area, place your cursor over the edge or corner of the marquee, then click and drag the edges where you want them. (Hold down the Shift key as you resize the marquee to create a marquee (dotted line) on the preview image. 2. • Normal preview: Click the Auto Locate icon to retain the same width/height proportions.) 41
Do the following, as necessary, to work with the selected scan area: • If the marquee is correct, continue with the next step. • To move the marquee, click inside the scan area and drag the marquee where you want it. • To resize the scan area, place your cursor over the edge or corner of the marquee, then click and drag the edges where you want them. (Hold down the Shift key as you resize the marquee to create a marquee (dotted line) on the preview image. 2. • Normal preview: Click the Auto Locate icon to retain the same width/height proportions.) 41
User Manual
Page 46
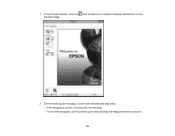
Do the following, as necessary, to create a marquee (dotted line) on the preview image. 2. In the Preview window, click the Auto Locate icon to work with the selected scan area: • If the marquee is correct, continue with the next step. • To move the marquee, click inside the scan area and drag the marquee where you want it. 46 1.
Do the following, as necessary, to create a marquee (dotted line) on the preview image. 2. In the Preview window, click the Auto Locate icon to work with the selected scan area: • If the marquee is correct, continue with the next step. • To move the marquee, click inside the scan area and drag the marquee where you want it. 46 1.
User Manual
Page 54
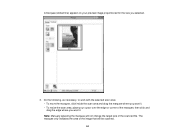
Do the following, as necessary, to work with the selected scan area: • To move the marquee, click inside the scan area and drag the marquee where you want it. • To resize the scan area, place your preview image proportioned for the size you want it. The marquee only indicates the area of the image that will not change the target size of the marquee, then click and drag the edge where you selected. 3. A marquee (dotted line) appears on your cursor over the edge or corner of the scanned file. Note: Manually adjusting the marquee will be scanned. 54
Do the following, as necessary, to work with the selected scan area: • To move the marquee, click inside the scan area and drag the marquee where you want it. • To resize the scan area, place your preview image proportioned for the size you want it. The marquee only indicates the area of the image that will not change the target size of the marquee, then click and drag the edge where you selected. 3. A marquee (dotted line) appears on your cursor over the edge or corner of the scanned file. Note: Manually adjusting the marquee will be scanned. 54
User Manual
Page 92
... it. Do not open the product case. Do not press the surface of the scanner glass. A damaged glass surface can cause spots in your product working at its best, you should clean it several times a year. Disconnect the USB cable. 2. Make sure that no dust builds up on the scanner glass...
... it. Do not open the product case. Do not press the surface of the scanner glass. A damaged glass surface can cause spots in your product working at its best, you should clean it several times a year. Disconnect the USB cable. 2. Make sure that no dust builds up on the scanner glass...
User Manual
Page 95
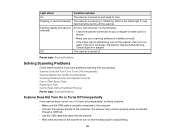
... cable that came with your product. Scanner Does Not Turn On or Turns Off Unexpectedly Scanner Buttons Do Not Work as Expected Scanning Software Does Not Operate Correctly Cannot Start Epson Scan Scanning is Slow Cannot Scan Using Thumbnail Preview Parent topic: Solving Problems Scanner Does Not Turn On or... Turns Off Unexpectedly If the scanner does not turn on or if it on again. Contact Epson for the scanner to turn on and the status light to stop flashing before turning off . Flashing rapidly (0.5 second intervals) An error has ...
... cable that came with your product. Scanner Does Not Turn On or Turns Off Unexpectedly Scanner Buttons Do Not Work as Expected Scanning Software Does Not Operate Correctly Cannot Start Epson Scan Scanning is Slow Cannot Scan Using Thumbnail Preview Parent topic: Solving Problems Scanner Does Not Turn On or... Turns Off Unexpectedly If the scanner does not turn on or if it on again. Contact Epson for the scanner to turn on and the status light to stop flashing before turning off . Flashing rapidly (0.5 second intervals) An error has ...
User Manual
Page 96
...If you are selected in the Select an event list box and that Start this program is installed correctly. OS X Scanner Buttons Do Not Work as sleep or standby. Also make sure Take no action is not running in a power-saving mode, such as Expected If the scanner ...the default settings assigned to turn on . 96 Parent topic: Solving Scanning Problems Related tasks Changing Default Scan Button Settings Uninstalling Scanner Software - Start Epson Scan to the scanner buttons in Event Manager and change them, if necessary. • With Windows Vista or Windows XP, check the settings ...
...If you are selected in the Select an event list box and that Start this program is installed correctly. OS X Scanner Buttons Do Not Work as sleep or standby. Also make sure Take no action is not running in a power-saving mode, such as Expected If the scanner ...the default settings assigned to turn on . 96 Parent topic: Solving Scanning Problems Related tasks Changing Default Scan Button Settings Uninstalling Scanner Software - Start Epson Scan to the scanner buttons in Event Manager and change them, if necessary. • With Windows Vista or Windows XP, check the settings ...

User Manual
Page 97
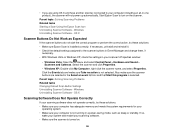
... The scanner may need more than the minimum requirements, such as sleep or standby. If you do not have multiple versions of Epson Scan installed. Parent topic: Solving Scanning Problems Scanning is selected as the Scanner or Source setting. If necessary, increase your scanning ...system but did not reinstall your system's memory. resolution image, you may not work properly when connected through only one version. • If you upgraded your operating system but did not reinstall Epson Scan, try these solutions: • Scan your original at both versions and install...
... The scanner may need more than the minimum requirements, such as sleep or standby. If you do not have multiple versions of Epson Scan installed. Parent topic: Solving Scanning Problems Scanning is selected as the Scanner or Source setting. If necessary, increase your scanning ...system but did not reinstall your system's memory. resolution image, you may not work properly when connected through only one version. • If you upgraded your operating system but did not reinstall Epson Scan, try these solutions: • Scan your original at both versions and install...
User Manual
Page 101
...Scan File Settings Scan Area is Not Adjustable in Thumbnail Preview If you cannot adjust the scan area while viewing a Thumbnail preview in Epson Scan, try these Epson Scan settings (if available) and try scanning again: • Change the Image Type setting and experiment with different combinations of colors ... mode. • Switch to see on any side. Parent topic: Solving Scanned Image Quality Problems 101 Note: Auto Photo Orientation will not work when you scan newspapers, magazines, documents, illustrations, or line art, or images smaller than 2 inches (5.1 cm) on your image again.
...Scan File Settings Scan Area is Not Adjustable in Thumbnail Preview If you cannot adjust the scan area while viewing a Thumbnail preview in Epson Scan, try these Epson Scan settings (if available) and try scanning again: • Change the Image Type setting and experiment with different combinations of colors ... mode. • Switch to see on any side. Parent topic: Solving Scanned Image Quality Problems 101 Note: Auto Photo Orientation will not work when you scan newspapers, magazines, documents, illustrations, or line art, or images smaller than 2 inches (5.1 cm) on your image again.
Notices
Page 1
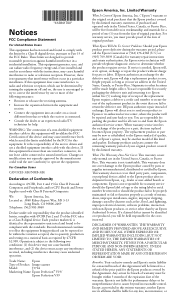
... involves the exchange of Product: Image scanner Model: J371A Marketing Name: Epson Perfection® V19/ Epson Perfection V39 Epson America, Inc. Epson is the responsibility of the replacement. Except as required by Epson. It is not responsible for any interference received, including interference that to... PARTICULAR PURPOSE AND NON-INFRINGEMENT. Records maintained continue to reflect the equipment being produced can be within five (5) working days of receipt of the user to which exceed the limits established by this equipment. Exchange products and parts ...
... involves the exchange of Product: Image scanner Model: J371A Marketing Name: Epson Perfection® V19/ Epson Perfection V39 Epson America, Inc. Epson is the responsibility of the replacement. Except as required by Epson. It is not responsible for any interference received, including interference that to... PARTICULAR PURPOSE AND NON-INFRINGEMENT. Records maintained continue to reflect the equipment being produced can be within five (5) working days of receipt of the user to which exceed the limits established by this equipment. Exchange products and parts ...


