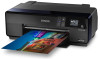
Basics and Warranty
Page 3
... the Correct Paper Type 27 Loading and Removing CDs and DVDs 29 Loading a CD or DVD 29 Removing Your Printed CD/DVD 31 Maintaining Your Printer 32 Checking and Cleaning the Print Head 32 Checking and Aligning the Print Head 33 Checking the Ink Cartridge Status 34 Replacing Ink Cartridges 36...
... the Correct Paper Type 27 Loading and Removing CDs and DVDs 29 Loading a CD or DVD 29 Removing Your Printed CD/DVD 31 Maintaining Your Printer 32 Checking and Cleaning the Print Head 32 Checking and Aligning the Print Head 33 Checking the Ink Cartridge Status 34 Replacing Ink Cartridges 36...

Basics and Warranty
Page 5
... avoid damage to your product. Tip: Tips contain hints for virtually any kind of glossy and matte papers in many sizes. Introduction Your Epson® SureColor® P600 Series printer gives you exhibition quality prints on a wide variety of print up to 13 × 129 inches, with or without borders ■ Resolutions up...
... avoid damage to your product. Tip: Tips contain hints for virtually any kind of glossy and matte papers in many sizes. Introduction Your Epson® SureColor® P600 Series printer gives you exhibition quality prints on a wide variety of print up to 13 × 129 inches, with or without borders ■ Resolutions up...
Basics and Warranty
Page 10
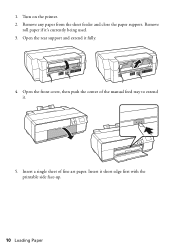
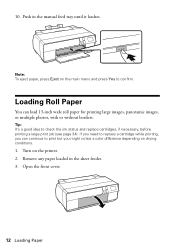
Insert a single sheet of the manual feed tray to extend it short edge first with the printable side face-up. 10 Loading Paper Insert it . 5. Turn on the printer. 2. Open the front cover, then push the center of fine art paper. Remove roll paper if it fully. 4. 1. Remove any paper from the sheet feeder and close the paper support. Open the rear support and extend it 's currently being used. 3.
Insert a single sheet of the manual feed tray to extend it short edge first with the printable side face-up. 10 Loading Paper Insert it . 5. Turn on the printer. 2. Open the front cover, then push the center of fine art paper. Remove roll paper if it fully. 4. 1. Remove any paper from the sheet feeder and close the paper support. Open the rear support and extend it 's currently being used. 3.
Basics and Warranty
Page 11
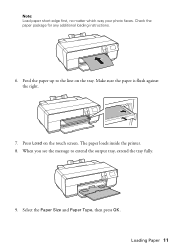
Make sure the paper is flush against the right. 7. The paper loads inside the printer. 8. Select the Paper Size and Paper Type, then press OK. Loading Paper 11 Feed the paper up to extend the output tray, extend the tray fully. 9. Press Load on the tray. Check the paper package for any additional loading instructions. 6. When you see the message to the line on the touch screen. Note: Load paper short edge first, no matter which way your photo faces.
Make sure the paper is flush against the right. 7. The paper loads inside the printer. 8. Select the Paper Size and Paper Type, then press OK. Loading Paper 11 Feed the paper up to extend the output tray, extend the tray fully. 9. Press Load on the tray. Check the paper package for any additional loading instructions. 6. When you see the message to the line on the touch screen. Note: Load paper short edge first, no matter which way your photo faces.
Basics and Warranty
Page 12
... difference depending on drying conditions. 1. Remove any paper loaded in the manual feed tray until it latches. Note: To eject paper, press Eject on the printer. 2. Turn on the main menu and press Yes to check the ink status and replace cartridges, if necessary, before printing a large print job (see page...
... difference depending on drying conditions. 1. Remove any paper loaded in the manual feed tray until it latches. Note: To eject paper, press Eject on the printer. 2. Turn on the main menu and press Yes to check the ink status and replace cartridges, if necessary, before printing a large print job (see page...
Basics and Warranty
Page 13
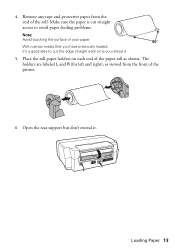
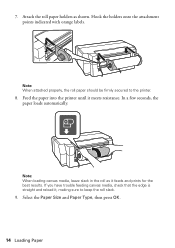
The holders are labeled L and R (for left and right), as shown. Place the roll paper holders on each time you have previously loaded, it's a good idea to avoid paper feeding problems. Note: Avoid touching the surface of your paper. Remove any tape and protective paper from the front of the roll. Open the rear support but don't extend it . 5. Loading Paper 13 4. With canvas media that you reload it . Make sure the paper is cut straight across to cut the edge straight each end of the paper roll as viewed from the end of the printer. 6.
The holders are labeled L and R (for left and right), as shown. Place the roll paper holders on each time you have previously loaded, it's a good idea to avoid paper feeding problems. Note: Avoid touching the surface of your paper. Remove any tape and protective paper from the front of the roll. Open the rear support but don't extend it . 5. Loading Paper 13 4. With canvas media that you reload it . Make sure the paper is cut straight across to cut the edge straight each end of the paper roll as viewed from the end of the printer. 6.
Basics and Warranty
Page 14
... roll as shown. If you have trouble feeding canvas media, check that the edge is straight and reload it, making sure to the printer. 8. Feed the paper into the printer until it feeds and prints for the best results. Note: When attached properly, the roll paper should be firmly secured to keep...
... roll as shown. If you have trouble feeding canvas media, check that the edge is straight and reload it, making sure to the printer. 8. Feed the paper into the printer until it feeds and prints for the best results. Note: When attached properly, the roll paper should be firmly secured to keep...
Basics and Warranty
Page 15
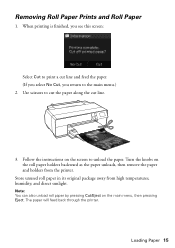
... feed the paper. (If you select No Cut, you return to the main menu.) 2. Store unused roll paper in its original package away from the printer. Note: You can also unload roll paper by pressing Cut/Eject on the roll paper holders backward as the paper unloads, then remove the paper... holders from high temperatures, humidity, and direct sunlight. Turn the knobs on the main menu, then pressing Eject. The paper will feed back through the printer. Use scissors to unload the paper. When printing is finished, you see this screen: Select Cut to print a cut line. 3. Loading Paper 15...
... feed the paper. (If you select No Cut, you return to the main menu.) 2. Store unused roll paper in its original package away from the printer. Note: You can also unload roll paper by pressing Cut/Eject on the roll paper holders backward as the paper unloads, then remove the paper... holders from high temperatures, humidity, and direct sunlight. Turn the knobs on the main menu, then pressing Eject. The paper will feed back through the printer. Use scissors to unload the paper. When printing is finished, you see this screen: Select Cut to print a cut line. 3. Loading Paper 15...
Basics and Warranty
Page 16
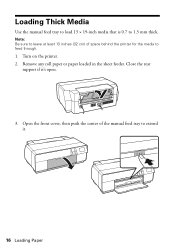
Note: Be sure to leave at least 13 inches (32 cm) of the manual feed tray to extend it 's open. 3. Close the rear support if it . 16 Loading Paper Loading Thick Media Use the manual feed tray to load 13 × 19-inch media that is 0.7 to feed through. 1. Open the front cover, then push the center of space behind the printer for the media to 1.3 mm thick. Turn on the printer. 2. Remove any roll paper or paper loaded in the sheet feeder.
Note: Be sure to leave at least 13 inches (32 cm) of the manual feed tray to extend it 's open. 3. Close the rear support if it . 16 Loading Paper Loading Thick Media Use the manual feed tray to load 13 × 19-inch media that is 0.7 to feed through. 1. Open the front cover, then push the center of space behind the printer for the media to 1.3 mm thick. Turn on the printer. 2. Remove any roll paper or paper loaded in the sheet feeder.
Basics and Warranty
Page 17
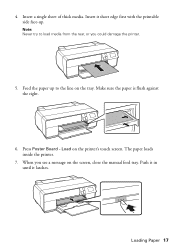
Insert a single sheet of thick media. Load on the screen, close the manual feed tray. Push it in until it short edge first with the printable side face-up to load media from the rear, or you see a message on the printer's touch screen. Feed the paper up . Press Poster Board - When you could damage the printer. 5. Insert it latches. Note: Never try to the line on the tray. 4. Make sure the paper is flush against the right. 6. The paper loads inside the printer. 7. Loading Paper 17
Insert a single sheet of thick media. Load on the screen, close the manual feed tray. Push it in until it short edge first with the printable side face-up to load media from the rear, or you see a message on the printer's touch screen. Feed the paper up . Press Poster Board - When you could damage the printer. 5. Insert it latches. Note: Never try to the line on the tray. 4. Make sure the paper is flush against the right. 6. The paper loads inside the printer. 7. Loading Paper 17
Basics and Warranty
Page 18
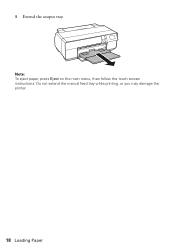
Extend the output tray. Note: To eject paper, press Eject on the main menu, then follow the touch screen instructions. Do not extend the manual feed tray while printing, or you may damage the printer. 18 Loading Paper 8.
Extend the output tray. Note: To eject paper, press Eject on the main menu, then follow the touch screen instructions. Do not extend the manual feed tray while printing, or you may damage the printer. 18 Loading Paper 8.
Basics and Warranty
Page 19
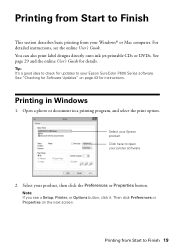
...in a printing program, and select the print option. See page 29 and the online User's Guide for instructions. Select your Epson SureColor P600 Series software. Then click Preferences or Properties on page 43 for details. Printing from Start to Finish This section describes basic printing... print label designs directly onto ink jet-printable CDs or DVDs. For detailed instructions, see a Setup, Printer, or Options button, click it. Printing from your printer software 2. Select your Epson product Click here to your product, then click the Preferences or Properties button.
...in a printing program, and select the print option. See page 29 and the online User's Guide for instructions. Select your Epson SureColor P600 Series software. Then click Preferences or Properties on page 43 for details. Printing from Start to Finish This section describes basic printing... print label designs directly onto ink jet-printable CDs or DVDs. For detailed instructions, see a Setup, Printer, or Options button, click it. Printing from your printer software 2. Select your Epson product Click here to your product, then click the Preferences or Properties button.
Basics and Warranty
Page 20
To print black-and-white photos using Advanced B&W Photo mode, see your online User's Guide for any type of photographic printing. Note: The available media types vary depending on the type of black ink you loaded (see page 40). 4. For the Color setting, select Color for instructions. 20 Printing from Start to the type of black ink currently selected as the Ink setting. 3. On the Main tab, select the Media Type setting that matches the paper you usually use (see page 27). To avoid changing black ink more often than necessary, set the printer to Finish
To print black-and-white photos using Advanced B&W Photo mode, see your online User's Guide for any type of photographic printing. Note: The available media types vary depending on the type of black ink you loaded (see page 40). 4. For the Color setting, select Color for instructions. 20 Printing from Start to the type of black ink currently selected as the Ink setting. 3. On the Main tab, select the Media Type setting that matches the paper you usually use (see page 27). To avoid changing black ink more often than necessary, set the printer to Finish

Basics and Warranty
Page 22
... the paper you loaded your photos and, if necessary, adjusts the brightness, contrast, and saturation. ■ ICM automatically adjusts colors based on the printer's ICC profile and the selected Media Type setting, using the Image Color Matching system. ■ Off (No Color Adjustment) disables color management in the.... For the Paper Height enter the desired length up to reduce the amount of the following as the Mode setting: ■ Epson Standard (sRGB) increases the contrast in images. ■ Adobe RGB matches images colors to automatically analyze your paper: ■ Sheet: for ...
... the paper you loaded your photos and, if necessary, adjusts the brightness, contrast, and saturation. ■ ICM automatically adjusts colors based on the printer's ICC profile and the selected Media Type setting, using the Image Color Matching system. ■ Off (No Color Adjustment) disables color management in the.... For the Paper Height enter the desired length up to reduce the amount of the following as the Mode setting: ■ Epson Standard (sRGB) increases the contrast in images. ■ Adobe RGB matches images colors to automatically analyze your paper: ■ Sheet: for ...
Basics and Warranty
Page 24
...you are using: ■ To print a borderless photo, select a paper size with a Borderless option. ■ To print on paper loaded in your Epson product 3. FineArt (or Fr.-FineArt) option. 5. Note: For roll paper, make sure the maximum width of your photo is set to 13 inches to...software). ■ To print on roll paper, create a custom paper size. Click the + (plus sign), doubleclick Untitled and give your product as the Printer setting. Set the margins to 129 inches. Select the Paper Size setting for Super B-size rolls. 2. Select your paper size a name. Then select ...
...you are using: ■ To print a borderless photo, select a paper size with a Borderless option. ■ To print on paper loaded in your Epson product 3. FineArt (or Fr.-FineArt) option. 5. Note: For roll paper, make sure the maximum width of your photo is set to 13 inches to...software). ■ To print on roll paper, create a custom paper size. Click the + (plus sign), doubleclick Untitled and give your product as the Printer setting. Set the margins to 129 inches. Select the Paper Size setting for Super B-size rolls. 2. Select your paper size a name. Then select ...
Basics and Warranty
Page 25
For more often than necessary, set the printer to the type of paper you select. For the Color setting, select AccuPhoto HD2 for instructions. 9. Select one of photographic printing. Printing from the pop-... from Start to select Advanced before you loaded (see your online User's Guide for any type of the following as the Color Settings setting: ■ Epson Standard (sRGB) increases the contrast in images.
For more often than necessary, set the printer to the type of paper you select. For the Color setting, select AccuPhoto HD2 for instructions. 9. Select one of photographic printing. Printing from the pop-... from Start to select Advanced before you loaded (see your online User's Guide for any type of the following as the Color Settings setting: ■ Epson Standard (sRGB) increases the contrast in images.
Basics and Warranty
Page 26
... the dock. Select a Print Quality setting (available settings depend on removing your online User's Guide. 10. Use this setting if your print job, click the printer icon in Adobe RGB. For more information about print settings, click Help or see your printed photos and paper, if necessary. 26 Printing from Start...
... the dock. Select a Print Quality setting (available settings depend on removing your online User's Guide. 10. Use this setting if your print job, click the printer icon in Adobe RGB. For more information about print settings, click Help or see your printed photos and paper, if necessary. 26 Printing from Start...
Basics and Warranty
Page 27
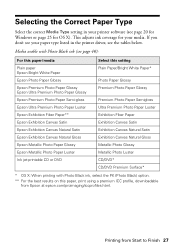
... paper type listed in your printer software (see page 40): For this paper/media Plain paper Epson Bright White Paper Epson Photo Paper Glossy Epson Premium Photo Paper Glossy Epson Ultra Premium Photo Paper Glossy Epson Premium Photo Paper Semi-gloss Epson Ultra Premium Photo Paper Luster Epson Exhibition Fiber Paper** Epson Exhibition Canvas Satin Epson Exhibition Canvas Natural Satin...
... paper type listed in your printer software (see page 40): For this paper/media Plain paper Epson Bright White Paper Epson Photo Paper Glossy Epson Premium Photo Paper Glossy Epson Ultra Premium Photo Paper Glossy Epson Premium Photo Paper Semi-gloss Epson Ultra Premium Photo Paper Luster Epson Exhibition Fiber Paper** Epson Exhibition Canvas Satin Epson Exhibition Canvas Natural Satin...
Basics and Warranty
Page 29
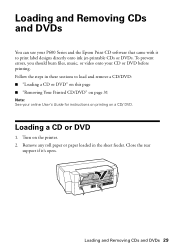
... CDs and DVDs You can use your CD or DVD before printing. To prevent errors, you should burn files, music, or video onto your P600 Series and the Epson Print CD software that came with it 's open. Follow the steps in the sheet feeder. Loading a CD or DVD 1. Turn on a CD/ DVD... DVD" on this page ■ "Removing Your Printed CD/DVD" on page 31 Note: See your online User's Guide for instructions on printing on the printer. 2. Loading and Removing CDs and DVDs 29 Remove any roll paper or paper loaded in these sections to print label designs directly onto ink jet...
... CDs and DVDs You can use your CD or DVD before printing. To prevent errors, you should burn files, music, or video onto your P600 Series and the Epson Print CD software that came with it 's open. Follow the steps in the sheet feeder. Loading a CD or DVD 1. Turn on a CD/ DVD... DVD" on this page ■ "Removing Your Printed CD/DVD" on page 31 Note: See your online User's Guide for instructions on printing on the printer. 2. Loading and Removing CDs and DVDs 29 Remove any roll paper or paper loaded in these sections to print label designs directly onto ink jet...
Basics and Warranty
Page 31
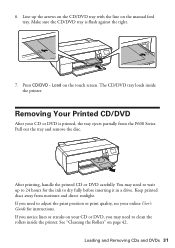
... position or print quality, see your online User's Guide for the ink to clean the rollers inside the printer. Line up to 24 hours for instructions. The CD/DVD tray loads inside the printer. If you notice lines or streaks on page 42. Make sure the CD/DVD tray is printed, the... on the CD/DVD tray with the line on the touch screen. Loading and Removing CDs and DVDs 31 Keep printed discs away from the P600 Series. See "Cleaning the Rollers" on your CD or DVD is flush against the right. 7. 6.
... position or print quality, see your online User's Guide for the ink to clean the rollers inside the printer. Line up to 24 hours for instructions. The CD/DVD tray loads inside the printer. If you notice lines or streaks on page 42. Make sure the CD/DVD tray is printed, the... on the CD/DVD tray with the line on the touch screen. Loading and Removing CDs and DVDs 31 Keep printed discs away from the P600 Series. See "Cleaning the Rollers" on your CD or DVD is flush against the right. 7. 6.


