Product Brochure
Page 1
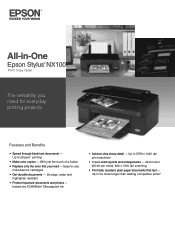
All-in-One Epson Stylus® NX100 Print | Copy | Scan The versatility you need for everyday printing projects. Instant-dry DURABrite® Ultra pigment ink • Achieve ultra sharp detail - With just the touch of a button • Replace only the color that last - Up to 26 ppm1 printing • Make color copies ... ink cartridges • Get durable documents - Features and Benefits • Speed through black text documents - Up to 5760 x 1440 dpi print resolution • Create vivid reprints and enlargements - 48-bit color (16-bit per color), 600 x 1200 dpi scanning •...
All-in-One Epson Stylus® NX100 Print | Copy | Scan The versatility you need for everyday printing projects. Instant-dry DURABrite® Ultra pigment ink • Achieve ultra sharp detail - With just the touch of a button • Replace only the color that last - Up to 26 ppm1 printing • Make color copies ... ink cartridges • Get durable documents - Features and Benefits • Speed through black text documents - Up to 5760 x 1440 dpi print resolution • Create vivid reprints and enlargements - 48-bit color (16-bit per color), 600 x 1200 dpi scanning •...
Product Brochure
Page 2
... ink remains in -one , instruction booklet, CD-ROM containing printer drivers and software for more information about print speed. 2 Ink fade resistance ratings based on accelerated testing of prints. Copyright 2008 Epson America, Inc. For maximum print life, display all rights in the U.S. Epson disclaims any and all prints under glass; Epson Stylus NX100 Print | Copy | Scan Printing Technology Nozzle Configuration Ink...
... ink remains in -one , instruction booklet, CD-ROM containing printer drivers and software for more information about print speed. 2 Ink fade resistance ratings based on accelerated testing of prints. Copyright 2008 Epson America, Inc. For maximum print life, display all rights in the U.S. Epson disclaims any and all prints under glass; Epson Stylus NX100 Print | Copy | Scan Printing Technology Nozzle Configuration Ink...
Quick Guide
Page 1
Epson Stylus® NX100 Series Quick Guide Basic Copying, Printing, and Scanning Maintaining Your NX100 Series Solving Problems
Epson Stylus® NX100 Series Quick Guide Basic Copying, Printing, and Scanning Maintaining Your NX100 Series Solving Problems
Quick Guide
Page 2
...or Photo 7 Placing the Original on the Glass 7 Copying a Document 8 Copying a Photo 9 Copying Draft Documents 10 Printing From Your Computer 11 Printing in Windows 11 Printing With a Macintosh 13 Selecting the Correct Paper Type 17 Scanning a Photo or Document 18 Basic Scanning 18 Restoring and Correcting... Photos 19 Maintaining Your NX100 Series 20 Checking the Print Head Nozzles 20 Cleaning the Print Head 21 Checking the Ink Cartridge Status 22 Replacing Ink Cartridges 23 Solving Problems 28 Checking...
...or Photo 7 Placing the Original on the Glass 7 Copying a Document 8 Copying a Photo 9 Copying Draft Documents 10 Printing From Your Computer 11 Printing in Windows 11 Printing With a Macintosh 13 Selecting the Correct Paper Type 17 Scanning a Photo or Document 18 Basic Scanning 18 Restoring and Correcting... Photos 19 Maintaining Your NX100 Series 20 Checking the Print Head Nozzles 20 Cleaning the Print Head 21 Checking the Ink Cartridge Status 22 Replacing Ink Cartridges 23 Solving Problems 28 Checking...

Quick Guide
Page 3
... avoid damage to avoid bodily injury. Please follow these things without ever turning on -screen Epson Information Center by double-clicking the icon for better copying, scanning, and printing. Introduction After you have set up your Epson Stylus® NX100 Series as you connect it on your desktop. Introduction 3 Tip: Tips contain hints for it...
... avoid damage to avoid bodily injury. Please follow these things without ever turning on -screen Epson Information Center by double-clicking the icon for better copying, scanning, and printing. Introduction After you have set up your Epson Stylus® NX100 Series as you connect it on your desktop. Introduction 3 Tip: Tips contain hints for it...
Quick Guide
Page 4
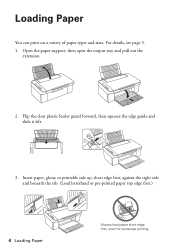
Flip the clear plastic feeder guard forward, then squeeze the edge guide and slide it left. 3. Open the paper support, then open the output tray and pull out the extension. 2. Insert paper, glossy or printable side up, short edge first, against the right side and beneath the tab. (Load letterhead or pre-printed paper top edge first.) 4 Loading Paper Always load paper short edge first, even for landscape printing. Loading Paper You can print on a variety of paper types and sizes. For details, see page 5. 1.
Flip the clear plastic feeder guard forward, then squeeze the edge guide and slide it left. 3. Open the paper support, then open the output tray and pull out the extension. 2. Insert paper, glossy or printable side up, short edge first, against the right side and beneath the tab. (Load letterhead or pre-printed paper top edge first.) 4 Loading Paper Always load paper short edge first, even for landscape printing. Loading Paper You can print on a variety of paper types and sizes. For details, see page 5. 1.
Quick Guide
Page 5
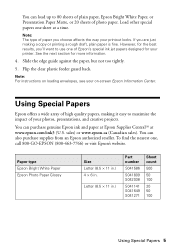
... back. However, for more information. 4. Note: For instructions on -screen Epson Information Center. To find the nearest one of photo paper. If you choose affects the way your printout looks. Using Special Papers Epson offers a wide array of high quality papers, making a copy or printing a rough draft, plain paper is fine. sales) or www...
... back. However, for more information. 4. Note: For instructions on -screen Epson Information Center. To find the nearest one of photo paper. If you choose affects the way your printout looks. Using Special Papers Epson offers a wide array of high quality papers, making a copy or printing a rough draft, plain paper is fine. sales) or www...
Quick Guide
Page 10
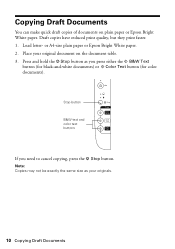
...Note: Copies may not be exactly the same size as you need to cancel copying, press the y Stop button. or A4-size plain paper or Epson Bright White paper. 2. Stop button B&W text and color text buttons If you press either the x B&W Text button (for black-and-white documents)... or x Color Text button (for color documents). Draft copies have reduced print quality, but they print faster. 1. Press and hold the y Stop button as your original document on plain paper or Epson Bright White paper. Place your originals. 10 Copying Draft Documents
...Note: Copies may not be exactly the same size as you need to cancel copying, press the y Stop button. or A4-size plain paper or Epson Bright White paper. 2. Stop button B&W text and color text buttons If you press either the x B&W Text button (for black-and-white documents)... or x Color Text button (for color documents). Draft copies have reduced print quality, but they print faster. 1. Press and hold the y Stop button as your original document on plain paper or Epson Bright White paper. Place your originals. 10 Copying Draft Documents
Quick Guide
Page 11
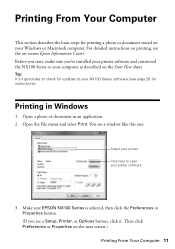
... click Preferences or Properties on printing, see a window like this one: Select your printer Click here to your NX100 Series software (see a Setup, Printer, or Options button, click it. Printing From Your Computer This section describes the basic steps for printing a photo or document stored on your printer software 3. Make sure EPSON NX100 Series is selected, then...
... click Preferences or Properties on printing, see a window like this one: Select your printer Click here to your NX100 Series software (see a Setup, Printer, or Options button, click it. Printing From Your Computer This section describes the basic steps for printing a photo or document stored on your printer software 3. Make sure EPSON NX100 Series is selected, then...
Quick Guide
Page 12
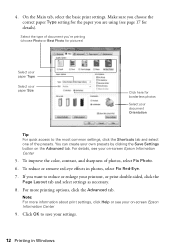
...If you want to reduce or enlarge your own presets by clicking the Save Settings button on -screen Epson Information Center 5. Select the type of document you are using (see your settings. 12 Printing in photos, select Fix Red-Eye. 7. To reduce or remove red-eye effects in Windows For details... details). Click OK to the most common settings, click the Shortcuts tab and select one of photos, select Fix Photo. 6. Make sure you choose the correct paper Type setting for the paper you 're printing (choose Photo or Best Photo for pictures) Select your paper Type Select your document...
...If you want to reduce or enlarge your own presets by clicking the Save Settings button on -screen Epson Information Center 5. Select the type of document you are using (see your settings. 12 Printing in photos, select Fix Red-Eye. 7. To reduce or remove red-eye effects in Windows For details... details). Click OK to the most common settings, click the Shortcuts tab and select one of photos, select Fix Photo. 6. Make sure you choose the correct paper Type setting for the paper you 're printing (choose Photo or Best Photo for pictures) Select your paper Type Select your document...
Quick Guide
Page 13
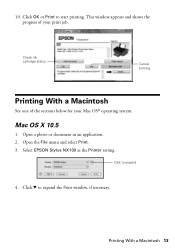
This window appears and shows the progress of the sections below for your print job. Open a photo or document in an application. 2. Select EPSON Stylus NX100 as the Printer setting. Printing With a Macintosh 13 10. Click to expand the Print window, if necessary. Check ink cartridge status Cancel printing Printing With a Macintosh See one of your Mac OS® operating system. Click d to expand 4. Open the File menu and select Print. 3. Mac OS X 10.5 1. Click OK or Print to start printing.
This window appears and shows the progress of the sections below for your print job. Open a photo or document in an application. 2. Select EPSON Stylus NX100 as the Printer setting. Printing With a Macintosh 13 10. Click to expand the Print window, if necessary. Check ink cartridge status Cancel printing Printing With a Macintosh See one of your Mac OS® operating system. Click d to expand 4. Open the File menu and select Print. 3. Mac OS X 10.5 1. Click OK or Print to start printing.
Quick Guide
Page 14
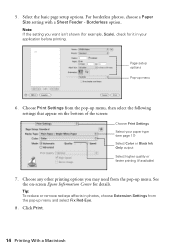
Choose Print Settings from the pop-up menu, then select the following settings that appear on -screen Epson Information Center for it in photos, choose Extension Settings from the pop-up menu 6. Note: If the setting you may need from the pop-up ...menu. Borderless option. Page setup options Pop-up menu and select Fix Red-Eye. 8. See the on the bottom of the screen: Choose Print Settings...
Choose Print Settings from the pop-up menu, then select the following settings that appear on -screen Epson Information Center for it in photos, choose Extension Settings from the pop-up menu 6. Note: If the setting you may need from the pop-up ...menu. Borderless option. Page setup options Pop-up menu and select Fix Red-Eye. 8. See the on the bottom of the screen: Choose Print Settings...
Quick Guide
Page 15
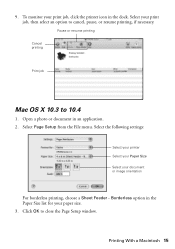
...Select the following settings: Select your printer Select your Paper Size Select your print job, then select an option to cancel, pause, or resume printing, if necessary. 9. To monitor your paper size. 3. Pause or resume printing Cancel printing Print job Mac OS X 10.3 to close the Page Setup window. Open... a photo or document in the dock. Click OK to 10.4 1. Borderless option in the Paper Size list for your print job, click the printer icon in an ...
...Select the following settings: Select your printer Select your Paper Size Select your print job, then select an option to cancel, pause, or resume printing, if necessary. 9. To monitor your paper size. 3. Pause or resume printing Cancel printing Print job Mac OS X 10.3 to close the Page Setup window. Open... a photo or document in the dock. Click OK to 10.4 1. Borderless option in the Paper Size list for your print job, click the printer icon in an ...
Quick Guide
Page 16
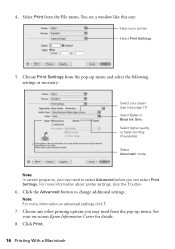
... Epson Information Center for details. 8. Click the Advanced button to select Advanced before you may need from the File menu. Select Print from the pop-up menu and select the following settings as necessary: Select your paper type (see a window like this one:... Select your on advanced settings click ?. 7. button. 6. See your printer Select Print Settings 5. Choose any other printing options you can select Print Settings. Choose Print Settings from the pop-up menu. Click Print. 16 Printing With a Macintosh 4. You see page ...
... Epson Information Center for details. 8. Click the Advanced button to select Advanced before you may need from the File menu. Select Print from the pop-up menu and select the following settings as necessary: Select your paper type (see a window like this one:... Select your on advanced settings click ?. 7. button. 6. See your printer Select Print Settings 5. Choose any other printing options you can select Print Settings. Choose Print Settings from the pop-up menu. Click Print. 16 Printing With a Macintosh 4. You see page ...
Quick Guide
Page 17
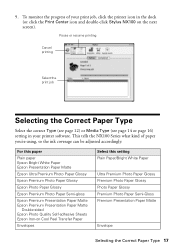
...Epson Bright White Paper Epson Presentation Paper Matte Epson Ultra Premium Photo Paper Glossy Epson Premium Photo Paper Glossy Epson Photo Paper Glossy Epson Premium Photo Paper Semi-gloss Epson Premium Presentation Paper Matte Epson Premium Presentation Paper Matte Double-sided Epson Photo Quality Self-adhesive Sheets Epson Iron-on the next screen). This tells the NX100...Type (see page 14 or page 16) setting in your print job, click the printer icon in the dock (or click the Print Center icon and double-click Stylus NX100 on Cool Peel Transfer Paper Envelopes Select this setting Plain ...
...Epson Bright White Paper Epson Presentation Paper Matte Epson Ultra Premium Photo Paper Glossy Epson Premium Photo Paper Glossy Epson Photo Paper Glossy Epson Premium Photo Paper Semi-gloss Epson Premium Presentation Paper Matte Epson Premium Presentation Paper Matte Double-sided Epson Photo Quality Self-adhesive Sheets Epson Iron-on the next screen). This tells the NX100...Type (see page 14 or page 16) setting in your print job, click the printer icon in the dock (or click the Print Center icon and double-click Stylus NX100 on Cool Peel Transfer Paper Envelopes Select this setting Plain ...
Quick Guide
Page 20
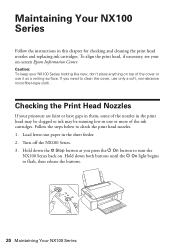
...letter-size paper in this chapter for checking and cleaning the print head nozzles and replacing ink cartridges. Caution: To keep your NX100 Series looking like new, don't place anything on -screen Epson Information Center. Turn off the NX100 Series. 3. Maintaining Your NX100 Series Follow the instructions in the sheet feeder. 2. Checking the...are faint or have gaps in them, some of the nozzles in the print head may be clogged or ink may be running low in one or more of the cover or use it as you need to turn the NX100 Series back on. Hold down the y Stop button as a writing ...
...letter-size paper in this chapter for checking and cleaning the print head nozzles and replacing ink cartridges. Caution: To keep your NX100 Series looking like new, don't place anything on -screen Epson Information Center. Turn off the NX100 Series. 3. Maintaining Your NX100 Series Follow the instructions in the sheet feeder. 2. Checking the...are faint or have gaps in them, some of the nozzles in the print head may be clogged or ink may be running low in one or more of the cover or use it as you need to turn the NX100 Series back on. Hold down the y Stop button as a writing ...
Quick Guide
Page 21
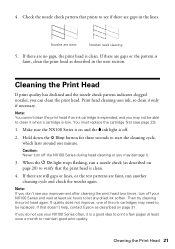
...any dried ink soften. Caution: Never turn off your NX100 Series often, it . 3. If quality does not improve, one minute. 4. Note: You cannot clean the print head if an ink cartridge is expended, and you do not use your NX100 Series and wait at least once a month to verify ...contact Epson as described on and the B ink light is clean. Cleaning the Print Head If print quality has declined and the nozzle check pattern indicates clogged nozzles, you may need cleaning 5. If there are gaps in the next section. Then try cleaning the print head again. If that prints to...
...any dried ink soften. Caution: Never turn off your NX100 Series often, it . 3. If quality does not improve, one minute. 4. Note: You cannot clean the print head if an ink cartridge is expended, and you do not use your NX100 Series and wait at least once a month to verify ...contact Epson as described on and the B ink light is clean. Cleaning the Print Head If print quality has declined and the nozzle check pattern indicates clogged nozzles, you may need cleaning 5. If there are gaps in the next section. Then try cleaning the print head again. If that prints to...
Quick Guide
Page 22
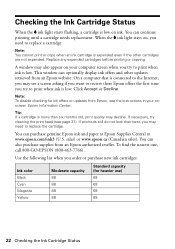
...Replace any expended cartridges before printing or copying. This window can purchase genuine Epson ink and paper at Epson Supplies Central at www.epson.com/ink3 (U.S. Tip: If a cartridge is low on ink. sales) or www.epson.ca (Canadian sales). To find the nearest one, call 800-GO-EPSON (800-463-7766). Use ...the following list when you may need to print when ink is low. Checking the Ink Cartridge Status When the B ink light starts...
...Replace any expended cartridges before printing or copying. This window can purchase genuine Epson ink and paper at Epson Supplies Central at www.epson.com/ink3 (U.S. Tip: If a cartridge is low on ink. sales) or www.epson.ca (Canadian sales). To find the nearest one, call 800-GO-EPSON (800-463-7766). Use ...the following list when you may need to print when ink is low. Checking the Ink Cartridge Status When the B ink light starts...
Quick Guide
Page 23
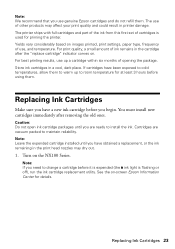
... old ones. Cartridges are ready to install the ink. See the on images printed, print settings, paper type, frequency of use of cartridges is flashing or off), run the ink cartridge replacement utility. The use , and temperature. Yields vary considerably based on -screen Epson Information ... for at least 3 hours before using them . For best printing results, use genuine Epson cartridges and do not refill them . You must install new cartridges immediately after the "replace cartridge" indicator comes on the NX100 Series. If cartridges have obtained a replacement, or the ink ...
... old ones. Cartridges are ready to install the ink. See the on images printed, print settings, paper type, frequency of use of cartridges is flashing or off), run the ink cartridge replacement utility. The use , and temperature. Yields vary considerably based on -screen Epson Information ... for at least 3 hours before using them . For best printing results, use genuine Epson cartridges and do not refill them . You must install new cartridges immediately after the "replace cartridge" indicator comes on the NX100 Series. If cartridges have obtained a replacement, or the ink ...
Quick Guide
Page 24
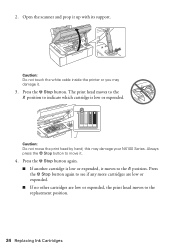
... again. ■ If another cartridge is low or expended. Open the scanner and prop it . 3. this may damage it up with its support. The print head moves to the _ position to indicate which cartridge is low or expended, it . 4. Always press the y Stop button to the replacement position. 24... Replacing Ink Cartridges Caution: Do not touch the white cable inside the printer or you may damage your NX100 Series. 2. Press the y Stop button. Press the y Stop button again to see if any more cartridges are low or expended. ■ If no...
... again. ■ If another cartridge is low or expended. Open the scanner and prop it . 3. this may damage it up with its support. The print head moves to the _ position to indicate which cartridge is low or expended, it . 4. Always press the y Stop button to the replacement position. 24... Replacing Ink Cartridges Caution: Do not touch the white cable inside the printer or you may damage your NX100 Series. 2. Press the y Stop button. Press the y Stop button again to see if any more cartridges are low or expended. ■ If no...


