Product Brochure
Page 1
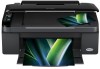
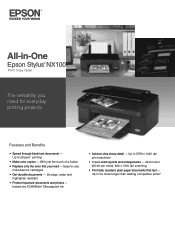
... and highlighter resistant • Protect important documents and photos - Up to 26 ppm1 printing • Make color copies - Features and Benefits • Speed through black text documents - All-in-One Epson Stylus® NX100 Print | Copy | Scan The versatility you need for everyday printing projects. With just the touch of a button • Replace only the color that...
... and highlighter resistant • Protect important documents and photos - Up to 26 ppm1 printing • Make color copies - Features and Benefits • Speed through black text documents - All-in-One Epson Stylus® NX100 Print | Copy | Scan The versatility you need for everyday printing projects. With just the touch of a button • Replace only the color that...
Product Brochure
Page 2
...www.epson.com www.epson.ca Specifications are trademarks and/or registered trademarks of their respective companies. Epson does not guarantee the longevity of unframed color prints on . For maximum print life, display all -in-one , ...Epson Corporation. Copyright 2008 Epson America, Inc. claim that you use genuine Epson ink cartridges. Epson disclaims any and all -in indoor display conditions. Epson, Epson Stylus and MicroPiezo are registered trademarks and PhotoEnhance is a trademark of Epson America, Inc. CPD-26314oss 9/08 Epson Stylus NX100 Print | Copy | Scan Printing...
...www.epson.com www.epson.ca Specifications are trademarks and/or registered trademarks of their respective companies. Epson does not guarantee the longevity of unframed color prints on . For maximum print life, display all -in-one , ...Epson Corporation. Copyright 2008 Epson America, Inc. claim that you use genuine Epson ink cartridges. Epson disclaims any and all -in indoor display conditions. Epson, Epson Stylus and MicroPiezo are registered trademarks and PhotoEnhance is a trademark of Epson America, Inc. CPD-26314oss 9/08 Epson Stylus NX100 Print | Copy | Scan Printing...
Quick Guide
Page 1
Epson Stylus® NX100 Series Quick Guide Basic Copying, Printing, and Scanning Maintaining Your NX100 Series Solving Problems
Epson Stylus® NX100 Series Quick Guide Basic Copying, Printing, and Scanning Maintaining Your NX100 Series Solving Problems
Quick Guide
Page 2
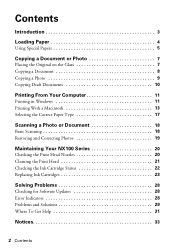
...or Photo 7 Placing the Original on the Glass 7 Copying a Document 8 Copying a Photo 9 Copying Draft Documents 10 Printing From Your Computer 11 Printing in Windows 11 Printing With a Macintosh 13 Selecting the Correct Paper Type 17 Scanning a Photo or Document 18 Basic Scanning 18 Restoring and Correcting... Photos 19 Maintaining Your NX100 Series 20 Checking the Print Head Nozzles 20 Cleaning the Print Head 21 Checking the Ink Cartridge Status 22 Replacing Ink Cartridges 23 Solving Problems 28 Checking...
...or Photo 7 Placing the Original on the Glass 7 Copying a Document 8 Copying a Photo 9 Copying Draft Documents 10 Printing From Your Computer 11 Printing in Windows 11 Printing With a Macintosh 13 Selecting the Correct Paper Type 17 Scanning a Photo or Document 18 Basic Scanning 18 Restoring and Correcting... Photos 19 Maintaining Your NX100 Series 20 Checking the Print Head Nozzles 20 Cleaning the Print Head 21 Checking the Ink Cartridge Status 22 Replacing Ink Cartridges 23 Solving Problems 28 Checking...

Quick Guide
Page 3
...document or photo ■ Get the basic steps for better copying, scanning, and printing. Caution: Cautions must be observed to avoid damage to your NX100 Series. Introduction After you have set up your Epson Stylus® NX100 Series as you connect it on the Start Here sheet, turn here to: ...■ Load paper ■ Make a copy of these guidelines as described on your Windows® or Macintosh® computer. Tip: Tips contain hints for printing from your computer ...
...document or photo ■ Get the basic steps for better copying, scanning, and printing. Caution: Cautions must be observed to avoid damage to your NX100 Series. Introduction After you have set up your Epson Stylus® NX100 Series as you connect it on the Start Here sheet, turn here to: ...■ Load paper ■ Make a copy of these guidelines as described on your Windows® or Macintosh® computer. Tip: Tips contain hints for printing from your computer ...
Quick Guide
Page 4
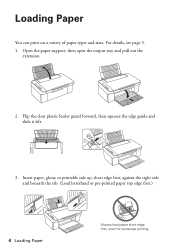
Insert paper, glossy or printable side up, short edge first, against the right side and beneath the tab. (Load letterhead or pre-printed paper top edge first.) 4 Loading Paper Always load paper short edge first, even for landscape printing. Flip the clear plastic feeder guard forward, then squeeze the edge guide and slide it left. 3. Open the paper support, then open the output tray and pull out the extension. 2. For details, see page 5. 1. Loading Paper You can print on a variety of paper types and sizes.
Insert paper, glossy or printable side up, short edge first, against the right side and beneath the tab. (Load letterhead or pre-printed paper top edge first.) 4 Loading Paper Always load paper short edge first, even for landscape printing. Flip the clear plastic feeder guard forward, then squeeze the edge guide and slide it left. 3. Open the paper support, then open the output tray and pull out the extension. 2. For details, see page 5. 1. Loading Paper You can print on a variety of paper types and sizes.
Quick Guide
Page 5
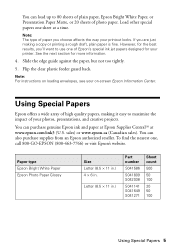
...ll want to use one , call 800-GO-EPSON (800-463-7766) or visit Epson's website. . Note: For instructions on loading envelopes, see your on-screen Epson Information Center. sales) or www.epson.ca (Canadian sales). To find the nearest one of high quality papers, making a copy or printing a rough draft, ...plain paper is fine. Note: The type of photo paper. Slide the edge guide against the paper, but not too tightly. 5. Using Special Papers Epson offers a wide array of Epson's special ink jet ...
...ll want to use one , call 800-GO-EPSON (800-463-7766) or visit Epson's website. . Note: For instructions on loading envelopes, see your on-screen Epson Information Center. sales) or www.epson.ca (Canadian sales). To find the nearest one of high quality papers, making a copy or printing a rough draft, ...plain paper is fine. Note: The type of photo paper. Slide the edge guide against the paper, but not too tightly. 5. Using Special Papers Epson offers a wide array of Epson's special ink jet ...
Quick Guide
Page 10
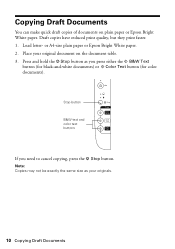
...-size plain paper or Epson Bright White paper. 2. Note: Copies may not be exactly the same size as you need to cancel copying, press the y Stop button. Place your originals. 10 Copying Draft Documents Draft copies have reduced print quality, but they print faster. 1. Copying Draft... Documents You can make quick draft copies of documents on the document table. 3. Load letter- Press and hold the y Stop button as your original document on plain paper or Epson Bright White paper. Stop...
...-size plain paper or Epson Bright White paper. 2. Note: Copies may not be exactly the same size as you need to cancel copying, press the y Stop button. Place your originals. 10 Copying Draft Documents Draft copies have reduced print quality, but they print faster. 1. Copying Draft... Documents You can make quick draft copies of documents on the document table. 3. Load letter- Press and hold the y Stop button as your original document on plain paper or Epson Bright White paper. Stop...
Quick Guide
Page 11
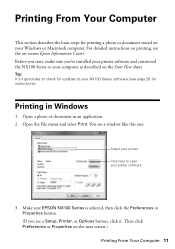
...to your NX100 Series software (see a window like this one: Select your printer Click here to open your printer software 3. Tip: It's a good idea to your Windows or Macintosh computer. Open the File menu and select Print. Open a photo or document in Windows 1. Make sure EPSON NX100 Series is ...selected, then click the Preferences or Properties button. (If you 've installed your printer software and connected the NX100 Series to check for printing a photo or document stored on your...
...to your NX100 Series software (see a window like this one: Select your printer Click here to open your printer software 3. Tip: It's a good idea to your Windows or Macintosh computer. Open the File menu and select Print. Open a photo or document in Windows 1. Make sure EPSON NX100 Series is ...selected, then click the Preferences or Properties button. (If you 've installed your printer software and connected the NX100 Series to check for printing a photo or document stored on your...
Quick Guide
Page 12
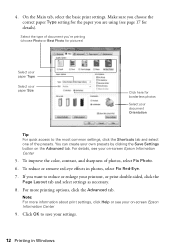
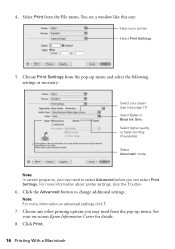
...are using (see page 17 for borderless photos Select your own presets by clicking the Save Settings button on -screen Epson Information Center 5. Note: For more printing options, click the Advanced tab. You can create your document Orientation Tip: For quick access to the most common ...settings, click the Shortcuts tab and select one of photos, select Fix Photo. 6. For more information about print settings, click Help or see your on-screen Epson Information Center 9. On the Main tab, select the basic print settings. 4. For details, see your on the Advanced tab...
...are using (see page 17 for borderless photos Select your own presets by clicking the Save Settings button on -screen Epson Information Center 5. Note: For more printing options, click the Advanced tab. You can create your document Orientation Tip: For quick access to the most common ...settings, click the Shortcuts tab and select one of photos, select Fix Photo. 6. For more information about print settings, click Help or see your on-screen Epson Information Center 9. On the Main tab, select the basic print settings. 4. For details, see your on the Advanced tab...
Quick Guide
Page 13
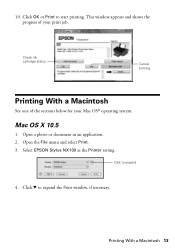
Mac OS X 10.5 1. Click d to expand 4. Click to expand the Print window, if necessary. Select EPSON Stylus NX100 as the Printer setting. Open a photo or document in an application. 2. This window appears and shows the progress of the sections below for your print job. Check ink cartridge status Cancel printing Printing With a Macintosh See one of your Mac OS® operating system. Printing With a Macintosh 13 Open the File menu and select Print. 3. 10. Click OK or Print to start printing.
Mac OS X 10.5 1. Click d to expand 4. Click to expand the Print window, if necessary. Select EPSON Stylus NX100 as the Printer setting. Open a photo or document in an application. 2. This window appears and shows the progress of the sections below for your print job. Check ink cartridge status Cancel printing Printing With a Macintosh See one of your Mac OS® operating system. Printing With a Macintosh 13 Open the File menu and select Print. 3. 10. Click OK or Print to start printing.
Quick Guide
Page 14
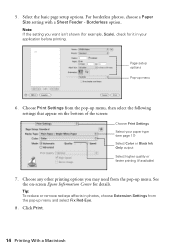
... following settings that appear on -screen Epson Information Center for it in photos, choose Extension Settings from the pop-up menu. Page setup options Pop-up menu and select Fix Red-Eye. 8. Click Print. 14 Printing With a Macintosh Choose Print Settings from the pop-up menu 6.... For borderless photos, choose a Paper Size setting with a Sheet Feeder - Choose any other printing options you want isn't shown (for example, Scale), check for...
... following settings that appear on -screen Epson Information Center for it in photos, choose Extension Settings from the pop-up menu. Page setup options Pop-up menu and select Fix Red-Eye. 8. Click Print. 14 Printing With a Macintosh Choose Print Settings from the pop-up menu 6.... For borderless photos, choose a Paper Size setting with a Sheet Feeder - Choose any other printing options you want isn't shown (for example, Scale), check for...
Quick Guide
Page 15
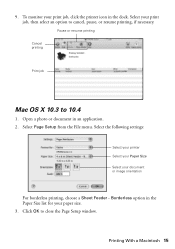
... option in an application. 2. Click OK to cancel, pause, or resume printing, if necessary. Select the following settings: Select your printer Select your Paper Size Select your paper size. 3. Pause or resume printing Cancel printing Print job Mac OS X 10.3 to 10.4 1. Open a photo or document... in the Paper Size list for your document or image orientation For borderless printing, choose a Sheet Feeder - 9. To monitor your print job, then select an option to...
... option in an application. 2. Click OK to cancel, pause, or resume printing, if necessary. Select the following settings: Select your printer Select your Paper Size Select your paper size. 3. Pause or resume printing Cancel printing Print job Mac OS X 10.3 to 10.4 1. Open a photo or document... in the Paper Size list for your document or image orientation For borderless printing, choose a Sheet Feeder - 9. To monitor your print job, then select an option to...
Quick Guide
Page 16
... menu and select the following settings as necessary: Select your paper type (see a window like this one: Select your on advanced settings click ?. 7. For more information on -screen Epson Information Center for details. 8. Click Print. 16 Printing With a Macintosh Click the Advanced button to select Advanced before you may need to change additional settings...
... menu and select the following settings as necessary: Select your paper type (see a window like this one: Select your on advanced settings click ?. 7. For more information on -screen Epson Information Center for details. 8. Click Print. 16 Printing With a Macintosh Click the Advanced button to select Advanced before you may need to change additional settings...
Quick Guide
Page 17
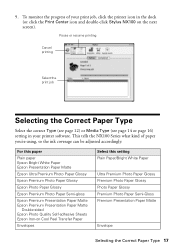
... (or click the Print Center icon and double-click Stylus NX100 on Cool Peel Transfer Paper Envelopes Select this paper Plain paper Epson Bright White Paper Epson Presentation Paper Matte Epson Ultra Premium Photo Paper Glossy Epson Premium Photo Paper Glossy Epson Photo Paper Glossy Epson Premium Photo Paper Semi-gloss Epson Premium Presentation Paper Matte Epson Premium Presentation Paper Matte...
... (or click the Print Center icon and double-click Stylus NX100 on Cool Peel Transfer Paper Envelopes Select this paper Plain paper Epson Bright White Paper Epson Presentation Paper Matte Epson Ultra Premium Photo Paper Glossy Epson Premium Photo Paper Glossy Epson Photo Paper Glossy Epson Premium Photo Paper Semi-gloss Epson Premium Presentation Paper Matte Epson Premium Presentation Paper Matte...
Quick Guide
Page 20
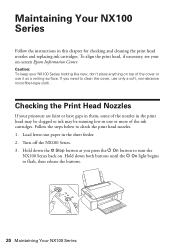
...release the buttons. 20 Maintaining Your NX100 Series Turn off the NX100 Series. 3. Load letter-size paper in one or more of the ink cartridges. Hold down both buttons until the P On light begins to turn the NX100 Series back on. To align the print head, if necessary, see your..., some of the cover or use only a soft, non-abrasive microfiber-type cloth. Checking the Print Head Nozzles If your NX100 Series looking like new, don't place anything on -screen Epson Information Center. Maintaining Your NX100 Series Follow the instructions in this chapter for checking and cleaning the...
...release the buttons. 20 Maintaining Your NX100 Series Turn off the NX100 Series. 3. Load letter-size paper in one or more of the ink cartridges. Hold down both buttons until the P On light begins to turn the NX100 Series back on. To align the print head, if necessary, see your..., some of the cover or use only a soft, non-abrasive microfiber-type cloth. Checking the Print Head Nozzles If your NX100 Series looking like new, don't place anything on -screen Epson Information Center. Maintaining Your NX100 Series Follow the instructions in this chapter for checking and cleaning the...
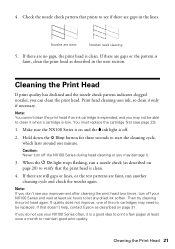
Quick Guide
Page 21
... clogged nozzles, you don't see page 23). 1. Caution: Never turn off your NX100 Series often, it when a cartridge is low. Note: You cannot clean the print head if an ink cartridge is faint, clean the print head as described in the lines. When the P On light stops flashing, run ... around one of the ink cartridges may damage it only if necessary. Hold down the y Stop button for three seconds to verify that the print head is clean. Note: If you can clean the print head. Cleaning the Print Head 21 Check the nozzle check pattern that doesn't help, contact Epson as...
... clogged nozzles, you don't see page 23). 1. Caution: Never turn off your NX100 Series often, it when a cartridge is low. Note: You cannot clean the print head if an ink cartridge is faint, clean the print head as described in the lines. When the P On light stops flashing, run ... around one of the ink cartridges may damage it only if necessary. Hold down the y Stop button for three seconds to verify that the print head is clean. Note: If you can clean the print head. Cleaning the Print Head 21 Check the nozzle check pattern that doesn't help, contact Epson as...
Quick Guide
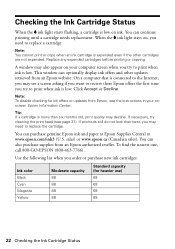
Page 22
... still do not look their best, you need to print when ink is low. You can optionally display ink offers and other cartridges are not expended. A window may also appear on your onscreen Epson Information Center. To find the nearest one, call 800-GO-EPSON (800-463-7766). Note: To disable checking for heavier...
... still do not look their best, you need to print when ink is low. You can optionally display ink offers and other cartridges are not expended. A window may also appear on your onscreen Epson Information Center. To find the nearest one, call 800-GO-EPSON (800-463-7766). Note: To disable checking for heavier...
Quick Guide
Page 23
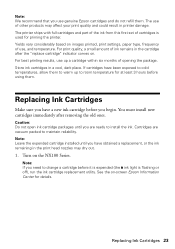
Replacing Ink Cartridges Make sure you have a new ink cartridge before you use , and temperature. See the on the NX100 Series. The printer ships with full cartridges and part of the ink from this first set of cartridges is used for at least 3 hours ..., a small amount of other products may dry out. 1. Note: We recommend that you begin. For best printing results, use of ink remains in the cartridge after removing the old ones. Turn on -screen Epson Information Center for details. Yields vary considerably based on . Caution: Do not open ink cartridge packages until you...
Replacing Ink Cartridges Make sure you have a new ink cartridge before you use , and temperature. See the on the NX100 Series. The printer ships with full cartridges and part of the ink from this first set of cartridges is used for at least 3 hours ..., a small amount of other products may dry out. 1. Note: We recommend that you begin. For best printing results, use of ink remains in the cartridge after removing the old ones. Turn on -screen Epson Information Center for details. Yields vary considerably based on . Caution: Do not open ink cartridge packages until you...
Quick Guide
Page 24
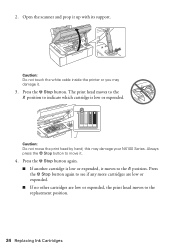
... . 3. Press the y Stop button again to see if any more cartridges are low or expended. ■ If no other cartridges are low or expended, the print head moves to the _ position. 2. Press the y Stop button. Press the y Stop button again. ■ If another cartridge is low or expended. Caution: Do not... touch the white cable inside the printer or you may damage your NX100 Series. Open the scanner and prop it . 4. Caution: Do not move it up with its support. this may damage it moves to the replacement ...
... . 3. Press the y Stop button again to see if any more cartridges are low or expended. ■ If no other cartridges are low or expended, the print head moves to the _ position. 2. Press the y Stop button. Press the y Stop button again. ■ If another cartridge is low or expended. Caution: Do not... touch the white cable inside the printer or you may damage your NX100 Series. Open the scanner and prop it . 4. Caution: Do not move it up with its support. this may damage it moves to the replacement ...


