Product Brochure
Page 2
... and all prints under glass; For maximum print life, display all rights in -one damage. Epson Stylus NX100 Print | Copy | Scan Printing Technology Nozzle Configuration Ink Palette Ink Cartridge Configuration Ink Type Fade Resistance / Print Longevity2 Minimum Ink Droplet Size Maximum Print Resolution Print Speed Scanner Type Photoelectric Device Optical Resolution Hardware Resolution Maximum Resolution...
... and all prints under glass; For maximum print life, display all rights in -one damage. Epson Stylus NX100 Print | Copy | Scan Printing Technology Nozzle Configuration Ink Palette Ink Cartridge Configuration Ink Type Fade Resistance / Print Longevity2 Minimum Ink Droplet Size Maximum Print Resolution Print Speed Scanner Type Photoelectric Device Optical Resolution Hardware Resolution Maximum Resolution...
Quick Guide
Page 24
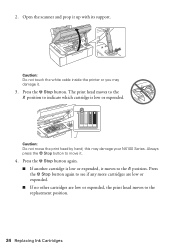
... position. 24 Replacing Ink Cartridges Caution: Do not move it . 3. Press the y Stop button again. ■ If another cartridge is low or expended. Open the scanner and prop it moves to move the print head by hand; Caution: Do not touch the white cable inside the printer or you may damage...
... position. 24 Replacing Ink Cartridges Caution: Do not move it . 3. Press the y Stop button again. ■ If another cartridge is low or expended. Open the scanner and prop it moves to move the print head by hand; Caution: Do not touch the white cable inside the printer or you may damage...
Quick Guide
Page 26
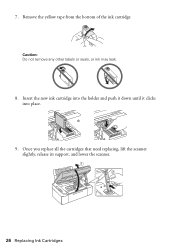
Remove the yellow tape from the bottom of the ink cartridge. Once you replace all the cartridges that need replacing, lift the scanner slightly, release its support, and lower the scanner. 26 Replacing Ink Cartridges Caution: Do not remove any other labels or seals, or ink may leak. 8. 7. Insert the new ink cartridge into the holder and push it down until it clicks into place. 9.
Remove the yellow tape from the bottom of the ink cartridge. Once you replace all the cartridges that need replacing, lift the scanner slightly, release its support, and lower the scanner. 26 Replacing Ink Cartridges Caution: Do not remove any other labels or seals, or ink may leak. 8. 7. Insert the new ink cartridge into the holder and push it down until it clicks into place. 9.
Quick Guide
Page 30
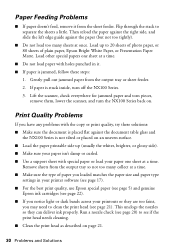
... against the paper (but not too tightly). ■ Do not load too many collect at a time. ■ Make sure the type of plain paper, Epson Bright White Paper, or Presentation Paper Matte. This unclogs the nozzles so they are too faint, you may need to see page 22). ■ If...paper or load your printouts or they can deliver ink properly. Load other special papers one sheet at once. Lift the scanner, check everywhere for jammed paper and torn pieces, remove them, lower the scanner, and turn off the NX100 Series. 3. Flip through the stack to 20 sheets of photo paper, or 80 sheets...
... against the paper (but not too tightly). ■ Do not load too many collect at a time. ■ Make sure the type of plain paper, Epson Bright White Paper, or Presentation Paper Matte. This unclogs the nozzles so they are too faint, you may need to see page 22). ■ If...paper or load your printouts or they can deliver ink properly. Load other special papers one sheet at once. Lift the scanner, check everywhere for jammed paper and torn pieces, remove them, lower the scanner, and turn off the NX100 Series. 3. Flip through the stack to 20 sheets of photo paper, or 80 sheets...
Quick Guide
Page 34
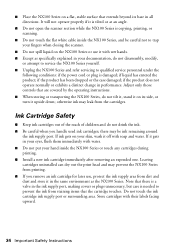
...or touch any cartridges during printing. ■ Install a new ink cartridge immediately after removing an expended one. Note that are covered by the operating instructions. ■ When storing or transporting the NX100 Series, do not drink the ink. ■ Be careful when you remove an ink cartridge for ...from dirt and dust and store it upside down; If it is tilted or at an angle. ■ Do not open the scanner section while the NX100 Series is needed to qualified service personnel under the following conditions: if the power cord or plug is damaged; Store cartridges with water...
...or touch any cartridges during printing. ■ Install a new ink cartridge immediately after removing an expended one. Note that are covered by the operating instructions. ■ When storing or transporting the NX100 Series, do not drink the ink. ■ Be careful when you remove an ink cartridge for ...from dirt and dust and store it upside down; If it is tilted or at an angle. ■ Do not open the scanner section while the NX100 Series is needed to qualified service personnel under the following conditions: if the power cord or plug is damaged; Store cartridges with water...
Start Here
Page 2
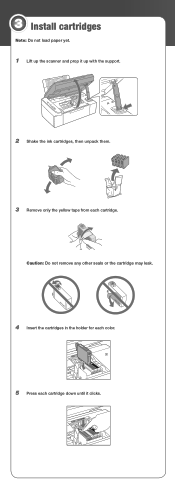
Caution: Do not remove any other seals or the cartridge may leak. 4 Insert the cartridges in the holder for each color. 5 Press each cartridge. 3 Install cartridges Note: Do not load paper yet. 1 Lift up with the support. 2 Shake the ink cartridges, then unpack them. 3 Remove only the yellow tape from each cartridge down until it up the scanner and prop it clicks.
Caution: Do not remove any other seals or the cartridge may leak. 4 Insert the cartridges in the holder for each color. 5 Press each cartridge. 3 Install cartridges Note: Do not load paper yet. 1 Lift up with the support. 2 Shake the ink cartridges, then unpack them. 3 Remove only the yellow tape from each cartridge down until it up the scanner and prop it clicks.
Start Here
Page 3
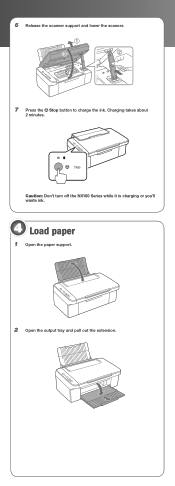
Stop Caution: Don't turn off the NX100 Series while it is charging or you'll waste ink. 4 Load paper 1 Open the paper support. 2 Open the output tray and pull out the extension. Charging takes about 2 minutes. 6 Release the scanner support and lower the scanner. 7 Press the Stop button to charge the ink.
Stop Caution: Don't turn off the NX100 Series while it is charging or you'll waste ink. 4 Load paper 1 Open the paper support. 2 Open the output tray and pull out the extension. Charging takes about 2 minutes. 6 Release the scanner support and lower the scanner. 7 Press the Stop button to charge the ink.


