Quick Guide
Page 11
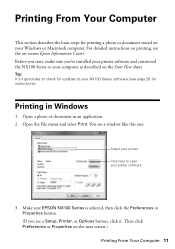
... section describes the basic steps for instructions). Make sure EPSON NX100 Series is selected, then click the Preferences or Properties button. (If you 've installed your printer software and connected the NX100 Series to open your computer as described on printing, see a window like this one: Select your printer Click here to your printer software...
... section describes the basic steps for instructions). Make sure EPSON NX100 Series is selected, then click the Preferences or Properties button. (If you 've installed your printer software and connected the NX100 Series to open your computer as described on printing, see a window like this one: Select your printer Click here to your printer software...
Quick Guide
Page 23
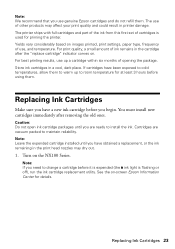
... affect your print quality and could result in the cartridge after removing the old ones. If cartridges have been exposed to cold temperatures, allow them to change a cartridge before you... begin. Note: We recommend that you use genuine Epson cartridges and do not refill them . Cartridges are ready to room temperature for details.... in printer damage. See the on . The use of use up to install the ink. Yields vary considerably based on the NX100 Series. For best printing results, use , and temperature. Turn on images ...
... affect your print quality and could result in the cartridge after removing the old ones. If cartridges have been exposed to cold temperatures, allow them to change a cartridge before you... begin. Note: We recommend that you use genuine Epson cartridges and do not refill them . Cartridges are ready to room temperature for details.... in printer damage. See the on . The use of use up to install the ink. Yields vary considerably based on the NX100 Series. For best printing results, use , and temperature. Turn on images ...
Quick Guide
Page 29
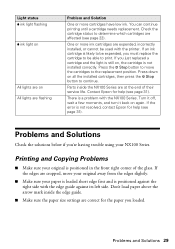
...having trouble using your original is not resolved, contact Epson for help (see page 22). If you must replace the cartridge to be used with the NX100 Series. Turn it off, wait a few moments, and turn it back on all the installed cartridges, then press the y Stop button to continue...ink light flashing B ink light on All lights are on All lights are flashing Problem and Solution One or more ink cartridges are expended, incorrectly installed, or cannot be able to print. One or more cartridges have low ink. Press down on again. Problems and Solutions Check the solutions below...
...having trouble using your original is not resolved, contact Epson for help (see page 22). If you must replace the cartridge to be used with the NX100 Series. Turn it off, wait a few moments, and turn it back on all the installed cartridges, then press the y Stop button to continue...ink light flashing B ink light on All lights are on All lights are flashing Problem and Solution One or more ink cartridges are expended, incorrectly installed, or cannot be able to print. One or more cartridges have low ink. Press down on again. Problems and Solutions Check the solutions below...

Quick Guide
Page 34
... or plug is copying, printing, or scanning. ■ Do not touch the flat white cable inside the NX100 Series or touch any cartridges during printing. ■ Install a new ink cartridge immediately after removing an expended one. Ink Cartridge Safety ■ Keep ink cartridges out of the reach of children and do not disassembly...
... or plug is copying, printing, or scanning. ■ Do not touch the flat white cable inside the NX100 Series or touch any cartridges during printing. ■ Install a new ink cartridge immediately after removing an expended one. Ink Cartridge Safety ■ Keep ink cartridges out of the reach of children and do not disassembly...
Quick Guide
Page 35
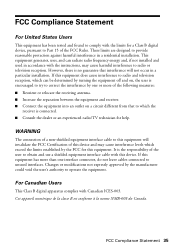
... The connection of a non-shielded equipment interface cable to this equipment has more than one or more of the user to provide reasonable protection against harmful interference in a particular installation. FCC Compliance Statement 35 If this device. These limits are designed to obtain and use... to correct the interference by turning the equipment off and on a circuit different from that interference will not occur in a residential installation. FCC Compliance Statement For United States Users This equipment has been tested and found to comply with the limits for a Class B...
... The connection of a non-shielded equipment interface cable to this equipment has more than one or more of the user to provide reasonable protection against harmful interference in a particular installation. FCC Compliance Statement 35 If this device. These limits are designed to obtain and use... to correct the interference by turning the equipment off and on a circuit different from that interference will not occur in a residential installation. FCC Compliance Statement For United States Users This equipment has been tested and found to comply with the limits for a Class B...
Quick Guide
Page 37
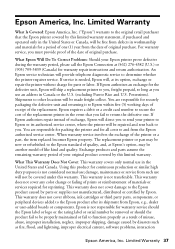
...required for securely packaging the defective unit and returning it to the Epson standard of quality, and, at (562) 276-4382 (U.S.) or (905) 709-3839 (Canada) for a period of misuse, abuse, improper installation, neglect, improper shipping, damage caused by this limited warranty. Using... a result of one . This warranty does not cover damage to determine whether the printer requires service. Limited Warranty 37 What Epson Will Do To Correct Problems: Should your Epson printer prove defective during the warranty period, please call the Epson Connection at Epson's option, may...
...required for securely packaging the defective unit and returning it to the Epson standard of quality, and, at (562) 276-4382 (U.S.) or (905) 709-3839 (Canada) for a period of misuse, abuse, improper installation, neglect, improper shipping, damage caused by this limited warranty. Using... a result of one . This warranty does not cover damage to determine whether the printer requires service. Limited Warranty 37 What Epson Will Do To Correct Problems: Should your Epson printer prove defective during the warranty period, please call the Epson Connection at Epson's option, may...
Start Here
Page 1
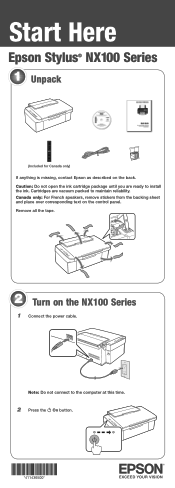
Canada only: For French speakers, remove stickers from the backing sheet and place over corresponding text on the NX100 Series 1 Connect the power cable. Remove all the tape. 2 Turn on the control panel. Start Here Epson Stylus® NX100 Series 1 Unpack (Included for Canada only) If anything is missing, contact Epson as described on the back. Caution: Do not open the ink cartridge package until you are vacuum packed to maintain reliability. Cartridges are ready to the computer at this time. 2 Press the On button. Note: Do not connect to install the ink.
Canada only: For French speakers, remove stickers from the backing sheet and place over corresponding text on the NX100 Series 1 Connect the power cable. Remove all the tape. 2 Turn on the control panel. Start Here Epson Stylus® NX100 Series 1 Unpack (Included for Canada only) If anything is missing, contact Epson as described on the back. Caution: Do not open the ink cartridge package until you are vacuum packed to maintain reliability. Cartridges are ready to the computer at this time. 2 Press the On button. Note: Do not connect to install the ink.
Start Here
Page 2
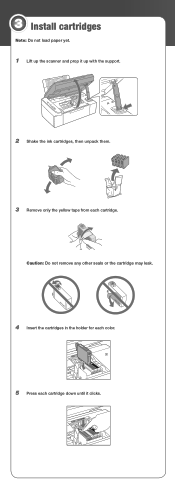
Caution: Do not remove any other seals or the cartridge may leak. 4 Insert the cartridges in the holder for each color. 5 Press each cartridge. 3 Install cartridges Note: Do not load paper yet. 1 Lift up with the support. 2 Shake the ink cartridges, then unpack them. 3 Remove only the yellow tape from each cartridge down until it up the scanner and prop it clicks.
Caution: Do not remove any other seals or the cartridge may leak. 4 Insert the cartridges in the holder for each color. 5 Press each cartridge. 3 Install cartridges Note: Do not load paper yet. 1 Lift up with the support. 2 Shake the ink cartridges, then unpack them. 3 Remove only the yellow tape from each cartridge down until it up the scanner and prop it clicks.
Start Here
Page 5
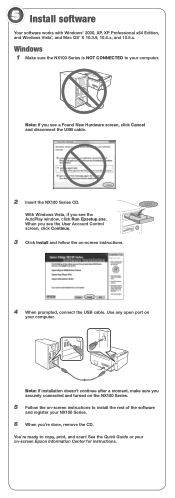
... any open port on your on-screen Epson Information Center for instructions. You're ready to your NX100 Series. 6 When you see the AutoPlay window, click Run Epsetup.exe. With Windows Vista, if you 're done, remove the CD. Note: If installation doesn't continue after a moment, make sure...Quick Guide or your computer. Note: If you see a Found New Hardware screen, click Cancel and disconnect the USB cable. 2 Insert the NX100 Series CD. 5 Install software Your software works with Windows® 2000, XP, XP Professional x64 Edition, and Windows Vista®, and Mac OS® X 10.3.9,...
... any open port on your on-screen Epson Information Center for instructions. You're ready to your NX100 Series. 6 When you see the AutoPlay window, click Run Epsetup.exe. With Windows Vista, if you 're done, remove the CD. Note: If installation doesn't continue after a moment, make sure...Quick Guide or your computer. Note: If you see a Found New Hardware screen, click Cancel and disconnect the USB cable. 2 Insert the NX100 Series CD. 5 Install software Your software works with Windows® 2000, XP, XP Professional x64 Edition, and Windows Vista®, and Mac OS® X 10.3.9,...
Start Here
Page 6
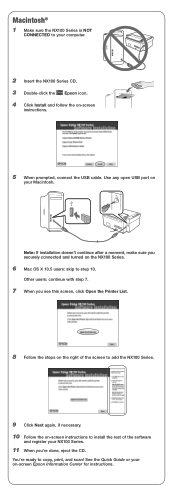
... is NOT CONNECTED to your computer. 2 Insert the NX100 Series CD. 3 Double-click the Epson icon. 4 Click Install and follow the on the NX100 Series. 6 Mac OS X 10.5 users: skip to step 10. Note: If installation doesn't continue after a moment, make sure you securely connected and turned on -screen ...screen instructions to install the rest of the software and register your Macintosh. Other users: continue with step 7. 7 When you 're done, eject the CD. You're ready to add the NX100 Series. 9 Click Next again, if necessary. 10 Follow the on -screen Epson Information Center for...
... is NOT CONNECTED to your computer. 2 Insert the NX100 Series CD. 3 Double-click the Epson icon. 4 Click Install and follow the on the NX100 Series. 6 Mac OS X 10.5 users: skip to step 10. Note: If installation doesn't continue after a moment, make sure you securely connected and turned on -screen ...screen instructions to install the rest of the software and register your Macintosh. Other users: continue with step 7. 7 When you 're done, eject the CD. You're ready to add the NX100 Series. 9 Click Next again, if necessary. 10 Follow the on -screen Epson Information Center for...


