

Product Information Guide
Page 1
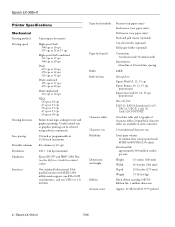
Epson LX-300+II LX-300+II Parts Printer cover Paper supports Edge guides Paper guide User Replaceable Parts User replaceable part Knob Logo plate Paper supports Paper eject assembly Printer cover assembly Sheet guide assembly Reference number 106 120 180 570 105 109 Part ...com (U.S. sales) or www.epson.ca (Canada sales). Additional Tractor Unit (C800301) Used in your printer. To find the nearest reseller, call 800-GO-EPSON (800-463-7766). Black Ribbon Cartridge (#8750) Expected ribbon life is approximately 3 million characters. 7/06 Epson LX-300+II - 1 Single-bin Cut-sheet...
Epson LX-300+II LX-300+II Parts Printer cover Paper supports Edge guides Paper guide User Replaceable Parts User replaceable part Knob Logo plate Paper supports Paper eject assembly Printer cover assembly Sheet guide assembly Reference number 106 120 180 570 105 109 Part ...com (U.S. sales) or www.epson.ca (Canada sales). Additional Tractor Unit (C800301) Used in your printer. To find the nearest reseller, call 800-GO-EPSON (800-463-7766). Black Ribbon Cartridge (#8750) Expected ribbon life is approximately 3 million characters. 7/06 Epson LX-300+II - 1 Single-bin Cut-sheet...
Product Information Guide
Page 2
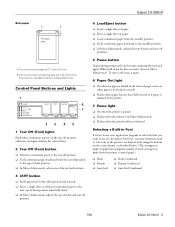
...Epson LX-300+II Printer Specifications Mechanical Printing method Printing speed Printing direction Line spacing Printable columns Resolution Emulation Interfaces 9-pin impact dot matrix High-speed draft 300 cps at 10 cpi 337 cps at 12 or 15 cpi High-speed draft condensed 321 cps at 17 cpi 300... available in 1/216-inch increments 80 columns (at 10 cpi) 240 × 144 dpi maximum Epson ESC/P® and IBM® 2380 Plus (see the Reference Guide for text and graphics printing....cartridge (#8750) Ribbon life: 3 million characters Approx. 49 dB (A) (ISO 7779 pattern) 2 - Epson LX-300+II 7/06
...Epson LX-300+II Printer Specifications Mechanical Printing method Printing speed Printing direction Line spacing Printable columns Resolution Emulation Interfaces 9-pin impact dot matrix High-speed draft 300 cps at 10 cpi 337 cps at 12 or 15 cpi High-speed draft condensed 321 cps at 17 cpi 300... available in 1/216-inch increments 80 columns (at 10 cpi) 240 × 144 dpi maximum Epson ESC/P® and IBM® 2380 Plus (see the Reference Guide for text and graphics printing....cartridge (#8750) Ribbon life: 3 million characters Approx. 49 dB (A) (ISO 7779 pattern) 2 - Epson LX-300+II 7/06
Product Information Guide
Page 5
.... ❏ In Micro Adjust mode, selects one of paper. ❏ Loads continuous paper from the printer's control panel.) ❏ Draft ❏ Roman ❏ Sans Serif ❏ Draft Condensed ❏ Roman Condensed ❏ Sans Serif Condensed 7/06 Epson LX-300+II - 5 However, you want to use your application program to select the font you may sometimes...
.... ❏ In Micro Adjust mode, selects one of paper. ❏ Loads continuous paper from the printer's control panel.) ❏ Draft ❏ Roman ❏ Sans Serif ❏ Draft Condensed ❏ Roman Condensed ❏ Sans Serif Condensed 7/06 Epson LX-300+II - 5 However, you want to use your application program to select the font you may sometimes...

Product Information Guide
Page 6
... recurs, contact your printed document at this position. n = on the printer again. The Pause light begins to resume printing. Your selection stays in the printer. then turn off your dealer. The printer feeds the paper to turn off the Pause light. Epson LX-300+II 7/06 Epson LX-300+II Follow these steps to use . Paper is not fed to the...
... recurs, contact your printed document at this position. n = on the printer again. The Pause light begins to resume printing. Your selection stays in the printer. then turn off your dealer. The printer feeds the paper to turn off the Pause light. Epson LX-300+II 7/06 Epson LX-300+II Follow these steps to use . Paper is not fed to the...

Product Information Guide
Page 7
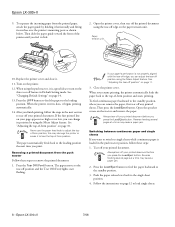
...release lever forward to the continuous paper position. 4. Move the paper support so it in place. The printer starts printing to the right of your paper, but do not lock it in place. 7/06 Epson LX-300+II - 7 Then open the sprocket covers and fit the first holes of the paper over the sprocket ...pins. 3. Slide the right sprocket to remove any slack in the paper and lock it . Epson LX-300+II Printing on Continuous Paper You can print on continuous paper using the tractor in either the push or pull position: ❏ Use the tractor in...
...release lever forward to the continuous paper position. 4. Move the paper support so it in place. The printer starts printing to the right of your paper, but do not lock it in place. 7/06 Epson LX-300+II - 7 Then open the sprocket covers and fit the first holes of the paper over the sprocket ...pins. 3. Slide the right sprocket to remove any slack in the paper and lock it . Epson LX-300+II Printing on Continuous Paper You can print on continuous paper using the tractor in either the push or pull position: ❏ Use the tractor in...
Product Information Guide
Page 8
...release lever back to adjust the topof-form position; Epson LX-300+II 7/06 Then slide the paper guide toward the front of -form position. Paper tension unit 10. Replace the printer cover and close it begins printing automatically. 14. When the printer receives data, it . 11. Never use the ...the paper guide by using the Micro Adjust feature. Always tear off position using the Micro Adjust feature. Epson LX-300+II 9. If the first printed line on page 14. 13. this may cause a paper jam. 2. When you can adjust the tear-off your printed document. Close the printer cover.
...release lever back to adjust the topof-form position; Epson LX-300+II 7/06 Then slide the paper guide toward the front of -form position. Paper tension unit 10. Replace the printer cover and close it begins printing automatically. 14. When the printer receives data, it . 11. Never use the ...the paper guide by using the Micro Adjust feature. Always tear off position using the Micro Adjust feature. Epson LX-300+II 9. If the first printed line on page 14. 13. this may cause a paper jam. 2. When you can adjust the tear-off your printed document. Close the printer cover.
Product Information Guide
Page 9
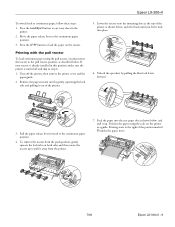
...Unlock the sprockets by gently squeezing the lock tabs and pulling it out of the printer. 5. Lower the tractor onto the mounting slots at the top of the position marked 0 (under the paper now). 7/06 Epson LX-300+II - 9 Position the paper using the pull tractor, you feel it lock into...FF button to the continuous paper position. 3. Press the Load/Eject button to step 6. 1. then remove the printer cover and the paper guide. 2. Feed the paper into place. 6. Epson LX-300+II To switch back to pull it away from the push position, gently squeeze the lock tabs on the tractor. ...
...Unlock the sprockets by gently squeezing the lock tabs and pulling it out of the printer. 5. Lower the tractor onto the mounting slots at the top of the position marked 0 (under the paper now). 7/06 Epson LX-300+II - 9 Position the paper using the pull tractor, you feel it lock into...FF button to the continuous paper position. 3. Press the Load/Eject button to step 6. 1. then remove the printer cover and the paper guide. 2. Feed the paper into place. 6. Epson LX-300+II To switch back to pull it away from the push position, gently squeeze the lock tabs on the tractor. ...

Product Information Guide
Page 10
Epson LX-300+II 8. When the printer receives data, it open. 13. Adjusting the top-of-form position If your printing appears too high or too low on the page, you can use the default position as the printer enters Micro Adjust mode. 4. Make sure the printer is turned on the printer. 14. Then slide ...Replace the printer cover but do not lock it horizontally and fit its pins are aligned with the holes in the paper and push the blue lock lever to remove any remaining slack by gently pulling the paper from the printed paper, attach the paper guide. Epson LX-300+II 7/06 this...
Epson LX-300+II 8. When the printer receives data, it open. 13. Adjusting the top-of-form position If your printing appears too high or too low on the page, you can use the default position as the printer enters Micro Adjust mode. 4. Make sure the printer is turned on the printer. 14. Then slide ...Replace the printer cover but do not lock it horizontally and fit its pins are aligned with the holes in the paper and push the blue lock lever to remove any remaining slack by gently pulling the paper from the printed paper, attach the paper guide. Epson LX-300+II 7/06 this...

Product Information Guide
Page 11
...Hold down the Pause button for instructions.) 7/06 Epson LX-300+II - 11 See "Restoring the printer's default settings" on page 14. Follow these limits, the printer beeps and stops moving the paper. 5. The printer beeps and the Pause light begins to restore the printer's default top-of-form position, you can use ...the Tear Off (Font) button. so you press the Tear Off (Font) button again, the printer feeds your software. If you try to the next top-of-form position. Epson LX-300+II Your top-of-form position setting remains in effect until you change it, even if you turn ...
...Hold down the Pause button for instructions.) 7/06 Epson LX-300+II - 11 See "Restoring the printer's default settings" on page 14. Follow these limits, the printer beeps and stops moving the paper. 5. The printer beeps and the Pause light begins to restore the printer's default top-of-form position, you can use ...the Tear Off (Font) button. so you press the Tear Off (Font) button again, the printer feeds your software. If you try to the next top-of-form position. Epson LX-300+II Your top-of-form position setting remains in effect until you change it, even if you turn ...
Product Information Guide
Page 12
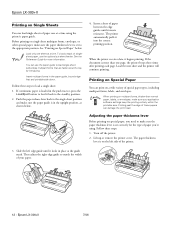
... of these papers can use the optional cut-sheet feeder. The printer automatically pulls it begins printing. Then adjust the right edge guide to the single-sheet position and make sure your paper. 12 - Epson LX-300+II Printing on a wide variety of special paper types, including multipart ...forms, labels, and envelopes. Before printing on multipart forms, thicker-than one sheet at the top by line gluing. Load only one page, the printer beeps three times after printing ...
... of these papers can use the optional cut-sheet feeder. The printer automatically pulls it begins printing. Then adjust the right edge guide to the single-sheet position and make sure your paper. 12 - Epson LX-300+II Printing on a wide variety of special paper types, including multipart ...forms, labels, and envelopes. Before printing on multipart forms, thicker-than one sheet at the top by line gluing. Load only one page, the printer beeps three times after printing ...
Product Information Guide
Page 13
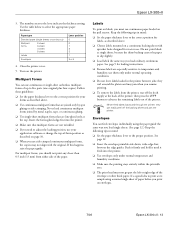
Epson LX-300+II 3. Multipart forms You can use continuous or single-sheet carbonless multipart forms of paper before you load ordinary continuous paper. If this happens, raise the ... other thick paper. Never feed labels backward through the printer; See page 12. ❏ Insert the envelope printable-side down, wide-edge-first, between jobs; Use the table below to slip slightly. ❏ Load labels the same way you print on envelopes. 7/06 Epson LX-300+II - 13 Follow these guidelines: ❏ Set the paper...
Epson LX-300+II 3. Multipart forms You can use continuous or single-sheet carbonless multipart forms of paper before you load ordinary continuous paper. If this happens, raise the ... other thick paper. Never feed labels backward through the printer; See page 12. ❏ Insert the envelope printable-side down, wide-edge-first, between jobs; Use the table below to slip slightly. ❏ Load labels the same way you print on envelopes. 7/06 Epson LX-300+II - 13 Follow these guidelines: ❏ Set the paper...

Product Information Guide
Page 14
... Off (Font) button to select the next setting you want to load a new sheet of all correct, turn off the printer to exit Default Setting mode. Epson LX-300+II 7/06 If you use single sheets, you'll need to change any settings, go to scroll through your application software or...for tractor Skip over perforation Auto tear-off . 2. Make sure paper is loaded and the printer is on the printer. When you finish making settings, turn off the printer to enter Default Setting mode. Epson LX-300+II Default Settings While you can select in this mode. (For more information, see the one ...
... Off (Font) button to select the next setting you want to load a new sheet of all correct, turn off the printer to exit Default Setting mode. Epson LX-300+II 7/06 If you use single sheets, you'll need to change any settings, go to scroll through your application software or...for tractor Skip over perforation Auto tear-off . 2. Make sure paper is loaded and the printer is on the printer. When you finish making settings, turn off the printer to enter Default Setting mode. Epson LX-300+II Default Settings While you can select in this mode. (For more information, see the one ...
Product Information Guide
Page 15
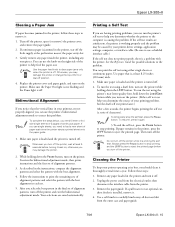
... the computer is working properly and the problem may damage the printer. 2. See the Reference Guide for possible solutions to carefully brush away all dust and dirt from the outer case and paper guide. 7/06 Epson LX-300+II - 15 To run the test using either single sheets or continuous ... button to eject the printed page. If the self test results are having printing problems, you should clean it off . Epson LX-300+II Clearing a Paper Jam If paper becomes jammed in the printer, follow these steps: 1. To complete the steps below, you need to clear paper jams only when the...
... the computer is working properly and the problem may damage the printer. 2. See the Reference Guide for possible solutions to carefully brush away all dust and dirt from the outer case and paper guide. 7/06 Epson LX-300+II - 15 To run the test using either single sheets or continuous ... button to eject the printed page. If the self test results are having printing problems, you should clean it off . Epson LX-300+II Clearing a Paper Jam If paper becomes jammed in the printer, follow these steps: 1. To complete the steps below, you need to clear paper jams only when the...

Product Information Guide
Page 16
... outer case or paper guide is turned off. 2. Related Documentation( Manual Epson LX-300+II User's Guide CD-ROM containing the on top of the printer firmly to remove the ribbon cartridge. You need to transport your printer is installed in place and flat on -screen Reference Guide Part number 4105348...head by the USB cable holder as the case. Epson LX-300+II 7/06 Make sure the print head is installed, remove it . 1. unsuitable lubricants can damage the printer components as well as the holder may be hot; Make sure the printer is still dirty, clean it with a soft, ...
... outer case or paper guide is turned off. 2. Related Documentation( Manual Epson LX-300+II User's Guide CD-ROM containing the on top of the printer firmly to remove the ribbon cartridge. You need to transport your printer is installed in place and flat on -screen Reference Guide Part number 4105348...head by the USB cable holder as the case. Epson LX-300+II 7/06 Make sure the print head is installed, remove it . 1. unsuitable lubricants can damage the printer components as well as the holder may be hot; Make sure the printer is still dirty, clean it with a soft, ...

Reference Guide
Page 2
...mechanical, photocopying, recording, or otherwise, without the prior written permission of this product, or (excluding the U.S.) failure to the purchaser of Epson America, Inc. Epson disclaims any form or by the purchaser or third parties as a result of: accident, misuse, or abuse of this product or unauthorized..., stored in a retrieval system, or transmitted in any and all rights in those designated as applied to other printers. No part of their respective owners. All rights reserved. 7/07 OSS Neither Seiko Epson Corporation nor its affiliates shall be trademarks of this...
...mechanical, photocopying, recording, or otherwise, without the prior written permission of this product, or (excluding the U.S.) failure to the purchaser of Epson America, Inc. Epson disclaims any form or by the purchaser or third parties as a result of: accident, misuse, or abuse of this product or unauthorized..., stored in a retrieval system, or transmitted in any and all rights in those designated as applied to other printers. No part of their respective owners. All rights reserved. 7/07 OSS Neither Seiko Epson Corporation nor its affiliates shall be trademarks of this...
Reference Guide
Page 3
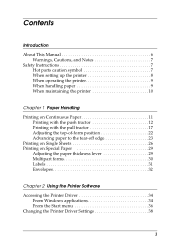
...About This Manual 6 Warnings, Cautions, and Notes 7 Safety Instructions 7 Hot parts caution symbol 7 When setting up the printer 8 When operating the printer 9 When handling paper 9 When maintaining the printer 10 Chapter 1 Paper Handling Printing on Continuous Paper 11 Printing with the push tractor 12 Printing with the pull tractor 17...Printing on Special Paper 29 Adjusting the paper thickness lever 29 Multipart forms 30 Labels 31 Envelopes 32 Chapter 2 Using the Printer Software Accessing the Printer Driver 34 From Windows applications 34 From the Start menu 36 Changing the...
...About This Manual 6 Warnings, Cautions, and Notes 7 Safety Instructions 7 Hot parts caution symbol 7 When setting up the printer 8 When operating the printer 9 When handling paper 9 When maintaining the printer 10 Chapter 1 Paper Handling Printing on Continuous Paper 11 Printing with the push tractor 12 Printing with the pull tractor 17...Printing on Special Paper 29 Adjusting the paper thickness lever 29 Multipart forms 30 Labels 31 Envelopes 32 Chapter 2 Using the Printer Software Accessing the Printer Driver 34 From Windows applications 34 From the Start menu 36 Changing the...

Reference Guide
Page 4
... Setting up EPSON Status Monitor 3 42 Accessing EPSON Status Monitor 3 43 Installing EPSON Status Monitor 3 44 Setting Up Your Printer on a Network 45 Setting up the printer server 45 Setting up the clients 49 Installing the printer driver from the CD-ROM 57 Canceling Printing 58 Uninstalling the Printer Software 59 Uninstalling the printer driver and EPSON Status Monitor...
... Setting up EPSON Status Monitor 3 42 Accessing EPSON Status Monitor 3 43 Installing EPSON Status Monitor 3 44 Setting Up Your Printer on a Network 45 Setting up the printer server 45 Setting up the clients 49 Installing the printer driver from the CD-ROM 57 Canceling Printing 58 Uninstalling the Printer Software 59 Uninstalling the printer driver and EPSON Status Monitor...
Reference Guide
Page 5
Chapter 5 Options and Consumables Cut-sheet Feeder 98 Optional Tractor 102 Roll Paper Holder 104 Replacing the Ribbon Cartridge 105 Chapter 6 Product Information Printer Parts 109 Specifications 111 Mechanical 111 Electronic 113 Electrical 115 Environmental 115 Paper 115 Printable area 119 Paper alignment 121 Command Lists 122 EPSON ESC/P control codes 122 IBM 2380 Plus emulation control codes 123 Standards and approvals 125 Safety approvals 125 CE marking 125 Index 126 5
Chapter 5 Options and Consumables Cut-sheet Feeder 98 Optional Tractor 102 Roll Paper Holder 104 Replacing the Ribbon Cartridge 105 Chapter 6 Product Information Printer Parts 109 Specifications 111 Mechanical 111 Electronic 113 Electrical 115 Environmental 115 Paper 115 Printable area 119 Paper alignment 121 Command Lists 122 EPSON ESC/P control codes 122 IBM 2380 Plus emulation control codes 123 Standards and approvals 125 Safety approvals 125 CE marking 125 Index 126 5
Reference Guide
Page 6
...includes basic maintenance procedures and solutions to suit your printer contains the printer driver for Microsoft® Windows® 98, Me, 2000, XP and NT 4.0, plus the EPSON Status Monitor 3 utility. Introduction Your Epson® LX-300+II printer provides high-quality printing and superior performance in a ...compact design. This 9-pin dot matrix printer provides: ❏ A variety of paper paths to possible ...
...includes basic maintenance procedures and solutions to suit your printer contains the printer driver for Microsoft® Windows® 98, Me, 2000, XP and NT 4.0, plus the EPSON Status Monitor 3 utility. Introduction Your Epson® LX-300+II printer provides high-quality printing and superior performance in a ...compact design. This 9-pin dot matrix printer provides: ❏ A variety of paper paths to possible ...
Reference Guide
Page 7
... damage to replace the ribbon cartridge. ❏ Chapter 6, "Product Information," contains technical information about the printer. Notes contain important information and useful tips on the printer. Let them . Warnings, Cautions, and Notes w Warnings must be hot. Never touch these safety instructions... before touching them cool for a few minutes before using the printer and follow all warnings and instructions marked on the operation of these parts just after the printer has been used. Introduction 7 Safety Instructions Read all of your equipment. ...
... damage to replace the ribbon cartridge. ❏ Chapter 6, "Product Information," contains technical information about the printer. Notes contain important information and useful tips on the printer. Let them . Warnings, Cautions, and Notes w Warnings must be hot. Never touch these safety instructions... before touching them cool for a few minutes before using the printer and follow all warnings and instructions marked on the operation of these parts just after the printer has been used. Introduction 7 Safety Instructions Read all of your equipment. ...


