

Product Information Guide
Page 1
... reduces the chance of ordinary single-sheet paper. To find the nearest reseller, call 800-GO-EPSON (800-463-7766). Additional Tractor Unit (C800301) Used in your printer. sales) or www.epson.ca (Canada sales). Epson LX-300+II LX-300+II Parts Printer cover Paper supports Edge guides Paper guide User Replaceable Parts User replaceable part Knob Logo plate Paper...
... reduces the chance of ordinary single-sheet paper. To find the nearest reseller, call 800-GO-EPSON (800-463-7766). Additional Tractor Unit (C800301) Used in your printer. sales) or www.epson.ca (Canada sales). Epson LX-300+II LX-300+II Parts Printer cover Paper supports Edge guides Paper guide User Replaceable Parts User replaceable part Knob Logo plate Paper...
Product Information Guide
Page 2
Epson LX-300+II Printer Specifications Mechanical Printing method Printing speed Printing direction Line spacing Printable columns Resolution Emulation Interfaces 9-pin impact dot matrix High-speed draft 300 cps at 10 cpi 337 cps at 12 or 15 cpi High-speed draft condensed 321 cps at 17 cpi 300...) Continuous 3 inches/second (76 mm/second) Intermittent 63ms/line at 20 cpi Bidirectional logic seeking for text and graphics printing. Epson LX-300+II 7/06 Unidirectional text or graphics printing can be selected using software commands. 1/6 inch or programmable in 1/216-inch increments 80 columns...
Epson LX-300+II Printer Specifications Mechanical Printing method Printing speed Printing direction Line spacing Printable columns Resolution Emulation Interfaces 9-pin impact dot matrix High-speed draft 300 cps at 10 cpi 337 cps at 12 or 15 cpi High-speed draft condensed 321 cps at 17 cpi 300...) Continuous 3 inches/second (76 mm/second) Intermittent 63ms/line at 20 cpi Bidirectional logic seeking for text and graphics printing. Epson LX-300+II 7/06 Unidirectional text or graphics printing can be selected using software commands. 1/6 inch or programmable in 1/216-inch increments 80 columns...

Product Information Guide
Page 3
... to 0.39 mm) Perforated edges (gathering area) up to 60% RH Do not load paper that has been folded or is damaged, wrinkled, or curled. Epson LX-300+II Electrical Input voltage range Rated frequency range Input frequency range Rated current Power consumption 120 V 220 to 240 V 99 to 132 V 198 to 264 V 50... only under normal temperature and humidity conditions, as follows: Temperature: 59 to 77 °F (15 to 25 °C) Humidity: 30 to 0.035 inch (0.9 mm) 7/06 Epson LX-300+II - 3
... to 0.39 mm) Perforated edges (gathering area) up to 60% RH Do not load paper that has been folded or is damaged, wrinkled, or curled. Epson LX-300+II Electrical Input voltage range Rated frequency range Input frequency range Rated current Power consumption 120 V 220 to 240 V 99 to 132 V 198 to 264 V 50... only under normal temperature and humidity conditions, as follows: Temperature: 59 to 77 °F (15 to 25 °C) Humidity: 30 to 0.035 inch (0.9 mm) 7/06 Epson LX-300+II - 3
Product Information Guide
Page 4
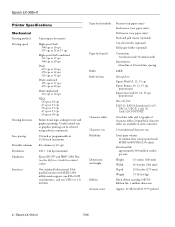
B The minimum left and right margins are 0.17 inch (4.2 mm). C The minimum bottom margin is 8 inches (203.2 mm). Epson LX-300+II 7/06 The maximum printable width is 0.17 inch (4.2 mm). Epson LX-300+II Weight (not multipart) 14 to 22 lb (52 to 82 g/m2) Weight (1 multipart sheet) 12 to 15 lb (40 to 58 g/m2) Binding Spot...
B The minimum left and right margins are 0.17 inch (4.2 mm). C The minimum bottom margin is 8 inches (203.2 mm). Epson LX-300+II 7/06 The maximum printable width is 0.17 inch (4.2 mm). Epson LX-300+II Weight (not multipart) 14 to 22 lb (52 to 82 g/m2) Weight (1 multipart sheet) 12 to 15 lb (40 to 58 g/m2) Binding Spot...
Product Information Guide
Page 5
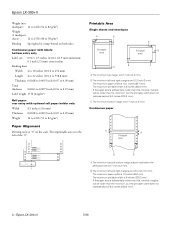
...to use in application programs usually override settings you make from the printer's control panel.) ❏ Draft ❏ Roman ❏ Sans Serif ❏ Draft Condensed ❏ Roman Condensed ❏ Sans Serif Condensed 7/06 Epson LX-300+II - 5 When held down for three seconds, turns on the control... However, you want to the standby position. ❏ In Micro Adjust mode, adjusts the top-of the printer's six built-in the tear-off , press it off position; Epson LX-300+II Roll paper A B Printable area A The minimum top margin is 8 inches (203.2 mm). B The minimum...
...to use in application programs usually override settings you make from the printer's control panel.) ❏ Draft ❏ Roman ❏ Sans Serif ❏ Draft Condensed ❏ Roman Condensed ❏ Sans Serif Condensed 7/06 Epson LX-300+II - 5 When held down for three seconds, turns on the control... However, you want to the standby position. ❏ In Micro Adjust mode, adjusts the top-of the printer's six built-in the tear-off , press it off position; Epson LX-300+II Roll paper A B Printable area A The minimum top margin is 8 inches (203.2 mm). B The minimum...

Product Information Guide
Page 6
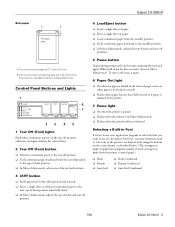
... short series of beeps (three beeps long series of beeps (five beeps) The printer beeps once if you press a control panel button when the corresponding function is jammed in effect until you want . Epson LX-300+II 7/06 Press the Tear Off (Font) button repeatedly to feed the paper out of... position. Error Indicators You can easily tear off the Pause light, if necessary. Epson LX-300+II Follow these steps to use the control panel to eject the sheet. Remove your dealer. the printer resumes printing automatically once the print head cools. If the error recurs, contact your...
... short series of beeps (three beeps long series of beeps (five beeps) The printer beeps once if you press a control panel button when the corresponding function is jammed in effect until you want . Epson LX-300+II 7/06 Press the Tear Off (Font) button repeatedly to feed the paper out of... position. Error Indicators You can easily tear off the Pause light, if necessary. Epson LX-300+II Follow these steps to use the control panel to eject the sheet. Remove your dealer. the printer resumes printing automatically once the print head cools. If the error recurs, contact your...

Product Information Guide
Page 7
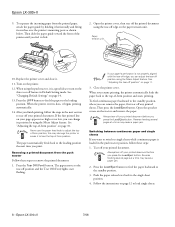
... or if you will feed in straight. 7. Stack your paper, but do not lock it in place. 7/06 Epson LX-300+II - 7 Make sure there are above the 0 mark on the printer scale (beneath the tractor). Close the covers. Push the lock lever back to remove any slack in the paper and...the right sprocket to match the width of your continuous paper behind the printer. Make sure your paper has a clean, straight, leading edge. Turn off continuous paper sheet-by pulling the blue lock levers forward. 8. Epson LX-300+II Printing on Continuous Paper You can print on continuous paper using the ...
... or if you will feed in straight. 7. Stack your paper, but do not lock it in place. 7/06 Epson LX-300+II - 7 Make sure there are above the 0 mark on the printer scale (beneath the tractor). Close the covers. Push the lock lever back to remove any slack in the paper and...the right sprocket to match the width of your continuous paper behind the printer. Make sure your paper has a clean, straight, leading edge. Turn off continuous paper sheet-by pulling the blue lock levers forward. 8. Epson LX-300+II Printing on Continuous Paper You can print on continuous paper using the ...
Product Information Guide
Page 8
...the tractor and remove the paper. If the first printed line on page 10. Epson LX-300+II 9. Turn on the paper tension unit. See "Adjusting the top-of the printer until you resume printing, the printer automatically feeds the paper back to lose the top-of -form position and starts ..., you can adjust the tear-off edge on the printer. 12. Close the printer cover. To feed continuous paper backward to the single sheet position. 4. Always tear off any printed sheets. Push the paper release lever back to the standby position, where you print. Epson LX-300+II 7/06
...the tractor and remove the paper. If the first printed line on page 10. Epson LX-300+II 9. Turn on the paper tension unit. See "Adjusting the top-of the printer until you resume printing, the printer automatically feeds the paper back to lose the top-of -form position and starts ..., you can adjust the tear-off edge on the printer. 12. Close the printer cover. To feed continuous paper backward to the single sheet position. 4. Always tear off any printed sheets. Push the paper release lever back to the standby position, where you print. Epson LX-300+II 7/06
Product Information Guide
Page 9
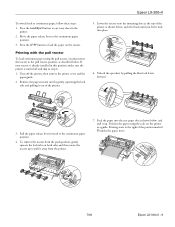
...6. If your tractor is turned off the printer; Lower the tractor onto the mounting slots at the top of the printer as a guide. Move the paper release lever to pull it out of the position marked 0 (under the paper now). 7/06 Epson LX-300+II - 9 Position the paper using the pull... 3. Press the LF/FF button to continuous paper, follow these steps: 1. Epson LX-300+II To switch back to load the paper on the tractor. Printing starts to the continuous paper position. 4. then remove the printer cover and the paper guide. 2. Pull the paper release lever forward to the...
...6. If your tractor is turned off the printer; Lower the tractor onto the mounting slots at the top of the printer as a guide. Move the paper release lever to pull it out of the position marked 0 (under the paper now). 7/06 Epson LX-300+II - 9 Position the paper using the pull... 3. Press the LF/FF button to continuous paper, follow these steps: 1. Epson LX-300+II To switch back to load the paper on the tractor. Printing starts to the continuous paper position. 4. then remove the printer cover and the paper guide. 2. Pull the paper release lever forward to the...

Product Information Guide
Page 10
...position lower on and paper is loaded. 2. When the printer receives data, it open. 13. Never use the default position as the printer enters Micro Adjust mode. 4. Set the Auto tear off the paper entering the printer; Epson LX-300+II 8. Open the sprocket covers. To eject the paper, tear...of -form position. 5. Hold it horizontally and fit its pins are aligned with the holes in place. The printer beeps and the Pause light starts flashing as a reference point when adjusting the top-of -form position, the printer beeps and stops moving the paper. Epson LX-300+II 7/06
...position lower on and paper is loaded. 2. When the printer receives data, it open. 13. Never use the default position as the printer enters Micro Adjust mode. 4. Set the Auto tear off the paper entering the printer; Epson LX-300+II 8. Open the sprocket covers. To eject the paper, tear...of -form position. 5. Hold it horizontally and fit its pins are aligned with the holes in place. The printer beeps and the Pause light starts flashing as a reference point when adjusting the top-of -form position, the printer beeps and stops moving the paper. Epson LX-300+II 7/06

Product Information Guide
Page 11
... your paper to the next top-of -form position and begins printing. Open the printer cover. 3. When you resume printing, the printer automatically feeds the paper back to the top-of -form position. Epson LX-300+II Your top-of-form position setting remains in effect until you change it, even if you ...turn off the printer. (If you want to restore the printer's default top-of-form position, you can reset the printer. If necessary, adjust the top-of data...
... your paper to the next top-of -form position and begins printing. Open the printer cover. 3. When you resume printing, the printer automatically feeds the paper back to the top-of -form position. Epson LX-300+II Your top-of-form position setting remains in effect until you change it, even if you ...turn off the printer. (If you want to restore the printer's default top-of-form position, you can reset the printer. If necessary, adjust the top-of data...
Product Information Guide
Page 12
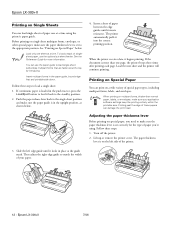
...Guide for the type of paper you need to the appropriate position. Follow these steps to the standby position. 2. Slide the left side of the printer. 3. Epson LX-300+II 7/06 Printing on Special Paper You can print on Special Paper" below . 4. If the document is loaded in the upright position, as shown... below . Then adjust the right edge guide to feed it locks in the paper guide, bound edge first and printable side down. Epson LX-300+II Printing on Single Sheets You can load single sheets of paper one at the guide mark. See "Printing on a wide variety of paper ...
...Guide for the type of paper you need to the appropriate position. Follow these steps to the standby position. 2. Slide the left side of the printer. 3. Epson LX-300+II 7/06 Printing on Special Paper You can print on Special Paper" below . 4. If the document is loaded in the upright position, as shown... below . Then adjust the right edge guide to feed it locks in the paper guide, bound edge first and printable side down. Epson LX-300+II Printing on Single Sheets You can load single sheets of paper one at the guide mark. See "Printing on a wide variety of paper ...
Product Information Guide
Page 13
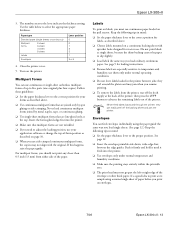
Epson LX-300+II 3. Multipart forms You can use continuous paper loaded on a continuous backing sheet with the... slightly. ❏ Load labels the same way you must not go past the left or right edge of the printer; See page 12. ❏ Insert the envelope printable-side down, wide-edge-first, between jobs; Never load ...crimped continuous multipart forms, the copies may jam when you print on the printer. The numbers next to select the appropriate paper thickness. Turn on envelopes. 7/06 Epson LX-300+II - 13 Envelopes You can easily peel off the fresh supply at the ...
Epson LX-300+II 3. Multipart forms You can use continuous paper loaded on a continuous backing sheet with the... slightly. ❏ Load labels the same way you must not go past the left or right edge of the printer; See page 12. ❏ Insert the envelope printable-side down, wide-edge-first, between jobs; Never load ...crimped continuous multipart forms, the copies may jam when you print on the printer. The numbers next to select the appropriate paper thickness. Turn on envelopes. 7/06 Epson LX-300+II - 13 Envelopes You can easily peel off the fresh supply at the ...

Product Information Guide
Page 14
... settings If you want to restore all the current settings. 5. If you want to change . 8. The printer prints instructions for selecting the language. Epson LX-300+II Default Settings While you can select in this mode. (For more information, see the one you want. Press the Tear ...set for the selected setting until the lights show the language you change a default setting from the printer's control panel using Default setting mode. If the settings are on .) 3. Epson LX-300+II 7/06 Hold down the Load/Eject, LF/FF, and Pause buttons while you turn off Auto line...
... settings If you want to restore all the current settings. 5. If you want to change . 8. The printer prints instructions for selecting the language. Epson LX-300+II Default Settings While you can select in this mode. (For more information, see the one you want. Press the Tear ...set for the selected setting until the lights show the language you change a default setting from the printer's control panel using Default setting mode. If the settings are on .) 3. Epson LX-300+II 7/06 Hold down the Load/Eject, LF/FF, and Pause buttons while you turn off Auto line...
Product Information Guide
Page 15
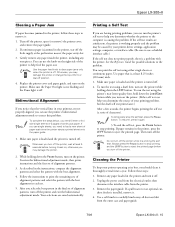
... from the outer case and paper guide. 7/06 Epson LX-300+II - 15 You can help you determine whether the printer or the computer is off the printer and exit the bidirectional adjustment mode. To run the test using the printer's near letter-quality font, hold down the Load...or interface cable. (Be sure to use the printer's bidirectional adjustment mode to remove it . 4. Epson LX-300+II Clearing a Paper Jam If paper becomes jammed in the printer, follow these steps: 1. Make sure paper is loaded and the printer is turned off the printer, wait at the perforation nearest the paper entry ...
... from the outer case and paper guide. 7/06 Epson LX-300+II - 15 You can help you determine whether the printer or the computer is off the printer and exit the bidirectional adjustment mode. To run the test using the printer's near letter-quality font, hold down the Load...or interface cable. (Be sure to use the printer's bidirectional adjustment mode to remove it . 4. Epson LX-300+II Clearing a Paper Jam If paper becomes jammed in the printer, follow these steps: 1. Make sure paper is loaded and the printer is turned off the printer, wait at the perforation nearest the paper entry ...

Product Information Guide
Page 16
... it . 1. then disconnect the interface cable from the electrical outlet; Epson LX-300+II 7/06 Never use a hard or abrasive brush. Hold the bottom left and right sides of the printer to transport your printer is installed, remove it using the original box and packing materials or ...21412 3101470-00/CPD-21416 Transporting the Printer If you have just used the printer, the print head may detach and cause the printer to remove the ribbon cartridge. Keep the printer cover in water. Related Documentation( Manual Epson LX-300+II User's Guide CD-ROM containing the ...
... it . 1. then disconnect the interface cable from the electrical outlet; Epson LX-300+II 7/06 Never use a hard or abrasive brush. Hold the bottom left and right sides of the printer to transport your printer is installed, remove it using the original box and packing materials or ...21412 3101470-00/CPD-21416 Transporting the Printer If you have just used the printer, the print head may detach and cause the printer to remove the ribbon cartridge. Keep the printer cover in water. Related Documentation( Manual Epson LX-300+II User's Guide CD-ROM containing the ...
Reference Guide
Page 6
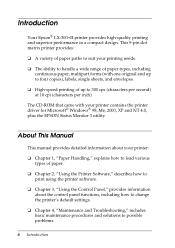
...and Troubleshooting," includes basic maintenance procedures and solutions to 300 cps (characters per second) at 10 cpi (characters per inch). This 9-pin dot matrix printer provides: ❏ A variety of paper paths to suit your printer: ❏ Chapter 1, "Paper Handling," explains ...types, including continuous paper, multipart forms (with your printer contains the printer driver for Microsoft® Windows® 98, Me, 2000, XP and NT 4.0, plus the EPSON Status Monitor 3 utility. Introduction Your Epson® LX-300+II printer provides high-quality printing and superior performance in a ...
...and Troubleshooting," includes basic maintenance procedures and solutions to 300 cps (characters per second) at 10 cpi (characters per inch). This 9-pin dot matrix printer provides: ❏ A variety of paper paths to suit your printer: ❏ Chapter 1, "Paper Handling," explains ...types, including continuous paper, multipart forms (with your printer contains the printer driver for Microsoft® Windows® 98, Me, 2000, XP and NT 4.0, plus the EPSON Status Monitor 3 utility. Introduction Your Epson® LX-300+II printer provides high-quality printing and superior performance in a ...
Reference Guide
Page 29
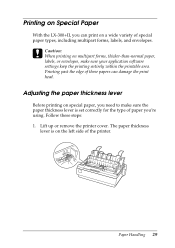
Printing on Special Paper With the LX-300+II, you can print on a wide variety of these steps: 1. Paper Handling 29 Lift up or remove the printer cover. c Caution: When printing on multipart forms, thicker-than-normal paper, labels, or envelopes, make sure the paper thickness lever is on special paper, you '... sure your application software settings keep the printing entirely within the printable area. The paper thickness lever is set correctly for the type of the printer. Follow these papers can damage the print head.
Printing on Special Paper With the LX-300+II, you can print on a wide variety of these steps: 1. Paper Handling 29 Lift up or remove the printer cover. c Caution: When printing on multipart forms, thicker-than-normal paper, labels, or envelopes, make sure the paper thickness lever is on special paper, you '... sure your application software settings keep the printing entirely within the printable area. The paper thickness lever is set correctly for the type of the printer. Follow these papers can damage the print head.
Reference Guide
Page 40
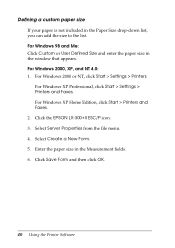
... appears. Select Create a New Form. 5. Click Save Form and then click OK. 40 Using the Printer Software Click the EPSON LX-300+II ESC/P icon. 3. For Windows 2000, XP, and NT 4.0: 1. For Windows 2000 or NT, click Start > Settings > Printers. For Windows 98 and Me: Click Custom or User Defined Size and enter the paper size...
... appears. Select Create a New Form. 5. Click Save Form and then click OK. 40 Using the Printer Software Click the EPSON LX-300+II ESC/P icon. 3. For Windows 2000, XP, and NT 4.0: 1. For Windows 2000 or NT, click Start > Settings > Printers. For Windows 98 and Me: Click Custom or User Defined Size and enter the paper size...
Reference Guide
Page 44
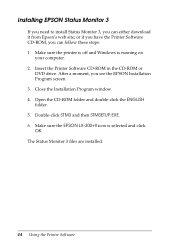
Close the Installation Program window. 4. The Status Monitor 3 files are installed. 44 Using the Printer Software Make sure the printer is off and Windows is selected and click OK. After a moment, you can follow these steps: 1. Make sure the EPSON LX-300+II icon is running on your computer. 2. Open the CD-ROM folder and double-click...
Close the Installation Program window. 4. The Status Monitor 3 files are installed. 44 Using the Printer Software Make sure the printer is off and Windows is selected and click OK. After a moment, you can follow these steps: 1. Make sure the EPSON LX-300+II icon is running on your computer. 2. Open the CD-ROM folder and double-click...


