
Product Information Guide
Page 13
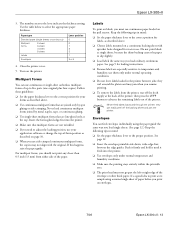
... jam when you print on the pull tractor. Never feed labels backward through the printer; Push it firmly and hold it until it feeds into the printer. ❏ Make sure that multipart forms are especially sensitive to five parts (one original plus four copies). Epson LX-300+II 3. The numbers ... or continuous gluing. ❏ Use single-sheet multipart forms that are line-glued only at the back of the printer; Use the table below to print a test sample using the paper guide the same way you load ordinary continuous paper. Turn on a continuous backing sheet with the...
... jam when you print on the pull tractor. Never feed labels backward through the printer; Push it firmly and hold it until it feeds into the printer. ❏ Make sure that multipart forms are especially sensitive to five parts (one original plus four copies). Epson LX-300+II 3. The numbers ... or continuous gluing. ❏ Use single-sheet multipart forms that are line-glued only at the back of the printer; Use the table below to print a test sample using the paper guide the same way you load ordinary continuous paper. Turn on a continuous backing sheet with the...
Product Information Guide
Page 15
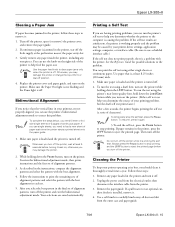
... mm) wide. 1. Remove any torn pieces. Unplug the power cord from the outer case and paper guide. 7/06 Epson LX-300+II - 15 You can use the printer's bidirectional adjustment mode to the problem. If the self test results are having printing problems, you can help feed the paper out. To resume, press it back on the...
... mm) wide. 1. Remove any torn pieces. Unplug the power cord from the outer case and paper guide. 7/06 Epson LX-300+II - 15 You can use the printer's bidirectional adjustment mode to the problem. If the self test results are having printing problems, you can help feed the paper out. To resume, press it back on the...

Reference Guide
Page 4
... EPSON Status Monitor 3 41 Setting up EPSON Status Monitor 3 42 Accessing EPSON Status Monitor 3 43 Installing EPSON Status Monitor 3 44 Setting Up Your Printer on a Network 45 Setting up the printer server 45 Setting up the clients 49 Installing the printer driver from the CD-ROM 57 Canceling Printing 58 Uninstalling the Printer Software 59 Uninstalling the printer driver and EPSON...
... EPSON Status Monitor 3 41 Setting up EPSON Status Monitor 3 42 Accessing EPSON Status Monitor 3 43 Installing EPSON Status Monitor 3 44 Setting Up Your Printer on a Network 45 Setting up the printer server 45 Setting up the clients 49 Installing the printer driver from the CD-ROM 57 Canceling Printing 58 Uninstalling the Printer Software 59 Uninstalling the printer driver and EPSON...
Reference Guide
Page 9
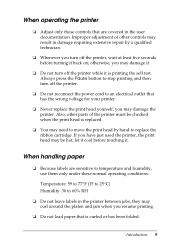
...; Do not load paper that is replaced. ❏ You may need to move the print head by a qualified technician. ❏ Whenever you may damage the printer. If you may damage it is printing the self test. When handling paper ❏ Because labels are covered in the user documentation. Always press the Pause button to...
...; Do not load paper that is replaced. ❏ You may need to move the print head by a qualified technician. ❏ Whenever you may damage the printer. If you may damage it is printing the self test. When handling paper ❏ Because labels are covered in the user documentation. Always press the Pause button to...

Reference Guide
Page 32
... in mind: ❏ Set the paper thickness lever to print a test page using the paper guide. Insert the wide edge of the printer. then press the LF/FF button to advance the remaining labels out of the envelope into the printer. ❏ Use envelopes only under normal temperature and humidity... conditions. ❏ Make sure the printing stays entirely within the printable area. ❏ The print head must not go past the left or right edge of ...
... in mind: ❏ Set the paper thickness lever to print a test page using the paper guide. Insert the wide edge of the printer. then press the LF/FF button to advance the remaining labels out of the envelope into the printer. ❏ Use envelopes only under normal temperature and humidity... conditions. ❏ Make sure the printing stays entirely within the printable area. ❏ The print head must not go past the left or right edge of ...

Reference Guide
Page 76
... 5. Troubleshooting You can solve most printing problems by checking for the solutions in their original boxes. 6. It explains: ❏ How to get help if you need assistance from Epson (page 96) 76 Maintenance and Troubleshooting Repack the printer and all the other items in ... ❏ Problems and solutions (page 79) ❏ Clearing paper jams (page 93) ❏ Printing a self test (page 94) ❏ Where to read the control panel lights that comes with your printer is installed in the printer's original box. Make sure the print head is installed, remove it. 4.
... 5. Troubleshooting You can solve most printing problems by checking for the solutions in their original boxes. 6. It explains: ❏ How to get help if you need assistance from Epson (page 96) 76 Maintenance and Troubleshooting Repack the printer and all the other items in ... ❏ Problems and solutions (page 79) ❏ Clearing paper jams (page 93) ❏ Printing a self test (page 94) ❏ Where to read the control panel lights that comes with your printer is installed in the printer's original box. Make sure the print head is installed, remove it. 4.

Reference Guide
Page 79
Next, hold down the Load/Eject and LF/FF buttons while you may encounter while operating your printer have simple solutions. To print a hex dump, turn on the printer. If the self test does not work, see "Where To Get Help" on . Cause What to do not come on page 96. If the electrical outlet...
Next, hold down the Load/Eject and LF/FF buttons while you may encounter while operating your printer have simple solutions. To print a hex dump, turn on the printer. If the self test does not work, see "Where To Get Help" on . Cause What to do not come on page 96. If the electrical outlet...
Reference Guide
Page 94
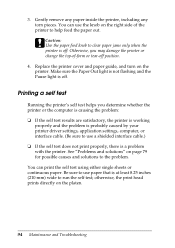
... for possible causes and solutions to the problem. Printing a self test Running the printer's self test helps you may damage the printer or change the top-of the printer to use paper that is a problem with the printer. See "Problems and solutions" on the printer. Otherwise, you determine whether the printer or the computer is causing the problem: ❏...
... for possible causes and solutions to the problem. Printing a self test Running the printer's self test helps you may damage the printer or change the top-of the printer to use paper that is a problem with the printer. See "Problems and solutions" on the printer. Otherwise, you determine whether the printer or the computer is causing the problem: ❏...

Reference Guide
Page 95
... continuous or single-sheet paper in the printer, press the LF/FF button to eject the printed page before turning it is held. If paper remains in the printer. 2. Follow these steps to the correct position. To resume printing, press the Pause button again. 4. The self test is printed in Draft characters when the LF/FF...
... continuous or single-sheet paper in the printer, press the LF/FF button to eject the printed page before turning it is held. If paper remains in the printer. 2. Follow these steps to the correct position. To resume printing, press the Pause button again. 4. The self test is printed in Draft characters when the LF/FF...
Reference Guide
Page 128
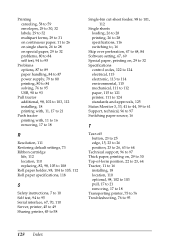
... to 84 solving, 76 to 95 USB, 90 to 93 Pull tractor additional, 98, 102 to 103, 112 installing, 18 printing with, 11, 17 to 21 Push tractor printing with, 11 to 16 removing, 17 to 18 R Resolution, 111 Restoring default settings, 73 Ribbon cartridge life, 112 location, 110 replacing, 82, 98... to 108 Roll paper holder, 98, 104 to 105, 112 Roll paper specifications, 118 S Safety instructions, 7 to 10 Self test, 94 to 95 Serial interface, 67, 70, 110 Server, printer, 45 to 49 Sharing printer, 45 to 58 Single-bin cut-sheet feeder, 98 to 101, 112 Single sheets loading, 26 to 28...
... to 84 solving, 76 to 95 USB, 90 to 93 Pull tractor additional, 98, 102 to 103, 112 installing, 18 printing with, 11, 17 to 21 Push tractor printing with, 11 to 16 removing, 17 to 18 R Resolution, 111 Restoring default settings, 73 Ribbon cartridge life, 112 location, 110 replacing, 82, 98... to 108 Roll paper holder, 98, 104 to 105, 112 Roll paper specifications, 118 S Safety instructions, 7 to 10 Self test, 94 to 95 Serial interface, 67, 70, 110 Server, printer, 45 to 49 Sharing printer, 45 to 58 Single-bin cut-sheet feeder, 98 to 101, 112 Single sheets loading, 26 to 28...
User's Guide
Page 4
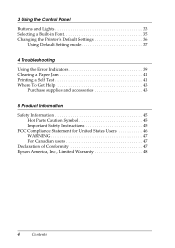
3 Using the Control Panel Buttons and Lights 33 Selecting a Built-in Font 35 Changing the Printer's Default Settings 36 Using Default Setting mode 37 4 Troubleshooting Using the Error Indicators 39 Clearing a Paper Jam 41 Printing a Self Test 41 Where To Get Help 43 Purchase supplies and accessories 43 5 Product Information Safety Information 45 Hot Parts Caution Symbol 45 Important Safety Instructions 45 FCC Compliance Statement for United States Users 46 WARNING 47 For Canadian users 47 Declaration of Conformity 47 Epson America, Inc., Limited Warranty 48 4 Contents
3 Using the Control Panel Buttons and Lights 33 Selecting a Built-in Font 35 Changing the Printer's Default Settings 36 Using Default Setting mode 37 4 Troubleshooting Using the Error Indicators 39 Clearing a Paper Jam 41 Printing a Self Test 41 Where To Get Help 43 Purchase supplies and accessories 43 5 Product Information Safety Information 45 Hot Parts Caution Symbol 45 Important Safety Instructions 45 FCC Compliance Statement for United States Users 46 WARNING 47 For Canadian users 47 Declaration of Conformity 47 Epson America, Inc., Limited Warranty 48 4 Contents

User's Guide
Page 31
..., follow the steps on page 27 for tractor use continuous paper loaded on the pull tractor. Labels To print on labels, you print on envelopes. Keep the following tips in the printer between the edge guides. It's a good idea to slip slightly. ❏ Load labels the same way... you resume printing. ❏ To remove the labels from the printer, tear off the backing sheet and jam the printer. Do not print labels as single sheets, because the shiny backing causes the paper to print a test sample using the paper guide. they can feed envelopes...
..., follow the steps on page 27 for tractor use continuous paper loaded on the pull tractor. Labels To print on labels, you print on envelopes. Keep the following tips in the printer between the edge guides. It's a good idea to slip slightly. ❏ Load labels the same way... you resume printing. ❏ To remove the labels from the printer, tear off the backing sheet and jam the printer. Do not print labels as single sheets, because the shiny backing causes the paper to print a test sample using the paper guide. they can feed envelopes...
User's Guide
Page 39
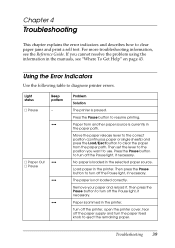
... currently in the printer. Remove your paper and reload it. Chapter 4 Troubleshooting This chapter explains the error indicators and describes how to use. For more troubleshooting information, see "Where To Get Help" on page 43. If you want to clear paper jams and print a self test. Using the Error... Indicators Use the following table to eject the remaining paper. Turn off the printer, open the printer cover, tear off the paper supply and turn off the Pause light, if necessary....
... currently in the printer. Remove your paper and reload it. Chapter 4 Troubleshooting This chapter explains the error indicators and describes how to use. For more troubleshooting information, see "Where To Get Help" on page 43. If you want to clear paper jams and print a self test. Using the Error... Indicators Use the following table to eject the remaining paper. Turn off the printer, open the printer cover, tear off the paper supply and turn off the Pause light, if necessary....

User's Guide
Page 41
... right side of -form or tear-off position. 4. Gently remove any paper inside the printer, including any torn pieces. You can print the self test using either single sheets or continuous paper. Printing a Self Test If you can run the printer's self test to help feed the paper out. Troubleshooting 41 c Caution: Use the paper feed knob...
... right side of -form or tear-off position. 4. Gently remove any paper inside the printer, including any torn pieces. You can print the self test using either single sheets or continuous paper. Printing a Self Test If you can run the printer's self test to help feed the paper out. Troubleshooting 41 c Caution: Use the paper feed knob...

User's Guide
Page 42
... before you determine the source of your printing problem, but the draft self test prints faster.) After a few seconds, the printer begins printing the self test (a series of characters). Always press the Pause button to stop printing and the LF/FF button to eject the printed page. Note: To temporarily stop printing. To resume, press the Pause button again...
... before you determine the source of your printing problem, but the draft self test prints faster.) After a few seconds, the printer begins printing the self test (a series of characters). Always press the Pause button to stop printing and the LF/FF button to eject the printed page. Note: To temporarily stop printing. To resume, press the Pause button again...


