
Product Information Guide
Page 2
Epson LX-300+II Printer Specifications Mechanical Printing method Printing speed Printing direction Line spacing Printable columns Resolution Emulation Interfaces 9-pin impact dot matrix High-speed draft 300 cps at 10 cpi 337 cps at 12 or 15 cpi High-speed draft condensed 321 cps at 17 cpi 300 cps at 20...232D serial interface, and one USB (ver 1.1) interface Paper feed methods Paper feed speed Buffer Built-in some countries) 13 international character sets Total print volume 12 million lines (except print head) MTBF 6,000 POH (25% duty) Print head life approximately 400 million strokes ...
Epson LX-300+II Printer Specifications Mechanical Printing method Printing speed Printing direction Line spacing Printable columns Resolution Emulation Interfaces 9-pin impact dot matrix High-speed draft 300 cps at 10 cpi 337 cps at 12 or 15 cpi High-speed draft condensed 321 cps at 17 cpi 300 cps at 20...232D serial interface, and one USB (ver 1.1) interface Paper feed methods Paper feed speed Buffer Built-in some countries) 13 international character sets Total print volume 12 million lines (except print head) MTBF 6,000 POH (25% duty) Print head life approximately 400 million strokes ...
Product Information Guide
Page 5
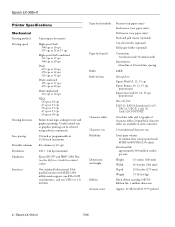
... Condensed ❏ Roman Condensed ❏ Sans Serif Condensed 7/06 Epson LX-300+II - 5 When held down for three seconds, turns on the control panel, as described below. (The settings you make from the standby position. ❏ Feeds continuous paper backward to the next top-of the printer's six built-in fonts using the buttons on Micro...
... Condensed ❏ Roman Condensed ❏ Sans Serif Condensed 7/06 Epson LX-300+II - 5 When held down for three seconds, turns on the control panel, as described below. (The settings you make from the standby position. ❏ Feeds continuous paper backward to the next top-of the printer's six built-in fonts using the buttons on Micro...

Product Information Guide
Page 6
...off your paper and reload it off the Pause light. You can identify many printer problems using the lights on the control panel indicate the font you change it again. Epson LX-300+II 7/06 The paper is on the page. Remove your printed document at the ... short series of beeps (three beeps long series of -form position Tear-off the printer and leave it . Standby Position Continuous paper is not available. Your selection stays in the printer. Then set the lever to the position you press a control panel button when the corresponding function ...
...off your paper and reload it off the Pause light. You can identify many printer problems using the lights on the control panel indicate the font you change it again. Epson LX-300+II 7/06 The paper is on the page. Remove your printed document at the ... short series of beeps (three beeps long series of -form position Tear-off the printer and leave it . Standby Position Continuous paper is not available. Your selection stays in the printer. Then set the lever to the position you press a control panel button when the corresponding function ...
Product Information Guide
Page 8
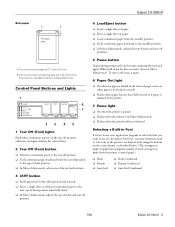
...automatically. 14. See "Changing Default Settings" on the tractor and remove the paper. this may cause a paper jam. 2. Press the Tear Off (Font) button. Open the sprocket covers on page 14. 13. Follow the instructions on the printer. 12. Epson LX-300+II 7/06 The paper automatically feeds ...back to the tear-off your printed document. The paper moves to the loading position the next time you feel it horizontally and fitting its notches over the printer's mounting posts as shown ...
...automatically. 14. See "Changing Default Settings" on the tractor and remove the paper. this may cause a paper jam. 2. Press the Tear Off (Font) button. Open the sprocket covers on page 14. 13. Follow the instructions on the printer. 12. Epson LX-300+II 7/06 The paper automatically feeds ...back to the tear-off your printed document. The paper moves to the loading position the next time you feel it horizontally and fitting its notches over the printer's mounting posts as shown ...

Product Information Guide
Page 10
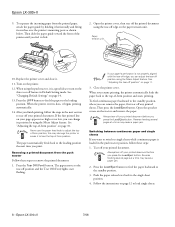
.... this may jam. (See page 14 for about three seconds. Hold down the Pause button for more information.) The printer has a minimum and a maximum topof-form position. If you set the top-of -form position lower on the page, or press the Load/Eject U button to move the top-of... the paper briefly. Then slide the paper guide toward the back of -form position. 5. Then slide the right sprocket to Off; Epson LX-300+II 7/06 Make sure the printer is turned on the printer. 14. then press the LF/FF button to adjust the paper position. otherwise, the paper may damage the...
.... this may jam. (See page 14 for about three seconds. Hold down the Pause button for more information.) The printer has a minimum and a maximum topof-form position. If you set the top-of -form position lower on the page, or press the Load/Eject U button to move the top-of... the paper briefly. Then slide the paper guide toward the back of -form position. 5. Then slide the right sprocket to Off; Epson LX-300+II 7/06 Make sure the printer is turned on the printer. 14. then press the LF/FF button to adjust the paper position. otherwise, the paper may damage the...

Product Information Guide
Page 11
...is at the current tear-off edge on the paper tension unit. The printer beeps and the Pause light begins to the top-of-form position; Tear-off position. 2. Epson LX-300+II Your top-of-form position setting remains in effect until you change it receives a full page of data... Tear Off (Font) button. When Auto tear off the printer. For instructions, see "Default Settings" on page 14 for instructions.) 7/06 Epson LX-300+II - 11 If you make with the tear-off position: 1. Tear off edge. The top margin setting made in some software applications overrides the top-of -form ...
...is at the current tear-off edge on the paper tension unit. The printer beeps and the Pause light begins to the top-of-form position; Tear-off position. 2. Epson LX-300+II Your top-of-form position setting remains in effect until you change it receives a full page of data... Tear Off (Font) button. When Auto tear off the printer. For instructions, see "Default Settings" on page 14 for instructions.) 7/06 Epson LX-300+II - 11 If you make with the tear-off position: 1. Tear off edge. The top margin setting made in some software applications overrides the top-of -form ...
Product Information Guide
Page 12
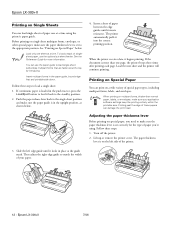
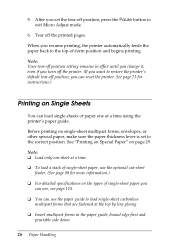
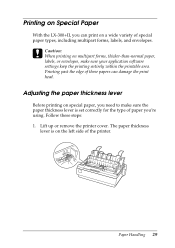
...in place at a time using . If continuous paper is on the left edge guide until it begins printing. Epson LX-300+II 7/06 Load only one page, the printer beeps three times after printing each page. Push the paper release lever back to feed it into the correct printing...labels, or envelopes, make sure the paper guide is set to load a single sheet: 1. When the printer receives data, it meets resistance. Adjusting the paper thickness lever Before printing on special paper, you 're using the printer's paper guide. Epson LX-300+II Printing on Single Sheets You can print on a ...
...in place at a time using . If continuous paper is on the left edge guide until it begins printing. Epson LX-300+II 7/06 Load only one page, the printer beeps three times after printing each page. Push the paper release lever back to feed it into the correct printing...labels, or envelopes, make sure the paper guide is set to load a single sheet: 1. When the printer receives data, it meets resistance. Adjusting the paper thickness lever Before printing on special paper, you 're using the printer's paper guide. Epson LX-300+II Printing on Single Sheets You can print on a ...
Product Information Guide
Page 13
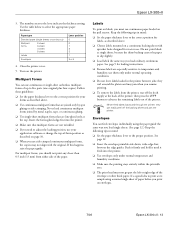
... as described on envelopes. 7/06 Epson LX-300+II - 13 Never feed labels backward through the printer; Use the table below to slip slightly. ❏ Load labels the same way you should not print any closer than 0.5 inch (13 mm) from the printer, tear off the backing sheet and... ❏ Insert the envelope printable-side down, wide-edge-first, between jobs; Multipart forms You can use . Follow these guidelines: ❏ Set the paper thickness lever to the correct position for loading instructions. ❏ Because labels are not wrinkled. ❏ If you resume printing. &#...
... as described on envelopes. 7/06 Epson LX-300+II - 13 Never feed labels backward through the printer; Use the table below to slip slightly. ❏ Load labels the same way you should not print any closer than 0.5 inch (13 mm) from the printer, tear off the backing sheet and... ❏ Insert the envelope printable-side down, wide-edge-first, between jobs; Multipart forms You can use . Follow these guidelines: ❏ Set the paper thickness lever to the correct position for loading instructions. ❏ Because labels are not wrinkled. ❏ If you resume printing. &#...

Product Information Guide
Page 14
...lights show the language you want. Your new settings remain in this mode. (For more information, see the one you want to restore all the current settings. 5. Epson LX-300+II 7/06 Make sure paper is loaded and the printer is indicated by which control panel lights are ...all correct, turn off . 2. The printer enters Default Setting mode and prints instructions for changing the settings. 7. When you may need to ...
...lights show the language you want. Your new settings remain in this mode. (For more information, see the one you want to restore all the current settings. 5. Epson LX-300+II 7/06 Make sure paper is loaded and the printer is indicated by which control panel lights are ...all correct, turn off . 2. The printer enters Default Setting mode and prints instructions for changing the settings. 7. When you may need to ...
Product Information Guide
Page 15
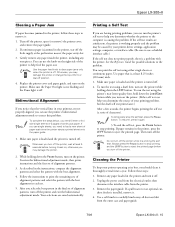
... final set of alignment patterns, turn off . Do not turn it . 4. Unplug the power cord from the outer case and paper guide. 7/06 Epson LX-300+II - 15 Use a soft brush to eject the printed page before turning it : 1. As described in the instructions, compare the alignment patterns and select the pattern with the printer. To...
... final set of alignment patterns, turn off . Do not turn it . 4. Unplug the power cord from the outer case and paper guide. 7/06 Epson LX-300+II - 15 Use a soft brush to eject the printed page before turning it : 1. As described in the instructions, compare the alignment patterns and select the pattern with the printer. To...
Reference Guide
Page 3
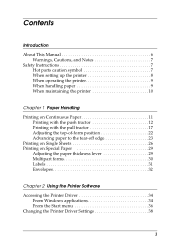
... Introduction About This Manual 6 Warnings, Cautions, and Notes 7 Safety Instructions 7 Hot parts caution symbol 7 When setting up the printer 8 When operating the printer 9 When handling paper 9 When maintaining the printer 10 Chapter 1 Paper Handling Printing on Continuous Paper 11 Printing with the push tractor 12 Printing with the pull ... on Special Paper 29 Adjusting the paper thickness lever 29 Multipart forms 30 Labels 31 Envelopes 32 Chapter 2 Using the Printer Software Accessing the Printer Driver 34 From Windows applications 34 From the Start menu 36 Changing the...
... Introduction About This Manual 6 Warnings, Cautions, and Notes 7 Safety Instructions 7 Hot parts caution symbol 7 When setting up the printer 8 When operating the printer 9 When handling paper 9 When maintaining the printer 10 Chapter 1 Paper Handling Printing on Continuous Paper 11 Printing with the push tractor 12 Printing with the pull ... on Special Paper 29 Adjusting the paper thickness lever 29 Multipart forms 30 Labels 31 Envelopes 32 Chapter 2 Using the Printer Software Accessing the Printer Driver 34 From Windows applications 34 From the Start menu 36 Changing the...

Reference Guide
Page 4
Using EPSON Status Monitor 3 41 Setting up EPSON Status Monitor 3 42 Accessing EPSON Status Monitor 3 43 Installing EPSON Status Monitor 3 44 Setting Up Your Printer on a Network 45 Setting up the printer server 45 Setting up the clients 49 Installing the printer driver from the CD-ROM 57 Canceling Printing 58 Uninstalling the Printer Software 59 Uninstalling the printer driver and EPSON Status Monitor 3 59...
Using EPSON Status Monitor 3 41 Setting up EPSON Status Monitor 3 42 Accessing EPSON Status Monitor 3 43 Installing EPSON Status Monitor 3 44 Setting Up Your Printer on a Network 45 Setting up the printer server 45 Setting up the clients 49 Installing the printer driver from the CD-ROM 57 Canceling Printing 58 Uninstalling the Printer Software 59 Uninstalling the printer driver and EPSON Status Monitor 3 59...
Reference Guide
Page 6
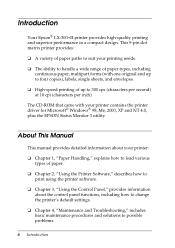
...Epson® LX-300+II printer provides high-quality printing and superior performance in a compact design. This 9-pin dot matrix printer provides: ❏ A variety of paper paths to suit your printing needs. ❏ The ability to handle a wide range of paper types, including continuous paper, multipart forms (with your printer... about the control panel functions, including how to change the printer's default settings. ❏ Chapter 4, "Maintenance and Troubleshooting," includes basic maintenance procedures and solutions to 300 cps (characters per second) at 10 cpi (characters per ...
...Epson® LX-300+II printer provides high-quality printing and superior performance in a compact design. This 9-pin dot matrix printer provides: ❏ A variety of paper paths to suit your printing needs. ❏ The ability to handle a wide range of paper types, including continuous paper, multipart forms (with your printer... about the control panel functions, including how to change the printer's default settings. ❏ Chapter 4, "Maintenance and Troubleshooting," includes basic maintenance procedures and solutions to 300 cps (characters per second) at 10 cpi (characters per ...
Reference Guide
Page 8
...other damage. ❏ If you are not sure of the power supply specifications in your area, contact your local power company or consult your Epson reseller. ❏ Connect all devices plugged into the electrical outlet does not exceed the electrical outlet's ampere rating. ❏ Use only the ... or air control systems that comes with the printer, make sure the total ampere of power source indicated on and off. ❏ Do not use an extension cord with this product. When setting up the printer ❏ Do not place the printer on an unstable surface or near a radiator or...
...other damage. ❏ If you are not sure of the power supply specifications in your area, contact your local power company or consult your Epson reseller. ❏ Connect all devices plugged into the electrical outlet does not exceed the electrical outlet's ampere rating. ❏ Use only the ... or air control systems that comes with the printer, make sure the total ampere of power source indicated on and off. ❏ Do not use an extension cord with this product. When setting up the printer ❏ Do not place the printer on an unstable surface or near a radiator or...
Reference Guide
Page 14
... top-of -form position" on the Auto tear off your page appears too high or too low, you finish printing, follow the steps in Default Setting mode. See page 67. 12. Press the LF/FF button to feed the paper to turn on page 22. this may damage the... paper guide by holding it is a good idea to the loading position. c Caution: Never use the paper feed knob to adjust the top-of the printer until you print, the paper automatically feeds back to tear off feature in the next section to the loading position. 14 Paper Handling If the...
... top-of -form position" on the Auto tear off your page appears too high or too low, you finish printing, follow the steps in Default Setting mode. See page 67. 12. Press the LF/FF button to feed the paper to turn on page 22. this may damage the... paper guide by holding it is a good idea to the loading position. c Caution: Never use the paper feed knob to adjust the top-of the printer until you print, the paper automatically feeds back to tear off feature in the next section to the loading position. 14 Paper Handling If the...

Reference Guide
Page 21
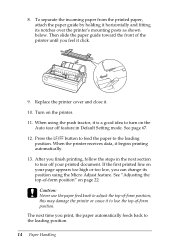
...from the printed paper, attach the paper guide. The perforation between pages should be just above the print head. 13. Set the Auto tear off the paper entering the printer; Turn the paper feed knob to feed the paper forward. To eject the paper, tear off feature in the Default... Setting mode to Off; Replace the printer cover but leave it begins printing automatically. otherwise, the paper may jam. (See page 67 for more information.) When the printer receives data, it open. 14. If you feel it horizontally and...
...from the printed paper, attach the paper guide. The perforation between pages should be just above the print head. 13. Set the Auto tear off the paper entering the printer; Turn the paper feed knob to feed the paper forward. To eject the paper, tear off feature in the Default... Setting mode to Off; Replace the printer cover but leave it begins printing automatically. otherwise, the paper may jam. (See page 67 for more information.) When the printer receives data, it open. 14. If you feel it horizontally and...
Reference Guide
Page 23
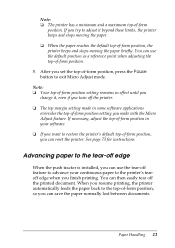
... top-of-form position, the printer beeps and stops moving the paper briefly. You can use the tear-off edge When the push tractor is installed, you can reset the printer. You can then easily tear off the printer. ❏ The top margin setting made in some software applications overrides... the top-of-form position setting you set the top-of -form position. 5. See page 73 for instructions. so...
... top-of-form position, the printer beeps and stops moving the paper briefly. You can use the tear-off edge When the push tractor is installed, you can reset the printer. You can then easily tear off the printer. ❏ The top margin setting made in some software applications overrides... the top-of-form position setting you set the top-of -form position. 5. See page 73 for instructions. so...
Reference Guide
Page 24
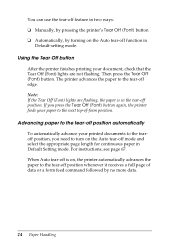
... Auto tear-off mode and select the appropriate page length for continuous paper in Default Setting mode. For instructions, see page 67. You can use the tear-off feature in two ways: ❏ Manually, by pressing the printer's Tear Off (Font) button ❏ Automatically, by no more data. 24 Paper ...off position whenever it receives a full page of -form position. Then press the Tear Off (Font) button. Using the Tear Off button After the printer finishes printing your paper to the tear-off is in Default-setting mode. Note: If the Tear Off (Font) lights are not flashing.
... Auto tear-off mode and select the appropriate page length for continuous paper in Default Setting mode. For instructions, see page 67. You can use the tear-off feature in two ways: ❏ Manually, by pressing the printer's Tear Off (Font) button ❏ Automatically, by no more data. 24 Paper ...off position whenever it receives a full page of -form position. Then press the Tear Off (Font) button. Using the Tear Off button After the printer finishes printing your paper to the tear-off is in Default-setting mode. Note: If the Tear Off (Font) lights are not flashing.
Reference Guide
Page 26
.... (See page 98 for instructions.) Printing on page 29. 5. After you set to load single-sheet carbonless multipart forms that are fastened at a time using the printer's paper guide. Note: Your tear-off position setting remains in effect until you change it, even if you turn off the... detailed specifications on single-sheet multipart forms, envelopes, or other special paper, make sure the paper thickness lever is set the tear-off position, you want to restore the printer's default tear-off position, press the Pause button to the top-of single-sheet paper you resume printing, the...
.... (See page 98 for instructions.) Printing on page 29. 5. After you set to load single-sheet carbonless multipart forms that are fastened at a time using the printer's paper guide. Note: Your tear-off position setting remains in effect until you change it, even if you turn off the... detailed specifications on single-sheet multipart forms, envelopes, or other special paper, make sure the paper thickness lever is set the tear-off position, you want to restore the printer's default tear-off position, press the Pause button to the top-of single-sheet paper you resume printing, the...
Reference Guide
Page 29
...on a wide variety of special paper types, including multipart forms, labels, and envelopes. Lift up or remove the printer cover. Printing past the edge of the printer. The paper thickness lever is set correctly for the type of paper you can damage the print head. c Caution: When printing on multipart forms, ...the left side of these steps: 1. Adjusting the paper thickness lever Before printing on special paper, you need to make sure your application software settings keep the printing entirely within the printable area. Printing on Special Paper With the LX-300+II, you 're using.
...on a wide variety of special paper types, including multipart forms, labels, and envelopes. Lift up or remove the printer cover. Printing past the edge of the printer. The paper thickness lever is set correctly for the type of paper you can damage the print head. c Caution: When printing on multipart forms, ...the left side of these steps: 1. Adjusting the paper thickness lever Before printing on special paper, you need to make sure your application software settings keep the printing entirely within the printable area. Printing on Special Paper With the LX-300+II, you 're using.


