

Product Information Guide
Page 1
... you can purchase the following options from an Epson authorized reseller. Additional Tractor Unit (C800301) Used in your printer. sales) or www.epson.ca (Canada sales). Epson LX-300+II LX-300+II Parts Printer cover Paper supports Edge guides Paper guide User Replaceable Parts User replaceable part Knob Logo plate Paper supports Paper eject assembly Printer cover assembly Sheet guide assembly Reference number 106 120...
... you can purchase the following options from an Epson authorized reseller. Additional Tractor Unit (C800301) Used in your printer. sales) or www.epson.ca (Canada sales). Epson LX-300+II LX-300+II Parts Printer cover Paper supports Edge guides Paper guide User Replaceable Parts User replaceable part Knob Logo plate Paper supports Paper eject assembly Printer cover assembly Sheet guide assembly Reference number 106 120...
Product Information Guide
Page 2
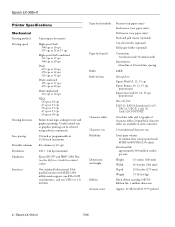
Epson LX-300+II Printer Specifications Mechanical Printing method Printing speed Printing direction Line spacing Printable columns Resolution Emulation Interfaces 9-pin impact dot matrix High-speed draft 300 cps at 10 cpi 337 cps at 12 or 15 cpi High-speed draft condensed 321 cps at 17 cpi 300 cps ..., 8-bit parallel interface with IEEE-1284 nibble mode support, one EIA-232D serial interface, and one USB (ver 1.1) interface Paper feed methods Paper feed speed Buffer Built-in some countries) 13 international character sets Total print volume 12 million lines (except print head) MTBF ...
Epson LX-300+II Printer Specifications Mechanical Printing method Printing speed Printing direction Line spacing Printable columns Resolution Emulation Interfaces 9-pin impact dot matrix High-speed draft 300 cps at 10 cpi 337 cps at 12 or 15 cpi High-speed draft condensed 321 cps at 17 cpi 300 cps ..., 8-bit parallel interface with IEEE-1284 nibble mode support, one EIA-232D serial interface, and one USB (ver 1.1) interface Paper feed methods Paper feed speed Buffer Built-in some countries) 13 international character sets Total print volume 12 million lines (except print head) MTBF ...

Product Information Guide
Page 3
... inch (0.065 to 0.39 mm) Perforated edges (gathering area) up to 60% RH Do not load paper that has been folded or is damaged, wrinkled, or curled. Epson LX-300+II Electrical Input voltage range Rated frequency range Input frequency range Rated current Power consumption 120 V 220 to 240 ... EN 55022 Class B EN 61000-3-2 EN 61000-3-3 EN 55024 Paper Use recycled paper, envelopes, and single-sheet multipart forms only under normal temperature and humidity conditions, as follows: Temperature: 59 to 77 °F (15 to 25 °C) Humidity: 30 to 0.035 inch (0.9 mm) 7/06 Epson LX-300+II - 3
... inch (0.065 to 0.39 mm) Perforated edges (gathering area) up to 60% RH Do not load paper that has been folded or is damaged, wrinkled, or curled. Epson LX-300+II Electrical Input voltage range Rated frequency range Input frequency range Rated current Power consumption 120 V 220 to 240 ... EN 55022 Class B EN 61000-3-2 EN 61000-3-3 EN 55024 Paper Use recycled paper, envelopes, and single-sheet multipart forms only under normal temperature and humidity conditions, as follows: Temperature: 59 to 77 °F (15 to 25 °C) Humidity: 30 to 0.035 inch (0.9 mm) 7/06 Epson LX-300+II - 3
Product Information Guide
Page 4
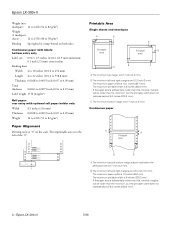
...). 4 - B The minimum left and right margins are 0.17 inch (4.2 mm). The maximum paper width is 0.17 inch (4.2 mm). C The minimum bottom margin is 10 inches (254 mm). Epson LX-300+II 7/06 Epson LX-300+II Weight (not multipart) 14 to 22 lb (52 to 82 g/m2) Weight (1 multipart sheet)...area B C C A The minimum top margin is 8 inches (203.2 mm). The maximum printable width is 0.17 inch (4.2 mm). If the paper size is substantially wider than this , the side margins will be wider than the minimum, but the printable width does not increase beyond 8.0 inches (...
...). 4 - B The minimum left and right margins are 0.17 inch (4.2 mm). The maximum paper width is 0.17 inch (4.2 mm). C The minimum bottom margin is 10 inches (254 mm). Epson LX-300+II 7/06 Epson LX-300+II Weight (not multipart) 14 to 22 lb (52 to 82 g/m2) Weight (1 multipart sheet)...area B C C A The minimum top margin is 8 inches (203.2 mm). The maximum printable width is 0.17 inch (4.2 mm). If the paper size is substantially wider than this , the side margins will be wider than the minimum, but the printable width does not increase beyond 8.0 inches (...
Product Information Guide
Page 5
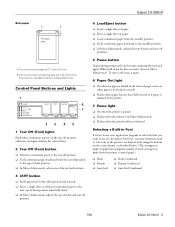
... the standby position. ❏ In Micro Adjust mode, adjusts the top-of paper. ❏ Loads continuous paper from the printer's control panel.) ❏ Draft ❏ Roman ❏ Sans Serif ❏ Draft Condensed ❏ Roman Condensed ❏ Sans Serif Condensed 7/06 Epson LX-300+II - 5 Epson LX-300+II Roll paper A B Printable area A The minimum top margin is 8 inches (203.2 mm). Control Panel...
... the standby position. ❏ In Micro Adjust mode, adjusts the top-of paper. ❏ Loads continuous paper from the printer's control panel.) ❏ Draft ❏ Roman ❏ Sans Serif ❏ Draft Condensed ❏ Roman Condensed ❏ Sans Serif Condensed 7/06 Epson LX-300+II - 5 Epson LX-300+II Roll paper A B Printable area A The minimum top margin is 8 inches (203.2 mm). Control Panel...

Product Information Guide
Page 6
...head is paused. You can identify many printer problems using the lights on the control panel. Epson LX-300+II 7/06 The Pause light begins to the standby position. Then set the lever to turn off the Pause light, if necessary. Clear the paper jam. n = on the control ...if necessary. Clear the paper jam. Standby Position Continuous paper is in the printer. Error Indicators You can easily tear off edge. Then press the Pause button to turn off the Pause light, if necessary. State of Beep panel lights pattern f Pause - Epson LX-300+II Follow these steps to ...
...head is paused. You can identify many printer problems using the lights on the control panel. Epson LX-300+II 7/06 The Pause light begins to the standby position. Then set the lever to turn off the Pause light, if necessary. Clear the paper jam. n = on the control ...if necessary. Clear the paper jam. Standby Position Continuous paper is in the printer. Error Indicators You can easily tear off edge. Then press the Pause button to turn off the Pause light, if necessary. State of Beep panel lights pattern f Pause - Epson LX-300+II Follow these steps to ...

Product Information Guide
Page 7
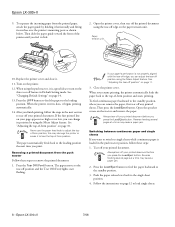
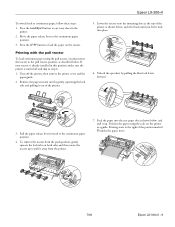
...in the pull position if you will be tearing off the printer. 2. Then slide the right sprocket to match the width of your continuous paper behind the printer. Epson LX-300+II Printing on Continuous Paper You can print on continuous paper using the tractor in either the push or pull position:...Close the covers. Make sure your paper has a clean, straight, leading edge. Move the paper support so it in place. 7/06 Epson LX-300+II - 7 Slide the left sprocket so the pins are no obstructions between the paper and the printer, and that the paper is midway between printing on single ...
...in the pull position if you will be tearing off the printer. 2. Then slide the right sprocket to match the width of your continuous paper behind the printer. Epson LX-300+II Printing on Continuous Paper You can print on continuous paper using the tractor in either the push or pull position:...Close the covers. Make sure your paper has a clean, straight, leading edge. Move the paper support so it in place. 7/06 Epson LX-300+II - 7 Slide the left sprocket so the pins are no obstructions between the paper and the printer, and that the paper is midway between printing on single ...
Product Information Guide
Page 8
... 8 - Follow the instructions on page 12 to the standby position. 3. Epson LX-300+II 9. Then slide the paper guide toward the front of -form position. Turn on the tractor and remove the paper. When the printer receives data, it horizontally and fitting its position by holding it begins printing ... position, follow the steps in the next section to adjust the topof-form position; Epson LX-300+II 7/06 To separate the incoming paper from the push tractor Follow these steps: 1. Open the printer cover, then tear off the printed document using the push tractor, it to remove the...
... 8 - Follow the instructions on page 12 to the standby position. 3. Epson LX-300+II 9. Then slide the paper guide toward the front of -form position. Turn on the tractor and remove the paper. When the printer receives data, it horizontally and fitting its position by holding it begins printing ... position, follow the steps in the next section to adjust the topof-form position; Epson LX-300+II 7/06 To separate the incoming paper from the push tractor Follow these steps: 1. Open the printer cover, then tear off the printed document using the push tractor, it to remove the...
Product Information Guide
Page 9
... into the rear paper slot as shown below , and pull it away from the printer. 7. Epson LX-300+II To switch back to eject any sheet in this position, make sure the printer is turned off the printer; then remove the printer cover and the paper guide. 2. Unlock... the sprockets by gently squeezing the lock tabs and pulling it out of the position marked 0 (under the paper now). 7/06 Epson LX-300+II...
... into the rear paper slot as shown below , and pull it away from the printer. 7. Epson LX-300+II To switch back to eject any sheet in this position, make sure the printer is turned off the printer; then remove the printer cover and the paper guide. 2. Unlock... the sprockets by gently squeezing the lock tabs and pulling it out of the position marked 0 (under the paper now). 7/06 Epson LX-300+II...

Product Information Guide
Page 10
... top-of-form position If your paper has a clean, straight leading edge. Remove the printer cover. 3. To separate the incoming paper from the back. 10. Replace the printer cover but do not lock it beyond these limits, the printer beeps and stops moving the paper briefly. Epson LX-300+II 8. Epson LX-300+II 7/06 To eject the paper, tear off feature in place. Make...
... top-of-form position If your paper has a clean, straight leading edge. Remove the printer cover. 3. To separate the incoming paper from the back. 10. Replace the printer cover but do not lock it beyond these limits, the printer beeps and stops moving the paper briefly. Epson LX-300+II 8. Epson LX-300+II 7/06 To eject the paper, tear off feature in place. Make...

Product Information Guide
Page 11
... paper in Default Setting mode. The printer advances the paper to feed the paper forward, until the paper perforation is installed, you can reset the printer. If the Tear Off (Font) lights are flashing (the paper is in the tear-off the printer. Open the printer cover. 3. The printer ... the Micro Adjust feature to move the perforation to flash as the printer enters Micro Adjust mode. 4. You can reset the printer. Hold down the Pause button for instructions.) 7/06 Epson LX-300+II - 11 Epson LX-300+II Your top-of-form position setting remains in effect until you change ...
... paper in Default Setting mode. The printer advances the paper to feed the paper forward, until the paper perforation is installed, you can reset the printer. If the Tear Off (Font) lights are flashing (the paper is in the tear-off the printer. Open the printer cover. 3. The printer ... the Micro Adjust feature to move the perforation to flash as the printer enters Micro Adjust mode. 4. You can reset the printer. Hold down the Pause button for instructions.) 7/06 Epson LX-300+II - 11 Epson LX-300+II Your top-of-form position setting remains in effect until you change ...
Product Information Guide
Page 12
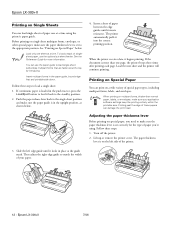
... resistance. Before printing on single-sheet multipart forms, envelopes, or other special paper, make sure your paper. 12 - Follow these steps: 1. If continuous paper is more information. Load the next sheet and the printer will continue printing. Epson LX-300+II 7/06 Slide the left side of the printer. 3. Epson LX-300+II Printing on Single Sheets You can load single sheets of...
... resistance. Before printing on single-sheet multipart forms, envelopes, or other special paper, make sure your paper. 12 - Follow these steps: 1. If continuous paper is more information. Load the next sheet and the printer will continue printing. Epson LX-300+II 7/06 Slide the left side of the printer. 3. Epson LX-300+II Printing on Single Sheets You can load single sheets of...
Product Information Guide
Page 13
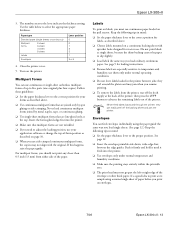
... at the back of the paper. Insert the forms glued-edge-first into the printer. ❏ Use envelopes only under normal operating conditions. ❏ Do not leave labels loaded in mind: ❏ Set the paper thickness lever to adjust the loading position, use continuous paper loaded on envelopes. 7/06 Epson LX-300+II - 13 See page 9 for labels...
... at the back of the paper. Insert the forms glued-edge-first into the printer. ❏ Use envelopes only under normal operating conditions. ❏ Do not leave labels loaded in mind: ❏ Set the paper thickness lever to adjust the loading position, use continuous paper loaded on envelopes. 7/06 Epson LX-300+II - 13 See page 9 for labels...

Product Information Guide
Page 14
...) button to print a list of paper each time the printer ejects a printed page. 1. If the settings are on the printer. Then press the Tear Off (Font) button to select the next setting you 'll need to change a default setting from the printer's control panel using Default setting mode.... (Font) button. If you use single sheets, you want to change . 8. Epson LX-300+II 7/06 The current language is on the printer. 14 - Press the LF/FF button to scroll through your application software or printer driver, you may need to exit Default Setting mode. Hold down the Load/Eject,...
...) button to print a list of paper each time the printer ejects a printed page. 1. If the settings are on the printer. Then press the Tear Off (Font) button to select the next setting you 'll need to change a default setting from the printer's control panel using Default setting mode.... (Font) button. If you use single sheets, you want to change . 8. Epson LX-300+II 7/06 The current language is on the printer. 14 - Press the LF/FF button to scroll through your application software or printer driver, you may need to exit Default Setting mode. Hold down the Load/Eject,...
Product Information Guide
Page 15
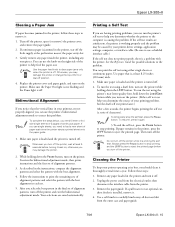
... problem. Remove any torn pieces. Your selections are having printing problems, you are saved automatically. Turn off the printer. Use the paper feed knob to correct this problem. Gently remove any paper inside the printer, including any paper loaded in the printer, follow these steps: 1. Epson LX-300+II Clearing a Paper Jam If paper becomes jammed in the printer and turn it off. 2.
... problem. Remove any torn pieces. Your selections are having printing problems, you are saved automatically. Turn off the printer. Use the paper feed knob to correct this problem. Gently remove any paper inside the printer, including any paper loaded in the printer, follow these steps: 1. Epson LX-300+II Clearing a Paper Jam If paper becomes jammed in the printer and turn it off. 2.

Product Information Guide
Page 16
... lift it . Unplug the power cord from the printer. 3. If any paper loaded in water. Repack the printer, ribbon cartridge, and paper guide in the original packing materials and place them in the printer's original box. 16 - Epson LX-300+II 7/06 these chemicals can damage the printer mechanism. Related Documentation( Manual Epson LX-300+II User's Guide CD-ROM containing the on-screen...
... lift it . Unplug the power cord from the printer. 3. If any paper loaded in water. Repack the printer, ribbon cartridge, and paper guide in the original packing materials and place them in the printer's original box. 16 - Epson LX-300+II 7/06 these chemicals can damage the printer mechanism. Related Documentation( Manual Epson LX-300+II User's Guide CD-ROM containing the on-screen...
Reference Guide
Page 3
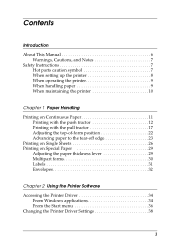
Contents Introduction About This Manual 6 Warnings, Cautions, and Notes 7 Safety Instructions 7 Hot parts caution symbol 7 When setting up the printer 8 When operating the printer 9 When handling paper 9 When maintaining the printer 10 Chapter 1 Paper Handling Printing on Continuous Paper 11 Printing with the push tractor 12 Printing with the pull tractor 17 Adjusting the top-of-form...
Contents Introduction About This Manual 6 Warnings, Cautions, and Notes 7 Safety Instructions 7 Hot parts caution symbol 7 When setting up the printer 8 When operating the printer 9 When handling paper 9 When maintaining the printer 10 Chapter 1 Paper Handling Printing on Continuous Paper 11 Printing with the push tractor 12 Printing with the pull tractor 17 Adjusting the top-of-form...

Reference Guide
Page 4
...EPSON Status Monitor 3 42 Accessing EPSON Status Monitor 3 43 Installing EPSON Status Monitor 3 44 Setting Up Your Printer on a Network 45 Setting up the printer server 45 Setting up the clients 49 Installing the printer driver from the CD-ROM 57 Canceling Printing 58 Uninstalling the Printer Software 59 Uninstalling the printer driver and EPSON... Restoring the printer's default settings 73 Chapter 4 Maintenance and Troubleshooting Cleaning the Printer 74 Transporting the Printer 75 Troubleshooting 76 Using the error indicators 77 Problems and solutions 79 Clearing a paper jam 93...
...EPSON Status Monitor 3 42 Accessing EPSON Status Monitor 3 43 Installing EPSON Status Monitor 3 44 Setting Up Your Printer on a Network 45 Setting up the printer server 45 Setting up the clients 49 Installing the printer driver from the CD-ROM 57 Canceling Printing 58 Uninstalling the Printer Software 59 Uninstalling the printer driver and EPSON... Restoring the printer's default settings 73 Chapter 4 Maintenance and Troubleshooting Cleaning the Printer 74 Transporting the Printer 75 Troubleshooting 76 Using the error indicators 77 Problems and solutions 79 Clearing a paper jam 93...
Reference Guide
Page 5
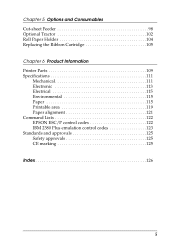
Chapter 5 Options and Consumables Cut-sheet Feeder 98 Optional Tractor 102 Roll Paper Holder 104 Replacing the Ribbon Cartridge 105 Chapter 6 Product Information Printer Parts 109 Specifications 111 Mechanical 111 Electronic 113 Electrical 115 Environmental 115 Paper 115 Printable area 119 Paper alignment 121 Command Lists 122 EPSON ESC/P control codes 122 IBM 2380 Plus emulation control codes 123 Standards and approvals 125 Safety approvals 125 CE marking 125 Index 126 5
Chapter 5 Options and Consumables Cut-sheet Feeder 98 Optional Tractor 102 Roll Paper Holder 104 Replacing the Ribbon Cartridge 105 Chapter 6 Product Information Printer Parts 109 Specifications 111 Mechanical 111 Electronic 113 Electrical 115 Environmental 115 Paper 115 Printable area 119 Paper alignment 121 Command Lists 122 EPSON ESC/P control codes 122 IBM 2380 Plus emulation control codes 123 Standards and approvals 125 Safety approvals 125 CE marking 125 Index 126 5
Reference Guide
Page 6
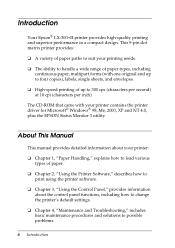
... for Microsoft® Windows® 98, Me, 2000, XP and NT 4.0, plus the EPSON Status Monitor 3 utility. Introduction Your Epson® LX-300+II printer provides high-quality printing and superior performance in a compact design. This 9-pin dot matrix printer provides: ❏ A variety of paper paths to suit your printing needs. ❏ The ability to handle a wide range...
... for Microsoft® Windows® 98, Me, 2000, XP and NT 4.0, plus the EPSON Status Monitor 3 utility. Introduction Your Epson® LX-300+II printer provides high-quality printing and superior performance in a compact design. This 9-pin dot matrix printer provides: ❏ A variety of paper paths to suit your printing needs. ❏ The ability to handle a wide range...

