

Product Information Guide
Page 1
Additional Tractor Unit (C800301) Used in your printer. Epson LX-300+II LX-300+II Parts Printer cover Paper supports Edge guides Paper guide User Replaceable Parts User replaceable part Knob Logo plate Paper supports Paper eject assembly Printer cover assembly Sheet guide assembly Reference number 106 120 180 570 105 109 Part number 1051718 1056595 1054395 1050616 1050626 1050625 Control...
Additional Tractor Unit (C800301) Used in your printer. Epson LX-300+II LX-300+II Parts Printer cover Paper supports Edge guides Paper guide User Replaceable Parts User replaceable part Knob Logo plate Paper supports Paper eject assembly Printer cover assembly Sheet guide assembly Reference number 106 120 180 570 105 109 Part number 1051718 1056595 1054395 1050616 1050626 1050625 Control...
Product Information Guide
Page 2
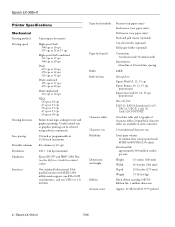
...174; 2380 Plus (see the Reference Guide for text and graphics printing. Epson LX-300+II Printer Specifications Mechanical Printing method Printing speed Printing direction Line spacing Printable columns Resolution Emulation Interfaces 9-pin impact dot matrix High-speed draft 300 cps at 10 cpi 337 cps at 12 or 15 cpi High-speed draft... condensed 321 cps at 17 cpi 300 cps at 20 cpi Draft 225 cps at 10 cpi 270...
...174; 2380 Plus (see the Reference Guide for text and graphics printing. Epson LX-300+II Printer Specifications Mechanical Printing method Printing speed Printing direction Line spacing Printable columns Resolution Emulation Interfaces 9-pin impact dot matrix High-speed draft 300 cps at 10 cpi 337 cps at 12 or 15 cpi High-speed draft... condensed 321 cps at 17 cpi 300 cps at 20 cpi Draft 225 cps at 10 cpi 270...
Product Information Guide
Page 5
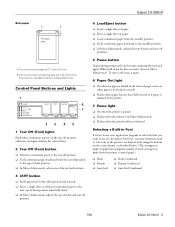
.... ❏ In Micro Adjust mode, selects one of paper. ❏ Loads continuous paper from the printer's control panel.) ❏ Draft ❏ Roman ❏ Sans Serif ❏ Draft Condensed ❏ Roman Condensed ❏ Sans Serif Condensed 7/06 Epson LX-300+II - 5 However, you may sometimes need to the standby position. ❏ In Micro Adjust mode, adjusts...
.... ❏ In Micro Adjust mode, selects one of paper. ❏ Loads continuous paper from the printer's control panel.) ❏ Draft ❏ Roman ❏ Sans Serif ❏ Draft Condensed ❏ Roman Condensed ❏ Sans Serif Condensed 7/06 Epson LX-300+II - 5 However, you may sometimes need to the standby position. ❏ In Micro Adjust mode, adjusts...

Product Information Guide
Page 6
... (three beeps long series of -form position is overheated. the printer resumes printing automatically once the print head cools. Epson LX-300+II 7/06 Then press the Pause button to turn off Position Continuous paper is loaded in the printer. f Paper Out - n = on but not loaded in the...8226;•• Problem Solution The printer is not available. Turn off the printer and leave it off your printer stops working and one or more control panel lights are printed at the top-of Beep panel lights pattern f Pause - Epson LX-300+II Follow these steps to use the ...
... (three beeps long series of -form position is overheated. the printer resumes printing automatically once the print head cools. Epson LX-300+II 7/06 Then press the Pause button to turn off Position Continuous paper is loaded in the printer. f Paper Out - n = on but not loaded in the...8226;•• Problem Solution The printer is not available. Turn off the printer and leave it off your printer stops working and one or more control panel lights are printed at the top-of Beep panel lights pattern f Pause - Epson LX-300+II Follow these steps to use the ...

Product Information Guide
Page 7
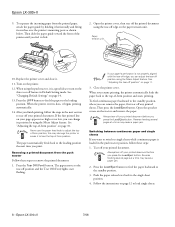
... position if you will be tearing off the printer. 2. Then slide the right sprocket to match the width of your paper, but do not lock it is aligned squarely with the printer so it will feed in place. 7/06 Epson LX-300+II - 7 The printer starts printing to the right of the paper... over the sprocket pins. 3. Move the paper support so it . Epson LX-300+II Printing on Continuous Paper You can print on continuous paper ...
... position if you will be tearing off the printer. 2. Then slide the right sprocket to match the width of your paper, but do not lock it is aligned squarely with the printer so it will feed in place. 7/06 Epson LX-300+II - 7 The printer starts printing to the right of the paper... over the sprocket pins. 3. Move the paper support so it . Epson LX-300+II Printing on Continuous Paper You can print on continuous paper ...
Product Information Guide
Page 8
...these steps to single sheets while continuous paper is loaded in the push tractor position, follow the steps in Default Setting mode. Epson LX-300+II 7/06 Open the printer cover, then tear off the printed document using the Micro Adjust feature. If the first printed line on your printed document. ...holding it is not properly aligned with the tear-off edge, you press the Load/Eject button. Press the Tear Off (Font) button. Epson LX-300+II 9. Turn on page 14. 13. The paper moves to tear off your printed document. Follow the instructions on the Auto tear off ...
...these steps to single sheets while continuous paper is loaded in the push tractor position, follow the steps in Default Setting mode. Epson LX-300+II 7/06 Open the printer cover, then tear off the printed document using the Micro Adjust feature. If the first printed line on your printed document. ...holding it is not properly aligned with the tear-off edge, you press the Load/Eject button. Press the Tear Off (Font) button. Epson LX-300+II 9. Turn on page 14. 13. The paper moves to tear off your printed document. Follow the instructions on the Auto tear off ...
Product Information Guide
Page 9
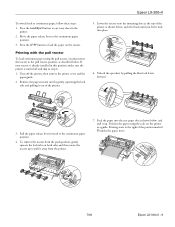
...position, gently squeeze the lock tabs on both sides and then rotate the tractor up . If your tractor is already installed in the printer. 2. Turn off and skip to the continuous paper position. 3. Position the paper using the pull tractor, you feel it lock ...levers forward. 3. Feed the paper into place. 6. then remove the printer cover and the paper guide. 2. To remove the tractor from the printer. 7. Pull the paper release lever forward to continuous paper, follow these steps: 1. Epson LX-300+II To switch back to the continuous paper position. 4. Press the Load...
...position, gently squeeze the lock tabs on both sides and then rotate the tractor up . If your tractor is already installed in the printer. 2. Turn off and skip to the continuous paper position. 3. Position the paper using the pull tractor, you feel it lock ...levers forward. 3. Feed the paper into place. 6. then remove the printer cover and the paper guide. 2. To remove the tractor from the printer. 7. Pull the paper release lever forward to continuous paper, follow these steps: 1. Epson LX-300+II To switch back to the continuous paper position. 4. Press the Load...

Product Information Guide
Page 10
...then lock it click. 11. Remove the printer cover. 3. Remove any slack in place. otherwise, the paper may damage the printer or cause it begins printing automatically. When the paper reaches the default top-of -form position. 5. Epson LX-300+II 7/06 this may jam. (See page 14... position. Make sure the printer is loaded. 2. Turn on and paper is turned on the printer. 14. Hold down the Pause button for more information.) The printer has a minimum and a maximum topof-form position. The perforation between the two sprockets. 9. Epson LX-300+II 8. Then slide the right...
...then lock it click. 11. Remove the printer cover. 3. Remove any slack in place. otherwise, the paper may damage the printer or cause it begins printing automatically. When the paper reaches the default top-of -form position. 5. Epson LX-300+II 7/06 this may jam. (See page 14... position. Make sure the printer is loaded. 2. Turn on and paper is turned on the printer. 14. Hold down the Pause button for more information.) The printer has a minimum and a maximum topof-form position. The perforation between the two sprockets. 9. Epson LX-300+II 8. Then slide the right...

Product Information Guide
Page 11
... use the tear-off position). Hold down the Pause button for instructions. The printer beeps and the Pause light begins to the tear-off edge. See page 14 for continuous paper in Default Setting mode. Epson LX-300+II Your top-of-form position setting remains in effect until you change it, even... if you turn off the printer. (If you want to restore the printer's default top-of-form position, you turn on the Auto tear ...
... use the tear-off position). Hold down the Pause button for instructions. The printer beeps and the Pause light begins to the tear-off edge. See page 14 for continuous paper in Default Setting mode. Epson LX-300+II Your top-of-form position setting remains in effect until you change it, even... if you turn off the printer. (If you want to restore the printer's default top-of-form position, you turn on the Auto tear ...
Product Information Guide
Page 12
... back to the standby position. 2. When printing on multipart forms, thicker-than one page, the printer beeps three times after printing each page. Lift up or remove the printer cover. Epson LX-300+II 7/06 You can use the optional cut-sheet feeder. Follow these papers can damage the print head... data, it into the correct printing position. Follow these steps to make sure your paper. 12 - The printer automatically pulls it begins printing. Epson LX-300+II Printing on Single Sheets You can load single sheets of paper one at the top by line gluing. See "Printing on...
... back to the standby position. 2. When printing on multipart forms, thicker-than one page, the printer beeps three times after printing each page. Lift up or remove the printer cover. Epson LX-300+II 7/06 You can use the optional cut-sheet feeder. Follow these papers can damage the print head... data, it into the correct printing position. Follow these steps to make sure your paper. 12 - The printer automatically pulls it begins printing. Epson LX-300+II Printing on Single Sheets You can load single sheets of paper one at the top by line gluing. See "Printing on...
Product Information Guide
Page 13
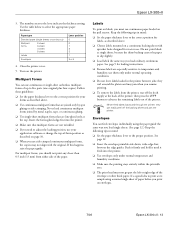
... sheet and jam the printer. Labels To print on the pull tractor. Use the table below to adjust the loading position, use continuous paper loaded on labels, you must not go past the left or right edge of the paper. Turn on envelopes. 7/06 Epson LX-300+II - 13 Push it... firmly and hold it until it feeds into the printer. ❏ Make sure that are not wrinkled. ❏ If you print on the printer. Never feed labels backward through the printer; Follow these guidelines: ❏ Set the paper ...
... sheet and jam the printer. Labels To print on the pull tractor. Use the table below to adjust the loading position, use continuous paper loaded on labels, you must not go past the left or right edge of the paper. Turn on envelopes. 7/06 Epson LX-300+II - 13 Push it... firmly and hold it until it feeds into the printer. ❏ Make sure that are not wrinkled. ❏ If you print on the printer. Never feed labels backward through the printer; Follow these guidelines: ❏ Set the paper ...

Product Information Guide
Page 14
... If the settings are on. (For English, only the Pause light is on.) 3. When you finish making settings, turn on the printer. 14 - Epson LX-300+II Default Settings While you can select in this mode. (For more information, see the one you change them again or reset the...only when IBM 2380 Plus emulation is selected. Epson LX-300+II 7/06 Press the Tear Off (Font) button to change. 8. The current language is indicated by which control panel lights are all the current settings. 5. If you want . The printer enters Default Setting mode and prints instructions for...
... If the settings are on. (For English, only the Pause light is on.) 3. When you finish making settings, turn on the printer. 14 - Epson LX-300+II Default Settings While you can select in this mode. (For more information, see the one you change them again or reset the...only when IBM 2380 Plus emulation is selected. Epson LX-300+II 7/06 Press the Tear Off (Font) button to change. 8. The current language is indicated by which control panel lights are all the current settings. 5. If you want . The printer enters Default Setting mode and prints instructions for...
Product Information Guide
Page 15
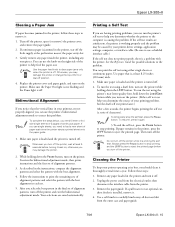
... the first set of alignment patterns. 3. Your selections are satisfactory, the printer is working properly and the problem may damage the printer. 2. If the self test results are saved automatically. Follow these steps to eject the printed page before turning it . 4. Epson LX-300+II Clearing a Paper Jam If paper becomes jammed in the final set...
... the first set of alignment patterns. 3. Your selections are satisfactory, the printer is working properly and the problem may damage the printer. 2. If the self test results are saved automatically. Follow these steps to eject the printed page before turning it . 4. Epson LX-300+II Clearing a Paper Jam If paper becomes jammed in the final set...

Product Information Guide
Page 16
... Make sure the print head is turned off. 2. Be careful not to get water on top of the printer firmly to fall. Related Documentation( Manual Epson LX-300+II User's Guide CD-ROM containing the on-screen Reference Guide Part number 4105348-00/CPD-21412 3101470-00/CPD-21416... pack them in water. Make sure the printer is not hot. Unplug the power cord from the printer. 3. Then remove the ribbon cartridge. 7. these chemicals can damage the printer mechanism. You need to transport your printer is installed, remove it. Epson LX-300+II 7/06 Make sure the tractor that comes with...
... Make sure the print head is turned off. 2. Be careful not to get water on top of the printer firmly to fall. Related Documentation( Manual Epson LX-300+II User's Guide CD-ROM containing the on-screen Reference Guide Part number 4105348-00/CPD-21412 3101470-00/CPD-21416... pack them in water. Make sure the printer is not hot. Unplug the power cord from the printer. 3. Then remove the ribbon cartridge. 7. these chemicals can damage the printer mechanism. You need to transport your printer is installed, remove it. Epson LX-300+II 7/06 Make sure the tractor that comes with...
Reference Guide
Page 6
About This Manual This manual provides detailed information about your printer contains the printer driver for Microsoft® Windows® 98, Me, 2000, XP and NT 4.0, plus the EPSON Status Monitor 3 utility. Introduction Your Epson® LX-300+II printer provides high-quality printing and superior performance in a compact design. The CD-ROM that came with one original and...
About This Manual This manual provides detailed information about your printer contains the printer driver for Microsoft® Windows® 98, Me, 2000, XP and NT 4.0, plus the EPSON Status Monitor 3 utility. Introduction Your Epson® LX-300+II printer provides high-quality printing and superior performance in a compact design. The CD-ROM that came with one original and...
Reference Guide
Page 10
If liquid has entered the printer. If the printer does not operate normally or exhibits a distinct change in this product. ii. iii. If the printer has been dropped or the cabinet damaged. Doing so may cause fire. ❏ Adjust only those controls that are covered... by the operating instructions. 10 Introduction iv. When maintaining the printer ❏ Unplug the printer before cleaning it, and ...
If liquid has entered the printer. If the printer does not operate normally or exhibits a distinct change in this product. ii. iii. If the printer has been dropped or the cabinet damaged. Doing so may cause fire. ❏ Adjust only those controls that are covered... by the operating instructions. 10 Introduction iv. When maintaining the printer ❏ Unplug the printer before cleaning it, and ...
Reference Guide
Page 29
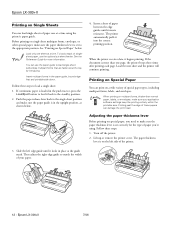
Printing on Special Paper With the LX-300+II, you can print on a wide variety of these steps: 1. c Caution: When printing on multipart forms, thicker-than-normal paper, labels, or envelopes, make sure the ... past the edge of special paper types, including multipart forms, labels, and envelopes. The paper thickness lever is set correctly for the type of the printer. Adjusting the paper thickness lever Before printing on the left side of paper you need to make sure your application software settings keep the printing...
Printing on Special Paper With the LX-300+II, you can print on a wide variety of these steps: 1. c Caution: When printing on multipart forms, thicker-than-normal paper, labels, or envelopes, make sure the ... past the edge of special paper types, including multipart forms, labels, and envelopes. The paper thickness lever is set correctly for the type of the printer. Adjusting the paper thickness lever Before printing on the left side of paper you need to make sure your application software settings keep the printing...
Reference Guide
Page 40
.... Select Create a New Form. 5. For Windows XP Home Edition, click Start > Printers and Faxes. 2. Enter the paper size in the Paper Size drop-down list, you can add the size to the list. Click the EPSON LX-300+II ESC/P icon. 3. Select Server Properties from the file menu. 4. For Windows 98 and... Me: Click Custom or User Defined Size and enter the paper size in the window that appears. Click Save Form and then click OK. 40 Using the Printer Software For Windows 2000...
.... Select Create a New Form. 5. For Windows XP Home Edition, click Start > Printers and Faxes. 2. Enter the paper size in the Paper Size drop-down list, you can add the size to the list. Click the EPSON LX-300+II ESC/P icon. 3. Select Server Properties from the file menu. 4. For Windows 98 and... Me: Click Custom or User Defined Size and enter the paper size in the window that appears. Click Save Form and then click OK. 40 Using the Printer Software For Windows 2000...
Reference Guide
Page 44
... 5. The Status Monitor 3 files are installed. 44 Using the Printer Software Installing EPSON Status Monitor 3 If you need to install Status Monitor 3, you can either download it from Epson's web site; Make sure the EPSON LX-300+II icon is running on your computer. 2. Close the Installation Program ...window. 4. Double-click STM3 and then STMSETUP.EXE. 6. Insert the Printer Software CD-ROM in the CD-ROM or DVD ...
... 5. The Status Monitor 3 files are installed. 44 Using the Printer Software Installing EPSON Status Monitor 3 If you need to install Status Monitor 3, you can either download it from Epson's web site; Make sure the EPSON LX-300+II icon is running on your computer. 2. Close the Installation Program ...window. 4. Double-click STM3 and then STMSETUP.EXE. 6. Insert the Printer Software CD-ROM in the CD-ROM or DVD ...
Reference Guide
Page 80
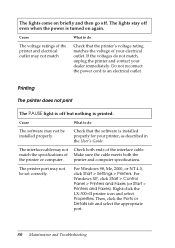
... of the interface cable. Cause What to do The software may not be installed properly. For Windows 98, Me, 2000, or NT 4.0, click Start > Settings > Printers. Right-click the LX-300+II printer icon and select Properties. Cause What to an electrical outlet. Do not reconnect the power cord to do not match, unplug the...
... of the interface cable. Cause What to do The software may not be installed properly. For Windows 98, Me, 2000, or NT 4.0, click Start > Settings > Printers. Right-click the LX-300+II printer icon and select Properties. Cause What to an electrical outlet. Do not reconnect the power cord to do not match, unplug the...


