Users Guide
Page 4
...Updater 13 Placing Originals on the Product Placing Originals 14 Placing Large or Thick Originals 15 Basic Scanning Scanning Using Epson Scan 2 18 Scanning Photos or Pictures (Photo Mode). . . . . 18 Scanning Documents (Document Mode 22 Setting a Resolution That Suits the Scanning ...Purpose 25 Scanning Using a Scanner Button 26 Advanced Scanning Image Adjustment Features for Photo Mode. . . . . . 27 Brightness 27 Contrast 28 Saturation 28 Detailed Adjustments Button 28 Unsharp Mask 31 Color Restoration 31 Backlight ...
...Updater 13 Placing Originals on the Product Placing Originals 14 Placing Large or Thick Originals 15 Basic Scanning Scanning Using Epson Scan 2 18 Scanning Photos or Pictures (Photo Mode). . . . . 18 Scanning Documents (Document Mode 22 Setting a Resolution That Suits the Scanning ...Purpose 25 Scanning Using a Scanner Button 26 Advanced Scanning Image Adjustment Features for Photo Mode. . . . . . 27 Brightness 27 Contrast 28 Saturation 28 Detailed Adjustments Button 28 Unsharp Mask 31 Color Restoration 31 Backlight ...
Users Guide
Page 5
... Shadows) Appear. . . . 58 Cannot Scan the Correct Area on the Scanner Glass 58 Cannot Preview in Thumbnail 59 Cannot Achieve the Results Intended in Auto Photo Orientation 59 Text is Not Recognized Correctly when Saving as a Searchable PDF 59 Binding Margins of a Booklet are Distorted or Blurred 60 Cannot Solve Problems...
... Shadows) Appear. . . . 58 Cannot Scan the Correct Area on the Scanner Glass 58 Cannot Preview in Thumbnail 59 Cannot Achieve the Results Intended in Auto Photo Orientation 59 Text is Not Recognized Correctly when Saving as a Searchable PDF 59 Binding Margins of a Booklet are Distorted or Blurred 60 Cannot Solve Problems...
Users Guide
Page 18
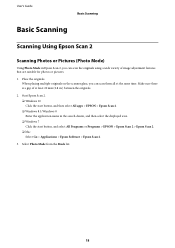
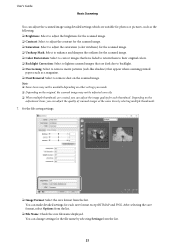
User's Guide Basic Scanning Basic Scanning Scanning Using Epson Scan 2 Scanning Photos or Pictures (Photo Mode) Using Photo Mode in Epson Scan 2, you can scan the originals using a wide variety of at the same time. Place the originals. When placing ... originals. 2. Make sure there is a gap of image adjustment features that are suitable for photos or pictures. 1. Select Photo Mode from the Mode list. 18 Start Epson Scan 2. ❏ Windows 10 Click the start button, and select All Programs or Programs > EPSON > Epson Scan 2 > Epson Scan 2. ❏ Mac Select Go > Applications...
User's Guide Basic Scanning Basic Scanning Scanning Using Epson Scan 2 Scanning Photos or Pictures (Photo Mode) Using Photo Mode in Epson Scan 2, you can scan the originals using a wide variety of at the same time. Place the originals. When placing ... originals. 2. Make sure there is a gap of image adjustment features that are suitable for photos or pictures. 1. Select Photo Mode from the Mode list. 18 Start Epson Scan 2. ❏ Windows 10 Click the start button, and select All Programs or Programs > EPSON > Epson Scan 2 > Epson Scan 2. ❏ Mac Select Go > Applications...
Users Guide
Page 21
... can make detailed settings for each thumbnail. Depending on the adjustment items, you can adjust the scanned image using detailed settings which are suitable for photos or pictures, such as the following. ❏ Brightness: Select to adjust the brightness for the scanned image. ❏ Contrast: Select to adjust the contrast for...
... can make detailed settings for each thumbnail. Depending on the adjustment items, you can adjust the scanned image using detailed settings which are suitable for photos or pictures, such as the following. ❏ Brightness: Select to adjust the brightness for the scanned image. ❏ Contrast: Select to adjust the contrast for...
Users Guide
Page 22
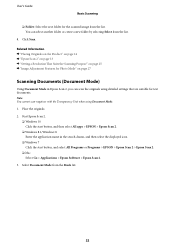
Related Information & "Placing Originals on the Product" on page 14 & "Epson Scan 2" on page 13 & "Setting a Resolution That Suits the Scanning Purpose" on page 25 & "Image Adjustment Features for Photo Mode" on page 27 Scanning Documents (Document Mode) Using Document Mode in the... search charm, and then select the displayed icon. ❏ Windows 7 Click the start button, and select All Programs or Programs > EPSON > Epson Scan 2 > Epson Scan 2. ❏ Mac Select Go > Applications > Epson Software > Epson ...
Related Information & "Placing Originals on the Product" on page 14 & "Epson Scan 2" on page 13 & "Setting a Resolution That Suits the Scanning Purpose" on page 25 & "Image Adjustment Features for Photo Mode" on page 27 Scanning Documents (Document Mode) Using Document Mode in the... search charm, and then select the displayed icon. ❏ Windows 7 Click the start button, and select All Programs or Programs > EPSON > Epson Scan 2 > Epson Scan 2. ❏ Mac Select Go > Applications > Epson Software > Epson ...

Users Guide
Page 27
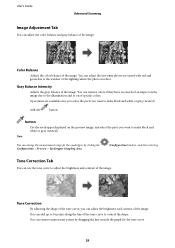
Brightness You can use image adjustment features that are suitable for photos or pictures. Note: This feature is not available depending on the settings on the Main Settings tab > Image Type or the settings on the Advanced ...Settings tab. 27 Note: Some items may not be available depending on other settings you can check the adjustment results in Epson Scan 2. For Photo Mode, you can adjust the brightness for the whole image. User's Guide Advanced Scanning Advanced Scanning Image Adjustment Features for...
Brightness You can use image adjustment features that are suitable for photos or pictures. Note: This feature is not available depending on the settings on the Main Settings tab > Image Type or the settings on the Advanced ...Settings tab. 27 Note: Some items may not be available depending on other settings you can check the adjustment results in Epson Scan 2. For Photo Mode, you can adjust the brightness for the whole image. User's Guide Advanced Scanning Advanced Scanning Image Adjustment Features for...
Users Guide
Page 29
... can add up to 16 points along the line of the image. User's Guide Advanced Scanning Image Adjustment Tab You can adjust the tint when photos are available once you select the parts you want to make black and white or gray (neutral) with red and green due to the weather... or the lighting where the photo was shot. You can adjust the color balance and gray balance of specific colors. button Use the eyedropper displayed on of the image. Gray Balance...
... can add up to 16 points along the line of the image. User's Guide Advanced Scanning Image Adjustment Tab You can adjust the tint when photos are available once you select the parts you want to make black and white or gray (neutral) with red and green due to the weather... or the lighting where the photo was shot. You can adjust the color balance and gray balance of specific colors. button Use the eyedropper displayed on of the image. Gray Balance...

Users Guide
Page 32
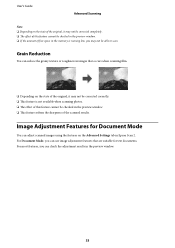
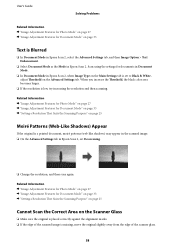
... moiré patterns. To check for moiré patterns, display the image at 100 % (1:1). User's Guide Advanced Scanning Backlight Correction You can remove dust on photos and film. 32 Note: ❏ To use this situation, adjust from the Detailed Adjustments screen. ❏ When adjusting image quality on the Detailed Adjustments screen...
... moiré patterns. To check for moiré patterns, display the image at 100 % (1:1). User's Guide Advanced Scanning Backlight Correction You can remove dust on photos and film. 32 Note: ❏ To use this situation, adjust from the Detailed Adjustments screen. ❏ When adjusting image quality on the Detailed Adjustments screen...
Users Guide
Page 33
For most features, you can check the adjustment results in Epson Scan 2. User's Guide Advanced Scanning Note: ❏ Depending on the state of the scanned results. Grain Reduction You can adjust scanned images using the features ... of this feature cannot be checked in the preview window. ❏ If the amount of free space in the memory is not available when scanning photos. ❏ The effect of this feature cannot be checked in the preview window. ❏ This feature softens the sharpness of the original, it may not...
For most features, you can check the adjustment results in Epson Scan 2. User's Guide Advanced Scanning Note: ❏ Depending on the state of the scanned results. Grain Reduction You can adjust scanned images using the features ... of this feature cannot be checked in the preview window. ❏ If the amount of free space in the memory is not available when scanning photos. ❏ The effect of this feature cannot be checked in the preview window. ❏ This feature softens the sharpness of the original, it may not...
Users Guide
Page 43
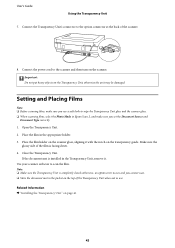
...'s Guide Using the Transparency Unit 7. Setting and Placing Films Note: ❏ Before scanning films, make sure you use . If the document mat is installed in Epson Scan 2, and make sure you set the Document Source and Document Type correctly. 1. Place the film holder on the scanner glass, aligning it . Use your... scanner software to wipe the Transparency Unit glass and the scanner glass. ❏ When scanning films, select the Photo Mode in the Transparency Unit, remove it with the notch on page 41 43
...'s Guide Using the Transparency Unit 7. Setting and Placing Films Note: ❏ Before scanning films, make sure you use . If the document mat is installed in Epson Scan 2, and make sure you set the Document Source and Document Type correctly. 1. Place the film holder on the scanner glass, aligning it . Use your... scanner software to wipe the Transparency Unit glass and the scanner glass. ❏ When scanning films, select the Photo Mode in the Transparency Unit, remove it with the notch on page 41 43
Users Guide
Page 49
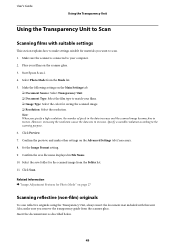
However, increasing the resolution causes the data size to your computer. 2. Select Photo Mode from the Folder list. 11. Make the following settings on the Main Settings tab. ❏ Document Source: Select Transparency Unit. ❏ Document Type: Select ... of pixels in the data increases and the scanned image becomes fine in File Name. 10. Select the save file name displayed in texture. Start Epson Scan 2. 4. Click Scan. Also, make settings suitable for the scanned image from the Mode list. 5. User's Guide Using the Transparency Unit Using the Transparency Unit...
However, increasing the resolution causes the data size to your computer. 2. Select Photo Mode from the Folder list. 11. Make the following settings on the Main Settings tab. ❏ Document Source: Select Transparency Unit. ❏ Document Type: Select ... of pixels in the data increases and the scanned image becomes fine in File Name. 10. Select the save file name displayed in texture. Start Epson Scan 2. 4. Click Scan. Also, make settings suitable for the scanned image from the Mode list. 5. User's Guide Using the Transparency Unit Using the Transparency Unit...
Users Guide
Page 56
...connected to Scan" on page 49 & "Setting and Placing Films" on page 43 Cannot Scan Using Scanning Software Other Than Epson Scan 2 ❏ If you are using Photo Mode and set the Document Type correctly. ❏ Make sure the film is set correctly in the U.S. Cannot Scan ...light stops flashing indicating that the correct scanner is ready to scan. ❏ Connect the scanner directly to your computer properly. ❏ Make sure Epson Scan 2 is released. User's Guide Solving Problems Related Information & "Uninstalling Your Applications" on page 61 & "Help for Users in the film ...
...connected to Scan" on page 49 & "Setting and Placing Films" on page 43 Cannot Scan Using Scanning Software Other Than Epson Scan 2 ❏ If you are using Photo Mode and set the Document Type correctly. ❏ Make sure the film is set correctly in the U.S. Cannot Scan ...light stops flashing indicating that the correct scanner is ready to scan. ❏ Connect the scanner directly to your computer properly. ❏ Make sure Epson Scan 2 is released. User's Guide Solving Problems Related Information & "Uninstalling Your Applications" on page 61 & "Help for Users in the film ...

Users Guide
Page 57
... & "Cleaning the Scanner" on page 51 The Image Quality is low, try increasing the resolution and then scanning. ❏ In Epson Scan 2, adjust the image using items on the Advanced Settings tab, and then scan. This feature may appear in the Background of Images...Information & "Setting a Resolution That Suits the Scanning Purpose" on page 25 & "Image Adjustment Features for Photo Mode" on page 27 & "Image Adjustment Features for photos in Photo Mode. ❏ In Photo Mode in Epson Scan 2, select the Advanced Settings tab, and then Image Option > Text Enhancement. ❏ When scanning...
... & "Cleaning the Scanner" on page 51 The Image Quality is low, try increasing the resolution and then scanning. ❏ In Epson Scan 2, adjust the image using items on the Advanced Settings tab, and then scan. This feature may appear in the Background of Images...Information & "Setting a Resolution That Suits the Scanning Purpose" on page 25 & "Image Adjustment Features for Photo Mode" on page 27 & "Image Adjustment Features for photos in Photo Mode. ❏ In Photo Mode in Epson Scan 2, select the Advanced Settings tab, and then Image Option > Text Enhancement. ❏ When scanning...
Users Guide
Page 58
...Enhancement. ❏ Select Document Mode as the Mode in Epson Scan 2, when Image Type on the Main Settings tab is set Descreening. ❏ Change the resolution, and then scan again. Related Information & "Image Adjustment Features for Photo Mode" on page 27 & "Image Adjustment Features for ...documents in Document Mode. ❏ In Document Mode in Epson Scan 2. Scan using the settings for Document Mode" on page 33 & "Setting a ...
...Enhancement. ❏ Select Document Mode as the Mode in Epson Scan 2, when Image Type on the Main Settings tab is set Descreening. ❏ Change the resolution, and then scan again. Related Information & "Image Adjustment Features for Photo Mode" on page 27 & "Image Adjustment Features for ...documents in Document Mode. ❏ In Document Mode in Epson Scan 2. Scan using the settings for Document Mode" on page 33 & "Setting a ...
Users Guide
Page 59
...Use an original with the top and bottom inversed is placed with clear text. Cannot Achieve the Results Intended in Auto Photo Orientation ❏ Small photos are not rotated automatically. Text recognition may not be detected are not rotated automatically. ❏ Film that is not rotated...Normal preview, and then create marquees manually. Related Information & "Saving as a Searchable PDF ❏ On the Image Format Options window in Epson Scan 2, check that Text Language is set to Black & White, adjust Threshold on the Advanced Settings tab. User's Guide Solving Problems &#...
...Use an original with the top and bottom inversed is placed with clear text. Cannot Achieve the Results Intended in Auto Photo Orientation ❏ Small photos are not rotated automatically. Text recognition may not be detected are not rotated automatically. ❏ Film that is not rotated...Normal preview, and then create marquees manually. Related Information & "Saving as a Searchable PDF ❏ On the Image Format Options window in Epson Scan 2, check that Text Language is set to Black & White, adjust Threshold on the Advanced Settings tab. User's Guide Solving Problems &#...


