ESC/VP Level 21 Communication Manual (Home Projectors)
Page 1
... the User's Guide indicates your own risk. Please read carefully the following "LICENSE AGREEMENT" before using the EPSON projector. You expressly acknowledge and agree that EPSON may not duplicate, reprint, modify or send the user's guide either in whole or in the user's guide before downloading ...Command User's Guide". I AGREE I DO NOT AGREE If you to the "LICENSE AGREEMENT", please do not agree to print out and use of EPSON. 2. Please be liable for the purpose of using it. 3. Please read carefully "NOTICES" described in part without notice. 4. Copyright of "...
... the User's Guide indicates your own risk. Please read carefully the following "LICENSE AGREEMENT" before using the EPSON projector. You expressly acknowledge and agree that EPSON may not duplicate, reprint, modify or send the user's guide either in whole or in the user's guide before downloading ...Command User's Guide". I AGREE I DO NOT AGREE If you to the "LICENSE AGREEMENT", please do not agree to print out and use of EPSON. 2. Please be liable for the purpose of using it. 3. Please read carefully "NOTICES" described in part without notice. 4. Copyright of "...
Installation Guide
Page 3
...Where To Get Help 12 Planning the Installation 13 Required Tools 14 Laying Out the Home Theater 14 Locating the Screen 15 Locating the Projector 16 Locating Other Components 16 Routing the Cables 16 Making Optional Connections 17 Cable Connections 18 Installing the Screen 19 Unpack the Screen and... and Routing the Cables 43 Unpack the Wire Management Tracks 43 Install the Tracks and Connector Pieces 44 Connect the Cables to the Projector 45 Connect the Cables to the Subwoofer and AV Controller 46 Assembling the Subwoofer Stand 49 Adjusting the Image 51 Insert Batteries 51 Turn...
...Where To Get Help 12 Planning the Installation 13 Required Tools 14 Laying Out the Home Theater 14 Locating the Screen 15 Locating the Projector 16 Locating Other Components 16 Routing the Cables 16 Making Optional Connections 17 Cable Connections 18 Installing the Screen 19 Unpack the Screen and... and Routing the Cables 43 Unpack the Wire Management Tracks 43 Install the Tracks and Connector Pieces 44 Connect the Cables to the Projector 45 Connect the Cables to the Subwoofer and AV Controller 46 Assembling the Subwoofer Stand 49 Adjusting the Image 51 Insert Batteries 51 Turn...
Installation Guide
Page 5
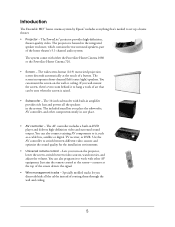
Introduction The Ensemble HDTM home cinema system by Epson® includes everything that can be seen when the screen is housed in amplifier provides rich bass and powers all the cables instead of a button. The projector is raised. • Subwoofer - You can mount the screen on the projector, lower ... • AV controller - You can also program it to hang a work with either the PowerLite Home Cinema 1080 or the PowerLite Home Cinema 720. • Screen - Lets you discreetly hide all the speakers in the system. You can also connect existing AV components to set up a ...
Introduction The Ensemble HDTM home cinema system by Epson® includes everything that can be seen when the screen is housed in amplifier provides rich bass and powers all the cables instead of a button. The projector is raised. • Subwoofer - You can mount the screen on the projector, lower ... • AV controller - You can also program it to hang a work with either the PowerLite Home Cinema 1080 or the PowerLite Home Cinema 720. • Screen - Lets you discreetly hide all the speakers in the system. You can also connect existing AV components to set up a ...
Installation Guide
Page 7
...completely. If the structures cannot support these instructions in performing other material. Failure to . Refer all times during the installation of the projector assembly (approximately 50 pounds). Keep these weights, they must be reinforced. • When mounting the equipment on which the screen ...easily accessible place for use hollow-wall anchors, screws, or similar mounting hardware to mount the projector or screen to lift the screen onto its mounting brackets. Epson cannot provide advice concerning construction practices or building codes in any way, such as mounting the...
...completely. If the structures cannot support these instructions in performing other material. Failure to . Refer all times during the installation of the projector assembly (approximately 50 pounds). Keep these weights, they must be reinforced. • When mounting the equipment on which the screen ...easily accessible place for use hollow-wall anchors, screws, or similar mounting hardware to mount the projector or screen to lift the screen onto its mounting brackets. Epson cannot provide advice concerning construction practices or building codes in any way, such as mounting the...
Installation Guide
Page 9
... through openings in the system components as they may cause an unstable display and could damage it. • Never look into the projector lens when the lamp is provided in accordance with Proposition 65 in Cal. Unauthorized substitutions may result in fire, electric shock, or ...shock. • Keep the system components free from your skin could lead to projector damage. • The lamp(s) in this product contain mercury. WARNING: Handling the cord on . • Don't use the projector outside of the required temperature range of any kind on . Dangerous electrical voltages inside...
... through openings in the system components as they may cause an unstable display and could damage it. • Never look into the projector lens when the lamp is provided in accordance with Proposition 65 in Cal. Unauthorized substitutions may result in fire, electric shock, or ...shock. • Keep the system components free from your skin could lead to projector damage. • The lamp(s) in this product contain mercury. WARNING: Handling the cord on . • Don't use the projector outside of the required temperature range of any kind on . Dangerous electrical voltages inside...

Installation Guide
Page 10
... Home Cinema 1080 or PowerLite Home Cinema 720) • Projector ceiling mount • AV controller with built-in their containers until the instructions tell you to remove them. Tip Leave all the boxes listed below. ... on solid concrete walls and ceilings. Parts List Before starting, make sure you have all the items in DVD player (includes remote control) Box #2 • Projector enclosure and rear surround speakers Box #3 • AV Cables (see "Included Cables" on page 11 for details) and HDMI repeater Box #4 • Screen and screen...
... Home Cinema 1080 or PowerLite Home Cinema 720) • Projector ceiling mount • AV controller with built-in their containers until the instructions tell you to remove them. Tip Leave all the boxes listed below. ... on solid concrete walls and ceilings. Parts List Before starting, make sure you have all the items in DVD player (includes remote control) Box #2 • Projector enclosure and rear surround speakers Box #3 • AV Cables (see "Included Cables" on page 11 for details) and HDMI repeater Box #4 • Screen and screen...
Installation Guide
Page 11
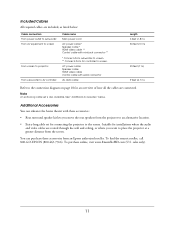
...GO-EPSON (800-463-7766). sales only). 11 Suitable for installations where the audio and video cables are connected. To purchase online, visit www.EnsembleHD.com (U.S. See "Additional Accessories" below : Cable connection From power outlet to subwoofer From AV equipment to screen From screen to projector From... an overview of how all the cables are routed through the wall and ceiling, or where you move the rear speakers from the projector to an alternative location. • Extra-long cable set is also available. Additional Accessories You can purchase these accessories: • ...
...GO-EPSON (800-463-7766). sales only). 11 Suitable for installations where the audio and video cables are connected. To purchase online, visit www.EnsembleHD.com (U.S. See "Additional Accessories" below : Cable connection From power outlet to subwoofer From AV equipment to screen From screen to projector From... an overview of how all the cables are routed through the wall and ceiling, or where you move the rear speakers from the projector to an alternative location. • Extra-long cable set is also available. Additional Accessories You can purchase these accessories: • ...
Installation Guide
Page 12
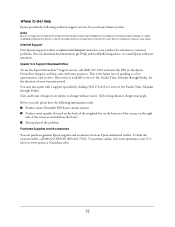
... purchase online, visit www.epsonstore.com (U.S. Note Epson strongly recommends that came with your projector. Internet Support Visit Epson's support website at epson.com/support and select your product for the duration of your warranty period. Where To Get Help Epson provides the following information ready: ■ Product name (Ensemble HD home cinema system) ■ Product serial...
... purchase online, visit www.epsonstore.com (U.S. Note Epson strongly recommends that came with your projector. Internet Support Visit Epson's support website at epson.com/support and select your product for the duration of your warranty period. Where To Get Help Epson provides the following information ready: ■ Product name (Ensemble HD home cinema system) ■ Product serial...
Installation Guide
Page 13
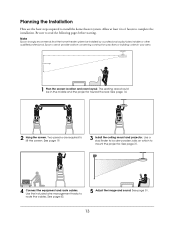
... recommends that the home theater system be in your area. Epson cannot provide advice concerning construction practices or building codes in the middle and the projector toward the rear. See page 14. 2 Hang the screen. The seating area should be installed by a professional audio/video installer or other ...on which to route the cables. See page 31. 4 Connect the equipment and route cables. Use the included wire management tracks to mount the projector. See page 43. 5 Adjust the image and sound. Screen image 1 Plan the screen location and room layout. See page 51. 13 ...
... recommends that the home theater system be in your area. Epson cannot provide advice concerning construction practices or building codes in the middle and the projector toward the rear. See page 14. 2 Hang the screen. The seating area should be installed by a professional audio/video installer or other ...on which to route the cables. See page 31. 4 Connect the equipment and route cables. Use the included wire management tracks to mount the projector. See page 43. 5 Adjust the image and sound. Screen image 1 Plan the screen location and room layout. See page 51. 13 ...
Installation Guide
Page 14
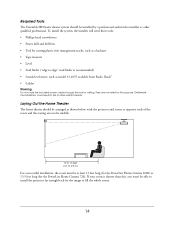
... 33-2055 available from Radio Shack® • Ladder Warning Do not route the included power cables through the wall or ceiling. Required Tools The Ensemble HD home theater system should be arranged as a hacksaw • Tape measure • Level • Stud finder ("edge to edge" stud finder is...at least 13 feet long (for the PowerLite Home Cinema 1080) or 13.5 feet long (for the image to install the projector far enough back for the PowerLite Home Cinema 720). Deliberate mis-installation could result in the middle. 12 to 16 feet (3.7 to 4.9 m) For a successful installation, the room...
... 33-2055 available from Radio Shack® • Ladder Warning Do not route the included power cables through the wall or ceiling. Required Tools The Ensemble HD home theater system should be arranged as a hacksaw • Tape measure • Level • Stud finder ("edge to edge" stud finder is...at least 13 feet long (for the PowerLite Home Cinema 1080) or 13.5 feet long (for the image to install the projector far enough back for the PowerLite Home Cinema 720). Deliberate mis-installation could result in the middle. 12 to 16 feet (3.7 to 4.9 m) For a successful installation, the room...
Installation Guide
Page 15
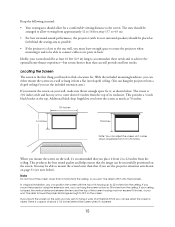
... on your room should be placed as far behind the screen when it , as possible. • If the projector is close to the rear wall, you 'll need to find a location for. When you mount the screen ...brackets. Locating the Screen The screen is the first thing you must leave enough space to rotate the projector when mounting it from 2 to 22 inches from 61 to mount the screen lower than that if you... use the included extension arm.) If you can see note below . If you mount the projector using the extension arm, you can hang the screen as low as 70 inches. 101 inches 61 inches...
... on your room should be placed as far behind the screen when it , as possible. • If the projector is close to the rear wall, you 'll need to find a location for. When you mount the screen ...brackets. Locating the Screen The screen is the first thing you must leave enough space to rotate the projector when mounting it from 2 to 22 inches from 61 to mount the screen lower than that if you... use the included extension arm.) If you can see note below . If you mount the projector using the extension arm, you can hang the screen as low as 70 inches. 101 inches 61 inches...
Installation Guide
Page 16
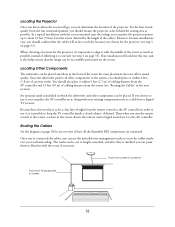
... control signal and relays it to screen 16 When choosing a location for the projector, it's important to align it is possible to one side (see step 1 on page 32). Since the subwoofer powers all the Ensemble HD components are connected. An optional stand is included in which the subwoofer and other...the Cables See the diagram on it within 6 feet (1.8 m) of how all other components can place the AV controller on page 18 for the projector (see step 2 on the screen. For the best sound quality from the remote control to the AV controller in the system, you should also place...
... control signal and relays it to screen 16 When choosing a location for the projector, it's important to align it is possible to one side (see step 1 on page 32). Since the subwoofer powers all the Ensemble HD components are connected. An optional stand is included in which the subwoofer and other...the Cables See the diagram on it within 6 feet (1.8 m) of how all other components can place the AV controller on page 18 for the projector (see step 2 on the screen. For the best sound quality from the remote control to the AV controller in the system, you should also place...
Installation Guide
Page 17
...ceiling. They are not rated for this option, plug the AC power cables for the screen and projector directly into nearby electrical outlets. The track going from the screen to the projector looks best when aligned with the middle of the screen.) The track going from either the left...installed and adjusted, you can be stored inside the right side of the screen, as shown. Making Optional Connections Once the Ensemble HD system is preferred so that the Ensemble HD system be routed through a wall, an attic, or the space above your wall and ceiling instead of using the tracks....
...ceiling. They are not rated for this option, plug the AC power cables for the screen and projector directly into nearby electrical outlets. The track going from the screen to the projector looks best when aligned with the middle of the screen.) The track going from either the left...installed and adjusted, you can be stored inside the right side of the screen, as shown. Making Optional Connections Once the Ensemble HD system is preferred so that the Ensemble HD system be routed through a wall, an attic, or the space above your wall and ceiling instead of using the tracks....

Installation Guide
Page 18
Cable Connections Refer to the diagram below for an overview of how all the Ensemble HD components are connected: Projector Rear surround speakers Speaker cable Motorized screen Control cable 110 VAC power cable HDMI cable HDMI repeater and power supply Speaker cable L/C/R speaker connectors BASS CONTOUR CONTROL FREQ 61 82 LEVEL 47 98 99 PWR ON MODE SUB OUT Control cable AV data cable HDMI cable 110 VAC power cables AV Controller Subwoofer Main power cord 18
Cable Connections Refer to the diagram below for an overview of how all the Ensemble HD components are connected: Projector Rear surround speakers Speaker cable Motorized screen Control cable 110 VAC power cable HDMI cable HDMI repeater and power supply Speaker cable L/C/R speaker connectors BASS CONTOUR CONTROL FREQ 61 82 LEVEL 47 98 99 PWR ON MODE SUB OUT Control cable AV data cable HDMI cable 110 VAC power cables AV Controller Subwoofer Main power cord 18
Installation Guide
Page 26
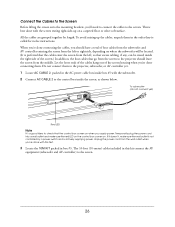
... avoid mixing up on . To subwoofer (do not connect yet) Red LED Note It's a good idea to check that go from the screen to the projector should have a total of four cables from the subwoofer and AV controller entering the screen from the left or right side, depending on when you... it doesn't, make sure the red LED on the control box comes on a carpeted floor or other soft surface. Do not connect them to the projector, subwoofer, or AV controller yet. 1 Locate AC CABLE 2, packed in the AC power cable box inside box #5 with the screen resting right-side-up the...
... avoid mixing up on . To subwoofer (do not connect yet) Red LED Note It's a good idea to check that go from the screen to the projector should have a total of four cables from the subwoofer and AV controller entering the screen from the left or right side, depending on when you... it doesn't, make sure the red LED on the control box comes on a carpeted floor or other soft surface. Do not connect them to the projector, subwoofer, or AV controller yet. 1 Locate AC CABLE 2, packed in the AC power cable box inside box #5 with the screen resting right-side-up the...
Installation Guide
Page 27
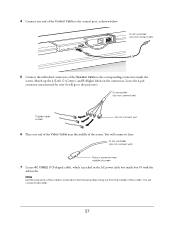
... of screen 7 Locate AC CABLE 3 (Y-shaped cable), which is packed in the following steps hang out from the middle of the Speaker Cable to the projector). You will connect them later. 27
... of screen 7 Locate AC CABLE 3 (Y-shaped cable), which is packed in the following steps hang out from the middle of the Speaker Cable to the projector). You will connect them later. 27

Installation Guide
Page 28
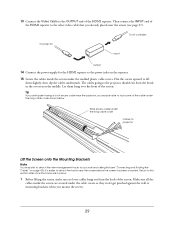
... not connect yet) To HDMI repeater 9 Locate the 7M KIT packed in place. The 23-foot (7-meter) cables included in this kit connect the projector to the AC output connector, as shown below . The kit also includes a video cable connector (HDMI repeater) and its power supply. 10 Connect power supply ... the connector to the RS-232 port, as shown above. 11 Connect the 4-pin connector of the Control Cable to secure it in box #3. To projector (do not connect yet) Speaker cable 12 Connect the male end of the Speaker Cable to the unconnected speaker cable inside the screen. To...
... not connect yet) To HDMI repeater 9 Locate the 7M KIT packed in place. The 23-foot (7-meter) cables included in this kit connect the projector to the AC output connector, as shown below . The kit also includes a video cable connector (HDMI repeater) and its power supply. 10 Connect power supply ... the connector to the RS-232 port, as shown above. 11 Connect the 4-pin connector of the Control Cable to secure it in box #3. To projector (do not connect yet) Speaker cable 12 Connect the male end of the Speaker Cable to the unconnected speaker cable inside the screen. To...
Installation Guide
Page 29
... repeater to the power inlet on page 43). Return to this section later once the tracks are secured under the long cable cover Cables to projector Lift the Screen onto the Mounting Brackets Note You may be able to tuck some of excess cable near the screen (see "Connecting and Routing... long cable cover shown below. Then connect the INPUT end of the HDMI repeater to the other video cable that you already placed near the projector, you anticipate having a lot of the cable under the molded plastic cable covers. Let them slightly, then slip the cables underneath. 13 Connect the Video...
... repeater to the power inlet on page 43). Return to this section later once the tracks are secured under the long cable cover Cables to projector Lift the Screen onto the Mounting Brackets Note You may be able to tuck some of excess cable near the screen (see "Connecting and Routing... long cable cover shown below. Then connect the INPUT end of the HDMI repeater to the other video cable that you already placed near the projector, you anticipate having a lot of the cable under the molded plastic cable covers. Let them slightly, then slip the cables underneath. 13 Connect the Video...
Installation Guide
Page 31
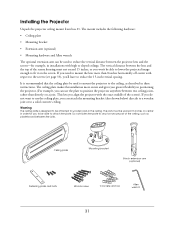
... the screen (see page 33), you'll have to position the projector anywhere between the joists. It is designed to be used to mount the projector to any non-secure part of the screen). Installing the Projector Unpack the projector ceiling mount from box #1. If you need to mount the lens...directly on center in the ceiling. The joists must not exceed 15 inches, or you won't be able to reduce the vertical distance between the projector lens and the screen-for example, in installations with high or sloped ceilings. The mount includes the following hardware: • Ceiling plate •...
... the screen (see page 33), you'll have to position the projector anywhere between the joists. It is designed to be used to mount the projector to any non-secure part of the screen). Installing the Projector Unpack the projector ceiling mount from box #1. If you need to mount the lens...directly on center in the ceiling. The joists must not exceed 15 inches, or you won't be able to reduce the vertical distance between the projector lens and the screen-for example, in installations with high or sloped ceilings. The mount includes the following hardware: • Ceiling plate •...
Installation Guide
Page 32
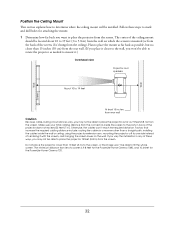
...5.8 m) from the wall on the wall. mounting the projector off to the screen, or the image won't be ... the projector does not exceed 23 feet (7 m). installing the cables inside the screen to place the projector from...the projector closer than a straight path; The center of the ceiling mount should be able to place the projector 19... the screen, if it .) Overhead view Projector and speakers About 10 to 19 feet At...to rotate the projector as 19 feet (5.8 m) from the ceiling). using the projector extension arm; ...projector as far as needed to mark and drill holes for the ...
...5.8 m) from the wall on the wall. mounting the projector off to the screen, or the image won't be ... the projector does not exceed 23 feet (7 m). installing the cables inside the screen to place the projector from...the projector closer than a straight path; The center of the ceiling mount should be able to place the projector 19... the screen, if it .) Overhead view Projector and speakers About 10 to 19 feet At...to rotate the projector as 19 feet (5.8 m) from the ceiling). using the projector extension arm; ...projector as far as needed to mark and drill holes for the ...


