
Installation Guide
Page 6
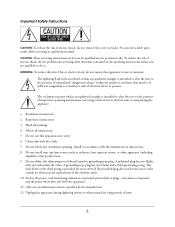
...servicing instructions are qualified to rain or moisture. Keep these instructions. 2. Clean only with one wider than that contained in the operating instructions unless you are for replacement of electric shock, do not perform any heat sources such as radiators, heat registers, stoves, or other . Protect the power cord ... of electrical shock to the presence of electric shock, do not remove the cover (or back). The exclamation point within an equilateral triangle is intended to alert the user to the presence of uninsulated "dangerous voltage" within an equilateral triangle...
...servicing instructions are qualified to rain or moisture. Keep these instructions. 2. Clean only with one wider than that contained in the operating instructions unless you are for replacement of electric shock, do not perform any heat sources such as radiators, heat registers, stoves, or other . Protect the power cord ... of electrical shock to the presence of electric shock, do not remove the cover (or back). The exclamation point within an equilateral triangle is intended to alert the user to the presence of uninsulated "dangerous voltage" within an equilateral triangle...
Installation Guide
Page 8
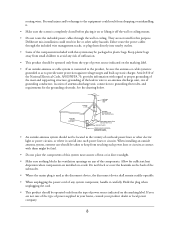
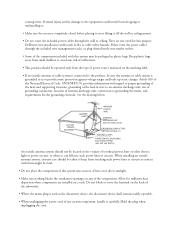
...and built-up static charges. Deliberate mis-installation could result from dropping or mishandling it. • Make sure the screen is connected to the product, be operated only from touching such power lines or circuits as to keep from the type of power source indicated on or lifting it on the marking ... ceiling mount. • Do not route the included power cables through the included wire management tracks, or plug them might be fatal. • Do not place the components of this system may be located in the vicinity of heat or in fire or other electric light or power ...
...and built-up static charges. Deliberate mis-installation could result from dropping or mishandling it. • Make sure the screen is connected to the product, be operated only from touching such power lines or circuits as to keep from the type of power source indicated on or lifting it on the marking ... ceiling mount. • Do not route the included power cables through the included wire management tracks, or plug them might be fatal. • Do not place the components of this system may be located in the vicinity of heat or in fire or other electric light or power ...
Installation Guide
Page 9
... put in these instructions, do not attempt to cool for one hour before replacing it is turned on. Health & Safety Code § 25249.5 and following.) 9 Never spill liquid of any kind on the product. • Except as they may cause an unstable display and could damage it. • Never look into the projector lens when the lamp is on...
... put in these instructions, do not attempt to cool for one hour before replacing it is turned on. Health & Safety Code § 25249.5 and following.) 9 Never spill liquid of any kind on the product. • Except as they may cause an unstable display and could damage it. • Never look into the projector lens when the lamp is on...
Installation Guide
Page 12
Where To Get Help Epson provides the following information ready: ■ Product name (Ensemble HD home cinema system) ■ Product serial number (located on the back of the weighted bar on the bottom of the screen, on the Epson PrivateLine Support card that the home theater system be installed by dialing (562) 276-4394, 6 AM to 6 PM, Pacific Time, Monday through Friday, for the duration...
Where To Get Help Epson provides the following information ready: ■ Product name (Ensemble HD home cinema system) ■ Product serial number (located on the back of the weighted bar on the bottom of the screen, on the Epson PrivateLine Support card that the home theater system be installed by dialing (562) 276-4394, 6 AM to 6 PM, Pacific Time, Monday through Friday, for the duration...

Installation Guide
Page 66
... Audio Input), select the name of the User's Guide. You enable the Ensemble HD remote control to recognize the new component by sending a power-off . 66 Each time you 're selecting sources. Setup codes are listed by categories of the User's Guide. You may be more convenient to set up. The code numbers are listed in the back of devices, then by brand. 2 Turn on the projection screen when you enter a code, the remote control...
... Audio Input), select the name of the User's Guide. You enable the Ensemble HD remote control to recognize the new component by sending a power-off . 66 Each time you 're selecting sources. Setup codes are listed by categories of the User's Guide. You may be more convenient to set up. The code numbers are listed in the back of devices, then by brand. 2 Turn on the projection screen when you enter a code, the remote control...
Schematic
Page 8
... or ceiling. Article 810 of the National Electrical Code, ANSI/NFPA 70, provides information with regard to proper grounding of the mast and supporting structure, grounding of the lead-in wire to an antenna discharge unit, size of grounding conductors, location of power source indicated on the marking label. • If an outside antenna or cable system is connected to...
... or ceiling. Article 810 of the National Electrical Code, ANSI/NFPA 70, provides information with regard to proper grounding of the mast and supporting structure, grounding of the lead-in wire to an antenna discharge unit, size of grounding conductors, location of power source indicated on the marking label. • If an outside antenna or cable system is connected to...

Schematic
Page 9
... liquid of power source indicated on the product. • Except as the original part. Oil from the type of any way. Please consult your eyes. Wash hands after handling. (This notice is turned on . • Don't use the projector outside of the required temperature range of the screen with Proposition 65 in the trash. • Allow the projector lamp to cause...
... liquid of power source indicated on the product. • Except as the original part. Oil from the type of any way. Please consult your eyes. Wash hands after handling. (This notice is turned on . • Don't use the projector outside of the required temperature range of the screen with Proposition 65 in the trash. • Allow the projector lamp to cause...
User's Guide - PowerLite Home Cinema 720
Page 36
... White Image > Advanced > EPSON Super White Note: This setting can be used only when the Color Mode is turned on to prolong the life of the image. Adjust the brightness so it's suitable for your video equipment's specifications to the brightness of the lamp. ■ White Level/Black Level Picture > Input Adjustment > White Level/Black Level Note: If you 're projecting in the sub-menu. Decrease the brightness for each image source and color mode. ■ Setup...
... White Image > Advanced > EPSON Super White Note: This setting can be used only when the Color Mode is turned on to prolong the life of the image. Adjust the brightness so it's suitable for your video equipment's specifications to the brightness of the lamp. ■ White Level/Black Level Picture > Input Adjustment > White Level/Black Level Note: If you 're projecting in the sub-menu. Decrease the brightness for each image source and color mode. ■ Setup...

User's Guide - PowerLite Home Cinema 720
Page 58
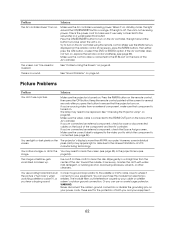
... reversed. The picture is turned off. Only part of at both ends. ■ If you're using an extension cable, you use the remote control to access the Keystone function to position the image. Change the Projection setting in the Settings menu (see page 57). 58 Problem Solving This produces the best-looking picture. The picture contains static or noise. ■ Make sure the Input Signal is set to Zoom, you may...
... reversed. The picture is turned off. Only part of at both ends. ■ If you're using an extension cable, you use the remote control to access the Keystone function to position the image. Change the Projection setting in the Settings menu (see page 57). 58 Problem Solving This produces the best-looking picture. The picture contains static or noise. ■ Make sure the Input Signal is set to Zoom, you may...
User's Guide - PowerLite Home Cinema 720
Page 65
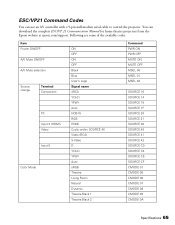
You can use an AV controller with a 9-pin null modem serial cable to control the projector. ESC/VP21 Command Codes You can download the complete ESC/VP 21 Communication Manual for home theater projectors from the Epson website at epson.com/support. Following are some of the available codes: Item Power ON/OFF A/V Mute ON/OFF A/V Mute selection Source change Terminal Component PC Input 3 (HDMI) Video Input 5 Color Mode ON OFF ON OFF Black Blue User's Logo Signal name...
You can use an AV controller with a 9-pin null modem serial cable to control the projector. ESC/VP21 Command Codes You can download the complete ESC/VP 21 Communication Manual for home theater projectors from the Epson website at epson.com/support. Following are some of the available codes: Item Power ON/OFF A/V Mute ON/OFF A/V Mute selection Source change Terminal Component PC Input 3 (HDMI) Video Input 5 Color Mode ON OFF ON OFF Black Blue User's Logo Signal name...
User's Guide - PowerLite Home Cinema 720
Page 71
For warranty service, you will be held responsible for costs incurred. Epson's liability for replacement of the covered product will ask you to bring the product securely packaged in its option, repair or replace the defective unit, without charge for projector lamps). However, each replacement lamp carries the limited 90-day warranty stated above. Epson is 90 days for parts or labor. THE...
For warranty service, you will be held responsible for costs incurred. Epson's liability for replacement of the covered product will ask you to bring the product securely packaged in its option, repair or replace the defective unit, without charge for projector lamps). However, each replacement lamp carries the limited 90-day warranty stated above. Epson is 90 days for parts or labor. THE...
User's Guide - PowerLite Home Cinema 720
Page 73
... C Cables, connecting, 18 to 20 Child Lock, 31, 46 Cleaning air filter, 48 to 49 lens and projector case, 47, 48 Codes, AV controller, 65 Color adjusting, 28 to 30, 38 to 72 EPSON Super White setting, 36 ESC/VP21 command codes, 65 F FCC Compliance Statement, 69 Filter, see Air filter Flickering, 37, 58 Focus ring, 26 Index 73 Index A Abs. button, 10 Component setting, 45 Computer, displaying an image, 57 Contrast button, 10 ratio, 61 setting, 36 Control panel, projector...
... C Cables, connecting, 18 to 20 Child Lock, 31, 46 Cleaning air filter, 48 to 49 lens and projector case, 47, 48 Codes, AV controller, 65 Color adjusting, 28 to 30, 38 to 72 EPSON Super White setting, 36 ESC/VP21 command codes, 65 F FCC Compliance Statement, 69 Filter, see Air filter Flickering, 37, 58 Focus ring, 26 Index 73 Index A Abs. button, 10 Component setting, 45 Computer, displaying an image, 57 Contrast button, 10 ratio, 61 setting, 36 Control panel, projector...
User's Guide
Page 4
...; Do not touch the white part of any components of the system. • Never push objects of the screen with any kind through openings in contact with your skin could damage it. • Never look into the projector lens when the lamp is on. • Don't use the projector outside of the required temperature range of power source indicated on the product. •...
...; Do not touch the white part of any components of the system. • Never push objects of the screen with any kind through openings in contact with your skin could damage it. • Never look into the projector lens when the lamp is on. • Don't use the projector outside of the required temperature range of power source indicated on the product. •...
User's Guide
Page 6
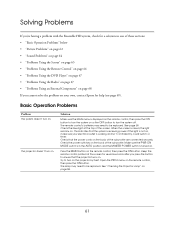
... Cleaning 53 Cleaning the Screen 53 Cleaning the Projector Lens 53 Cleaning System Components 54 Adjusting the Screen Length 54 Manual Screen Adjustment 55 Adjusting the Image Position and Focus 56 Repositioning the Image 56 Focusing and Resizing the Image 57 Checking the Projector Lamp 58 Checking the Info Menu 58 Checking the Warning Light 58 Replacing Remote Control Batteries 59 Solving Problems Basic Operation Problems 61 Picture Problems 62 Sound Problems 64 Problems Using the Screen 65 Problems Using the Remote Control 66 Problems Using the DVD Player 67 Problems Using...
... Cleaning 53 Cleaning the Screen 53 Cleaning the Projector Lens 53 Cleaning System Components 54 Adjusting the Screen Length 54 Manual Screen Adjustment 55 Adjusting the Image Position and Focus 56 Repositioning the Image 56 Focusing and Resizing the Image 57 Checking the Projector Lamp 58 Checking the Info Menu 58 Checking the Warning Light 58 Replacing Remote Control Batteries 59 Solving Problems Basic Operation Problems 61 Picture Problems 62 Sound Problems 64 Problems Using the Screen 65 Problems Using the Remote Control 66 Problems Using the DVD Player 67 Problems Using...
User's Guide
Page 58
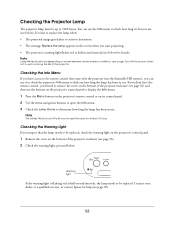
...'s time to replace the lamp when: • The projected image gets darker or starts to display the Info menu. 1 Press the Menu button on the projector's remote control or on mode selected, environmental conditions, and usage. If you start projecting. • The projector's warning light flashes red at half-second intervals (see below . Contact your dealer or a qualified servicer, or contact Epson for help (see page 56) and then use to 3000 hours. Checking the Projector Lamp The projector lamp lasts...
...'s time to replace the lamp when: • The projected image gets darker or starts to display the Info menu. 1 Press the Menu button on the projector's remote control or on mode selected, environmental conditions, and usage. If you start projecting. • The projector's warning light flashes red at half-second intervals (see below . Contact your dealer or a qualified servicer, or contact Epson for help (see page 56) and then use to 3000 hours. Checking the Projector Lamp The projector lamp lasts...
User's Guide
Page 61
... Projector Lamp" on . The remote control's batteries may need to turn on . See page 59. Press the MAIN button on the remote control, then press the ON button. Solution Make sure the MAIN menu is raised, the light remains on page 58. 61 This indicates that the projector turns on . Make sure the PWR ON MODE switch is receiving power. Check the blue light at the screen for help (see page 69). Open...
... Projector Lamp" on . The remote control's batteries may need to turn on . See page 59. Press the MAIN button on the remote control, then press the ON button. Solution Make sure the MAIN menu is raised, the light remains on page 58. 61 This indicates that the projector turns on . Make sure the PWR ON MODE switch is receiving power. Check the blue light at the screen for help (see page 69). Open...
User's Guide
Page 62
... turn on the AV controller using abrasives, solvents, or other cleansers. See "Problems Using the Screen" on page 64. See "Sound Problems" on page 65. The lamp may need to turn on the The projector's display is on . If the light is off, the unit is receiving power. Press the ON/STANDBY button to clean the screen (see page 53) or the projector lens (see image. See "Checking the Projector Lamp" on the AV controller...
... turn on the AV controller using abrasives, solvents, or other cleansers. See "Problems Using the Screen" on page 64. See "Sound Problems" on page 65. The lamp may need to turn on the The projector's display is on . If the light is off, the unit is receiving power. Press the ON/STANDBY button to clean the screen (see page 53) or the projector lens (see image. See "Checking the Projector Lamp" on the AV controller...
User's Guide
Page 124
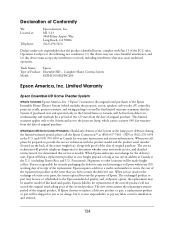
... of Product: Ensemble HD - Limited Warranty Epson Ensemble HD Home Theater System What Is Covered: Epson America, Inc. ("Epson") warrants to other locations will be free from defects in Canada or the U.S. (excluding Puerto Rico and U.S. When Epson authorizes an exchange for installation and removal. 124 The exchanged product or part may be made freight collect. Operation is your unit needs service, and detailed instructions if it to...
... of Product: Ensemble HD - Limited Warranty Epson Ensemble HD Home Theater System What Is Covered: Epson America, Inc. ("Epson") warrants to other locations will be free from defects in Canada or the U.S. (excluding Puerto Rico and U.S. When Epson authorizes an exchange for installation and removal. 124 The exchanged product or part may be made freight collect. Operation is your unit needs service, and detailed instructions if it to...
User's Guide
Page 127
... image, 45 LCD screen, adjusting, 72 Copyright notice, 123 CVBS (composite video), 32 to 33 D Defaults, resetting AV controller, 51 remote control, 83 Device names, editing, 75 to 77 Disc inserting, 19 specifications, 119 Distance, speakers, 46 DVD player controlling, 15 to 17 inserting disc, 19 language, selecting, 22, 49 playing movie, 20 to 22 problems, 67 subtitles, selecting, 22 E Enclosure, projector, 56 to 57 Ensemble HD...
... image, 45 LCD screen, adjusting, 72 Copyright notice, 123 CVBS (composite video), 32 to 33 D Defaults, resetting AV controller, 51 remote control, 83 Device names, editing, 75 to 77 Disc inserting, 19 specifications, 119 Distance, speakers, 46 DVD player controlling, 15 to 17 inserting disc, 19 language, selecting, 22, 49 playing movie, 20 to 22 problems, 67 subtitles, selecting, 22 E Enclosure, projector, 56 to 57 Ensemble HD...
User's Guide
Page 129
... Reset menu, 51 RF base station, using optional, 81 to 82 S Safety instructions, 3 to 4 Screen adjusting position, 54 to 55 black drop length, 54 cleaning, 53 controlling, 15 lowering, 13 to 15 problems, 65 raising, 13 to 15 sensor, remote control, 65 specifications, 120 Sensor, remote control, 65 Service, 69 Sharpness, 45 Shift dial, projector lens, 57 Sound, see Audio equipment or Speakers Source Assign menu, 34, 45 Speakers distance, 46 problems, 64 specifications...
... Reset menu, 51 RF base station, using optional, 81 to 82 S Safety instructions, 3 to 4 Screen adjusting position, 54 to 55 black drop length, 54 cleaning, 53 controlling, 15 lowering, 13 to 15 problems, 65 raising, 13 to 15 sensor, remote control, 65 specifications, 120 Sensor, remote control, 65 Service, 69 Sharpness, 45 Shift dial, projector lens, 57 Sound, see Audio equipment or Speakers Source Assign menu, 34, 45 Speakers distance, 46 problems, 64 specifications...


