Installation Guide
Page 38
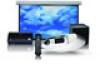
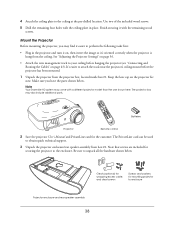
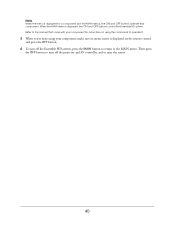
...find it easier to perform the following tasks first: • Plug in place. Batteries Projector Remote control 2 Save the projector User's Manual and PrivateLine card for securing the projector to obtain quick technical support. 3 Unpack the projector enclosure/rear speaker assembly from the ceiling. ...the image so it with the ceiling plate in the projector and turn it on the projector for wrapping excess cable; Note Your Ensemble HD system may also include additional parts. The PrivateLine card can be used to the enclosure. 4 Attach the ceiling plate to enclosure Projector ...
...find it easier to perform the following tasks first: • Plug in place. Batteries Projector Remote control 2 Save the projector User's Manual and PrivateLine card for securing the projector to obtain quick technical support. 3 Unpack the projector enclosure/rear speaker assembly from the ceiling. ...the image so it with the ceiling plate in the projector and turn it on the projector for wrapping excess cable; Note Your Ensemble HD system may also include additional parts. The PrivateLine card can be used to the enclosure. 4 Attach the ceiling plate to enclosure Projector ...

Installation Guide
Page 62
... the FREQ switch on the back of each frequency, locate the frequency on using the system, see the User's Guide for details). Note This switch does not set the crossover frequency, which is complete, retain all the manuals included with your calculation. 7 Use the u d l r arrow buttons to highlight the ...For an introduction to the home theater's full range of capabilities and how to the height of the test tones and use them, watch the Ensemble HD DVD that is the highest. When you want to play it nearly equal to the corresponding -dB setting, based on your system. Play each of the...
... the FREQ switch on the back of each frequency, locate the frequency on using the system, see the User's Guide for details). Note This switch does not set the crossover frequency, which is complete, retain all the manuals included with your calculation. 7 Use the u d l r arrow buttons to highlight the ...For an introduction to the home theater's full range of capabilities and how to the height of the test tones and use them, watch the Ensemble HD DVD that is the highest. When you want to play it nearly equal to the corresponding -dB setting, based on your system. Play each of the...
Installation Guide
Page 68
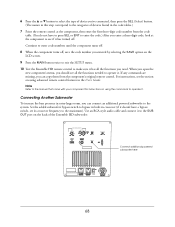
Note Refer to the manual that came with your component for instructions on using advanced remote control features in the...exit the SETUP menu. 10 Test the Ensemble HD remote control to make sure it doesn't have to press SEL or ENT to enter the code.) After you can connect an additional powered subwoofer to the system. Use an RCA-style audio cable ... connected, then press the SEL (Select) button. (The names in this step correspond to the categories of the Ensemble HD subwoofer: BASS CONTOUR CONTROL FREQ 61 82 47 98 99 LEVEL PWR ON MODE SUB OUT Connect additional powered subwoofer ...
Note Refer to the manual that came with your component for instructions on using advanced remote control features in the...exit the SETUP menu. 10 Test the Ensemble HD remote control to make sure it doesn't have to press SEL or ENT to enter the code.) After you can connect an additional powered subwoofer to the system. Use an RCA-style audio cable ... connected, then press the SEL (Select) button. (The names in this step correspond to the categories of the Ensemble HD subwoofer: BASS CONTOUR CONTROL FREQ 61 82 47 98 99 LEVEL PWR ON MODE SUB OUT Connect additional powered subwoofer ...
Product Brochure
Page 19
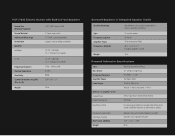
...Power Dimensions (WxHxD) Side/reflective surround; Horizontal +/- 47% (150x1 sub) (50x1 center) (35x4 LR/SrSl) 32-31kHz Five pre-programmed EQs manually selected based on screen installation location on either wall or ceiling Sub Acoustic Adjustment Anti-Boom Circuitry Dimensions (WxHxD) Weight... Manual rotary control varies frequency and gain Smooths room induced base peak 14.9" x 16.1" x 18.0" 65 lb Vertical +/- 96%; 100" (16:9) Electric Screen ...
...Power Dimensions (WxHxD) Side/reflective surround; Horizontal +/- 47% (150x1 sub) (50x1 center) (35x4 LR/SrSl) 32-31kHz Five pre-programmed EQs manually selected based on screen installation location on either wall or ceiling Sub Acoustic Adjustment Anti-Boom Circuitry Dimensions (WxHxD) Weight... Manual rotary control varies frequency and gain Smooths room induced base peak 14.9" x 16.1" x 18.0" 65 lb Vertical +/- 96%; 100" (16:9) Electric Screen ...
Supplemental / Late Breaking Information
Page 1
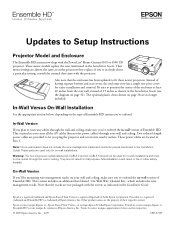
... packaged with the PowerLite® Home Cinema 6100 or 6500 UB projector. Note that the enclosure has been updated to Setup Instructions Projector Model and Enclosure The Ensemble HD system now ships with the screen, as indicated in Box 1. Toutes les autres marques appartiennent à leurs sociétés respectives. © 2009 Epson America, Inc. 4/09 CPD...
... packaged with the PowerLite® Home Cinema 6100 or 6500 UB projector. Note that the enclosure has been updated to Setup Instructions Projector Model and Enclosure The Ensemble HD system now ships with the screen, as indicated in Box 1. Toutes les autres marques appartiennent à leurs sociétés respectives. © 2009 Epson America, Inc. 4/09 CPD...
User's Guide - PowerLite Home Cinema 6100
Page 3
Contents Introduction Projector Parts Front Back Bottom Projector Control Panel Remote Control Button Map Optional Accessories Registration and Warranty Using This Manual Setting Up the Projector Choosing a Location Installing the Projector Connecting the Cables Connecting Video and Computer Equipment Making Other Connections Installing Batteries in the Remote ...
Contents Introduction Projector Parts Front Back Bottom Projector Control Panel Remote Control Button Map Optional Accessories Registration and Warranty Using This Manual Setting Up the Projector Choosing a Location Installing the Projector Connecting the Cables Connecting Video and Computer Equipment Making Other Connections Installing Batteries in the Remote ...
User's Guide - PowerLite Home Cinema 6100
Page 12
...the manual: Warning: Must be observed to avoid damage to your equipment. Use this site to view FAQs (Frequently Asked Questions) or product information and e-mail your questions to avoid bodily injury. Please follow these guidelines as you need more help ? Take advantage of Epson's ...automated support services 24 hours a day at www.epson.com/support. Note: Contains important information about your projector. 12 Introduction If you need to basic setup and...
...the manual: Warning: Must be observed to avoid damage to your equipment. Use this site to view FAQs (Frequently Asked Questions) or product information and e-mail your questions to avoid bodily injury. Please follow these guidelines as you need more help ? Take advantage of Epson's ...automated support services 24 hours a day at www.epson.com/support. Note: Contains important information about your projector. 12 Introduction If you need to basic setup and...

User's Guide - PowerLite Home Cinema 6100
Page 48
... setting on this setting if you are using the projector at higher altitudes. as the length of the lamp. or select YCbCr or YPbPr to manually select your projection screen. ■ Component Settings > Input Signal > Component Change this setting to match the type of equipment connected to output a 12-volt signal...
... setting on this setting if you are using the projector at higher altitudes. as the length of the lamp. or select YCbCr or YPbPr to manually select your projection screen. ■ Component Settings > Input Signal > Component Change this setting to match the type of equipment connected to output a 12-volt signal...
User's Guide - PowerLite Home Cinema 6100
Page 60
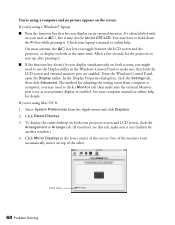
.... From the Windows Control Panel, open the Display utility. The method for adjusting the setting varies from the Apple menu and click Displays. 2. Select System Preferences from computer to hold down the Fn key while pressing it. In the Display Properties dialog box, click the Settings tab, then click Advanced... online help for the projector to sync up after pressing it isn't hidden by another window.) 4. Check your computer manual or online help . If you're using a Windows® laptop: ■ Press the function key that lets you display on both screens, you don't ...
.... From the Windows Control Panel, open the Display utility. The method for adjusting the setting varies from the Apple menu and click Displays. 2. Select System Preferences from computer to hold down the Fn key while pressing it. In the Display Properties dialog box, click the Settings tab, then click Advanced... online help for the projector to sync up after pressing it isn't hidden by another window.) 4. Check your computer manual or online help . If you're using a Windows® laptop: ■ Press the function key that lets you display on both screens, you don't ...
User's Guide - PowerLite Home Cinema 6100
Page 70
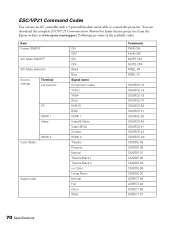
... CMODE 0C ASPECT 00 ASPECT 40 ASPECT 50 ASPECT 70 70 Specifications ESC/VP21 Command Codes You can download the complete ESC/VP 21 Communication Manual for home theater projectors from the Epson website at www.epson.com/support.
... CMODE 0C ASPECT 00 ASPECT 40 ASPECT 50 ASPECT 70 70 Specifications ESC/VP21 Command Codes You can download the complete ESC/VP 21 Communication Manual for home theater projectors from the Epson website at www.epson.com/support.
User's Guide
Page 6
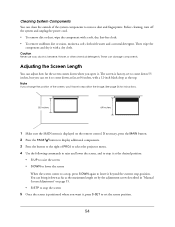
... Parental Controls 50 Restoring Factory Defaults 51 Cleaning and Maintenance Cleaning 53 Cleaning the Screen 53 Cleaning the Projector Lens 53 Cleaning System Components 54 Adjusting the Screen Length 54 Manual Screen Adjustment 55 Adjusting the Image Position and Focus 56 Repositioning the Image 56 Focusing and Resizing the Image 57 Checking...
... Parental Controls 50 Restoring Factory Defaults 51 Cleaning and Maintenance Cleaning 53 Cleaning the Screen 53 Cleaning the Projector Lens 53 Cleaning System Components 54 Adjusting the Screen Length 54 Manual Screen Adjustment 55 Adjusting the Image Position and Focus 56 Repositioning the Image 56 Focusing and Resizing the Image 57 Checking...
User's Guide
Page 15
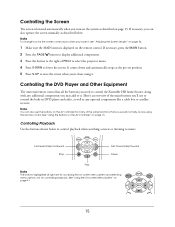
... operate the screen manually as described below to control playback when watching a movie or listening to music: Fast-rewind/skip backward Stop Fast-forward/skip forward Pause Play Note The buttons highlighted at the pre-set position. 5 Press S-UP to control the Ensemble HD home theater, along with... any optional components like a cable box or satellite receiver. See "Using the On-screen Menu System" on page 16. Note To change how far the screen comes down and ...
... operate the screen manually as described below to control playback when watching a movie or listening to music: Fast-rewind/skip backward Stop Fast-forward/skip forward Pause Play Note The buttons highlighted at the pre-set position. 5 Press S-UP to control the Ensemble HD home theater, along with... any optional components like a cable box or satellite receiver. See "Using the On-screen Menu System" on page 16. Note To change how far the screen comes down and ...

User's Guide
Page 29
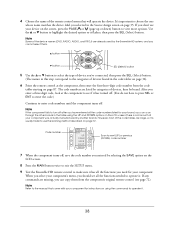
... control, then select AUD1. Tuning to the Desired Station 1 Select the RADIO option on the remote control to activate the radio: MAIN DVD CABLE SAT HD RADIO 1 OF 2 Select RADIO Note To use the AV controller to receive AM or FM radio broadcasts. to change the frequency: • Press the button.... The display on your tape deck to begin playing music. Listening to AM/FM Radio You can use the radio, it to change the frequency manually. • Or press and hold the button to find the next available station automatically. Listening to a Tape Deck Make sure your tape deck (or other...
... control, then select AUD1. Tuning to the Desired Station 1 Select the RADIO option on the remote control to activate the radio: MAIN DVD CABLE SAT HD RADIO 1 OF 2 Select RADIO Note To use the AV controller to receive AM or FM radio broadcasts. to change the frequency: • Press the button.... The display on your tape deck to begin playing music. Listening to AM/FM Radio You can use the radio, it to change the frequency manually. • Or press and hold the button to find the next available station automatically. Listening to a Tape Deck Make sure your tape deck (or other...
User's Guide
Page 38
Note Some of the code tables are already used by the Ensemble HD system, and you need for instructions on using the UP and DOWN options on page 35. 4 Choose...the SAVE option on the LCD screen. 8 Press the MAIN button twice to exit the SETUP menu. 9 Test the Ensemble HD remote control to make sure it has all the functions you cannot select them from the code tables starting on the screen...connected, then press the SEL (Select) button. (The names in the table using the commands to the manual that came with your component for your component. If any commands are listed by brand.
Note Some of the code tables are already used by the Ensemble HD system, and you need for instructions on using the UP and DOWN options on page 35. 4 Choose...the SAVE option on the LCD screen. 8 Press the MAIN button twice to exit the SETUP menu. 9 Test the Ensemble HD remote control to make sure it has all the functions you cannot select them from the code tables starting on the screen...connected, then press the SEL (Select) button. (The names in the table using the commands to the manual that came with your component for your component. If any commands are listed by brand.
User's Guide
Page 40
...'re done using your component, make sure its menu screen is displayed on the remote control and press the OFF button. 4 To turn off the Ensemble HD system, press the MAIN button to return to the MAIN menu. Note When the menu is displayed, the ON and OFF buttons control the... Ensemble HD system. Refer to raise the screen. 40 Then press the OFF button to turn off the projector and AV controller, and to the manual that came with your component for a component (not the MAIN menu), the ON and...
...'re done using your component, make sure its menu screen is displayed on the remote control and press the OFF button. 4 To turn off the Ensemble HD system, press the MAIN button to return to the MAIN menu. Note When the menu is displayed, the ON and OFF buttons control the... Ensemble HD system. Refer to raise the screen. 40 Then press the OFF button to turn off the projector and AV controller, and to the manual that came with your component for a component (not the MAIN menu), the ON and...
User's Guide
Page 54
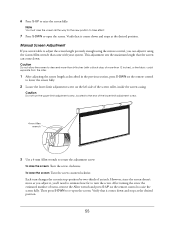
... it to come down as far as the maximum length set by the adjustment screw described in "Manual Screen Adjustment" on the remote control. See page 56 for instructions. 55 inches 64 inches 1... 5 Once the screen is factory-set to come down 55 inches, but you open it. Cleaning System Components You can clean the outside of the screen, you'll have to reposition the image. Then ...it with water and a neutral detergent. You can set the screen position. 54 Before cleaning, turn off the system and unplug the power cord. • To remove dirt or dust, wipe the component with a soft, ...
... it to come down as far as the maximum length set by the adjustment screw described in "Manual Screen Adjustment" on the remote control. See page 56 for instructions. 55 inches 64 inches 1... 5 Once the screen is factory-set to come down 55 inches, but you open it. Cleaning System Components You can clean the outside of the screen, you'll have to reposition the image. Then ...it with water and a neutral detergent. You can set the screen position. 54 Before cleaning, turn off the system and unplug the power cord. • To remove dirt or dust, wipe the component with a soft, ...
User's Guide
Page 55
...new position to raise the screen fully. Then press S-DWN to raise the screen fully. Caution Do not allow the screen to turn the screw. Manual Screen Adjustment If you weren't able to adjust the screen length precisely enough using the 4-mm Allen wrench that it , you can come down. ...the screen: Turn the screw counterclockwise. Caution Do not turn changes the screen's stop-position by two-thirds of more than 64 inches (with your system. Verify that came with a black drop of an inch. This adjustment sets the maximum length that the screen can adjust it using the remote ...
...new position to raise the screen fully. Then press S-DWN to raise the screen fully. Caution Do not allow the screen to turn the screw. Manual Screen Adjustment If you weren't able to adjust the screen length precisely enough using the 4-mm Allen wrench that it , you can come down. ...the screen: Turn the screw counterclockwise. Caution Do not turn changes the screen's stop-position by two-thirds of more than 64 inches (with your system. Verify that came with a black drop of an inch. This adjustment sets the maximum length that the screen can adjust it using the remote ...
User's Guide
Page 67
... Problem Solution The DVD/CD tray doesn't open or Make sure a flash drive isn't inserted into the USB slot. See your antenna's manual or the Ensemble HD Installation Guide to where it , but you and your power cords. The module filters out interference caused by the outdoor ground connection. These ... Using the Radio Problem Solution You get audio hum or buzz as CABLE or SAT, it displays the menu system for the projection of a DVD. (The MENU button displays the Ensemble HD setup menu if the MAIN menu is inserted, the DVD player cannot be used and a disc cannot be ...
... Problem Solution The DVD/CD tray doesn't open or Make sure a flash drive isn't inserted into the USB slot. See your antenna's manual or the Ensemble HD Installation Guide to where it , but you and your power cords. The module filters out interference caused by the outdoor ground connection. These ... Using the Radio Problem Solution You get audio hum or buzz as CABLE or SAT, it displays the menu system for the projection of a DVD. (The MENU button displays the Ensemble HD setup menu if the MAIN menu is inserted, the DVD player cannot be used and a disc cannot be ...
User's Guide
Page 121
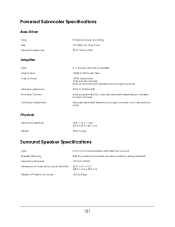
....7" (68.3 × 16.3 × 32.3 cm) 15 lb (6.8 kg) 121 also removable for ceiling installation 100 Hz to 20 kHz ±2dB 5 pre-programmed EQs, manually selectable depending on installed location of Projector Enclosure 4" (10 cm) coaxial speaker; side/reflective surround Built into projector enclosure; smooths room-induced bass peak Physical...; 40.9 × 45.7 cm) 35 lb (16 kg) Surround Speaker Specifications Type Speaker Mounting Frequency Response Dimensions of Projector Enclosure (W×H×D) Weight of screen Manually selectable frequency and gain;
....7" (68.3 × 16.3 × 32.3 cm) 15 lb (6.8 kg) 121 also removable for ceiling installation 100 Hz to 20 kHz ±2dB 5 pre-programmed EQs, manually selectable depending on installed location of Projector Enclosure 4" (10 cm) coaxial speaker; side/reflective surround Built into projector enclosure; smooths room-induced bass peak Physical...; 40.9 × 45.7 cm) 35 lb (16 kg) Surround Speaker Specifications Type Speaker Mounting Frequency Response Dimensions of Projector Enclosure (W×H×D) Weight of screen Manually selectable frequency and gain;

