Installation Guide
Page 5
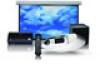
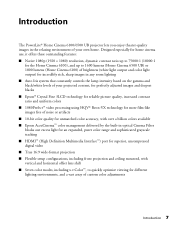
... to switch between video sources, watch movies, and adjust the volume. The system comes with built-in amplifier provides rich bass and powers all the cables instead of routing them through the wall and ceiling. 5 Lets you place the subwoofer, AV controller, and other AV equipment. Introduction The Ensemble HDTM home cinema system by Epson® includes everything that can be seen when the screen...
... to switch between video sources, watch movies, and adjust the volume. The system comes with built-in amplifier provides rich bass and powers all the cables instead of routing them through the wall and ceiling. 5 Lets you place the subwoofer, AV controller, and other AV equipment. Introduction The Ensemble HDTM home cinema system by Epson® includes everything that can be seen when the screen...
Installation Guide
Page 6
... intended to alert the user to do not remove the cover (or back). Refer servicing to rain or moisture. Do not block any heat sources such as radiators, heat registers, stoves, or other . Keep these instructions. 2. Read these instructions. 3. No user serviceable parts inside. Do not defeat the safety purpose of time. 6 The lightning flash with dry cloth. 7. Only use this apparatus during lightning...
... intended to alert the user to do not remove the cover (or back). Refer servicing to rain or moisture. Do not block any heat sources such as radiators, heat registers, stoves, or other . Keep these instructions. 2. Read these instructions. 3. No user serviceable parts inside. Do not defeat the safety purpose of time. 6 The lightning flash with dry cloth. 7. Only use this apparatus during lightning...
Installation Guide
Page 8
... be taken to keep from the type of power source indicated on or lifting it off the wall or ceiling mount. • Do not route the included power cables through the included wire management tracks, or plug them might be fatal. • Do not place the components of this purpose. When installing an outside antenna system should be operated only from...
... be taken to keep from the type of power source indicated on or lifting it off the wall or ceiling mount. • Do not route the included power cables through the included wire management tracks, or plug them might be fatal. • Do not place the components of this purpose. When installing an outside antenna system should be operated only from...
Installation Guide
Page 9
... let children look into the lens when it is on the product. • Except as specifically explained in these instructions, do not attempt to 35 °C). Never spill liquid of any kind on . • Don't use the projector outside of the required temperature range of fire or electric shock. • Keep the system components free from your hands. Unauthorized...
... let children look into the lens when it is on the product. • Except as specifically explained in these instructions, do not attempt to 35 °C). Never spill liquid of any kind on . • Don't use the projector outside of the required temperature range of fire or electric shock. • Keep the system components free from your hands. Unauthorized...
Installation Guide
Page 12
... genuine Epson supplies and accessories from an Epson authorized reseller. Days and hours of speaking to 6 PM, Pacific Time, Monday through Friday. Where To Get Help Epson provides the following information ready: ■ Product name (Ensemble HD home cinema system) ■ Product serial number (located on the back of the weighted bar on the bottom of the screen, on the Epson PrivateLine Support card that the home theater system be installed...
... genuine Epson supplies and accessories from an Epson authorized reseller. Days and hours of speaking to 6 PM, Pacific Time, Monday through Friday. Where To Get Help Epson provides the following information ready: ■ Product name (Ensemble HD home cinema system) ■ Product serial number (located on the back of the weighted bar on the bottom of the screen, on the Epson PrivateLine Support card that the home theater system be installed...
Installation Guide
Page 51
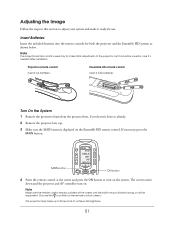
... System 1 Remove the protective foam from the projector lens, if you haven't done so already. 2 Remove the projector lens cap. 3 Make sure the MAIN menu is used only to turn on. Note Make sure the remote control remains pointed at the screen and press the ON button to make it 's needed after installation. The screen comes down and the projector and AV controller turn on the Ensemble HD remote control. MAIN button MAIN DVD CABLE...
... System 1 Remove the protective foam from the projector lens, if you haven't done so already. 2 Remove the projector lens cap. 3 Make sure the MAIN menu is used only to turn on. Note Make sure the remote control remains pointed at the screen and press the ON button to make it 's needed after installation. The screen comes down and the projector and AV controller turn on the Ensemble HD remote control. MAIN button MAIN DVD CABLE...

Installation Guide
Page 66
... port to which you 've connected your component by brand. 2 Turn on the unused input to free up that you 've connected the audio cable. That way, you assign to a device (e.g. You enable the Ensemble HD remote control to work with it. You may be more convenient to set up the Ensemble HD remote control to recognize the new component by entering a setup code. Note The label you only need to use...
... port to which you 've connected your component by brand. 2 Turn on the unused input to free up that you 've connected the audio cable. That way, you assign to a device (e.g. You enable the Ensemble HD remote control to work with it. You may be more convenient to set up the Ensemble HD remote control to recognize the new component by entering a setup code. Note The label you only need to use...
Schematic
Page 8
... off the wall or ceiling mount. • Do not route the included power cables through the included wire management tracks, or plug them might be sure the antenna or cable system is grounded so as the disconnect device, the disconnect device shall remain readily operable. • When unplugging the power cord of the National Electrical Code, ANSI/NFPA 70, provides...
... off the wall or ceiling mount. • Do not route the included power cables through the included wire management tracks, or plug them might be sure the antenna or cable system is grounded so as the disconnect device, the disconnect device shall remain readily operable. • When unplugging the power cord of the National Electrical Code, ANSI/NFPA 70, provides...

Schematic
Page 9
... white part of power source indicated on the marking label. Do not put in accordance with your hands. Health & Safety Code § 25249.5 and following.) Please consult your eyes. • This product should be operated only from your skin could damage it. • Never look into the projector lens when the lamp is turned on. Unauthorized substitutions may cause an unstable display...
... white part of power source indicated on the marking label. Do not put in accordance with your hands. Health & Safety Code § 25249.5 and following.) Please consult your eyes. • This product should be operated only from your skin could damage it. • Never look into the projector lens when the lamp is turned on. Unauthorized substitutions may cause an unstable display...
User's Guide - PowerLite Home Cinema 6100
Page 7
... Home Cinema 6100), and up to quickly optimize viewing for incredibly rich, sharp images in optical Cinema Filter blocks out excess light for an expanded, purer color range and sophisticated grayscale tracking ■ HDMI™ (High Definition Multimedia Interface™) port for superior, uncompressed digital video ■ True 16:9 wide-format projection ■ Flexible setup configurations, including front projection and ceiling mounted, with vertical and horizontal offset lens shift ■ Seven color modes...
... Home Cinema 6100), and up to quickly optimize viewing for incredibly rich, sharp images in optical Cinema Filter blocks out excess light for an expanded, purer color range and sophisticated grayscale tracking ■ HDMI™ (High Definition Multimedia Interface™) port for superior, uncompressed digital video ■ True 16:9 wide-format projection ■ Flexible setup configurations, including front projection and ceiling mounted, with vertical and horizontal offset lens shift ■ Seven color modes...
User's Guide - PowerLite Home Cinema 6100
Page 36
... video equipment's specifications to be sure of the correct setting. ■ EPSON Super White Signal > Advanced > EPSON Super White Note: This setting can be used only when an NTSC signal is being input through the Component video ports. Decrease the brightness for each image source and color mode. ■ Setup Level Signal > Advanced > Setup Level Note: This setting can be used only when a composite video, S-Video, or component video signal is being input through the Video or S-Video port, or when a video signal...
... video equipment's specifications to be sure of the correct setting. ■ EPSON Super White Signal > Advanced > EPSON Super White Note: This setting can be used only when an NTSC signal is being input through the Component video ports. Decrease the brightness for each image source and color mode. ■ Setup Level Signal > Advanced > Setup Level Note: This setting can be used only when a composite video, S-Video, or component video signal is being input through the Video or S-Video port, or when a video signal...

User's Guide - PowerLite Home Cinema 6100
Page 59
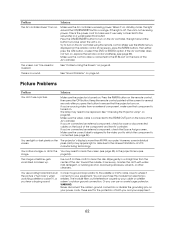
... turned off , reset the projector settings (see page 45). Allow a few seconds for 3 seconds to select the correct input source. Solving Picture Problems You cannot turn on the projector. ■ Make sure the power cord is connected and the power switch in standby (or sleep) mode. No picture appears on . you must use the remote control (see the No Signal message displayed. ■ Press one of the image is set to sync up before pressing the Ppower button...
... turned off , reset the projector settings (see page 45). Allow a few seconds for 3 seconds to select the correct input source. Solving Picture Problems You cannot turn on the projector. ■ Make sure the power cord is connected and the power switch in standby (or sleep) mode. No picture appears on . you must use the remote control (see the No Signal message displayed. ■ Press one of the image is set to sync up before pressing the Ppower button...

User's Guide - PowerLite Home Cinema 6100
Page 80
... Sleep mode, 48 Source buttons, 9, 10 Source, selecting image, 24 Specifications compatible video formats, 68 to 69 dimensions, 66 electrical, 66 environmental, 67 general, 65 lamp, 66 remote control, 66 Startup screen, selecting, 47 Static, 61 Storing projector, 56 Support, 12, 63 S-Video connection, 19 Sync (Synchronization) setting, 42 T Technical support, 12, 63 Test pattern, 25 Tint, 40 Tracking, 42 Transporting projector, 56 Trigger out port, 21 Trigger out setting, 48 Turning...
... Sleep mode, 48 Source buttons, 9, 10 Source, selecting image, 24 Specifications compatible video formats, 68 to 69 dimensions, 66 electrical, 66 environmental, 67 general, 65 lamp, 66 remote control, 66 Startup screen, selecting, 47 Static, 61 Storing projector, 56 Support, 12, 63 S-Video connection, 19 Sync (Synchronization) setting, 42 T Technical support, 12, 63 Test pattern, 25 Tint, 40 Tracking, 42 Transporting projector, 56 Trigger out port, 21 Trigger out setting, 48 Turning...
User's Guide
Page 4
... of this system near sources of heat or in direct sunlight. • Make sure nothing blocks the ventilation openings on any kind on the product. • Except as specifically explained in these instructions, do not attempt to service this product yourself. Allow for one hour before replacing it . • Never look into the projector lens when the lamp is used replacement parts specified by...
... of this system near sources of heat or in direct sunlight. • Make sure nothing blocks the ventilation openings on any kind on the product. • Except as specifically explained in these instructions, do not attempt to service this product yourself. Allow for one hour before replacing it . • Never look into the projector lens when the lamp is used replacement parts specified by...
User's Guide
Page 6
... Mode 48 Using Other Features 49 Choosing the Language 49 Using Parental Controls 50 Restoring Factory Defaults 51 Cleaning and Maintenance Cleaning 53 Cleaning the Screen 53 Cleaning the Projector Lens 53 Cleaning System Components 54 Adjusting the Screen Length 54 Manual Screen Adjustment 55 Adjusting the Image Position and Focus 56 Repositioning the Image 56 Focusing and Resizing the Image 57 Checking the Projector Lamp 58 Checking the Info Menu 58 Checking the Warning Light 58 Replacing Remote Control Batteries 59 Solving Problems Basic Operation Problems 61 Picture...
... Mode 48 Using Other Features 49 Choosing the Language 49 Using Parental Controls 50 Restoring Factory Defaults 51 Cleaning and Maintenance Cleaning 53 Cleaning the Screen 53 Cleaning the Projector Lens 53 Cleaning System Components 54 Adjusting the Screen Length 54 Manual Screen Adjustment 55 Adjusting the Image Position and Focus 56 Repositioning the Image 56 Focusing and Resizing the Image 57 Checking the Projector Lamp 58 Checking the Info Menu 58 Checking the Warning Light 58 Replacing Remote Control Batteries 59 Solving Problems Basic Operation Problems 61 Picture...
User's Guide
Page 61
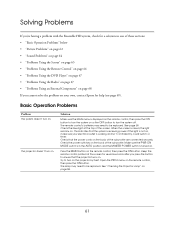
... screen. See "Checking the Projector Lamp" on the remote control, then press the ON button. Solving Problems If you're having a problem with the Ensemble HD system, check for a solution in the AUTO position and the MASTER POWER switch is receiving power. The projector doesn't turn the system off. If the light is not on, make sure your own, contact Epson for several seconds after you press the button to turn on . Basic Operation Problems Problem The system...
... screen. See "Checking the Projector Lamp" on the remote control, then press the ON button. Solving Problems If you're having a problem with the Ensemble HD system, check for a solution in the AUTO position and the MASTER POWER switch is receiving power. The projector doesn't turn the system off. If the light is not on, make sure your own, contact Epson for several seconds after you press the button to turn on . Basic Operation Problems Problem The system...
User's Guide
Page 62
... light is off, the unit is receiving power. See "Problems Using the Screen" on page 64. See "Sound Problems" on page 65. Keep the remote control pointed at the screen for loose or disconnected cables on the back of the AV controller. See "Checking the Projector Lamp" on the remote control (if necessary, press the MAIN button). If you've connected an external component, check for several seconds after you 're sourcing video...
... light is off, the unit is receiving power. See "Problems Using the Screen" on page 64. See "Sound Problems" on page 65. Keep the remote control pointed at the screen for loose or disconnected cables on the back of the AV controller. See "Checking the Projector Lamp" on the remote control (if necessary, press the MAIN button). If you've connected an external component, check for several seconds after you 're sourcing video...
User's Guide
Page 69
... (Ensemble HD home cinema system) • Product serial number (located on the back of the weighted bar at the bottom of the problem Purchase Supplies and Accessories You can download documentation, get FAQs and troubleshooting advice, or e-mail Epson with your questions. Or you call Epson for solutions to a Support Representative To use the Epson PrivateLine® Support service, call 800-GO-EPSON (800-463-7766). Toll or long distance charges...
... (Ensemble HD home cinema system) • Product serial number (located on the back of the weighted bar at the bottom of the problem Purchase Supplies and Accessories You can download documentation, get FAQs and troubleshooting advice, or e-mail Epson with your questions. Or you call Epson for solutions to a Support Representative To use the Epson PrivateLine® Support service, call 800-GO-EPSON (800-463-7766). Toll or long distance charges...
User's Guide
Page 124
... cause undesired operation. The new items assume the remaining warranty period of Epson. Complete Home Cinema System Model: ELPHC100/ELPHC200 Epson America, Inc. When service involves the exchange of a unit or its parts, the items replaced become the property of the original product. Limited Warranty Epson Ensemble HD Home Theater System What Is Covered: Epson America, Inc. ("Epson") warrants to the original retail purchaser of the Epson Ensemble Home Theater System (which carries...
... cause undesired operation. The new items assume the remaining warranty period of Epson. Complete Home Cinema System Model: ELPHC100/ELPHC200 Epson America, Inc. When service involves the exchange of a unit or its parts, the items replaced become the property of the original product. Limited Warranty Epson Ensemble HD Home Theater System What Is Covered: Epson America, Inc. ("Epson") warrants to the original retail purchaser of the Epson Ensemble Home Theater System (which carries...
User's Guide
Page 129
... Reset menu, 51 RF base station, using optional, 81 to 82 S Safety instructions, 3 to 4 Screen adjusting position, 54 to 55 black drop length, 54 cleaning, 53 controlling, 15 lowering, 13 to 15 problems, 65 raising, 13 to 15 sensor, remote control, 65 specifications, 120 Sensor, remote control, 65 Service, 69 Sharpness, 45 Shift dial, projector lens, 57 Sound, see Audio equipment or Speakers Source Assign menu, 34, 45 Speakers distance, 46 problems, 64 specifications...
... Reset menu, 51 RF base station, using optional, 81 to 82 S Safety instructions, 3 to 4 Screen adjusting position, 54 to 55 black drop length, 54 cleaning, 53 controlling, 15 lowering, 13 to 15 problems, 65 raising, 13 to 15 sensor, remote control, 65 specifications, 120 Sensor, remote control, 65 Service, 69 Sharpness, 45 Shift dial, projector lens, 57 Sound, see Audio equipment or Speakers Source Assign menu, 34, 45 Speakers distance, 46 problems, 64 specifications...


