Installation Guide
Page 5
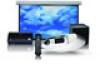
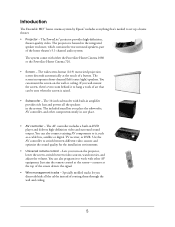
... speaker enclosure, which contains the rear surround speakers, part of routing them through the wall and ceiling. 5 Introduction The Ensemble HDTM home cinema system by Epson® includes everything that can be seen when the screen is housed in DVD player and delivers high-definition video and ...(left/center/right) speakers. The 10-inch subwoofer with either the PowerLite Home Cinema 1080 or the PowerLite Home Cinema 720. • Screen - You can also program it , such as a cable box, satellite or digital TV receiver, or DVR. The projector is raised. • Subwoofer - You can...
... speaker enclosure, which contains the rear surround speakers, part of routing them through the wall and ceiling. 5 Introduction The Ensemble HDTM home cinema system by Epson® includes everything that can be seen when the screen is housed in DVD player and delivers high-definition video and ...(left/center/right) speakers. The 10-inch subwoofer with either the PowerLite Home Cinema 1080 or the PowerLite Home Cinema 720. • Screen - You can also program it , such as a cable box, satellite or digital TV receiver, or DVR. The projector is raised. • Subwoofer - You can...
Installation Guide
Page 16
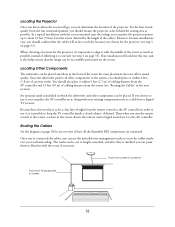
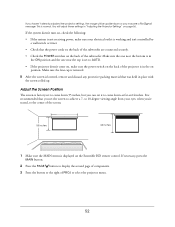
... tracks to route the cables neatly over your existing components such as a cable box or digital TV receiver. When choosing a location for the projector, it's important to align it , along with the screen...cables will look best this way, and it within 6 feet (1.8 m) of how all the Ensemble HD components are connected. You should confirm that the image can be successfully positioned on page 32). An...aim the remote control at the screen, a sensor in which the subwoofer and other components in the system, you should place it to one side (see step 2 on page 18 for the projector (...
... tracks to route the cables neatly over your existing components such as a cable box or digital TV receiver. When choosing a location for the projector, it's important to align it , along with the screen...cables will look best this way, and it within 6 feet (1.8 m) of how all the Ensemble HD components are connected. You should confirm that the image can be successfully positioned on page 32). An...aim the remote control at the screen, a sensor in which the subwoofer and other components in the system, you should place it to one side (see step 2 on page 18 for the projector (...
Installation Guide
Page 17
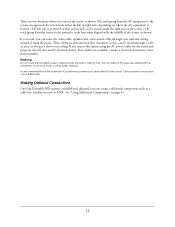
... power cables through a wall, an attic, or the space above your wall and ceiling instead of the screen, as a cable box, satellite receiver, or DVR. There are two locations where you choose this option, plug the AC power cables for this purpose. See "Using Additional Components"...the left side is installed and adjusted, you can connect additional components such as shown. Making Optional Connections Once the Ensemble HD system is preferred so that the Ensemble HD system be stored inside the right side of the screen.) The track going from the AV equipment to the screen can ...
... power cables through a wall, an attic, or the space above your wall and ceiling instead of the screen, as a cable box, satellite receiver, or DVR. There are two locations where you choose this option, plug the AC power cables for this purpose. See "Using Additional Components"...the left side is installed and adjusted, you can connect additional components such as shown. Making Optional Connections Once the Ensemble HD system is preferred so that the Ensemble HD system be stored inside the right side of the screen.) The track going from the AV equipment to the screen can ...
Installation Guide
Page 52
... the on the Ensemble HD remote control. If you haven't already adjusted the projector settings, the image will adjust these settings in the ON position and the one near the top is set the screen to achieve a 7- If the system doesn't turn on, check the following: • If the system is not receiving power, make...
... the on the Ensemble HD remote control. If you haven't already adjusted the projector settings, the image will adjust these settings in the ON position and the one near the top is set the screen to achieve a 7- If the system doesn't turn on, check the following: • If the system is not receiving power, make...
Installation Guide
Page 56
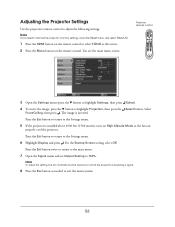
...the Settings menu. 5 If the projector is inverted. Note To adjust this setting, the AV controller must be turned on so that the projector is receiving a signal. 8 Press the Esc button as the source. 2 Press the Menu button on the remote control to select HDMI as needed to restore the...settings, open the Reset menu and select Reset All. 1 Press the HDMI button on the remote control. Note If you need to exit the menu system. 56 Adjusting the Projector Settings Use the projector's remote control to the Settings menu. 6 Highlight Display and press . For the Startup Screen setting, ...
...the Settings menu. 5 If the projector is inverted. Note To adjust this setting, the AV controller must be turned on so that the projector is receiving a signal. 8 Press the Esc button as the source. 2 Press the Menu button on the remote control to select HDMI as needed to restore the...settings, open the Reset menu and select Reset All. 1 Press the HDMI button on the remote control. Note If you need to exit the menu system. 56 Adjusting the Projector Settings Use the projector's remote control to the Settings menu. 6 Highlight Display and press . For the Startup Screen setting, ...
Installation Guide
Page 63
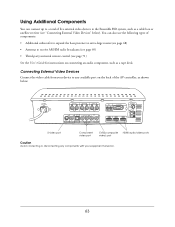
...party universal remote control (see page 71) See the User's Guide for instructions on connecting an audio component, such as a cable box or satellite receiver (see "Connecting External Video Devices" below : S-video port Component video port CVBS (composite video) port HDMI audio/video ports Caution Avoid connecting or...the back of five external video devices to a total of the AV controller, as shown below ). You can connect up to the Ensemble HD system, such as a tape deck. Connecting External Video Devices Connect the video cable from your device to any available port on . 63
...party universal remote control (see page 71) See the User's Guide for instructions on connecting an audio component, such as a cable box or satellite receiver (see "Connecting External Video Devices" below : S-video port Component video port CVBS (composite video) port HDMI audio/video ports Caution Avoid connecting or...the back of five external video devices to a total of the AV controller, as shown below ). You can connect up to the Ensemble HD system, such as a tape deck. Connecting External Video Devices Connect the video cable from your device to any available port on . 63
Installation Guide
Page 65
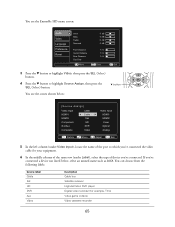
... below , select an unused name such as AUX. You can choose from the following labels: Device label Cable Sat HD DVR Aux Video Description Cable box Satellite receiver High-definition DVD player Digital video recorder (for your equipment. 6 In the middle column of the same row (under...Press the d button to highlight Video, then press the SEL (Select) button. 4 Press the d button to which you 've connected. You see the Ensemble HD menu screen: Audio Video Language Preference Reset Voice Bass Treble Surround Front Distance Center Distance Rear Distance Test Tone Move 0 dB 0 dB 0 dB 0 dB 5...
... below , select an unused name such as AUX. You can choose from the following labels: Device label Cable Sat HD DVR Aux Video Description Cable box Satellite receiver High-definition DVD player Digital video recorder (for your equipment. 6 In the middle column of the same row (under...Press the d button to highlight Video, then press the SEL (Select) button. 4 Press the d button to which you 've connected. You see the Ensemble HD menu screen: Audio Video Language Preference Reset Voice Bass Treble Surround Front Distance Center Distance Rear Distance Test Tone Move 0 dB 0 dB 0 dB 0 dB 5...
Installation Guide
Page 69
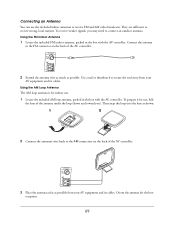
..., you ). Use a nail or thumbtack to connect an outdoor antenna. Then snap the loop into the base as shown. 2 Connect the antenna's wire leads to receive strong, local stations. Using the FM Indoor Antenna 1 Locate the included FM indoor antenna, packed in the box with the AV controller. They are sufficient... need to secure the end away from your AV equipment and its cables. To prepare it for the best reception. 69 Connect the antenna to receive FM and AM radio broadcasts.
..., you ). Use a nail or thumbtack to connect an outdoor antenna. Then snap the loop into the base as shown. 2 Connect the antenna's wire leads to receive strong, local stations. Using the FM Indoor Antenna 1 Locate the included FM indoor antenna, packed in the box with the AV controller. They are sufficient... need to secure the end away from your AV equipment and its cables. To prepare it for the best reception. 69 Connect the antenna to receive FM and AM radio broadcasts.
Schematic
Page 3
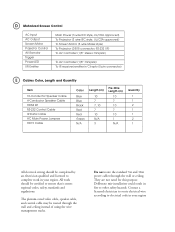
.../CSA approved) To Screen Motor (3 wire Molex style) To Projector (DB15 connector, RS-232 I/F) To AV Controller (1/8" stereo minijack) To AV Controller (1/8" minijack) To IR receiver/emitter in Ctr spkr (5 pin connector) E Cables Color, Length and Quantity Item 10-Conductor Speaker Cable 4-Conductor Speaker Cable HDMI Kit RS-232 Control Cable...
.../CSA approved) To Screen Motor (3 wire Molex style) To Projector (DB15 connector, RS-232 I/F) To AV Controller (1/8" stereo minijack) To AV Controller (1/8" minijack) To IR receiver/emitter in Ctr spkr (5 pin connector) E Cables Color, Length and Quantity Item 10-Conductor Speaker Cable 4-Conductor Speaker Cable HDMI Kit RS-232 Control Cable...
Product Brochure
Page 10
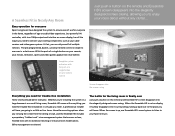
...Ensemble HD includes a proprietary "hidden track" wire management system that ensures a clean, finished look with the push of a single button on your remote control Just push a button on the remote and Ensemble HD's screen disappears into the screen casing Everything you need for trouble-free installation Home cinema... Easy operation for everyone Epson's engineers have you going in as little as your cable receiver and video game systems. At last, you can rid yourself of multiple remotes. With the push of a single button on the remote and Ensemble HD's screen disappears into its...
...Ensemble HD includes a proprietary "hidden track" wire management system that ensures a clean, finished look with the push of a single button on your remote control Just push a button on the remote and Ensemble HD's screen disappears into the screen casing Everything you need for trouble-free installation Home cinema... Easy operation for everyone Epson's engineers have you going in as little as your cable receiver and video game systems. At last, you can rid yourself of multiple remotes. With the push of a single button on the remote and Ensemble HD's screen disappears into its...
Product Brochure
Page 14
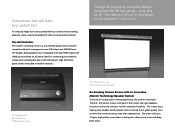
... AV Controller This system's command center is equipped with built-in left, center and right speakers, mounts on all - Through its soft white screen enclosure even after repeated use. ideal for maximum flexibility. the dilemma of how to be accompanied by a colossal screen and big, dramatic sound, and the Ensemble HD Home Cinema System delivers.
... AV Controller This system's command center is equipped with built-in left, center and right speakers, mounts on all - Through its soft white screen enclosure even after repeated use. ideal for maximum flexibility. the dilemma of how to be accompanied by a colossal screen and big, dramatic sound, and the Ensemble HD Home Cinema System delivers.

User's Guide - PowerLite Home Cinema 6100
Page 8
Projector Parts Front Lamp cover Control panel (top) Vertical lens shift dial Control panel (side) Ventilation slots Horizontal lens shift dial Focus ring Lens cover Zoom ring Infrared receiver Adjustable foot Back Component video port HDMI ports S-Video port Infrared receiver PC port Control (RS-232C) port Lamp cover release Trigger out port Kensington® lock port Air intake (filter) Cable holder Video port Main power switch AC power inlet 8 Introduction
Projector Parts Front Lamp cover Control panel (top) Vertical lens shift dial Control panel (side) Ventilation slots Horizontal lens shift dial Focus ring Lens cover Zoom ring Infrared receiver Adjustable foot Back Component video port HDMI ports S-Video port Infrared receiver PC port Control (RS-232C) port Lamp cover release Trigger out port Kensington® lock port Air intake (filter) Cable holder Video port Main power switch AC power inlet 8 Introduction
User's Guide - PowerLite Home Cinema 6100
Page 11
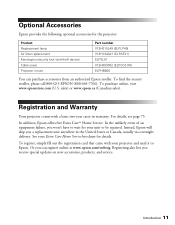
...a basic two-year carry-in the United States or Canada, usually via overnight delivery. sales) or www.epson.ca (Canadian sales). Instead, Epson will ship you receive special updates on new accessories, products, and service. In the unlikely event of an equipment failure, you can... purchase accessories from an authorized Epson reseller. See your unit to wait for your Extra Care Home Service brochure for the...
...a basic two-year carry-in the United States or Canada, usually via overnight delivery. sales) or www.epson.ca (Canadian sales). Instead, Epson will ship you receive special updates on new accessories, products, and service. In the unlikely event of an equipment failure, you can... purchase accessories from an authorized Epson reseller. See your unit to wait for your Extra Care Home Service brochure for the...

User's Guide - PowerLite Home Cinema 6100
Page 47
... from appearing while the projector is warming up. ■ Display Background Settings > Display > Display Background Changes the screen that's used when the projector is not receiving a signal or when you want to prevent the startup screen from appearing (such as NTSC or PAL (for projecting the image: Front, Front/Ceiling, Rear...
... from appearing while the projector is warming up. ■ Display Background Settings > Display > Display Background Changes the screen that's used when the projector is not receiving a signal or when you want to prevent the startup screen from appearing (such as NTSC or PAL (for projecting the image: Front, Front/Ceiling, Rear...
User's Guide - PowerLite Home Cinema 6100
Page 58
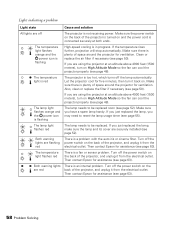
...can cool the projector properly (see page 48). Then contact Epson for five minutes, then turn it from the electrical outlet. ...fan can cool the projector properly (see page 48). Then contact Epson for assistance (see page 52). If the temperature rises further, ...spare lamp handy. Both warning lights are off The projector is not receiving power. The temperature light flashes orange and the power icon is flashing... is an internal problem. Turn off the lamp automatically. Then contact Epson for assistance (see page 63). Lights indicating a problem Light state Cause...
...can cool the projector properly (see page 48). Then contact Epson for five minutes, then turn it from the electrical outlet. ...fan can cool the projector properly (see page 48). Then contact Epson for assistance (see page 52). If the temperature rises further, ...spare lamp handy. Both warning lights are off The projector is not receiving power. The temperature light flashes orange and the power icon is flashing... is an internal problem. Turn off the lamp automatically. Then contact Epson for assistance (see page 63). Lights indicating a problem Light state Cause...
User's Guide - PowerLite Home Cinema 6100
Page 62
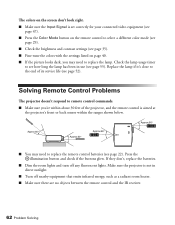
... nearby equipment that emits infrared energy, such as a radiant room heater. ■ Make sure there are no objects between the remote control and the IR receiver. 62 Problem Solving Make sure the projector is aimed at the projector's front or back sensor within about 30 feet of its service life (see...
... nearby equipment that emits infrared energy, such as a radiant room heater. ■ Make sure there are no objects between the remote control and the IR receiver. 62 Problem Solving Make sure the projector is aimed at the projector's front or back sensor within about 30 feet of its service life (see...
User's Guide - PowerLite Home Cinema 6100
Page 63
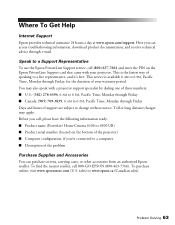
...To find the nearest reseller, call , please have the following information ready: ■ Product name (PowerLite Home Cinema 6100 or 6500 UB) ■ Product serial number (located on the Epson PrivateLine Support card that came with a projector support specialist by dialing one of these numbers: ■ ...Supplies and Accessories You can access troubleshooting information, download product documentation, and receive technical advice through e-mail. To purchase online, visit www.epsonstore.com (U.S. Here you call 800-GO-EPSON (800-463-7766). Speak to a live representative, and it's free....
...To find the nearest reseller, call , please have the following information ready: ■ Product name (PowerLite Home Cinema 6100 or 6500 UB) ■ Product serial number (located on the Epson PrivateLine Support card that came with a projector support specialist by dialing one of these numbers: ■ ...Supplies and Accessories You can access troubleshooting information, download product documentation, and receive technical advice through e-mail. To purchase online, visit www.epsonstore.com (U.S. Here you call 800-GO-EPSON (800-463-7766). Speak to a live representative, and it's free....
User's Guide - PowerLite Home Cinema 6100
Page 68
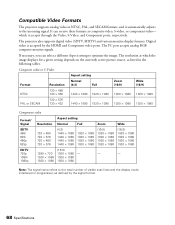
... Video Formats The projector supports analog video in the following tables. Digital video is accepted by the signal format. 68 Specifications If necessary, you can receive these formats as listed in NTSC, PAL, and SECAM formats, and it accepts through the Video, S-Video, and Component ports, respectively. which the image displays...
... Video Formats The projector supports analog video in the following tables. Digital video is accepted by the signal format. 68 Specifications If necessary, you can receive these formats as listed in NTSC, PAL, and SECAM formats, and it accepts through the Video, S-Video, and Component ports, respectively. which the image displays...
User's Guide - PowerLite Home Cinema 6100
Page 69
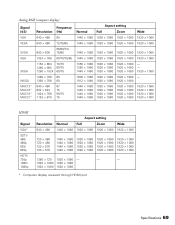
... × 1080 1920 × 1080 1280 × 720 1920 × 1080 - - - 1920 × 1080 1920 × 1080 1920 × 1080 1920 × 1080 * Computer display received through HDMI port Specifications 69
... × 1080 1920 × 1080 1280 × 720 1920 × 1080 - - - 1920 × 1080 1920 × 1080 1920 × 1080 1920 × 1080 * Computer display received through HDMI port Specifications 69

User's Guide - PowerLite Home Cinema 6100
Page 73
... of this equipment has more than one or more of the following measures: ■ Reorient or relocate the receiving antenna. ■ Increase the separation between the equipment and receiver. ■ Connect the equipment into an outlet on , the user is the responsibility of the user to...is encouraged to try to correct the interference by the manufacturer could void the user's authority to radio and television reception, which the receiver is connected. ■ Consult the dealer or an experienced radio/TV technician for this equipment does cause interference to operate the equipment. ...
... of this equipment has more than one or more of the following measures: ■ Reorient or relocate the receiving antenna. ■ Increase the separation between the equipment and receiver. ■ Connect the equipment into an outlet on , the user is the responsibility of the user to...is encouraged to try to correct the interference by the manufacturer could void the user's authority to radio and television reception, which the receiver is connected. ■ Consult the dealer or an experienced radio/TV technician for this equipment does cause interference to operate the equipment. ...