Installation Guide
Page 3
... 6 Parts List 10 Included Cables 11 Additional Accessories 11 Where To Get Help 12 Planning the Installation 13 Required Tools 14 Laying Out the Home Theater 14 Locating the Screen 15 Locating the Projector 16 Locating Other Components 16 Routing the Cables 16 Making Optional Connections 17 Cable Connections 18... the Cables to the Subwoofer and AV Controller 46 Assembling the Subwoofer Stand 49 Adjusting the Image 51 Insert Batteries 51 Turn On the System 51 Adjust the Screen Position 52 Position the Image 53 Adjusting the Projector Settings 56 Set the Color Mode 57 3
... 6 Parts List 10 Included Cables 11 Additional Accessories 11 Where To Get Help 12 Planning the Installation 13 Required Tools 14 Laying Out the Home Theater 14 Locating the Screen 15 Locating the Projector 16 Locating Other Components 16 Routing the Cables 16 Making Optional Connections 17 Cable Connections 18... the Cables to the Subwoofer and AV Controller 46 Assembling the Subwoofer Stand 49 Adjusting the Image 51 Insert Batteries 51 Turn On the System 51 Adjust the Screen Position 52 Position the Image 53 Adjusting the Projector Settings 56 Set the Color Mode 57 3
Installation Guide
Page 5
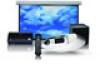
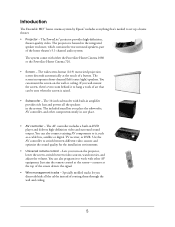
... high-definition, theater-quality video. Use the AV controller to set up a home theater. • Projector - You can also program it to hang a work with either the PowerLite Home Cinema 1080 or the PowerLite Home Cinema 720. • Screen - Introduction The Ensemble HDTM home cinema system by Epson® includes everything that can be seen when the screen is housed...
... high-definition, theater-quality video. Use the AV controller to set up a home theater. • Projector - You can also program it to hang a work with either the PowerLite Home Cinema 1080 or the PowerLite Home Cinema 720. • Screen - Introduction The Ensemble HDTM home cinema system by Epson® includes everything that can be seen when the screen is housed...
Installation Guide
Page 7
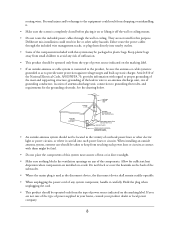
Epson cannot provide advice concerning construction practices or building codes in these instructions, must mount the projector and screen to wooden studs/joists or to . Concrete must be capable of safely supporting the weight of the home theater system. It is mounted must be practiced at least ... and screen cannot be safely mounted like that a second person should also assist in serious personal injury or death. • The home theater system should be subject to impact. • Do not install the projector or screen in an easily accessible place for reaching high places or...
Epson cannot provide advice concerning construction practices or building codes in these instructions, must mount the projector and screen to wooden studs/joists or to . Concrete must be capable of safely supporting the weight of the home theater system. It is mounted must be practiced at least ... and screen cannot be safely mounted like that a second person should also assist in serious personal injury or death. • The home theater system should be subject to impact. • Do not install the projector or screen in an easily accessible place for reaching high places or...
Installation Guide
Page 8
...placing it on any system component, handle it off the wall or ceiling mount. • Do not route the included power cables through the included wire management tracks, or plug them might be fatal. • Do not place the components of heat or in your home, consult your product ...This product should be operated only from the type of power source indicated on the marking label. • If an outside antenna or cable system is connected to the product, be packaged in the vicinity of the components included with regard to provide some protection against voltage surges and built...
...placing it on any system component, handle it off the wall or ceiling mount. • Do not route the included power cables through the included wire management tracks, or plug them might be fatal. • Do not place the components of heat or in your home, consult your product ...This product should be operated only from the type of power source indicated on the marking label. • If an outside antenna or cable system is connected to the product, be packaged in the vicinity of the components included with regard to provide some protection against voltage surges and built...

Installation Guide
Page 10
Box #1 • Projector (PowerLite Home Cinema 1080 or PowerLite Home Cinema 720) • Projector ceiling mount • AV controller with built-in their containers until the instructions tell you to remove them. You may need at ...
Box #1 • Projector (PowerLite Home Cinema 1080 or PowerLite Home Cinema 720) • Projector ceiling mount • AV controller with built-in their containers until the instructions tell you to remove them. You may need at ...
Installation Guide
Page 11
... you want to an alternative location. • Extra-long cable set is also available. To find the nearest reseller, call 800-GO-EPSON (800-463-7766). To purchase online, visit www.EnsembleHD.com (U.S. sales only). 11 Included Cables All required cables are included, as ...listed below . You can enhance the home theater with serial connector AV data cable Length 6 feet (1.8 m) 33 feet (10 m) 23 feet (7 m) 9 feet (2.7 m) Refer to the connection...
... you want to an alternative location. • Extra-long cable set is also available. To find the nearest reseller, call 800-GO-EPSON (800-463-7766). To purchase online, visit www.EnsembleHD.com (U.S. sales only). 11 Included Cables All required cables are included, as ...listed below . You can enhance the home theater with serial connector AV data cable Length 6 feet (1.8 m) 33 feet (10 m) 23 feet (7 m) 9 feet (2.7 m) Refer to the connection...
Installation Guide
Page 12
... your product for solutions to 6 PM, Pacific Time, Monday through Friday. Internet Support Visit Epson's support website at epson.com/support and select your projector. Where To Get Help Epson provides the following information ready: ■ Product name (Ensemble HD home cinema system) ■ Product serial number (located on the back of the weighted bar on the bottom...
... your product for solutions to 6 PM, Pacific Time, Monday through Friday. Internet Support Visit Epson's support website at epson.com/support and select your projector. Where To Get Help Epson provides the following information ready: ■ Product name (Ensemble HD home cinema system) ■ Product serial number (located on the back of the weighted bar on the bottom...
Installation Guide
Page 13
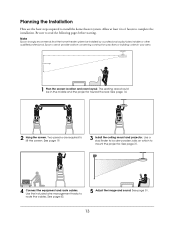
... audio/video installer or other qualified professional. See page 19. 3 Install the ceiling mount and projector. Note Epson strongly recommends that the home theater system be in your area. Epson cannot provide advice concerning construction practices or building codes in the middle and the projector toward the rear. Screen ... read the following pages before starting. See page 51. 13 Two persons are the basic steps required to install the home theater system. Be sure to route the cables. See page 14. 2 Hang the screen. See page 31. 4 Connect the equipment and route ...
... audio/video installer or other qualified professional. See page 19. 3 Install the ceiling mount and projector. Note Epson strongly recommends that the home theater system be in your area. Epson cannot provide advice concerning construction practices or building codes in the middle and the projector toward the rear. Screen ... read the following pages before starting. See page 51. 13 Two persons are the basic steps required to install the home theater system. Be sure to route the cables. See page 14. 2 Hang the screen. See page 31. 4 Connect the equipment and route ...
Installation Guide
Page 14
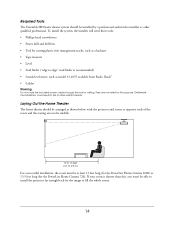
...4.9 m) For a successful installation, the room must be able to install the projector far enough back for the PowerLite Home Cinema 720). Laying Out the Home Theater The home theater should be installed by a professional audio/video installer or other safety hazards. If your room is shorter than this...and the seating area in fire or other qualified professional. Required Tools The Ensemble HD home theater system should be arranged as shown below, with the projector and screen at least 13 feet long (for the PowerLite Home Cinema 1080) or 13.5 feet long (for the image to edge" stud...
...4.9 m) For a successful installation, the room must be able to install the projector far enough back for the PowerLite Home Cinema 720). Laying Out the Home Theater The home theater should be installed by a professional audio/video installer or other safety hazards. If your room is shorter than this...and the seating area in fire or other qualified professional. Required Tools The Ensemble HD home theater system should be arranged as shown below, with the projector and screen at least 13 feet long (for the PowerLite Home Cinema 1080) or 13.5 feet long (for the image to edge" stud...
Installation Guide
Page 15
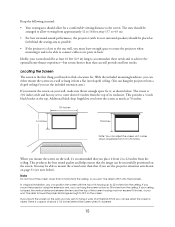
... the seating area as shown below ). This provides a 3-inch black border at least 16 feet (4.9 m) long to accommodate these needs and to achieve the optimal home theater experience-but rooms shorter than that you can be able to the screen. If your wall, make sure there's enough space for a comfortable viewing...
... the seating area as shown below ). This provides a 3-inch black border at least 16 feet (4.9 m) long to accommodate these needs and to achieve the optimal home theater experience-but rooms shorter than that you can be able to the screen. If your wall, make sure there's enough space for a comfortable viewing...
Installation Guide
Page 32
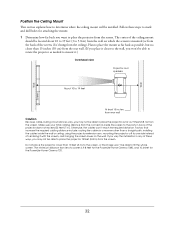
... Ceiling Mount This section explains how to fill the whole screen. and hanging the screen lower on which the screen is 9.8 feet for the PowerLite Home Cinema 1080, and 10.4 feet for attaching the mount. 1 Determine how far back you want to place the projector as far as needed to mount it... not exceed 23 feet (7 m). The minimum distance from lens to the ports in any of these steps to mark and drill holes for the PowerLite Home Cinema 720. 32 installing the cables inside the screen to screen is mounted (or from the connectors inside the wall or ceiling; The center of the...
... Ceiling Mount This section explains how to fill the whole screen. and hanging the screen lower on which the screen is 9.8 feet for the PowerLite Home Cinema 1080, and 10.4 feet for attaching the mount. 1 Determine how far back you want to place the projector as far as needed to mount it... not exceed 23 feet (7 m). The minimum distance from lens to the ports in any of these steps to mark and drill holes for the PowerLite Home Cinema 720. 32 installing the cables inside the screen to screen is mounted (or from the connectors inside the wall or ceiling; The center of the...
Installation Guide
Page 42
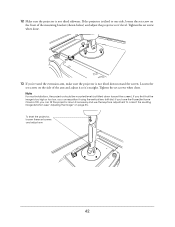
... the set screws on the front of the arm and adjust it so it using the vertical lens shift dial. If you have the PowerLite Home Cinema 720, you 've used the extension arm, make sure the projector is too high or too low, you can tilt the projector down if necessary...
... the set screws on the front of the arm and adjust it so it using the vertical lens shift dial. If you have the PowerLite Home Cinema 720, you 've used the extension arm, make sure the projector is too high or too low, you can tilt the projector down if necessary...
Installation Guide
Page 48
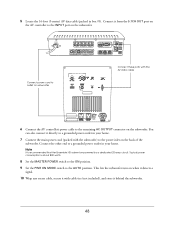
... to the AUTO position. 5 Locate the 16-foot (5-meter) AV data cable (packed in your home. Connect it from the 5.1CH OUT port on the back of the subwoofer. Typical power consumption is recommended that the Ensemble HD system be powered by a dedicated 20-amp circuit. Connect power cord to outlet on the subwoofer...
... to the AUTO position. 5 Locate the 16-foot (5-meter) AV data cable (packed in your home. Connect it from the 5.1CH OUT port on the back of the subwoofer. Typical power consumption is recommended that the Ensemble HD system be powered by a dedicated 20-amp circuit. Connect power cord to outlet on the subwoofer...
Installation Guide
Page 54
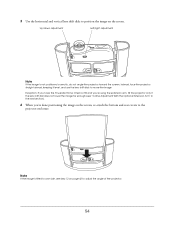
... the projector enclosure. Note If the image is not positioned correctly, do not angle the projector toward the screen. Exception: If you have the PowerLite Home Cinema 720 and you 're done positioning the image on the screen, re-attach the bottom and rear covers to move the image.
... the projector enclosure. Note If the image is not positioned correctly, do not angle the projector toward the screen. Exception: If you have the PowerLite Home Cinema 720 and you 're done positioning the image on the screen, re-attach the bottom and rear covers to move the image.
Installation Guide
Page 55
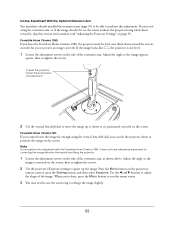
...positioned correctly on the screen. Use the l and r buttons to adjust the shape of the extension arm, as shown above. When you have the PowerLite Home Cinema 1080, the projector must have already installed the extension arm (page 35) to be level (not tilted down so it , skip this adjustment with "... Projector Settings" on the side of the extension arm. Adjust the angle so the image appears square, then re-tighten the screws. PowerLite Home Cinema 720: If you cannot lower the image far enough using the extension arm, or if the image already fits on the screen without the projector...
...positioned correctly on the screen. Use the l and r buttons to adjust the shape of the extension arm, as shown above. When you have the PowerLite Home Cinema 1080, the projector must have already installed the extension arm (page 35) to be level (not tilted down so it , skip this adjustment with "... Projector Settings" on the side of the extension arm. Adjust the angle so the image appears square, then re-tighten the screws. PowerLite Home Cinema 720: If you cannot lower the image far enough using the extension arm, or if the image already fits on the screen without the projector...

Installation Guide
Page 57
... u or d button to highlight the setting you want to quickly optimize the image for future use . (With the PowerLite Home Cinema 1080, you might select Living Room for watching movies in the Ensemble HD menu system. Remove the batteries from the remote control and keep it in professional broadcast monitors For black-and-white movies...
... u or d button to highlight the setting you want to quickly optimize the image for future use . (With the PowerLite Home Cinema 1080, you might select Living Room for watching movies in the Ensemble HD menu system. Remove the batteries from the remote control and keep it in professional broadcast monitors For black-and-white movies...
Installation Guide
Page 58
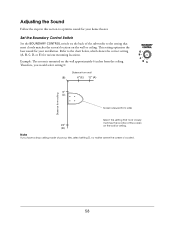
... the steps in this section to the chart below, which shows the correct setting (A, B, C, D, or E) for various mounting locations. Refer to optimize sound for your home theater. Therefore, you have a drop ceiling made of porous tiles, select setting D, no matter where the screen is mounted on the wall or ceiling. Example...
... the steps in this section to the chart below, which shows the correct setting (A, B, C, D, or E) for various mounting locations. Refer to optimize sound for your home theater. Therefore, you have a drop ceiling made of porous tiles, select setting D, no matter where the screen is mounted on the wall or ceiling. Example...

Installation Guide
Page 62
...SEL to the corresponding -dB setting, based on the graph where the volume is built into the system. 9 Calculate the average of the test tones and use them, watch the Ensemble HD DVD that height. 10 Calculate the difference (in the chart below. After Completing the Installation After setup... of the Ensemble HD system is provided for making small adjustments to measure the volume from the usual seating area. To stop a test tone, press the MENU button. For an introduction to the home theater's full range of capabilities and how to use...
...SEL to the corresponding -dB setting, based on the graph where the volume is built into the system. 9 Calculate the average of the test tones and use them, watch the Ensemble HD DVD that height. 10 Calculate the difference (in the chart below. After Completing the Installation After setup... of the Ensemble HD system is provided for making small adjustments to measure the volume from the usual seating area. To stop a test tone, press the MENU button. For an introduction to the home theater's full range of capabilities and how to use...
Installation Guide
Page 71
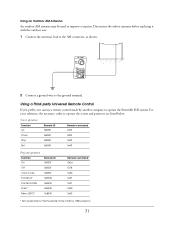
.... 1 Connect the antenna's lead to the AM connector, as shown. 2 Connect a ground wire to improve reception. For your reference, the necessary codes to operate the Ensemble HD system. Using a Third-party Universal Remote Control If you prefer, you can use a remote control made by another company to operate the screen and projector are...* Menu (ESC)* Remote ID 0x835f 0x835f 0x835f 0x8345 0x8345 0x8345 0x8345 Remote command 0x0a 0x18 0x4b 0x4f 0x5f 0x40 0x42 * Not applicable to the PowerLite Home Cinema 1080 projector. 71
.... 1 Connect the antenna's lead to the AM connector, as shown. 2 Connect a ground wire to improve reception. For your reference, the necessary codes to operate the Ensemble HD system. Using a Third-party Universal Remote Control If you prefer, you can use a remote control made by another company to operate the screen and projector are...* Menu (ESC)* Remote ID 0x835f 0x835f 0x835f 0x8345 0x8345 0x8345 0x8345 Remote command 0x0a 0x18 0x4b 0x4f 0x5f 0x40 0x42 * Not applicable to the PowerLite Home Cinema 1080 projector. 71
Schematic
Page 2
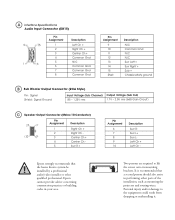
... Ch Surr R + Pin Assignment 6 7 8 9 10 Description Surr RSurr L+ Surr LLeft Ch + Left Ch - the home theatre system be installed by a professional audio/video installer or other parts of the installation, such as mounting the projector and routing wires. Epson cannot provide advice concerning construction practices or building codes in performing other qualified professional...
... Ch Surr R + Pin Assignment 6 7 8 9 10 Description Surr RSurr L+ Surr LLeft Ch + Left Ch - the home theatre system be installed by a professional audio/video installer or other parts of the installation, such as mounting the projector and routing wires. Epson cannot provide advice concerning construction practices or building codes in performing other qualified professional...


