
Users Guide
Page 4
... 64 Network Projector E-mail Alert Messages 65 Setting Up Monitoring Using SNMP 66 Controlling a Networked Projector Using a Web Browser 67 Using Basic Projector Features ...71 Turning On the Projector ...71 Using the Home Screen...73...
... 64 Network Projector E-mail Alert Messages 65 Setting Up Monitoring Using SNMP 66 Controlling a Networked Projector Using a Web Browser 67 Using Basic Projector Features ...71 Turning On the Projector ...71 Using the Home Screen...73...

Users Guide
Page 5
... Ratio ...93 Changing the Image Aspect Ratio 93 Available Image Aspect Ratios ...94 Color Mode...95 Changing the Color Mode...96 Available Color Modes...96 Turning On Auto Iris...97 Controlling the Volume with the Volume Buttons 98 Projecting a PC Free Presentation ...98 Supported PC Free File Types ...98 Starting a PC...
... Ratio ...93 Changing the Image Aspect Ratio 93 Available Image Aspect Ratios ...94 Color Mode...95 Changing the Color Mode...96 Available Color Modes...96 Turning On Auto Iris...97 Controlling the Volume with the Volume Buttons 98 Projecting a PC Free Presentation ...98 Supported PC Free File Types ...98 Starting a PC...
Users Guide
Page 24
Pro EX9210/Pro EX9220) 24 LAN button (cycles through connected network sources) 25 USB button (cycles through connected USB sources) 26 Source Search button (searches for different ... performs functions for the MHL device; buttons (zoom into and out of the image) 14 A/V Mute button (turns off picture and sound) 15 Split button (splits the screen between two image sources; Pro EX9210/Pro EX9220/VS355) 16 Home button (accesses source selection, projector help information, and other features) 17 Freeze button...
Pro EX9210/Pro EX9220) 24 LAN button (cycles through connected network sources) 25 USB button (cycles through connected USB sources) 26 Source Search button (searches for different ... performs functions for the MHL device; buttons (zoom into and out of the image) 14 A/V Mute button (turns off picture and sound) 15 Split button (splits the screen between two image sources; Pro EX9210/Pro EX9220/VS355) 16 Home button (accesses source selection, projector help information, and other features) 17 Freeze button...
Users Guide
Page 31
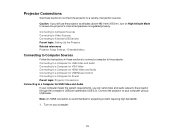
Connecting to Computer Sources Connecting to Video Sources Connecting to a Computer for projecting content requiring high bandwidth. 1. Turn on High Altitude Mode to ensure the projector's internal temperature is recommended for USB Video and Audio If your computer using a USB...can send video and audio output to your computer meets the system requirements, you will use the projector at altitudes above 4921 feet (1500 m), turn on your computer. 31 Connect the projector to the projector through the computer's USB port (preferably USB 2.0). Connecting to a Computer for USB ...
Connecting to Computer Sources Connecting to Video Sources Connecting to a Computer for projecting content requiring high bandwidth. 1. Turn on High Altitude Mode to ensure the projector's internal temperature is recommended for USB Video and Audio If your computer using a USB...can send video and audio output to your computer meets the system requirements, you will use the projector at altitudes above 4921 feet (1500 m), turn on your computer. 31 Connect the projector to the projector through the computer's USB port (preferably USB 2.0). Connecting to a Computer for USB ...

Users Guide
Page 44
2. Connect the other end of the cable (if applicable) to the projector's USB-A port. EX5260/VS250/VS350/VS355 Pro EX9210/Pro EX9220 Note: Do not connect a USB hub or a USB cable longer than 10 feet (3 m), or the device may not operate correctly. 3. Connect the USB cable (or USB flash drive) to your device. Make sure the connected USB source is turned on, if necessary. 44 Parent topic: Connecting to External USB Devices Selecting the Connected USB Source You can switch the projector's display to the source you connected to the USB-A port. 1.
2. Connect the other end of the cable (if applicable) to the projector's USB-A port. EX5260/VS250/VS350/VS355 Pro EX9210/Pro EX9220 Note: Do not connect a USB hub or a USB cable longer than 10 feet (3 m), or the device may not operate correctly. 3. Connect the USB cable (or USB flash drive) to your device. Make sure the connected USB source is turned on, if necessary. 44 Parent topic: Connecting to External USB Devices Selecting the Connected USB Source You can switch the projector's display to the source you connected to the USB-A port. 1.
Users Guide
Page 45
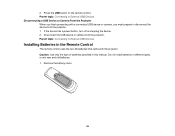
... Batteries in this manual. Parent topic: Connecting to disconnect the device from the projector. 2. Remove the battery cover. 45 If the device has a power button, turn off and unplug the device. 2. Caution: Use only the type of different types, or mix new and old batteries. 1.
... Batteries in this manual. Parent topic: Connecting to disconnect the device from the projector. 2. Remove the battery cover. 45 If the device has a power button, turn off and unplug the device. 2. Caution: Use only the type of different types, or mix new and old batteries. 1.

Users Guide
Page 50
... Equipment and Replacement Parts Using a QR Code to connect a mobile device using the screw you have installed the latest version of Epson iProjection on when the module is communicating over the network. Note: Make sure you removed. Attach the wireless LAN module cover and... secure it to Connect a Mobile Device After you select the wireless network settings for more information. 1. Visit epson.com/iprojection (U.S.) or epson.ca/iprojection (Canada) for your device. The light flashes when the module is installed and operating. The light on the wireless...
... Equipment and Replacement Parts Using a QR Code to connect a mobile device using the screw you have installed the latest version of Epson iProjection on when the module is communicating over the network. Note: Make sure you removed. Attach the wireless LAN module cover and... secure it to Connect a Mobile Device After you select the wireless network settings for more information. 1. Visit epson.com/iprojection (U.S.) or epson.ca/iprojection (Canada) for your device. The light flashes when the module is installed and operating. The light on the wireless...

Users Guide
Page 53
... device. 9. Remove the wireless LAN module from the USB-A port (EX5260/Pro EX9210/VS250/VS350/VS355). 4. Insert the USB key into the projector's USB-A port. EX5260/VS250/VS350/VS355 53 Start Epson iProjection on the projector. 3. Use the QR code reader feature to the projector.... projector. 1. Turn on your presentation and remove the key when you do not see the QR code after pressing the LAN button, press Enter to a Windows computer wirelessly. Visit epson.com/iprojection (U.S.) or epson.ca/iprojection (Canada) for instructions. 2. Note: See the Epson iProjection Operation Guide...
... device. 9. Remove the wireless LAN module from the USB-A port (EX5260/Pro EX9210/VS250/VS350/VS355). 4. Insert the USB key into the projector's USB-A port. EX5260/VS250/VS350/VS355 53 Start Epson iProjection on the projector. 3. Use the QR code reader feature to the projector.... projector. 1. Turn on your presentation and remove the key when you do not see the QR code after pressing the LAN button, press Enter to a Windows computer wirelessly. Visit epson.com/iprojection (U.S.) or epson.ca/iprojection (Canada) for instructions. 2. Note: See the Epson iProjection Operation Guide...
Users Guide
Page 55
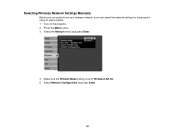
Turn on the projector. 2. Press the Menu button. 3. Make sure the Wireless Mode setting is set to Wireless LAN On. 5. Select Network Configuration and press Enter. 55 Selecting Wireless Network Settings Manually Before you can project from your wireless network, you must select the network settings for the projector using its menu system. 1. Select the Network menu and press Enter. 4.
Turn on the projector. 2. Press the Menu button. 3. Make sure the Wireless Mode setting is set to Wireless LAN On. 5. Select Network Configuration and press Enter. 55 Selecting Wireless Network Settings Manually Before you can project from your wireless network, you must select the network settings for the projector using its menu system. 1. Select the Network menu and press Enter. 4.

Users Guide
Page 56
... lets you enter a password up to the projector by anyone not in the room with Epson iProjection. • Projector Keyword lets you turn on the projected image when accessing the projector using the Epson iProjection app. • Display Keyword lets you display a keyword on a security password to...projector over the web. (Default user name is EPSONREMOTE; default password is guest.) • Web Control Password lets you must enter using Epson iProjection. 56 6. The projector displays a random keyword that you enter a password up to 4 numbers long for accessing the Remote or ...
... lets you enter a password up to the projector by anyone not in the room with Epson iProjection. • Projector Keyword lets you turn on the projected image when accessing the projector using the Epson iProjection app. • Display Keyword lets you display a keyword on a security password to...projector over the web. (Default user name is EPSONREMOTE; default password is guest.) • Web Control Password lets you must enter using Epson iProjection. 56 6. The projector displays a random keyword that you enter a password up to 4 numbers long for accessing the Remote or ...
Users Guide
Page 58
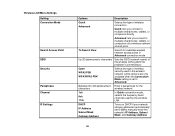
... network 1ch 6ch 11ch In Quick connection mode, selects the frequency band (channel) used by the wireless LAN DHCP IP Address Subnet Mask Gateway Address Turns on DHCP if your network assigns addresses automatically;
... network 1ch 6ch 11ch In Quick connection mode, selects the frequency band (channel) used by the wireless LAN DHCP IP Address Subnet Mask Gateway Address Turns on DHCP if your network assigns addresses automatically;

Users Guide
Page 59
... network (Advanced mode), select the network name (SSID). • If your projector is configured for Quick mode, select the projector's SSID. 3. Make sure AirPort is turned on, then do one of the following : • If your projector is set up on an existing network (Advanced mode), select the network name (SSID...
... network (Advanced mode), select the network name (SSID). • If your projector is configured for Quick mode, select the projector's SSID. 3. Make sure AirPort is turned on, then do one of the following : • If your projector is set up on an existing network (Advanced mode), select the network name (SSID...

Users Guide
Page 65
...: Setting Up Projector Network E-Mail Alerts 65 5. Enter the sender's email address as the From setting • Epson Projector on Mail Notification. 6. Your e-mail address can be up to 32 alphanumeric characters long. 10. Turn on the subject line • The name of the projector experiencing a problem • The IP address of...
...: Setting Up Projector Network E-Mail Alerts 65 5. Enter the sender's email address as the From setting • Epson Projector on Mail Notification. 6. Your e-mail address can be up to 32 alphanumeric characters long. 10. Turn on the subject line • The name of the projector experiencing a problem • The IP address of...

Users Guide
Page 66
...the IP address using 0 to 255 for SNMP monitoring. 1. Press the Menu button. 2. Select the Notifications menu and press Enter. 5. Turn on network computers so they can monitor projectors. Enter up the projector for each address field. Do not use these addresses: 127.x.x.x or 224....0.0.0 through 255.255.255.255 (where x is a number from 0 to receive broadcasted messages over the network using Epson Projector Management (Windows only). 8. If your settings and exit the menus. 66 Setting Up Monitoring Using SNMP Network administrators can install SNMP (...
...the IP address using 0 to 255 for SNMP monitoring. 1. Press the Menu button. 2. Select the Notifications menu and press Enter. 5. Turn on network computers so they can monitor projectors. Enter up the projector for each address field. Do not use these addresses: 127.x.x.x or 224....0.0.0 through 255.255.255.255 (where x is a number from 0 to receive broadcasted messages over the network using Epson Projector Management (Windows only). 8. If your settings and exit the menus. 66 Setting Up Monitoring Using SNMP Network administrators can install SNMP (...

Users Guide
Page 67
... the ECO menu, you access the projector remotely. Note: If you set Standby Mode to select settings and control projection even if the projector is turned on a computer or device connected to the network. 3. Type the projector's IP address into the browser's address box and press the computer's Enter key. 67...
... the ECO menu, you access the projector remotely. Note: If you set Standby Mode to select settings and control projection even if the projector is turned on a computer or device connected to the network. 3. Type the projector's IP address into the browser's address box and press the computer's Enter key. 67...

Users Guide
Page 71
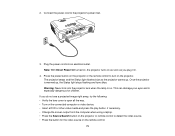
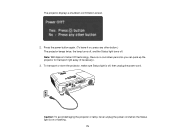
...Basic Projector Features Follow the instructions in these sections to use before you want to use your projector's basic features. Turning On the Projector Turning Off the Projector Selecting the Language for the Projector Menus Adjusting the Image Height Image Shape Resizing the Image Focusing ... Projection Modes Image Aspect Ratio Color Mode Controlling the Volume with the Volume Buttons Projecting a PC Free Presentation Turning On the Projector Turn on the computer or video equipment you turn on the projector so it can display the image source. 1. Open the projector's lens cover. 71
...Basic Projector Features Follow the instructions in these sections to use before you want to use your projector's basic features. Turning On the Projector Turning Off the Projector Selecting the Language for the Projector Menus Adjusting the Image Height Image Shape Resizing the Image Focusing ... Projection Modes Image Aspect Ratio Color Mode Controlling the Volume with the Volume Buttons Projecting a PC Free Presentation Turning On the Projector Turn on the computer or video equipment you turn on the projector so it can display the image source. 1. Open the projector's lens cover. 71
Users Guide
Page 72
...source. • Press the button for children. Once the projector is on as soon as the projector warms up , the Status light stops flashing and turns blue. Warning: Never look into an electrical outlet. Plug the power cord into the projector lens when the lamp is warmed up . 2. If you ... the lens cover is especially dangerous for the video source on the projector. This can damage your eyes and is open all the way. • Turn on the connected computer or video device. • Insert a DVD or other video media and press the play button, if necessary. • Change the...
...source. • Press the button for children. Once the projector is on as soon as the projector warms up , the Status light stops flashing and turns blue. Warning: Never look into an electrical outlet. Plug the power cord into the projector lens when the lamp is warmed up . 2. If you ... the lens cover is especially dangerous for the video source on the projector. This can damage your eyes and is open all the way. • Turn on the connected computer or video device. • Insert a DVD or other video media and press the play button, if necessary. • Change the...

Users Guide
Page 73
... screen, do one of the following: • Press the Home button on the control panel or remote control. • Turn on the projector with the Home Screen Auto Disp setting enabled. • Turn on the remote control or control panel to navigate the screen, and press Enter to select an option. 1 Select...
... screen, do one of the following: • Press the Home button on the control panel or remote control. • Turn on the projector with the Home Screen Auto Disp setting enabled. • Turn on the remote control or control panel to navigate the screen, and press Enter to select an option. 1 Select...
Users Guide
Page 74
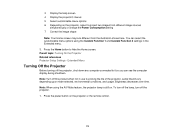
... will vary depending upon mode selected, environmental conditions, and usage. Extended Menu Turning Off the Projector Before turning off the projector, shut down any computer connected to prolong the life of the projector. Note: Turn off the projector. 1. To turn off the lamp, turn off this product when not in the Extended menu. 3. Note: When... 2 settings in use to it so you can select the customizable menu options using the A/V Mute feature, the projector lamp is still on. Parent topic: Turning On the Projector Related references Projector Setup Settings -
... will vary depending upon mode selected, environmental conditions, and usage. Extended Menu Turning Off the Projector Before turning off the projector, shut down any computer connected to prolong the life of the projector. Note: Turn off the projector. 1. To turn off the lamp, turn off this product when not in the Extended menu. 3. Note: When... 2 settings in use to it so you can select the customizable menu options using the A/V Mute feature, the projector lamp is still on. Parent topic: Turning On the Projector Related references Projector Setup Settings -
Users Guide
Page 75
The projector displays a shutdown confirmation screen. 2. To transport or store the projector, make sure Status light is off . Caution: To avoid damaging the projector or lamp, never unplug the power cord when the Status light is no cool-down period so you can pack up the projector for transport right away (if necessary). 3. Note: With Epson's Instant Off technology, there is on , press any other button.) The projector beeps twice, the lamp turns off, and the Status light turns off , then unplug the power cord. Press the power button again. (To leave it on or flashing. 75
The projector displays a shutdown confirmation screen. 2. To transport or store the projector, make sure Status light is off . Caution: To avoid damaging the projector or lamp, never unplug the power cord when the Status light is no cool-down period so you can pack up the projector for transport right away (if necessary). 3. Note: With Epson's Instant Off technology, there is on , press any other button.) The projector beeps twice, the lamp turns off, and the Status light turns off , then unplug the power cord. Press the power button again. (To leave it on or flashing. 75


