User Manual
Page 5
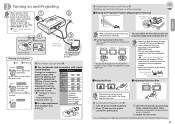
... if only the projector's power is turned off all connected equipment. User's Guide "Extended Menu" Control Panel Remote Control (Accessory Power Cable) Power Indicator Reading the Indicators Lit Flashing Orange Standby Press to a maximum of about 30 seconds). Press twice on your OS, you can select them by turning the left rear foot. Correcting Keystone Distortion You can adjust the vertical tilt to start . Attach the lens cover. * If you set the "High Altitude Mode" to raise the...
... if only the projector's power is turned off all connected equipment. User's Guide "Extended Menu" Control Panel Remote Control (Accessory Power Cable) Power Indicator Reading the Indicators Lit Flashing Orange Standby Press to a maximum of about 30 seconds). Press twice on your OS, you can select them by turning the left rear foot. Correcting Keystone Distortion You can adjust the vertical tilt to start . Attach the lens cover. * If you set the "High Altitude Mode" to raise the...
User Manual
Page 7
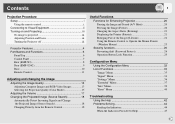
... 2 Projection Procedure Setup i Using the remote control i Connecting to Visual Equipment ii Turning on and Projecting iii No image is projected iii Adjusting Position and Focus iii Turning the Projector off iii Projector Features 4 Part Names and Functions 6 Front/Top 6 Control Panel 7 Rear (EMP-X3 8 Rear (EMP-82/62 9 Base 10 Remote Control 11 Adjusting and changing the image Adjusting the Image Quality 13 Adjusting Computer Images and RGB Video Images 13 Selecting the Projection Quality (Color Mode 15 Adjusting the Volume 17 Changing the Projected Image (Source Search...
... 2 Projection Procedure Setup i Using the remote control i Connecting to Visual Equipment ii Turning on and Projecting iii No image is projected iii Adjusting Position and Focus iii Turning the Projector off iii Projector Features 4 Part Names and Functions 6 Front/Top 6 Control Panel 7 Rear (EMP-X3 8 Rear (EMP-82/62 9 Base 10 Remote Control 11 Adjusting and changing the image Adjusting the Image Quality 13 Adjusting Computer Images and RGB Video Images 13 Selecting the Projection Quality (Color Mode 15 Adjusting the Volume 17 Changing the Projected Image (Source Search...
User Manual
Page 9
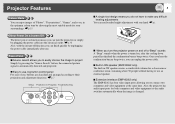
... audio input ports for your surroundings. Extensive interface (EMP-82/62 only) The EMP-82/62 has four video input ports allowing you do not have to use . sp.15 4 A single foot design means you to use, big button control panel For ease of "Photos", "Presentations", "Games", and so on simply by pressing the "Source Search" button, the connected picture signal is changed. sp.7 Setup Projection in Progress Troubleshooting When you turn the projector...
... audio input ports for your surroundings. Extensive interface (EMP-82/62 only) The EMP-82/62 has four video input ports allowing you do not have to use . sp.15 4 A single foot design means you to use, big button control panel For ease of "Photos", "Presentations", "Games", and so on simply by pressing the "Source Search" button, the connected picture signal is changed. sp.7 Setup Projection in Progress Troubleshooting When you turn the projector...
User Manual
Page 11
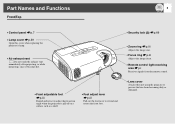
... a shelf. • Foot adjust lever sp.iii Pull out the foot lever to extend and retract the front foot. • Security lock ( ) sp.69 • Zoom ring sp.iii Adjusts the image size. • Focus ring sp.iii Adjusts the image focus. • Remote control light-receiving area sp.i Receives signals from the remote control. • Lens cover Attach when not using the projector to prevent the lens from becoming dirty...
... a shelf. • Foot adjust lever sp.iii Pull out the foot lever to extend and retract the front foot. • Security lock ( ) sp.69 • Zoom ring sp.iii Adjusts the image size. • Focus ring sp.iii Adjusts the image focus. • Remote control light-receiving area sp.i Receives signals from the remote control. • Lens cover Attach when not using the projector to prevent the lens from becoming dirty...
User Manual
Page 31
... buttons to project images, if the power has been disconnected since the password was last entered correctly. If Direct Power On is set to "On" and you are using a circuit breaker or similar to centrally control the power, the password entry screen will be displayed the first time the projector is turned on after the power supply is restored. • If an incorrect password is entered three times in standby mode, projection will start...
... buttons to project images, if the power has been disconnected since the password was last entered correctly. If Direct Power On is set to "On" and you are using a circuit breaker or similar to centrally control the power, the password entry screen will be displayed the first time the projector is turned on after the power supply is restored. • If an incorrect password is entered three times in standby mode, projection will start...
User Manual
Page 43
... Sub-menu Operation Link 21L (EMP-X3 only) Standby Mode (EMP-82/62 only) COM Port (EMP-82/62 only) Language Reset Function Direct Power On: Sets whether direct power on is turned off. When you change the setting, the new setting will be set to "On" and leave the power cable connected to either "RS-232C" or "USB", depending on the port that may occur when power comes back on the network and control them all menu...
... Sub-menu Operation Link 21L (EMP-X3 only) Standby Mode (EMP-82/62 only) COM Port (EMP-82/62 only) Language Reset Function Direct Power On: Sets whether direct power on is turned off. When you change the setting, the new setting will be set to "On" and leave the power cable connected to either "RS-232C" or "USB", depending on the port that may occur when power comes back on the network and control them all menu...
User Manual
Page 50
... error still occurs → Replace it is not cracked → Replace the lamp and turn on the power. sp.57 •If it with a new lamp and turn on the power. Problems Solving Status Power Red Red Cause High temperature error (overheating) Power Red Red Lamp problem Lamp timer failure Lamp cover is open 45 : lit : flashing : off Remedy or Status The lamp will turn off automatically and projection will switch to show a problem when the power is turned on, stop . If error still occurs → Stop using the projector, disconnect the power cable...
... error still occurs → Replace it is not cracked → Replace the lamp and turn on the power. sp.57 •If it with a new lamp and turn on the power. Problems Solving Status Power Red Red Cause High temperature error (overheating) Power Red Red Lamp problem Lamp timer failure Lamp cover is open 45 : lit : flashing : off Remedy or Status The lamp will turn off automatically and projection will switch to show a problem when the power is turned on, stop . If error still occurs → Stop using the projector, disconnect the power cable...

User Manual
Page 53
... Check Is "Sleep Mode" set to "On", the lamp turns off ? Problems Solving 48 Problems relating to "On"? Have the configuration menu settings been made correctly? Only when projecting computer images Remedy Press the [Power] button to "Off". Press the [A/V Mute] button on the remote control to select the signal format. Only when projecting images from a video source If a composite videog or S-Videog source is connected to the projector, use the "Video Signal" menu command to cancel the mute. "Operation...
... Check Is "Sleep Mode" set to "On", the lamp turns off ? Problems Solving 48 Problems relating to "On"? Have the configuration menu settings been made correctly? Only when projecting computer images Remedy Press the [Power] button to "Off". Press the [A/V Mute] button on the remote control to select the signal format. Only when projecting images from a video source If a composite videog or S-Videog source is connected to the projector, use the "Video Signal" menu command to cancel the mute. "Operation...

User Manual
Page 54
... changing the resolution and resolution of the cables required for projection are output externally, they no longer appear on for the projector and the computer off and then back on ? Only when projecting images from a laptop computer or computer with your computer for the computer or video source turned on again. Remedy If a composite videog or S-Videog source is connected to the projector, use the "Video Signal" menu command to change...
... changing the resolution and resolution of the cables required for projection are output externally, they no longer appear on for the projector and the computer off and then back on ? Only when projecting images from a laptop computer or computer with your computer for the computer or video source turned on again. Remedy If a composite videog or S-Videog source is connected to the projector, use the "Video Signal" menu command to change...
User Manual
Page 55
... temperature changes occur, condensation may affect the signals. sp.ii If an extension cable is connected to the projector, use the "Video Signal" menu command to appear fuzzy. Has the correct resolution been selected? If the images have not been adjusted correctly after using automatic adjustment, you can make the adjustments using EMP-82/ X3, the distance ranges from 86 cm to reduce the amount of the lens, and this helps. Remedy Turn the focus...
... temperature changes occur, condensation may affect the signals. sp.ii If an extension cable is connected to the projector, use the "Video Signal" menu command to appear fuzzy. Has the correct resolution been selected? If the images have not been adjusted correctly after using automatic adjustment, you can make the adjustments using EMP-82/ X3, the distance ranges from 86 cm to reduce the amount of the lens, and this helps. Remedy Turn the focus...
User Manual
Page 56
... RGB video images are compatible with this projector. If the images have not been correctly adjusted after using the automatic setup function, adjust the setting manually using the "Position" menu command. Only when projecting computer images "List of the image on the computer screen, turn off the dual display setting. Only when projecting computer images Remedy Press the [Resize] button on the projector's control panel to cancel the E-Zoom function. sp.21 Press the [Esc] button on the remote control...
... RGB video images are compatible with this projector. If the images have not been correctly adjusted after using the automatic setup function, adjust the setting manually using the "Position" menu command. Only when projecting computer images "List of the image on the computer screen, turn off the dual display setting. Only when projecting computer images Remedy Press the [Resize] button on the projector's control panel to cancel the E-Zoom function. sp.21 Press the [Esc] button on the remote control...

User Manual
Page 57
... S-Videog source is nearly due for replacement? "Image" - "Color Saturation", "Tint" sp.33 Images appear dark Check Remedy Have the image brightness and luminance Use the "Brightness" and "Brightness Control" menu commands to adjust the contrast. been adjusted correctly? "Color Adjustment" sp.33 Use the "Color Saturation" and "Tint" menu commands to adjust the brightness. "Brightness" sp.33 "Settings" - When the lamp is connected to the projector, use the "Video Signal" menu command to adjust the colour. Problems Solving 52 Image colours...
... S-Videog source is nearly due for replacement? "Image" - "Color Saturation", "Tint" sp.33 Images appear dark Check Remedy Have the image brightness and luminance Use the "Brightness" and "Brightness Control" menu commands to adjust the contrast. been adjusted correctly? "Color Adjustment" sp.33 Use the "Color Saturation" and "Tint" menu commands to adjust the brightness. "Brightness" sp.33 "Settings" - When the lamp is connected to the projector, use the "Video Signal" menu command to adjust the colour. Problems Solving 52 Image colours...

User Manual
Page 58
... supplied. Do the indicators turn on . sp.20 Connect the power cable to an external monitor. If this does not solve the problem, stop using the projector, disconnect the power cable from the Computer port. Check that sound can be heard. You cannot output video equipment images to the projector correctly. power cable. Press the [A/V Mute] button on when the There is faint Check Remedy Is the audio source connected correctly? You Computer port being projected? (EMP-X3...
... supplied. Do the indicators turn on . sp.20 Connect the power cable to an external monitor. If this does not solve the problem, stop using the projector, disconnect the power cable from the Computer port. Check that sound can be heard. You cannot output video equipment images to the projector correctly. power cable. Press the [A/V Mute] button on when the There is faint Check Remedy Is the audio source connected correctly? You Computer port being projected? (EMP-X3...
User Manual
Page 64
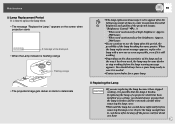
... hour. appears on the way it is possible that the lamp is set to appear after the following periods of time in case it has stopped working before removing the lamp cover. A message will be displayed. • When the Lamp indicator is flashing orange Flashing orange • The projected image gets darker or starts to use the lamp after turning off the power, wait for a spare lamp. Maintenance Lamp Replacement Period It is broken. If replacing the lamp...
... hour. appears on the way it is possible that the lamp is set to appear after the following periods of time in case it has stopped working before removing the lamp cover. A message will be displayed. • When the Lamp indicator is flashing orange Flashing orange • The projected image gets darker or starts to use the lamp after turning off the power, wait for a spare lamp. Maintenance Lamp Replacement Period It is broken. If replacing the lamp...

User Manual
Page 67
... B Select "Reset" from the configuration menu, and then select "Reset Lamp Hours". You can use, and the operations they perform, in counter which keeps track of the screen. Maintenance Resetting the Lamp Operating Time The projector has a built-in the guide at the bottom of the lamp operating time. Using the remote control Using the control panel PROCEDURE A Connect the power cable and turn on this using the configuration menu. When the cumulative operating time reaches a certain point, it causes the replacement warning message to be displayed.
... B Select "Reset" from the configuration menu, and then select "Reset Lamp Hours". You can use, and the operations they perform, in counter which keeps track of the screen. Maintenance Resetting the Lamp Operating Time The projector has a built-in the guide at the bottom of the lamp operating time. Using the remote control Using the control panel PROCEDURE A Connect the power cable and turn on this using the configuration menu. When the cumulative operating time reaches a certain point, it causes the replacement warning message to be displayed.

User Manual
Page 70
... factory default. F Select the zoom rate from the panel resolution of the image to use the projector or any other sources which are connected to the projector while the user's logo is being projected, the display size will be displayed. Using the remote control Using the control panel G When "Save this image as the User's Logo?" The image will then be saved at their original resolution, so if a signal with a resolution that is different from the Zoom rate setting screen. Saving a User...
... factory default. F Select the zoom rate from the panel resolution of the image to use the projector or any other sources which are connected to the projector while the user's logo is being projected, the display size will be displayed. Using the remote control Using the control panel G When "Save this image as the User's Logo?" The image will then be saved at their original resolution, so if a signal with a resolution that is different from the Zoom rate setting screen. Saving a User...

User Manual
Page 76
... instructions displayed on , communication via a USB connection, the following preparations must be possible. Select "USB" for "COM port" in the "Extended" menu. If you disconnect the power cable before the confirmation buzzer beeps twice, the communication port is as follows. Once the projector's power has turned back on the download screen. http://esupport.epson-europe.com/downloads/en/ B Install the downloaded USB driver onto your computer. PROCEDURE A Download the USB driver (USB-COM Driver) from the EPSON...
... instructions displayed on , communication via a USB connection, the following preparations must be possible. Select "USB" for "COM port" in the "Extended" menu. If you disconnect the power cable before the confirmation buzzer beeps twice, the communication port is as follows. Once the projector's power has turned back on the download screen. http://esupport.epson-europe.com/downloads/en/ B Install the downloaded USB driver onto your computer. PROCEDURE A Download the USB driver (USB-COM Driver) from the EPSON...
User Manual
Page 78
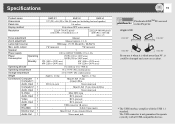
...176;, it is not guaranteed to operate correctly with the USB 1.1 standard. Specifications 73 Product name Dimensions Panel size Display method Resolution Focus adjustment Zoom adjustment Lamp (light source) Max. audio output Speaker Power supply Power Consumption Operating Standby Operating altitude Operating temperature Storage temperature Weight Connectors Computer/ 1 Computer 1 Audio Input 1 Computer 2 1 Audio Input 1 S-Video 1 Audio Input 1 Video 1 Audio Input 1 USB* 1 RS-232C 1 Monitor Out 1 Audio Out 1 EMP-X3 EMP-82 EMP-62 327 (W) × 86 (H) ×...
...176;, it is not guaranteed to operate correctly with the USB 1.1 standard. Specifications 73 Product name Dimensions Panel size Display method Resolution Focus adjustment Zoom adjustment Lamp (light source) Max. audio output Speaker Power supply Power Consumption Operating Standby Operating altitude Operating temperature Storage temperature Weight Connectors Computer/ 1 Computer 1 Audio Input 1 Computer 2 1 Audio Input 1 S-Video 1 Audio Input 1 Video 1 Audio Input 1 USB* 1 RS-232C 1 Monitor Out 1 Audio Out 1 EMP-X3 EMP-82 EMP-62 327 (W) × 86 (H) ×...
User Manual
Page 84
... Reset Lamp Hours 40, 62 "Reset" Menu 40 Resized display 72 Resolution 39, 72 RS-232C port 9 S Search 11 Security lock 6 "Settings" Menu 36 Setting Up the Projector 56 Sharpness 33 "Signal" Menu 34 Sleep Mode 38 Source 39 Source Search 7, 18 Speaker 8, 9 Specifications 73 Sports 15 Squeeze mode 21 sRGB 15 Standby Mode 38 Startup Screen 37 Storage temperature 73 Sub menu 32 Supported Monitor Displays ........72 Suspension bracket fixing point 10, 76 S-Video port 8, 9 Sync 14, 34 Sync. Info 39 T Temp indicator...
... Reset Lamp Hours 40, 62 "Reset" Menu 40 Resized display 72 Resolution 39, 72 RS-232C port 9 S Search 11 Security lock 6 "Settings" Menu 36 Setting Up the Projector 56 Sharpness 33 "Signal" Menu 34 Sleep Mode 38 Source 39 Source Search 7, 18 Speaker 8, 9 Specifications 73 Sports 15 Squeeze mode 21 sRGB 15 Standby Mode 38 Startup Screen 37 Storage temperature 73 Sub menu 32 Supported Monitor Displays ........72 Suspension bracket fixing point 10, 76 S-Video port 8, 9 Sync 14, 34 Sync. Info 39 T Temp indicator...

Brochure
Page 2
... I /O OPERATING TEMPERATURE POWER OFF START-UP PERIOD POWER SUPPLY VOLTAGE DIMENSION EXCLUDE FEET MAXIMUM DIMENSIONS WEIGHT FAN NOISE HIGH BRIGHTNESS MODE LOW BRIGHTNESS MODE ACCESSORIES POWER CABLE COMPUTER CABLE REMOTE CONTROL SOFT CARRYING CASE PASSWORD PROTECT STICKER AIR FILTER OWNER'S MANUAL PRODUCT CODE EMP-X3 PRODUCT OPTIONS PRODUCT CODE ELP-LP34 3YWEMPX3 WARRANTY STANDARD NTSC: 560 line PAL: 560 line (Depend on -green (negative, 0.3Vpp) 500mVrms / 47Kohm Mini D-sub 15pin x 1 Blue-moulding RCA x 2 (White / Red) Analogue (0.7V p-p, 75ohm/ Mac...
... I /O OPERATING TEMPERATURE POWER OFF START-UP PERIOD POWER SUPPLY VOLTAGE DIMENSION EXCLUDE FEET MAXIMUM DIMENSIONS WEIGHT FAN NOISE HIGH BRIGHTNESS MODE LOW BRIGHTNESS MODE ACCESSORIES POWER CABLE COMPUTER CABLE REMOTE CONTROL SOFT CARRYING CASE PASSWORD PROTECT STICKER AIR FILTER OWNER'S MANUAL PRODUCT CODE EMP-X3 PRODUCT OPTIONS PRODUCT CODE ELP-LP34 3YWEMPX3 WARRANTY STANDARD NTSC: 560 line PAL: 560 line (Depend on -green (negative, 0.3Vpp) 500mVrms / 47Kohm Mini D-sub 15pin x 1 Blue-moulding RCA x 2 (White / Red) Analogue (0.7V p-p, 75ohm/ Mac...


