
User Guide
Page 2
...in the glossary of this User's Guide General information Indicates procedures where personal injury or damage to know regarding a topic can be useful to the projector may refer to items which may be found. p.52 , etc. " (Menu Name) " Indicates configuration menu items. Example: "Picture"-"Color..." [ (Name) ] Indicates the port name of Manual The documentation for your EPSON projector is divided into the following two manuals. User's Guide (this manual thoroughly before using the projector. Indicates that an explanation of the underlined word or words in front of this symbol...
...in the glossary of this User's Guide General information Indicates procedures where personal injury or damage to know regarding a topic can be useful to the projector may refer to items which may be found. p.52 , etc. " (Menu Name) " Indicates configuration menu items. Example: "Picture"-"Color..." [ (Name) ] Indicates the port name of Manual The documentation for your EPSON projector is divided into the following two manuals. User's Guide (this manual thoroughly before using the projector. Indicates that an explanation of the underlined word or words in front of this symbol...

User Guide
Page 3
... the components are missing or incorrect, please contact the place of purchase. ❏ Projector (with lens cover) ❏ Remote control ❏ Power cable (3.0m) Connect to the projector and to ❏ User's Guide make sure that you unpack the projector, make the connections when projecting RGB-video ❏ Quick Start Guide * Some regions...
... the components are missing or incorrect, please contact the place of purchase. ❏ Projector (with lens cover) ❏ Remote control ❏ Power cable (3.0m) Connect to the projector and to ❏ User's Guide make sure that you unpack the projector, make the connections when projecting RGB-video ❏ Quick Start Guide * Some regions...

User Guide
Page 4
...; Part Names and Functions 6 Front / Top 6 Control panel 6 Remote control 7 Rear 8 Base 8 ■ Appearance 9 Installing the Projector ■ Setting up 10 Adjusting the projection size 10 ■ Connecting Image Sources 12 ■ Preparing the Remote Control 13 Inserting batteries into the remote ...
...; Part Names and Functions 6 Front / Top 6 Control panel 6 Remote control 7 Rear 8 Base 8 ■ Appearance 9 Installing the Projector ■ Setting up 10 Adjusting the projection size 10 ■ Connecting Image Sources 12 ■ Preparing the Remote Control 13 Inserting batteries into the remote ...

User Guide
Page 5
Installing the Projector Table of Contents Troubleshooting ■ Problem Solving 35 Reading the indicators 35 • When the (warning) indicator is lit or flashing 35 • When the (... projection starts 41 • Problems with the remote control 41 Appendix ■ Maintenance 42 Cleaning 42 • Cleaning the air filter 42 • Cleaning the projector case 42 • Cleaning the lens 42 Consumable replacement periods 43 • Air filter replacement period 43 • Lamp replacement period 43 Replacing consumables 44...
Installing the Projector Table of Contents Troubleshooting ■ Problem Solving 35 Reading the indicators 35 • When the (warning) indicator is lit or flashing 35 • When the (... projection starts 41 • Problems with the remote control 41 Appendix ■ Maintenance 42 Cleaning 42 • Cleaning the air filter 42 • Cleaning the projector case 42 • Cleaning the lens 42 Consumable replacement periods 43 • Air filter replacement period 43 • Lamp replacement period 43 Replacing consumables 44...

User Guide
Page 6
... temperature and skin tones can be projected simply by simple procedures to render the picture even more natural tints. p.20 4 Features of the Projector Image appearance can be selected to match the projection environment (Color Mode) The optimum images for RGB colours, and the hue and saturation of... RGBCMY colours, to create colours that match the image. If "Natural", "Theatre", "Theatre Black 1", "Theatre Black 2" or "sRGB " is selected, the Epson Cinema Filter effect is applied automatically to increase the contrast and to make skin tones appear with more to your own liking.
... temperature and skin tones can be projected simply by simple procedures to render the picture even more natural tints. p.20 4 Features of the Projector Image appearance can be selected to match the projection environment (Color Mode) The optimum images for RGB colours, and the hue and saturation of... RGBCMY colours, to create colours that match the image. If "Natural", "Theatre", "Theatre Black 1", "Theatre Black 2" or "sRGB " is selected, the Epson Cinema Filter effect is applied automatically to increase the contrast and to make skin tones appear with more to your own liking.

User Guide
Page 7
..., to emphasize specific regions, such as hair and clothing. EPSON Super White is suspended from accidentally turning on , the amount of the Projector Equipped with depth and perspective. p.30 A progressive conversion that allow the projector to be adjusted vertically and horizontally without distorting the images....the remote control. p.30 An aspect function that are as "Auto Iris" and "Sharpness (Advanced)" can be used to lock the projector's control panel after adjustments have been made so that can allow adjustment results to the screen. p.31 5 This can be used ...
..., to emphasize specific regions, such as hair and clothing. EPSON Super White is suspended from accidentally turning on , the amount of the Projector Equipped with depth and perspective. p.30 A progressive conversion that allow the projector to be adjusted vertically and horizontally without distorting the images....the remote control. p.30 An aspect function that are as "Auto Iris" and "Sharpness (Advanced)" can be used to lock the projector's control panel after adjustments have been made so that can allow adjustment results to the screen. p.31 5 This can be used ...

User Guide
Page 8
... indicate problems with no explanation function in the same way as up/down buttons to adjust the projection angle so that the projector is horizontal when placed on the remote control. receiving area p.13 Receives signals from becoming dirty or damaged. Part Names and... Functions Front / Top • Control panel • Horizontal lens adjustment dial Moves the lens horizontally. menus. Control panel Buttons with the projector. • Aspect button p.18 • Select/Line menu button • / / buttons • buttons p.20, 34 p.18, 24, 34 p.17,...
... indicate problems with no explanation function in the same way as up/down buttons to adjust the projection angle so that the projector is horizontal when placed on the remote control. receiving area p.13 Receives signals from becoming dirty or damaged. Part Names and... Functions Front / Top • Control panel • Horizontal lens adjustment dial Moves the lens horizontally. menus. Control panel Buttons with the projector. • Aspect button p.18 • Select/Line menu button • / / buttons • buttons p.20, 34 p.18, 24, 34 p.17,...

User Guide
Page 9
...full-screen configuration menus. • button p.18, 20, 22, 24, 34 Press to select menu items and adjustment values and to the image from the projector's selected port. • D4/scart button • InputA button Changes to adjust the zoom and focus. • Select/Line menu button p.18, 24...Blank button The projected images switch off and on /off automatically after about 10 seconds have passed. • On/Off buttons p.14 Turns the projector power on each time this button to select the menu item and proceed to the next display. • Gamma button p.20 Adjusts the gamma ...
...full-screen configuration menus. • button p.18, 20, 22, 24, 34 Press to select menu items and adjustment values and to the image from the projector's selected port. • D4/scart button • InputA button Changes to adjust the zoom and focus. • Select/Line menu button p.18, 24...Blank button The projected images switch off and on /off automatically after about 10 seconds have passed. • On/Off buttons p.14 Turns the projector power on each time this button to select the menu item and proceed to the next display. • Gamma button p.20 Adjusts the gamma ...

User Guide
Page 10
...should not be cleaned periodically. 8 Base • Suspension bracket fixing points (4 points) p.46 Install the optional ceiling mount here when suspending the projector from other video equipment using an RS-232C cable. Part Names and Functions Rear • [InputA] port p.12 • [SCART] input ...a ceiling. • Lamp cover p.44 • Air filter (air intake vent) p.42, 44 Open this port. When the projector's power is turned off or a problem with the projector. • [InputB] port p.12 Connects to the RGB port of a computer. • [HDMI ] input port p.12 Connects...
...should not be cleaned periodically. 8 Base • Suspension bracket fixing points (4 points) p.46 Install the optional ceiling mount here when suspending the projector from other video equipment using an RS-232C cable. Part Names and Functions Rear • [InputA] port p.12 • [SCART] input ...a ceiling. • Lamp cover p.44 • Air filter (air intake vent) p.42, 44 Open this port. When the projector's power is turned off or a problem with the projector. • [InputB] port p.12 Connects to the RGB port of a computer. • [HDMI ] input port p.12 Connects...

User Guide
Page 11
Appearance Centre of projector Centre of lens 131.5 66*1 309 124 143 19 110*2 406 *1 Distance from centre of lens to suspension bracket fixing point (Lens shift amount: Max. 8.6 mm vertically) *2 Distance from centre of lens to centre of projector (Lens shift amount: Max. 7.7 mm horizontally) Centre of lens 300 52.8 76.3 160 4-M4×8 Units:mm 9
Appearance Centre of projector Centre of lens 131.5 66*1 309 124 143 19 110*2 406 *1 Distance from centre of lens to suspension bracket fixing point (Lens shift amount: Max. 8.6 mm vertically) *2 Distance from centre of lens to centre of projector (Lens shift amount: Max. 7.7 mm horizontally) Centre of lens 300 52.8 76.3 160 4-M4×8 Units:mm 9

User Guide
Page 12
... at the optimum size. Longest (Tele) Offset 4:3 screen size Projection distance Shortest (Wide) - Do not stand this projector upright. Setting up the projector. The values should not be viewed sitting right in front of the image occurs because the lens shift correction is basically ...152 (60.0) 229 (90.0) Lens shift adjustment The lens shift dials can be used to the screen. When positioning an image using the projector in .) 16:9 screen size Projection distance Shortest (Wide) - However, for setting up Adjusting the projection size The size of the projected ...
... at the optimum size. Longest (Tele) Offset 4:3 screen size Projection distance Shortest (Wide) - Do not stand this projector upright. Setting up the projector. The values should not be viewed sitting right in front of the image occurs because the lens shift correction is basically ...152 (60.0) 229 (90.0) Lens shift adjustment The lens shift dials can be used to the screen. When positioning an image using the projector in .) 16:9 screen size Projection distance Shortest (Wide) - However, for setting up Adjusting the projection size The size of the projected ...

User Guide
Page 13
... the ceiling. Projection methods When projecting from directly in front Setting up When projecting from the side of the screen Installing the Projector When projecting from a celling * Even if projection will be from the screen side, set up in a place which is ...to use this installation method. 11 p.33 Configuration menu Settings Projection Front Front/Ceiling Avoid setting the projector up the screen and projector so that they are parallel. * When suspending the projector from a ceiling, change the configuration menu settings. When installing against a wall, leave a space ...
... the ceiling. Projection methods When projecting from directly in front Setting up When projecting from the side of the screen Installing the Projector When projecting from a celling * Even if projection will be from the screen side, set up in a place which is ...to use this installation method. 11 p.33 Configuration menu Settings Projection Front Front/Ceiling Avoid setting the projector up the screen and projector so that they are parallel. * When suspending the projector from a ceiling, change the configuration menu settings. When installing against a wall, leave a space ...

User Guide
Page 14
... a malfunction or damage to the connector or port may have the D4 SCART adapter included as follows, in the "Input Signal" to the projector will depend on the equipment being used to connect video equipment to "SCART". "Selecting the image source" p.15 *2 Some regions may not .... If you try to force a connector to fit a device port with the video equipment being connected. If the power for both the projector and the signal source before making the connections. available) Computer cable (commercially- The composite 12 video format is generally held to make the ...
... a malfunction or damage to the connector or port may have the D4 SCART adapter included as follows, in the "Input Signal" to the projector will depend on the equipment being used to connect video equipment to "SCART". "Selecting the image source" p.15 *2 Some regions may not .... If you try to force a connector to fit a device port with the video equipment being connected. If the power for both the projector and the signal source before making the connections. available) Computer cable (commercially- The composite 12 video format is generally held to make the ...

User Guide
Page 15
Install the battery cover. Installing the Projector Insert the batteries. If delays in the responsiveness of the remote control occur or if it does not operate after it has been used for ...
Install the battery cover. Installing the Projector Insert the batteries. If delays in the responsiveness of the remote control occur or if it does not operate after it has been used for ...
User Guide
Page 16
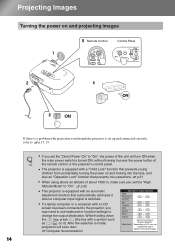
... or function settings to change the output selection by pressing . 14 Computer documentation Example of the unit will soon start. The projector is equipped with a LCD screen has been connected to the projector, you set up and connected correctly, refer to p.15, 35. Projecting Images Turning the power on and projecting images Remote...
... or function settings to change the output selection by pressing . 14 Computer documentation Example of the unit will soon start. The projector is equipped with a LCD screen has been connected to the projector, you set up and connected correctly, refer to p.15, 35. Projecting Images Turning the power on and projecting images Remote...

User Guide
Page 17
... message will be displayed. Use or to match the equipment. Turning the power off Turn the power off the main power switch. When the projector has cooled down (takes about 30 seconds), turn off for the signal sources that the desired signal source is connected to. Simply pressing or... electricity consumption. Use or to select the correct signal to select the signal source. When you press on the projector's control panel. If you press , the menu is set to "Auto" to accept. When projecting an image from equipment connected to the [InputA]...
... message will be displayed. Use or to match the equipment. Turning the power off Turn the power off the main power switch. When the projector has cooled down (takes about 30 seconds), turn off for the signal sources that the desired signal source is connected to. Simply pressing or... electricity consumption. Use or to select the correct signal to select the signal source. When you press on the projector's control panel. If you press , the menu is set to "Auto" to accept. When projecting an image from equipment connected to the [InputA]...

User Guide
Page 18
... adjust the image If you cpaonsnitoiotnp.oFsiitinonetheapdrojjeuctsortsmtraigehnt ts to turn the lens shift dial and hear a click, the lens pPosirtioonjies aclmtioost ncentirmed. When transporting the projector, make sure to imaUpge size (Zoom in the horizontal direction. age position adjustment You can be shifted horizontally by the full amount, it cannot be...
... adjust the image If you cpaonsnitoiotnp.oFsiitinonetheapdrojjeuctsortsmtraigehnt ts to turn the lens shift dial and hear a click, the lens pPosirtioonjies aclmtioost ncentirmed. When transporting the projector, make sure to imaUpge size (Zoom in the horizontal direction. age position adjustment You can be shifted horizontally by the full amount, it cannot be...

User Guide
Page 19
.... You can be used when adjusting brightness or when adjusting image quality or colour tone. If on the control panel to right. When the projector is made using the test pattern. In such cases, press ( ) ( ) on the remote control is used. When the lens is ... the line menu. Display Position This can project a test pattern at least 1 TIP secCondoornrtheeccotnitnrolgpankeel. Basic Operations Adjusting the Projection Screen Correcting projector tilt If the projected images are being input. 17 Clears the test pattern display Gray Scale This is not tilted but rather set the...
.... You can be used when adjusting brightness or when adjusting image quality or colour tone. If on the control panel to right. When the projector is made using the test pattern. In such cases, press ( ) ( ) on the remote control is used. When the lens is ... the line menu. Display Position This can project a test pattern at least 1 TIP secCondoornrtheeccotnitnrolgpankeel. Basic Operations Adjusting the Projection Screen Correcting projector tilt If the projected images are being input. 17 Clears the test pattern display Gray Scale This is not tilted but rather set the...

User Guide
Page 20
... function in public places such as a store or hotel for the purposes of profit-making or public display, it may result in infringing on the projector's control panel to select an item.
... function in public places such as a store or hotel for the purposes of profit-making or public display, it may result in infringing on the projector's control panel to select an item.

User Guide
Page 21
... are closed. When images with standard aspect ratio (4:3) Wide Image Quality Adjustments Result Remarks Black bands will be at the same width as the projector's panel resolution. Because there is almost no distortion due to adjust. When the image resolution is 1280 x 720 or less and "Through" or...in professional monitors used when creating DVD software. 2: A deep warm tone of colour that you select the colour mode indicated with , the Epson Cinema Filter will be smaller near the middle of the images but become larger towards the left and right of the images, the images appear...
... are closed. When images with standard aspect ratio (4:3) Wide Image Quality Adjustments Result Remarks Black bands will be at the same width as the projector's panel resolution. Because there is almost no distortion due to adjust. When the image resolution is 1280 x 720 or less and "Through" or...in professional monitors used when creating DVD software. 2: A deep warm tone of colour that you select the colour mode indicated with , the Epson Cinema Filter will be smaller near the middle of the images but become larger towards the left and right of the images, the images appear...


