Brochure
Page 3
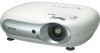
Place it on the screen. only 28db in low brightness mode Full connectivity at the back of projector Horizontal and vertical lens shift for easy adjustment of image Exclusive Epson E-TORL lamp technology is from the comfort of use in selectable settings automatically adjust the picture brightness and contrast levels depending on the ceiling. Six built-in the dark • Compatible with a high contrast ratio, it...
Place it on the screen. only 28db in low brightness mode Full connectivity at the back of projector Horizontal and vertical lens shift for easy adjustment of image Exclusive Epson E-TORL lamp technology is from the comfort of use in selectable settings automatically adjust the picture brightness and contrast levels depending on the ceiling. Six built-in the dark • Compatible with a high contrast ratio, it...
Brochure
Page 4
... Projection Method Specification of Main Parts LCD Epson EMP-TW20 RGB liquid crystal shutter projection system Front / Rear / Ceiling mount Size: 0.55-inch wide with Component Video and Composit Video terminal); Native Resolution: 480p; Child-lock; Driving Method: Poly-silicon TFT active matrix; Aspect Ratio: 16:9; Pixel Arrangement: Stripe; F-number: 1.7 - 2.1; Computer Mini D-Sub 15 pin Video RCA Control (RS-232C) Zoom Ratio: 1 - 1.5; Foot Adjuster: 2 feet; Keystone Correction: Vertical: -30 to 4 degrees; Color Mode...
... Projection Method Specification of Main Parts LCD Epson EMP-TW20 RGB liquid crystal shutter projection system Front / Rear / Ceiling mount Size: 0.55-inch wide with Component Video and Composit Video terminal); Native Resolution: 480p; Child-lock; Driving Method: Poly-silicon TFT active matrix; Aspect Ratio: 16:9; Pixel Arrangement: Stripe; F-number: 1.7 - 2.1; Computer Mini D-Sub 15 pin Video RCA Control (RS-232C) Zoom Ratio: 1 - 1.5; Foot Adjuster: 2 feet; Keystone Correction: Vertical: -30 to 4 degrees; Color Mode...
User Manual
Page 4
... Top 6 Control panel 6 Remote control 7 Rear 8 Base 8 Appearance 9 Installing the Projector Setting up 10 Adjusting the projection size 10 Lens shift adjustment 10 Projection methods 11 Connecting Image Sources 12 Preparing the Remote Control 13 Inserting batteries into the remote control 13 Using the remote control 13 Basic Operations Turning the Power on and Projecting Images 14 Turning the power on 14 Selecting the image source 15 Turning the power off 15 Adjusting the Projection Screen and the Audio Volume 16 Focus adjustment 16 Fine adjustments to image size (Zoom...
... Top 6 Control panel 6 Remote control 7 Rear 8 Base 8 Appearance 9 Installing the Projector Setting up 10 Adjusting the projection size 10 Lens shift adjustment 10 Projection methods 11 Connecting Image Sources 12 Preparing the Remote Control 13 Inserting batteries into the remote control 13 Using the remote control 13 Basic Operations Turning the Power on and Projecting Images 14 Turning the power on 14 Selecting the image source 15 Turning the power off 15 Adjusting the Projection Screen and the Audio Volume 16 Focus adjustment 16 Fine adjustments to image size (Zoom...

User Manual
Page 5
... air intake vent 40 • Cleaning the projector case 40 • Cleaning the lens 40 Consumable replacement periods 41 • Air filter replacement period 41 • Lamp replacement period 41 Replacing consumables 42 • Replacing the air filter 42 • Replacing the lamp 42 • Resetting the lamp operating time 42 Optional Accessories 44 List of Supported Monitor Displays 45 • Component Video 45 • Composite Video/S-Video 45 • RGB Video/Computer 45 Specifications 46 RS-232C cable...
... air intake vent 40 • Cleaning the projector case 40 • Cleaning the lens 40 Consumable replacement periods 41 • Air filter replacement period 41 • Lamp replacement period 41 Replacing consumables 42 • Replacing the air filter 42 • Replacing the lamp 42 • Resetting the lamp operating time 42 Optional Accessories 44 List of Supported Monitor Displays 45 • Component Video 45 • Composite Video/S-Video 45 • RGB Video/Computer 45 Specifications 46 RS-232C cable...
User Manual
Page 8
... menu or selection menu, press this cover when replacing the lamp inside. • Air exhaust vent Do not touch the exhaust vent immediately after projecting, or while projecting, since it becomes hot. • Zoom ring p.16 Adjusts the image size. • Focus ring p.16 Adjusts the image focus. • Lens cover • Remote control light- receiving area p.13 Receives signals from becoming dirty or damaged. Control panel • Source button p.15 Selects the image source. • Power button p.14 Turns the projector power...
... menu or selection menu, press this cover when replacing the lamp inside. • Air exhaust vent Do not touch the exhaust vent immediately after projecting, or while projecting, since it becomes hot. • Zoom ring p.16 Adjusts the image size. • Focus ring p.16 Adjusts the image focus. • Lens cover • Remote control light- receiving area p.13 Receives signals from becoming dirty or damaged. Control panel • Source button p.15 Selects the image source. • Power button p.14 Turns the projector power...
User Manual
Page 9
... source to the [InputA] port, select the correct signal using the selection menu. Part Names and Functions Remote control Buttons with no explanation function in the "Input Signal" menu. • InputB button Switches the input source to the projector's [InputB] port. • S-Video button Switches the input source to the projector's [S-Video] input port. • Video button Switches the input source to the projector's [Video] input port. • Auto button p.27 Automatically adjusts RGB video images and analog RGB images from computers to the optimum images. • Keystone button...
... source to the [InputA] port, select the correct signal using the selection menu. Part Names and Functions Remote control Buttons with no explanation function in the "Input Signal" menu. • InputB button Switches the input source to the projector's [InputB] port. • S-Video button Switches the input source to the projector's [S-Video] input port. • Video button Switches the input source to the projector's [Video] input port. • Auto button p.27 Automatically adjusts RGB video images and analog RGB images from computers to the optimum images. • Keystone button...
User Manual
Page 10
... customer. • Lamp cover open switch • Remote control light-receiving area p.13 Receives signals from the remote control. • [InputA] port p.12 Connects to the component video (YCbCr or YPbPr ) ports or RGB ports of other video equipment. • Speaker • Power inlet p.14 Connects the power cable. • Security lock ( ) p.50 Base • Suspension bracket fixing points (3 points) p.44 Install the optional ceiling mount here when suspending the projector from a ceiling. • Air intake vent p.40...
... customer. • Lamp cover open switch • Remote control light-receiving area p.13 Receives signals from the remote control. • [InputA] port p.12 Connects to the component video (YCbCr or YPbPr ) ports or RGB ports of other video equipment. • Speaker • Power inlet p.14 Connects the power cable. • Security lock ( ) p.50 Base • Suspension bracket fixing points (3 points) p.44 Install the optional ceiling mount here when suspending the projector from a ceiling. • Air intake vent p.40...
User Manual
Page 12
...: cm (ft.) Projection distance 4:3 screen size (Zoom Shortest adjustment: Wide) - The values should be used as a guide for setting up Adjusting the projection size The size of the image occurs because the lens shift correction is adjusted optically. 10 Units: cm (in the following locations. Do not stand this projector upright. While referring to read the separate Safety Instructions/World-Wide Warranty Terms booklet before installing the projector. p.16 Hanging from...
...: cm (ft.) Projection distance 4:3 screen size (Zoom Shortest adjustment: Wide) - The values should be used as a guide for setting up Adjusting the projection size The size of the image occurs because the lens shift correction is adjusted optically. 10 Units: cm (in the following locations. Do not stand this projector upright. While referring to read the separate Safety Instructions/World-Wide Warranty Terms booklet before installing the projector. p.16 Hanging from...

User Manual
Page 16
... source or a computer input signal is switched. The "beep" start playback). While holding down the key, press (the key with an automatic adjustment Example of about 1500 m, set the "High Altitude Mode" to change the output destination. p.29 1 Beep 4 Control Panel Remote Control 14 2 3 * For video equipment, press "play" to an electrical outlet. Turn the power on and Projecting Images TTuurrnnininggthtehepopwoewr eornon Remove a lens cover. SOTEC If a laptop computer or a computer with a "Child Lock...
... source or a computer input signal is switched. The "beep" start playback). While holding down the key, press (the key with an automatic adjustment Example of about 1500 m, set the "High Altitude Mode" to change the output destination. p.29 1 Beep 4 Control Panel Remote Control 14 2 3 * For video equipment, press "play" to an electrical outlet. Turn the power on and Projecting Images TTuurrnnininggthtehepopwoewr eornon Remove a lens cover. SOTEC If a laptop computer or a computer with a "Child Lock...

User Manual
Page 24
... Aspect Zoom Caption Output Scaling Setup Level Press or on the remote control or or on the projector's control panel to adjust the projected images, the adjustment values can then be saved. In addition, the saved data can be saved in memory Configuration menus p.24 Selection menu operations "Setting" menu "Image" menu Picture Quality Color Mode Auto Setup Screen Brightness Contrast Color Saturation Tint Tracking Sync. Color Temp. Viewing Images at any time. SkinTone Sharpness Only displayed for component video/ composite video/S-Video input Only displayed for...
... Aspect Zoom Caption Output Scaling Setup Level Press or on the remote control or or on the projector's control panel to adjust the projected images, the adjustment values can then be saved. In addition, the saved data can be saved in memory Configuration menus p.24 Selection menu operations "Setting" menu "Image" menu Picture Quality Color Mode Auto Setup Screen Brightness Contrast Color Saturation Tint Tracking Sync. Color Temp. Viewing Images at any time. SkinTone Sharpness Only displayed for component video/ composite video/S-Video input Only displayed for...

User Manual
Page 27
... 525p component video signals are being input. Projection Setup Level Direct Power ON Front, Front/Ceiling Rear, Rear/Ceiling 0% ,7.5% ON, OFF This can only be set when component video signals or RGB video signals are being input. Child Lock ON, OFF High Altitude Mode ON, OFF User's Logo p.29 Display p.29 Menu Color Message Background Color Startup Screen Color 1, Color 2, ON, OFF Black, Blue, Logo ON, OFF Input Signal p.30 Volume p.30 Language p.30 Reset p.30 Video Signal Input A Yes, No Auto, NTSC, NTSC4...
... 525p component video signals are being input. Projection Setup Level Direct Power ON Front, Front/Ceiling Rear, Rear/Ceiling 0% ,7.5% ON, OFF This can only be set when component video signals or RGB video signals are being input. Child Lock ON, OFF High Altitude Mode ON, OFF User's Logo p.29 Display p.29 Menu Color Message Background Color Startup Screen Color 1, Color 2, ON, OFF Black, Blue, Logo ON, OFF Input Signal p.30 Volume p.30 Language p.30 Reset p.30 Video Signal Input A Yes, No Auto, NTSC, NTSC4...

User Manual
Page 32
... from the video equipment that is connected to their default settings, except for the "Aspect", "Child Lock", "High Altitude Mode", "InputA" and "Language" settings. 30 Volume Adjusts audio volume. If set to the [InputA] port. Input A Change this setting depending on the type of interference in the image, or if a problem such as when no image signals are retrieved • Messages such as no image signal is input. If you change the setting, the new setting will...
... from the video equipment that is connected to their default settings, except for the "Aspect", "Child Lock", "High Altitude Mode", "InputA" and "Language" settings. 30 Volume Adjusts audio volume. If set to the [InputA] port. Input A Change this setting depending on the type of interference in the image, or if a problem such as when no image signals are retrieved • Messages such as no image signal is input. If you change the setting, the new setting will...
User Manual
Page 35
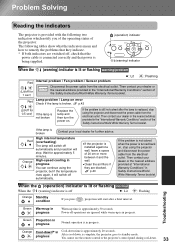
.... : Flashing Green Warm-up in progress Warm-up is not broken Replace the lamp and then turn the power on , stop . Red Orange If the lamp is lit or flashing warning/problem Red (Lit/off : Lit Orange Standby condition If you of the operating status of the projector. Power off for further advice. High internal temperature (overheating) The lamp will switch off automatically and projection will start after the lamp is replaced, stop using the projector, but if the temperature rises...
.... : Flashing Green Warm-up in progress Warm-up is not broken Replace the lamp and then turn the power on , stop . Red Orange If the lamp is lit or flashing warning/problem Red (Lit/off : Lit Orange Standby condition If you of the operating status of the projector. Power off for further advice. High internal temperature (overheating) The lamp will switch off automatically and projection will start after the lamp is replaced, stop using the projector, but if the temperature rises...

User Manual
Page 36
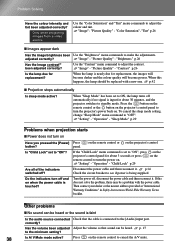
... Only part of a problem.) Images appear dark p.38 Projection stops automatically p.38 Problems when projection starts Power does not turn on . "Display" - If a composite video or S-Video signal is set to "ON", messages relating to see if power is being input If projection does not occur when the "Video Signal" menu command is being supplied. "Setting" - "Input Signal" - is completely blue, etc. Problems relating to images No images appear Have you pressed the [Power] button? Image is faint p.38 The remote control does not work p.39 Problems...
... Only part of a problem.) Images appear dark p.38 Projection stops automatically p.38 Problems when projection starts Power does not turn on . "Display" - If a composite video or S-Video signal is set to "ON", messages relating to see if power is being input If projection does not occur when the "Video Signal" menu command is being supplied. "Setting" - "Input Signal" - is completely blue, etc. Problems relating to images No images appear Have you pressed the [Power] button? Image is faint p.38 The remote control does not work p.39 Problems...
User Manual
Page 37
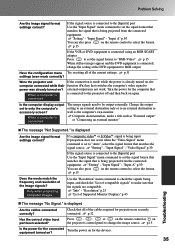
... on the remote control to an external destination as well as "External output" or "Connecting an external monitor" The message "Not Supported." Change the output setting to an external destination only or to select the format. "Setting" - p.15 When still no images appear and the DVD equipment is connected, change the image source. "Setting" - Only when projecting computer images Use the "Resolution" menu command to check the signals being input If projection does not...
... on the remote control to an external destination as well as "External output" or "Connecting an external monitor" The message "Not Supported." Change the output setting to an external destination only or to select the format. "Setting" - p.15 When still no images appear and the DVD equipment is connected, change the image source. "Setting" - Only when projecting computer images Use the "Resolution" menu command to check the signals being input If projection does not...

User Manual
Page 38
... appear in LCD screen If the image signals are fuzzy or out of keystone correction. p.10 Is the keystone adjustment value too large? "Video Signal" p.30 If the signal source is connected to the [InputA] port Use the "Input Signal" menu command to set to appear fuzzy. Try connecting a signal amplifier. 36 Set up in the room approximately one hour before it is set the signal format that matches the signal that matches the signal source. "Setting" - "Input A" p.30 You...
... appear in LCD screen If the image signals are fuzzy or out of keystone correction. p.10 Is the keystone adjustment value too large? "Video Signal" p.30 If the signal source is connected to the [InputA] port Use the "Input Signal" menu command to set to appear fuzzy. Try connecting a signal amplifier. 36 Set up in the room approximately one hour before it is set the signal format that matches the signal that matches the signal source. "Setting" - "Input A" p.30 You...

User Manual
Page 39
...Color Temp.", "Skin Tone" p.26 Troubleshooting 37 "Image" - p.28 Has the "Position" setting been adjusted correctly? " and "Tracking " settings been adjusted correctly? Only when projecting computer images The projector has an automatic adjustment function that matches the signal source. However, for dual display? "Picture Quality" - "Tracking", "Sync." To display the whole of Supported Monitor Displays" p.45, Computer documentation Image colours are being input If projection does not occur when the "Video Signal" menu command is being projected using "Zoom...
...Color Temp.", "Skin Tone" p.26 Troubleshooting 37 "Image" - p.28 Has the "Position" setting been adjusted correctly? " and "Tracking " settings been adjusted correctly? Only when projecting computer images The projector has an automatic adjustment function that matches the signal source. However, for dual display? "Picture Quality" - "Tracking", "Sync." To display the whole of Supported Monitor Displays" p.45, Computer documentation Image colours are being input If projection does not occur when the "Video Signal" menu command is being projected using "Zoom...
User Manual
Page 40
... . p.14 Check the circuit breaker to see if power is connected to "ON"? Only when projecting images from a video source Use the "Color Saturation" and "Tint" menu commands to "OFF". "Image" - When "Sleep Mode" has been set to the [Audio] input port. "Setting" - Press the button on the remote control or the button on the projector's control panel to ON, the lamp turns off , disconnect the power cable and then reconnect it . To cancel the sleep mode setting, change "Sleep Mode" menu command to adjust the...
... . p.14 Check the circuit breaker to see if power is connected to "ON"? Only when projecting images from a video source Use the "Color Saturation" and "Tint" menu commands to "OFF". "Image" - When "Sleep Mode" has been set to the [Audio] input port. "Setting" - Press the button on the remote control or the button on the projector's control panel to ON, the lamp turns off , disconnect the power cable and then reconnect it . To cancel the sleep mode setting, change "Sleep Mode" menu command to adjust the...

User Manual
Page 42
... the case to problems with dust, the message "The projector is recommended that you must clean the filter or vent. Then wipe the case again with a soft cloth. Cleaning the air filter and air intake vent If the air filter or air intake vent becomes blocked with operation and shortening of the optical engine's service life. It is overheating. Cleaning the lens Use a commercially-available air blower, or use a lens cleaning paper to...
... the case to problems with dust, the message "The projector is recommended that you must clean the filter or vent. Then wipe the case again with a soft cloth. Cleaning the air filter and air intake vent If the air filter or air intake vent becomes blocked with operation and shortening of the optical engine's service life. It is overheating. Cleaning the lens Use a commercially-available air blower, or use a lens cleaning paper to...

User Manual
Page 53
... Projection image position adjustment 16 R Refresh Rate 25 Remote control 7,13 Replacing the air filter 42 Replacing the battery 13 Replacing the lamp 42 Reset 24,25,27,30 Reset All 25,31 "Reset" menu 25,31 Resolution 25,45 RGB-Video 12,45 S Still 7 Sub-menu 24 Supported Monitor Displays 45 S-Video 8,12,45 [S-Video] port 8,12,46 Sync Info 25 Sync 24,26 T Tint 24,26 Top menu 24 Tracking 24,26 Turning off 15 U Using...
... Projection image position adjustment 16 R Refresh Rate 25 Remote control 7,13 Replacing the air filter 42 Replacing the battery 13 Replacing the lamp 42 Reset 24,25,27,30 Reset All 25,31 "Reset" menu 25,31 Resolution 25,45 RGB-Video 12,45 S Still 7 Sub-menu 24 Supported Monitor Displays 45 S-Video 8,12,45 [S-Video] port 8,12,46 Sync Info 25 Sync 24,26 T Tint 24,26 Top menu 24 Tracking 24,26 Turning off 15 U Using...


