
User Manual
Page 3
... filter covers. Keep plastic bags away from small children to qualified service personnel. p Close any cover on ; Caution: When you replace the lamp, never touch the new lamp with your computer-based iii These conditions commonly cause problems for most infrared-controlled equipment. p Turn off any risk of direct sunlight. the bright light can severely injure you can operate the projector by the oil on . Warning...
... filter covers. Keep plastic bags away from small children to qualified service personnel. p Close any cover on ; Caution: When you replace the lamp, never touch the new lamp with your computer-based iii These conditions commonly cause problems for most infrared-controlled equipment. p Turn off any risk of direct sunlight. the bright light can severely injure you can operate the projector by the oil on . Warning...

User Manual
Page 5
Contents Introduction 1 Optional Accessories 3 About This Manual 4 Safety Instructions 5 Where to Get Help 7 Electronic Support Services 7 Automated Telephone Services 8 1 Setting Up the Projector 11 Unpacking the Projector 12 Additional Components 14 Attaching the Hand Strap 16 Installing the Remote Control Batteries 18 Where to Place the Projector 19 Connecting the Power Cord 21 v
Contents Introduction 1 Optional Accessories 3 About This Manual 4 Safety Instructions 5 Where to Get Help 7 Electronic Support Services 7 Automated Telephone Services 8 1 Setting Up the Projector 11 Unpacking the Projector 12 Additional Components 14 Attaching the Hand Strap 16 Installing the Remote Control Batteries 18 Where to Place the Projector 19 Connecting the Power Cord 21 v

User Manual
Page 6
... Address System 45 Turning the Equipment On and Off 46 Turning the Projector On and Off 46 Sleep Mode 48 2 Using the Projector 49 Positioning the Projector 51 Calculating Image Size and Projection Distance 52 Focusing and Positioning the Screen Image 54 Resizing the Projected Image 56 Controlling the Projector 57 Using the Remote Control 58 Using the Control Panel 63 Projector Status Lights 65 Power Light 65 Projector Lamp Light 66 Temperature Light 66 3 Adjusting Projector Settings 67 Accessing the Main Menu 69 Changing a Menu Setting 70 Adjusting Video...
... Address System 45 Turning the Equipment On and Off 46 Turning the Projector On and Off 46 Sleep Mode 48 2 Using the Projector 49 Positioning the Projector 51 Calculating Image Size and Projection Distance 52 Focusing and Positioning the Screen Image 54 Resizing the Projected Image 56 Controlling the Projector 57 Using the Remote Control 58 Using the Control Panel 63 Projector Status Lights 65 Power Light 65 Projector Lamp Light 66 Temperature Light 66 3 Adjusting Projector Settings 67 Accessing the Main Menu 69 Changing a Menu Setting 70 Adjusting Video...

User Manual
Page 7
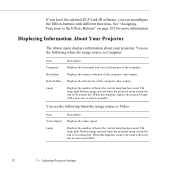
Adjusting Audio Settings 75 Changing Basic Projector Settings 76 Creating and Assigning a User Logo 78 Creating the User Logo 78 Assigning the Logo to the AV/Mute Button 80 Modifying the Special Effects 81 Displaying Information About Your Projector 82 Resetting All Menu Options 83 4 Using ELP Link III 85 Unpacking the ELP Link III Kit 86 Connecting the ELP Link III Cables 87 Connecting to a PC Desktop...
Adjusting Audio Settings 75 Changing Basic Projector Settings 76 Creating and Assigning a User Logo 78 Creating the User Logo 78 Assigning the Logo to the AV/Mute Button 80 Modifying the Special Effects 81 Displaying Information About Your Projector 82 Resetting All Menu Options 83 4 Using ELP Link III 85 Unpacking the ELP Link III Kit 86 Connecting the ELP Link III Cables 87 Connecting to a PC Desktop...

User Manual
Page 8
Using the Projector Setting Dialog Box 116 Using the Quick Change Toolbar 118 Changing Projector Settings 118 Testing Projector Performance 124 Running ELP Link III Without the Projector 129 5 Maintenance 131 Cleaning the Lens 132 Cleaning the Projector Case 132 Cleaning the Air Filter 133 Replacing the Lamp 134 Transporting the Projector 137 6 Troubleshooting 139 Using the Online Help Menu 140 Problems with the Projector 141 Problems with the Remote Control 144 Problems with the Image or Sound 145 7 Technical Specifications 149 Glossary 155...
Using the Projector Setting Dialog Box 116 Using the Quick Change Toolbar 118 Changing Projector Settings 118 Testing Projector Performance 124 Running ELP Link III Without the Projector 129 5 Maintenance 131 Cleaning the Lens 132 Cleaning the Projector Case 132 Cleaning the Air Filter 133 Replacing the Lamp 134 Transporting the Projector 137 6 Troubleshooting 139 Using the Online Help Menu 140 Problems with the Projector 141 Problems with the Remote Control 144 Problems with the Image or Sound 145 7 Technical Specifications 149 Glossary 155...

User Manual
Page 12
Chapter 2, "Using the Projector," gets you encounter specific problems. Chapter 7, "Technical Specifications," lists the projector's technical specifications. Chapter 6, "Troubleshooting," describes how to interpret your projector's warning lights and what to do when you started with the basics: how to position and focus your projector to a computer, video, or audio source, and turning on the remote control and control panel. Chapter 4, "Using ELP Link III," explains how to set up and use the EPSON PowerLite 5550C and PowerLite 7550C projectors. About...
Chapter 2, "Using the Projector," gets you encounter specific problems. Chapter 7, "Technical Specifications," lists the projector's technical specifications. Chapter 6, "Troubleshooting," describes how to interpret your projector's warning lights and what to do when you started with the basics: how to position and focus your projector to a computer, video, or audio source, and turning on the remote control and control panel. Chapter 4, "Using ELP Link III," explains how to set up and use the EPSON PowerLite 5550C and PowerLite 7550C projectors. About...

User Manual
Page 58
... the lens when the lamp is fully warmed up . It is projected. power light projector lamp light temperature light 50 1 • Setting Up the Projector 3. Press the Power button on the remote control or the control panel on . When you want to appear on and the power light flashes orange for about 30 seconds for an extended time may cause an afterimage to stop projecting images, press the Power button again. The fan remains on the screen. Note: Projecting an image...
... the lens when the lamp is fully warmed up . It is projected. power light projector lamp light temperature light 50 1 • Setting Up the Projector 3. Press the Power button on the remote control or the control panel on . When you want to appear on and the power light flashes orange for about 30 seconds for an extended time may cause an afterimage to stop projecting images, press the Power button again. The fan remains on the screen. Note: Projecting an image...

User Manual
Page 72
..., you zoom the image using the top (zoom out) and bottom (zoom in) multi-purpose buttons. Press to open submenus. Adjusts the volume. Resizes the image on page 140 for details. Press to open submenus. Displays the Help menu. Keeps the current computer or video image on the remote control allow you to enhance your computer display. Using the Effects buttons The Effects buttons on the screen until pressed again. Volume + Power Function Acts...
..., you zoom the image using the top (zoom out) and bottom (zoom in) multi-purpose buttons. Press to open submenus. Adjusts the volume. Resizes the image on page 140 for details. Press to open submenus. Displays the Help menu. Keeps the current computer or video image on the remote control allow you to enhance your computer display. Using the Effects buttons The Effects buttons on the screen until pressed again. Volume + Power Function Acts...
User Manual
Page 76
Button Power Function Turns the projector lamp on or off and back on page 140 for details. Menu Displays or hides the active menu. Volume + Adjusts the volume. The following table summarizes the functions on the screen to match the resolution of your computer display. Source Switches the input source between computer and video. AV/Mute Turns the projector's audio and video output off . Up, down arrows (Sync+/Sync-) Synchronize the computer's graphic signal to...
Button Power Function Turns the projector lamp on or off and back on page 140 for details. Menu Displays or hides the active menu. Volume + Adjusts the volume. The following table summarizes the functions on the screen to match the resolution of your computer display. Source Switches the input source between computer and video. AV/Mute Turns the projector's audio and video output off . Up, down arrows (Sync+/Sync-) Synchronize the computer's graphic signal to...
User Manual
Page 77
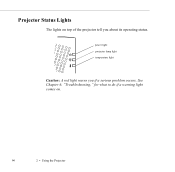
power light projector lamp light temperature light Caution: A red light warns you about its operating status. See Chapter 6, "Troubleshooting," for what to do if a warning light comes on top of the projector tell you if a serious problem occurs. Projector Status Lights The lights on . 66 2 • Using the Projector
power light projector lamp light temperature light Caution: A red light warns you about its operating status. See Chapter 6, "Troubleshooting," for what to do if a warning light comes on top of the projector tell you if a serious problem occurs. Projector Status Lights The lights on . 66 2 • Using the Projector
User Manual
Page 78
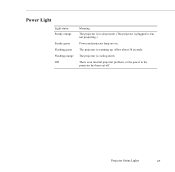
There is cooling down. Allow about 30 seconds. Projector Status Lights 67 The projector is an internal projector problem, or the power to the projector has been cut off. Power Light Light status Steady orange Steady green Flashing green Flashing orange Off Meaning The projector is in , but not projecting.) Power and projector lamp are on. The projector is plugged in sleep mode. (The projector is warming up.
There is cooling down. Allow about 30 seconds. Projector Status Lights 67 The projector is an internal projector problem, or the power to the projector has been cut off. Power Light Light status Steady orange Steady green Flashing green Flashing orange Off Meaning The projector is in , but not projecting.) Power and projector lamp are on. The projector is plugged in sleep mode. (The projector is warming up.

User Manual
Page 79
...; Using the Projector Replace it to be replaced. The projector is functioning normally. Flashing red There's a problem with the cooling fan or temperature sensor. Call a service representative. Steady red Projector lamp has burned out. There's a problem with the projector lamp, lamp power supply, or lamp fuse, or a circuit malfunctioned in the projector. See "Replacing the Lamp" on page 134 for instructions. Projector Lamp Light Light status Meaning Orange and red The lamp needs to project images. Temperature Light Light status Flashing orange Steady red Flashing red...
...; Using the Projector Replace it to be replaced. The projector is functioning normally. Flashing red There's a problem with the cooling fan or temperature sensor. Call a service representative. Steady red Projector lamp has burned out. There's a problem with the projector lamp, lamp power supply, or lamp fuse, or a circuit malfunctioned in the projector. See "Replacing the Lamp" on page 134 for instructions. Projector Lamp Light Light status Meaning Orange and red The lamp needs to project images. Temperature Light Light status Flashing orange Steady red Flashing red...
User Manual
Page 95
..., replace the projector lamp with a new one as soon as possible. The lamp light flashes orange and red when the projector lamp is near the end of its normal life. The lamp light flashes orange and red when the projector lamp is near the end of the computer. See "Assigning Functions to the Effects Buttons" on page 102 for more information. You see the following when the image source is Video: Item Video Signal Lamp Description Displays...
..., replace the projector lamp with a new one as soon as possible. The lamp light flashes orange and red when the projector lamp is near the end of its normal life. The lamp light flashes orange and red when the projector lamp is near the end of the computer. See "Assigning Functions to the Effects Buttons" on page 102 for more information. You see the following when the image source is Video: Item Video Signal Lamp Description Displays...

User Manual
Page 104
... remote control as a mouse for instructions. 9. Tighten the screws on the square end of the PS/2 mouse cable to work with your computer uses a serial mouse, perform steps 5 and 6 using a setup utility provided by the computer manufacturer. Connect the other end of the main cable. If you have to set the display to the MOUSE terminal on all connectors. 8. 4. Some laptops let you want to install...
... remote control as a mouse for instructions. 9. Tighten the screws on the square end of the PS/2 mouse cable to work with your computer uses a serial mouse, perform steps 5 and 6 using a setup utility provided by the computer manufacturer. Connect the other end of the main cable. If you have to set the display to the MOUSE terminal on all connectors. 8. 4. Some laptops let you want to install...
User Manual
Page 147
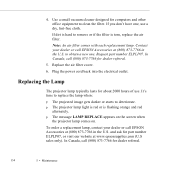
... hours of use a dry, lint-free cloth. Note: An air filter comes with each replacement lamp. Plug the power cord back into the electrical outlet. Replacing the Lamp The projector lamp typically lasts for part number ELPLP07, or visit our website at (800) 873-7766 in the U.S. p The projector lamp light is red or is torn, replace the air filter. If you don't have one . Request part number ELPLP07. It's time to replace the lamp when: p The projected image...
... hours of use a dry, lint-free cloth. Note: An air filter comes with each replacement lamp. Plug the power cord back into the electrical outlet. Replacing the Lamp The projector lamp typically lasts for part number ELPLP07, or visit our website at (800) 873-7766 in the U.S. p The projector lamp light is red or is torn, replace the air filter. If you don't have one . Request part number ELPLP07. It's time to replace the lamp when: p The projected image...

User Manual
Page 154
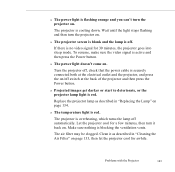
power light projector lamp light temperature light Problems with projector operation. These lights alert you have problems with the projector, first turn the projector back on top of the projector. If this doesn't solve the problem, check the lights on . Then plug the power cord back in and turn it off and unplug it. Problems with the Projector If you to problems with the Projector 141
power light projector lamp light temperature light Problems with projector operation. These lights alert you have problems with the projector, first turn the projector back on top of the projector. If this doesn't solve the problem, check the lights on . Then plug the power cord back in and turn it off and unplug it. Problems with the Projector If you to problems with the Projector 141

User Manual
Page 155
... see these warning lights or encounter other specific problems with the projector. 142 6 • Troubleshooting There's an internal projector problem, or the power to be replaced. Call a service representative. See the following pages for instructions. The projector has turned off . There's a problem with the cooling fan or temperature sensor. The projector is in the projector. Allow about 30 seconds. The projector is cooling down. There's a problem with the projector lamp, lamp power supply, or a lamp fuse; or...
... see these warning lights or encounter other specific problems with the projector. 142 6 • Troubleshooting There's an internal projector problem, or the power to be replaced. Call a service representative. See the following pages for instructions. The projector has turned off . There's a problem with the cooling fan or temperature sensor. The projector is in the projector. Allow about 30 seconds. The projector is cooling down. There's a problem with the projector lamp, lamp power supply, or a lamp fuse; or...
User Manual
Page 156
... Power button. The projector is overheating, which turns the lamp off switch at the electrical outlet and the projector, and press the on/off automatically. The air filter may be clogged. Problems with the Projector 143 Wait until the light stops flashing and then turn the projector on . If there is no video signal for a few minutes, then turn it as described in "Cleaning the Air Filter" on . w The power light doesn't come on . Replace...
... Power button. The projector is overheating, which turns the lamp off switch at the electrical outlet and the projector, and press the on/off automatically. The air filter may be clogged. Problems with the Projector 143 Wait until the light stops flashing and then turn the projector on . If there is no video signal for a few minutes, then turn it as described in "Cleaning the Air Filter" on . w The power light doesn't come on . Replace...

User Manual
Page 159
... Apple menu and then choose Monitors & Sound. In Windows 3.x, use the dialog box to modify your software manual for a different resolution. For a Macintosh with this resizing, choose a different display setting on the computer. For supported display settings, see "Supported Computers and Monitor Displays" on the desktop, select Properties, click the Settings tab, and use Windows Setup in the Main program group. w Only part of the following: the wrong image source is...
... Apple menu and then choose Monitors & Sound. In Windows 3.x, use the dialog box to modify your software manual for a different resolution. For a Macintosh with this resizing, choose a different display setting on the computer. For supported display settings, see "Supported Computers and Monitor Displays" on the desktop, select Properties, click the Settings tab, and use Windows Setup in the Main program group. w Only part of the following: the wrong image source is...

User Manual
Page 176
... 53 connecting, 23 to 45, 87 to 95 controlling, 57 to 64 focusing, 54 to 56 hanging from the ceiling, 52, 77, 123 lamp specifications, 150 maintaining, 131 to 136 parts identified, 50 positioning, 51 to 52 positioning the screen image, 54 to 56, 72, 120 problems, 141 to 144 setting up, 16 to 48 settings, changing, 70 to 71, 118 to 123 status lights...
... 53 connecting, 23 to 45, 87 to 95 controlling, 57 to 64 focusing, 54 to 56 hanging from the ceiling, 52, 77, 123 lamp specifications, 150 maintaining, 131 to 136 parts identified, 50 positioning, 51 to 52 positioning the screen image, 54 to 56, 72, 120 problems, 141 to 144 setting up, 16 to 48 settings, changing, 70 to 71, 118 to 123 status lights...


