Instruction Manual
Page 2
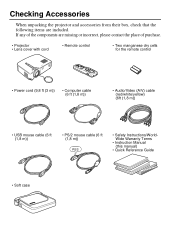
... following items are missing or incorrect, please contact the place of purchase. • Projector • Lens cover with cord • Remote control • Two manganese dry cells for the remote control • Power cord (9,8 ft (3 m)) • Computer cable (6 ft (1,8 m)) • Audio/Video (A/V) cable (red/white/yellow) (6ft (1,8 m)) • USB mouse cable (6 ft (1,8 m)) • PS/2 mouse cable (6 ft (1,8 m)) • Safety Instructions/WorldWide Warranty Terms • Instruction Manual (this manual) • Quick Reference Guide • Soft case
... following items are missing or incorrect, please contact the place of purchase. • Projector • Lens cover with cord • Remote control • Two manganese dry cells for the remote control • Power cord (9,8 ft (3 m)) • Computer cable (6 ft (1,8 m)) • Audio/Video (A/V) cable (red/white/yellow) (6ft (1,8 m)) • USB mouse cable (6 ft (1,8 m)) • PS/2 mouse cable (6 ft (1,8 m)) • Safety Instructions/WorldWide Warranty Terms • Instruction Manual (this manual) • Quick Reference Guide • Soft case
Instruction Manual
Page 3
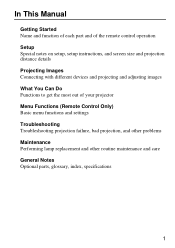
... of each part and of the remote control operation Setup Special notes on setup, setup instructions, and screen size and projection distance details Projecting Images Connecting with different devices and projecting and adjusting images What You Can Do Functions to get the most out of your projector Menu Functions (Remote Control Only) Basic menu functions and settings Troubleshooting Troubleshooting projection failure, bad projection, and other problems Maintenance Performing lamp replacement and other routine maintenance and care General Notes Optional parts, glossary, index, specifications 1
... of each part and of the remote control operation Setup Special notes on setup, setup instructions, and screen size and projection distance details Projecting Images Connecting with different devices and projecting and adjusting images What You Can Do Functions to get the most out of your projector Menu Functions (Remote Control Only) Basic menu functions and settings Troubleshooting Troubleshooting projection failure, bad projection, and other problems Maintenance Performing lamp replacement and other routine maintenance and care General Notes Optional parts, glossary, index, specifications 1

Instruction Manual
Page 12
...) Adjusts volume. [Back] Indicator Lights during signal output from remote control. Computer, S-Video, Video Button (See page 26) Switches to turn the power off . To release the freeze, press the button again. Auto Button (See page 30) Optimizes computer video. R/C switch (See pages 25, 32) Switches remote control power on and off. *Press twice to the selected video source. Menu Button (See page 42) Displays or cancels menus. Help Button (See page 40) Provides topic-specific explanation for scrolling, menu...
...) Adjusts volume. [Back] Indicator Lights during signal output from remote control. Computer, S-Video, Video Button (See page 26) Switches to turn the power off . To release the freeze, press the button again. Auto Button (See page 30) Optimizes computer video. R/C switch (See pages 25, 32) Switches remote control power on and off. *Press twice to the selected video source. Menu Button (See page 42) Displays or cancels menus. Help Button (See page 40) Provides topic-specific explanation for scrolling, menu...
Instruction Manual
Page 13
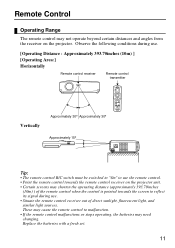
... on the projector unit. • Certain screens may need changing. Replace the batteries with a fresh set. 11 These may cause the remote control to reflect its signal during use the remote control. • Point the remote control towards the screen to malfunction. • If the remote control malfunctions or stops operating, the batteries may shorten the operating distance (approximately 393.70inches (10m) ) of direct sunlight, fluorescent light, and similar light sources. Observe...
... on the projector unit. • Certain screens may need changing. Replace the batteries with a fresh set. 11 These may cause the remote control to reflect its signal during use the remote control. • Point the remote control towards the screen to malfunction. • If the remote control malfunctions or stops operating, the batteries may shorten the operating distance (approximately 393.70inches (10m) ) of direct sunlight, fluorescent light, and similar light sources. Observe...
Instruction Manual
Page 27
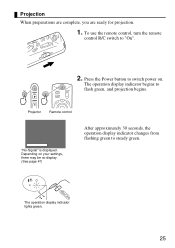
The operation display indicator begins to "On". 2. The operation display indicator lights green. 25 Depending on . Projector Remote control "No-Signal" is displayed. Projection When preparations are complete, you are ready for projection. 1. Press the Power button to switch power on your settings, there may be no display. (See page 47) After approximately 30 seconds, the operation display indicator changes from flashing green to steady green. To use the remote control, turn the remote control R/C switch to flash green, and projection begins.
The operation display indicator begins to "On". 2. The operation display indicator lights green. 25 Depending on . Projector Remote control "No-Signal" is displayed. Projection When preparations are complete, you are ready for projection. 1. Press the Power button to switch power on your settings, there may be no display. (See page 47) After approximately 30 seconds, the operation display indicator changes from flashing green to steady green. To use the remote control, turn the remote control R/C switch to flash green, and projection begins.
Instruction Manual
Page 29
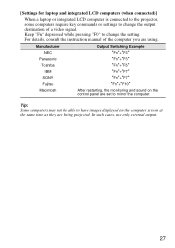
..., use only external output. 27 Tip: Some computers may not be able to have images displayed on the control panel are being projected. For details, consult the instruction manual of a video signal. [Settings for laptop and integrated LCD computers (when connected)] When a laptop or integrated LCD computer is connected to the projector, some computers require key commands or settings to change the setting. Manufacturer NEC Panasonic Toshiba IBM SONY Fujitsu Output Switching Example...
..., use only external output. 27 Tip: Some computers may not be able to have images displayed on the control panel are being projected. For details, consult the instruction manual of a video signal. [Settings for laptop and integrated LCD computers (when connected)] When a laptop or integrated LCD computer is connected to the projector, some computers require key commands or settings to change the setting. Manufacturer NEC Panasonic Toshiba IBM SONY Fujitsu Output Switching Example...
Instruction Manual
Page 33
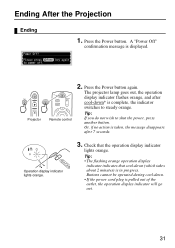
... indicator switches to shut the power, press another button. The projector lamp goes out, the operation display indicator flashes orange, and after 7 seconds. Tip: If you do not wish to steady orange. Tip: • The flashing orange operation display indicator indicates that the operation display indicator lights orange. Check that cool-down (which takes about 2 minutes) is taken, the message disappears after cool-down . • If the power cord plug is pulled out of the outlet, the operation display indicator will...
... indicator switches to shut the power, press another button. The projector lamp goes out, the operation display indicator flashes orange, and after 7 seconds. Tip: If you do not wish to steady orange. Tip: • The flashing orange operation display indicator indicates that the operation display indicator lights orange. Check that cool-down (which takes about 2 minutes) is taken, the message disappears after cool-down . • If the power cord plug is pulled out of the outlet, the operation display indicator will...
Instruction Manual
Page 34
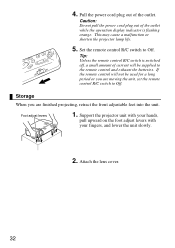
..., set the remote control R/C switch to Off. Caution: Do not pull the power cord plug out of the outlet while the operation display indicator is switched off, a small amount of the outlet. This may cause a malfunction or shorten the projector lamp life. 5. Set the remote control R/C switch to Off. Attach the lens cover. 32 Foot adjust levers 1. Storage When you are finished projecting, retract the front adjustable feet into the unit. 4. Support the projector...
..., set the remote control R/C switch to Off. Caution: Do not pull the power cord plug out of the outlet while the operation display indicator is switched off, a small amount of the outlet. This may cause a malfunction or shorten the projector lamp life. 5. Set the remote control R/C switch to Off. Attach the lens cover. 32 Foot adjust levers 1. Storage When you are finished projecting, retract the front adjustable feet into the unit. 4. Support the projector...
Instruction Manual
Page 37
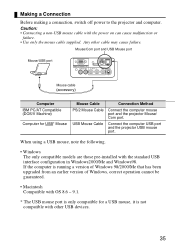
...-installed with the power on can cause malfunction or failure. • Use only the mouse cable supplied. Mouse/Com port and USB Mouse port Mouse/USB port Mouse cable (accessory) Computer IBM PC/AT Compatible (DOS/V Machine) Computer for a USB mouse, it is only compatible for USB* Mouse Mouse Cable PS/2 Mouse Cable USB Mouse Cable Connection Method Connect the computer mouse port and the projector Mouse/ Com port. Making a Connection Before making a connection, switch off power...
...-installed with the power on can cause malfunction or failure. • Use only the mouse cable supplied. Mouse/Com port and USB Mouse port Mouse/USB port Mouse cable (accessory) Computer IBM PC/AT Compatible (DOS/V Machine) Computer for a USB mouse, it is only compatible for USB* Mouse Mouse Cable PS/2 Mouse Cable USB Mouse Cable Connection Method Connect the computer mouse port and the projector Mouse/ Com port. Making a Connection Before making a connection, switch off power...
Instruction Manual
Page 42
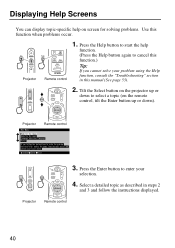
... Displaying Help Screens You can display topic-specific help function. (Press the Help button again to cancel this function.) Tip: If you cannot solve your selection. 4. Projector Remote control 1. Tilt the Select button on the projector up or down to enter your problem using the Help function, consult the "Troubleshooting" section in steps 2 and 3 and follow the instructions displayed. Press the Enter button to select a topic (on screen for solving problems. Use this manual...
... Displaying Help Screens You can display topic-specific help function. (Press the Help button again to cancel this function.) Tip: If you cannot solve your selection. 4. Projector Remote control 1. Tilt the Select button on the projector up or down to enter your problem using the Help function, consult the "Troubleshooting" section in steps 2 and 3 and follow the instructions displayed. Press the Enter button to select a topic (on screen for solving problems. Use this manual...

Instruction Manual
Page 46
... PAL (60Hz) mode, set when projecting a component video image (YCbCr*, YPbPr*).) Returns Video menu settings to factory shipping values, use the "Reset All" menu. : setting available : setting not available Adjusts image sharpness. +: Strengthens sharpness and defines image. - : Weakens sharpness and softens image. * If keystone correction makes unevenness distinctive, reduce the sharpness. Adjusts tint. +: Strengthens red. - : Strengthens green. Adjusts color of Auto provides automatic video signal identification, but for factory shipping values. Adjusts difference in color brightness...
... PAL (60Hz) mode, set when projecting a component video image (YCbCr*, YPbPr*).) Returns Video menu settings to factory shipping values, use the "Reset All" menu. : setting available : setting not available Adjusts image sharpness. +: Strengthens sharpness and defines image. - : Weakens sharpness and softens image. * If keystone correction makes unevenness distinctive, reduce the sharpness. Adjusts tint. +: Strengthens red. - : Strengthens green. Adjusts color of Auto provides automatic video signal identification, but for factory shipping values. Adjusts difference in color brightness...
Instruction Manual
Page 52
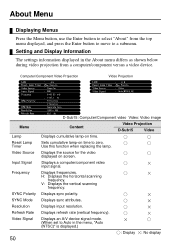
... Menu Displaying Menus Press the Menu button, use the Enter button to select "About" from a computer/component versus a video device. Displays a computer/component video input signal. Use this function when replacing the lamp. H: Displays the horizontal scanning frequency. Computer/Component Video Projection Video Projection Menu Lamp Reset Lamp Timer Video Source Input Signal Frequency SYNC Polarity SYNC Mode Resolution Refresh Rate Video Signal 50 D-Sub15: Computer/Component video Video: Video image Content Video Projection D-Sub15 Video Displays cumulative lamp...
... Menu Displaying Menus Press the Menu button, use the Enter button to select "About" from a computer/component versus a video device. Displays a computer/component video input signal. Use this function when replacing the lamp. H: Displays the horizontal scanning frequency. Computer/Component Video Projection Video Projection Menu Lamp Reset Lamp Timer Video Source Input Signal Frequency SYNC Polarity SYNC Mode Resolution Refresh Rate Video Signal 50 D-Sub15: Computer/Component video Video: Video image Content Video Projection D-Sub15 Video Displays cumulative lamp...
Instruction Manual
Page 57
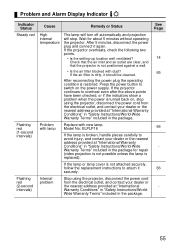
... air filter blocked with new lamp. Press the power button to overheat even after the above points have been checked, or if the indicators show a problem when the power is replaced). After 5 minutes, disconnect the power plug and connect it again. If the projector continues to switch on , stop . Problem and Alarm Display Indicator Indicator Status Steady red Flashing red (1-second intervals) Flashing red (2-second intervals) Cause Remedy or Status High internal temperature The lamp will turn off automatically and projection...
... air filter blocked with new lamp. Press the power button to overheat even after the above points have been checked, or if the indicators show a problem when the power is replaced). After 5 minutes, disconnect the power plug and connect it again. If the projector continues to switch on , stop . Problem and Alarm Display Indicator Indicator Status Steady red Flashing red (1-second intervals) Flashing red (2-second intervals) Cause Remedy or Status High internal temperature The lamp will turn off automatically and projection...
Instruction Manual
Page 59
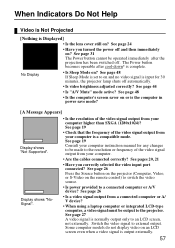
... computer instruction manual for 30 minutes, the projector lamp shuts off automatically. • Is video brightness adjusted correctly? Switch the video signal to the projector. The Power button becomes operable after the projection has been switched off and then immediately on or is input for any changes to be made to a connected computer or A/V device? See page 26 Press the Source button on the projector (Computer, Video, or S-Video on ? Some computer models do not display video...
... computer instruction manual for 30 minutes, the projector lamp shuts off automatically. • Is video brightness adjusted correctly? Switch the video signal to the projector. The Power button becomes operable after the projection has been switched off and then immediately on or is input for any changes to be made to a connected computer or A/V device? See page 26 Press the Source button on the projector (Computer, Video, or S-Video on ? Some computer models do not display video...
Instruction Manual
Page 60
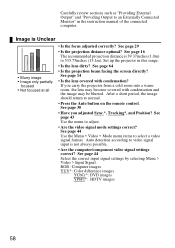
.../component video signal settings correct? See page 44 Use the Menu > Video > Mode menu items to normal. • Press the Auto button on the remote control. See page 64 • Is the projection beam facing the screen directly? See page 29 • Is the projection distance optimal? After a short period, the image should return to select a video signal format. RGB: Computer images YUV*: Color difference images YCbCr*: DVD images YPbPr*: HDTV images 58 Carefully review...
.../component video signal settings correct? See page 44 Use the Menu > Video > Mode menu items to normal. • Press the Auto button on the remote control. See page 64 • Is the projection beam facing the screen directly? See page 29 • Is the projection distance optimal? After a short period, the image should return to select a video signal format. RGB: Computer images YUV*: Color difference images YCbCr*: DVD images YPbPr*: HDTV images 58 Carefully review...
Instruction Manual
Page 61
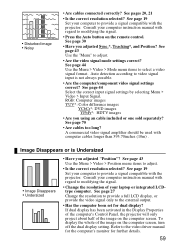
... Use the Menu > Video > Mode menu items to modifying the signal. • Change the resolution of your computer to video signal input is Undersized • Image Disappears • Undersized • Have you adjusted "Position"? See page 19 Set your laptop or integrated LCDtype computer. If dual display has been activated in the Display Properties of the computer's Control Panel, the projector will only project about half of the image on the computer screen, turn...
... Use the Menu > Video > Mode menu items to modifying the signal. • Change the resolution of your computer to video signal input is Undersized • Image Disappears • Undersized • Have you adjusted "Position"? See page 19 Set your laptop or integrated LCDtype computer. If dual display has been activated in the Display Properties of the computer's Control Panel, the projector will only project about half of the image on the computer screen, turn...
Instruction Manual
Page 66
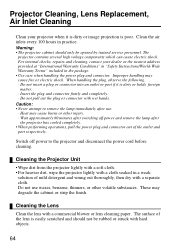
... out thoroughly, then dry with hard objects. 64 Projector Cleaning, Lens Replacement, Air Inlet Cleaning Clean your dealer or the nearest address provided at "International Warranty Conditions" in "Safety Instructions/World-Wide Warranty Terms" included in practice. Improper handling may degrade the cabinet or strip the finish. Switch off power and remove the lamp after use waxes, benzene, thinners, or other injury. · Wait...
... out thoroughly, then dry with hard objects. 64 Projector Cleaning, Lens Replacement, Air Inlet Cleaning Clean your dealer or the nearest address provided at "International Warranty Conditions" in "Safety Instructions/World-Wide Warranty Terms" included in practice. Improper handling may degrade the cabinet or strip the finish. Switch off power and remove the lamp after use waxes, benzene, thinners, or other injury. · Wait...
Instruction Manual
Page 68
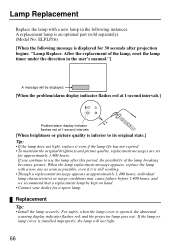
... a new one as soon as possible, even if it is still working. • Though a replacement message appears at 1-second intervals [When brightness or picture quality is inferior to use the lamp after projection begins: "Lamp Replace. If the lamp or lamp cover is opened, the abnormal warning display indicator flashes red, and the projector lamp goes out. Replacement Tip: • Install the lamp securely. After the replacement of the lamp breaking becomes greater. A replacement lamp is an optional part...
... a new one as soon as possible, even if it is still working. • Though a replacement message appears at 1-second intervals [When brightness or picture quality is inferior to use the lamp after projection begins: "Lamp Replace. If the lamp or lamp cover is opened, the abnormal warning display indicator flashes red, and the projector lamp goes out. Replacement Tip: • Install the lamp securely. After the replacement of the lamp breaking becomes greater. A replacement lamp is an optional part...
Instruction Manual
Page 78
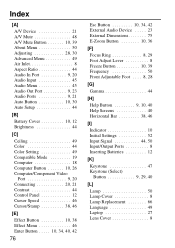
... A/V Mute 48 A/V Mute Button 10, 39 About Menu 50 Adjusting 28, 30 Advanced Menu 49 Air Inlet 8 Aspect Ratio 44 Audio In Port 9, 20 Audio Input 45 Audio Menu 45 Audio Out Port 9, 23 Audio Ports 9, 21 Auto Button 10, 30 Auto Setup 44 [B] Battery Cover 10, 12 Brightness 44 [C] Ceiling 49 Color 44 Color Setting 49 Compatible Mode 19 Computer 18 Computer Button 10, 26 Computer/Component Video Port 9, 20 Connecting 20, 21 Contrast 44 Control Panel 12 Cursor Speed...
... A/V Mute 48 A/V Mute Button 10, 39 About Menu 50 Adjusting 28, 30 Advanced Menu 49 Air Inlet 8 Aspect Ratio 44 Audio In Port 9, 20 Audio Input 45 Audio Menu 45 Audio Out Port 9, 23 Audio Ports 9, 21 Auto Button 10, 30 Auto Setup 44 [B] Battery Cover 10, 12 Brightness 44 [C] Ceiling 49 Color 44 Color Setting 49 Compatible Mode 19 Computer 18 Computer Button 10, 26 Computer/Component Video Port 9, 20 Connecting 20, 21 Contrast 44 Control Panel 12 Cursor Speed...
Instruction Manual
Page 79
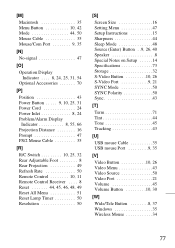
... Projection Distance 16 Prompt 47 PS/2 Mouse Cable 35 [R] R/C Switch 10, 25, 32 Rear Adjustable Foot 8 Rear Projection 49 Refresh Rate 50 Remote Control 10, 11 Remote Control Receiver . . . . 8 Reset 44, 45, 46, 48, 49 Reset All Menu 51 Reset Lamp Timer 50 Resolution 50 [S] Screen Size 16 Setting Menu 47 Setup Instructions 15 Sharpness 44 Sleep Mode 48 Source (Enter) Button . .9, 26, 40 Speaker 8 Special Notes on Setup . . . . . .14 Specifications 73 Storage 32 S-Video Button 10, 26 S-Video Port 9, 21 SYNC Mode 50 SYNC...
... Projection Distance 16 Prompt 47 PS/2 Mouse Cable 35 [R] R/C Switch 10, 25, 32 Rear Adjustable Foot 8 Rear Projection 49 Refresh Rate 50 Remote Control 10, 11 Remote Control Receiver . . . . 8 Reset 44, 45, 46, 48, 49 Reset All Menu 51 Reset Lamp Timer 50 Resolution 50 [S] Screen Size 16 Setting Menu 47 Setup Instructions 15 Sharpness 44 Sleep Mode 48 Source (Enter) Button . .9, 26, 40 Speaker 8 Special Notes on Setup . . . . . .14 Specifications 73 Storage 32 S-Video Button 10, 26 S-Video Port 9, 21 SYNC Mode 50 SYNC...


