Product Brochure
Page 1
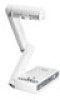
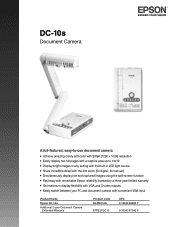
DC-10s Document Camera A full-featured, easy-to-use document camera • Achieve amazing clarity and color with SXGA (1280 x 1024) resolution • Easily display two full pages with a capture area up to ...images using the split-screen function • Rest easy with remarkable Epson reliability, backed by a three-year limited warranty • Get maximum display flexibility with VGA and S-video outputs • Easily switch between your PC and document camera with convenient VGA input Product Name Epson DC-10s Additional 2-year Document Camera Extended Warranty Product Code ELPDC10S ...
DC-10s Document Camera A full-featured, easy-to-use document camera • Achieve amazing clarity and color with SXGA (1280 x 1024) resolution • Easily display two full pages with a capture area up to ...images using the split-screen function • Rest easy with remarkable Epson reliability, backed by a three-year limited warranty • Get maximum display flexibility with VGA and S-video outputs • Easily switch between your PC and document camera with convenient VGA input Product Name Epson DC-10s Additional 2-year Document Camera Extended Warranty Product Code ELPDC10S ...
Quick Setup
Page 1
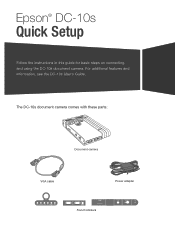
The DC-10s document camera comes with these parts: Document camera VGA cable Power adapter French stickers For additional features and information, see the DC-10s User's Guide. Epson® DC-10s Quick Setup Follow the instructions in this guide for basic steps on connecting and using the DC-10s document camera.
The DC-10s document camera comes with these parts: Document camera VGA cable Power adapter French stickers For additional features and information, see the DC-10s User's Guide. Epson® DC-10s Quick Setup Follow the instructions in this guide for basic steps on connecting and using the DC-10s document camera.
Quick Setup
Page 2
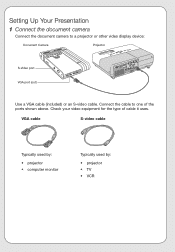
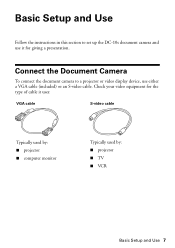
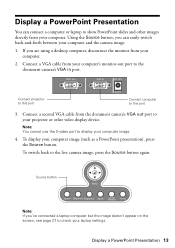
Setting Up Your Presentation 1 Connect the document camera Connect the document camera to one of cable it uses. Connect the cable to a projector or other video display device: Document Camera Projector S-Video port VGA port (out) Use a VGA cable (included) or an S-video cable. Check your video equipment for the type of the ports shown above. VGA cable S-video cable Typically used by: • projector • computer monitor Typically used by: • projector • TV • VCR
Setting Up Your Presentation 1 Connect the document camera Connect the document camera to one of cable it uses. Connect the cable to a projector or other video display device: Document Camera Projector S-Video port VGA port (out) Use a VGA cable (included) or an S-video cable. Check your video equipment for the type of the ports shown above. VGA cable S-video cable Typically used by: • projector • computer monitor Typically used by: • projector • TV • VCR

Quick Setup
Page 4
A 2 Press the lamp button to illuminate your document on the screen. 4 Press the Focus button. Your document is automatically focused. Orient it off. Note When you're done using the document camera, press and hold the Power button to orient the image on the table under the camera head. A 4 Place your document 1 Place your document. To store it, disconnect any cables and fold down the camera arm. Lamp button Image rotation dial Focus button 3 Turn the dial on the camera head to turn it either way as shown.
A 2 Press the lamp button to illuminate your document on the screen. 4 Press the Focus button. Your document is automatically focused. Orient it off. Note When you're done using the document camera, press and hold the Power button to orient the image on the table under the camera head. A 4 Place your document 1 Place your document. To store it, disconnect any cables and fold down the camera arm. Lamp button Image rotation dial Focus button 3 Turn the dial on the camera head to turn it either way as shown.
Quick Setup
Page 5
...internal memory. AC Frequency Eliminates flicker when giving presentations in regions with different electrical systems. See the User's Guide for example, the live camera image • PC (if connected) • internal memory • SD card (if inserted) Menu Press to view the on an...stored in the room where you access commonly used features: Press to adjust settings. Select the image source: • live camera image and an image stored in internal memory). Focus the image. Enlarge part of the image. Use the arrow buttons to display positive images. ...
...internal memory. AC Frequency Eliminates flicker when giving presentations in regions with different electrical systems. See the User's Guide for example, the live camera image • PC (if connected) • internal memory • SD card (if inserted) Menu Press to view the on an...stored in the room where you access commonly used features: Press to adjust settings. Select the image source: • live camera image and an image stored in internal memory). Focus the image. Enlarge part of the image. Use the arrow buttons to display positive images. ...

Quick Setup
Page 6
... and all rights in China You may also speak with your document camera. To find the nearest reseller, call , please have this information ready: • Product name (DC-10s document camera) • Product serial number (located on the Epson PrivateLine Support card that came with a support specialist by dialing ... Speak to a live representative, and it's free. Toll or long distance charges may be trademarks of speaking to a Support Representative To use the Epson PrivateLine® Support service, call (800) 637-7661 and enter the PIN on the bottom of the product) • Proof of...
... and all rights in China You may also speak with your document camera. To find the nearest reseller, call , please have this information ready: • Product name (DC-10s document camera) • Product serial number (located on the Epson PrivateLine Support card that came with a support specialist by dialing ... Speak to a live representative, and it's free. Toll or long distance charges may be trademarks of speaking to a Support Representative To use the Epson PrivateLine® Support service, call (800) 637-7661 and enter the PIN on the bottom of the product) • Proof of...
Supplemental / Late Breaking Information
Page 1
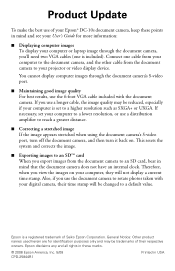
... distance. ■ Correcting a stretched image If the image appears stretched when using the document camera's S-video port, turn off the document camera, and then turn it back on your computer, they will be reduced, especially if your computer is a registered trademark of your Epson® DC-10s document camera, keep these points in USA Connect one is included). Product Update...
... distance. ■ Correcting a stretched image If the image appears stretched when using the document camera's S-video port, turn off the document camera, and then turn it back on your computer, they will be reduced, especially if your computer is a registered trademark of your Epson® DC-10s document camera, keep these points in USA Connect one is included). Product Update...
User's Guide
Page 2
.... PrivateLine is designed only for any and all rights in certain circumstances, those circumstances may be trademarks of this Epson product. Epson disclaims any use with Seiko Epson Corporation's operating and maintenance instructions. Trademarks Epson is a registered trademark and Epson Exceed Your Vision is subject to other than those marks. This information is a registered logomark of...
.... PrivateLine is designed only for any and all rights in certain circumstances, those circumstances may be trademarks of this Epson product. Epson disclaims any use with Seiko Epson Corporation's operating and maintenance instructions. Trademarks Epson is a registered trademark and Epson Exceed Your Vision is subject to other than those marks. This information is a registered logomark of...
User's Guide
Page 3
English Contents Introduction 5 Document Camera Parts 6 Basic Setup and Use 7 Connect the Document Camera 7 Plug In and Turn On 9 Extend the Camera Arm 10 Display a Document 11 Display a Whiteboard 12 Display a PowerPoint Presentation 13 Image Adjustments and Effects 15 Adjustments Using the Control Panel 15 Adjustments Using the On-screen Menu 16 Displaying a Split Screen 18 ...a Memory Card 22 Giving a Slideshow 23 Solving Problems 25 Problems and Solutions 25 Operation Problems 25 Image Quality Problems 26 Problems Using an SD Card 27 Problems Connecting a Laptop 27 3
English Contents Introduction 5 Document Camera Parts 6 Basic Setup and Use 7 Connect the Document Camera 7 Plug In and Turn On 9 Extend the Camera Arm 10 Display a Document 11 Display a Whiteboard 12 Display a PowerPoint Presentation 13 Image Adjustments and Effects 15 Adjustments Using the Control Panel 15 Adjustments Using the On-screen Menu 16 Displaying a Split Screen 18 ...a Memory Card 22 Giving a Slideshow 23 Solving Problems 25 Problems and Solutions 25 Operation Problems 25 Image Quality Problems 26 Problems Using an SD Card 27 Problems Connecting a Laptop 27 3

User's Guide
Page 5
... The Epson® DC-10s document camera captures color images of the room ■ Internal memory lets you capture images and display them as a slideshow ■ Built-in a classroom, conference room, or other images from your computer; The DC-10s document camera includes these features: ■ Small footprint uses little desk space, yet the camera's design lets you view entire documents up...
... The Epson® DC-10s document camera captures color images of the room ■ Internal memory lets you capture images and display them as a slideshow ■ Built-in a classroom, conference room, or other images from your computer; The DC-10s document camera includes these features: ■ Small footprint uses little desk space, yet the camera's design lets you view entire documents up...
User's Guide
Page 7
Connect the Document Camera To connect the document camera to set up the DC-10s document camera and use either a VGA cable (included) or an S-video cable. Check your video equipment for giving a presentation. Basic Setup and Use Follow the instructions in this section to a projector or video display device, use it for the type of cable it uses: VGA cable S-video cable Typically used by: ■ projector ■ computer monitor Typically used by: ■ projector ■ TV ■ VCR Basic Setup and Use 7
Connect the Document Camera To connect the document camera to set up the DC-10s document camera and use either a VGA cable (included) or an S-video cable. Check your video equipment for giving a presentation. Basic Setup and Use Follow the instructions in this section to a projector or video display device, use it for the type of cable it uses: VGA cable S-video cable Typically used by: ■ projector ■ computer monitor Typically used by: ■ projector ■ TV ■ VCR Basic Setup and Use 7
User's Guide
Page 8
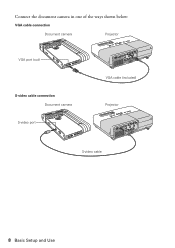
Connect the document camera in one of the ways shown below: VGA cable connection Document camera Projector VGA port (out) S-video cable connection Document camera S-video port VGA cable (included) Projector S-video cable 8 Basic Setup and Use
Connect the document camera in one of the ways shown below: VGA cable connection Document camera Projector VGA port (out) S-video cable connection Document camera S-video port VGA cable (included) Projector S-video cable 8 Basic Setup and Use

User's Guide
Page 9
Plug the adapter into a wall outlet. It takes about 10 seconds for the document camera to turn on your projector or video display device. Turn on the document camera. Plug In and Turn On 9 Note: When you're done using the document camera, press and hold the P Power button to output an image. 3. Connect the power adapter as shown. Power button Power 2. Plug In and Turn On 1. Press the P Power button to turn it off, disconnect any cables, and fold down the camera arm.
Plug the adapter into a wall outlet. It takes about 10 seconds for the document camera to turn on your projector or video display device. Turn on the document camera. Plug In and Turn On 9 Note: When you're done using the document camera, press and hold the P Power button to output an image. 3. Connect the power adapter as shown. Power button Power 2. Plug In and Turn On 1. Press the P Power button to turn it off, disconnect any cables, and fold down the camera arm.
User's Guide
Page 10
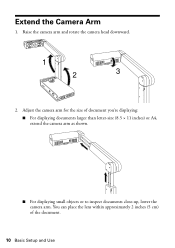
Extend the Camera Arm 1. Adjust the camera arm for the size of the document. 10 Basic Setup and Use Raise the camera arm and rotate the camera head downward. 1 2 3 2. You can place the lens within approximately 2 inches (5 cm) of document you're displaying: ■ For displaying documents larger than letter-size (8.5 × 11 inches) or A4, extend the camera arm as shown. ■ For displaying small objects or to inspect documents close-up, lower the camera arm.
Extend the Camera Arm 1. Adjust the camera arm for the size of the document. 10 Basic Setup and Use Raise the camera arm and rotate the camera head downward. 1 2 3 2. You can place the lens within approximately 2 inches (5 cm) of document you're displaying: ■ For displaying documents larger than letter-size (8.5 × 11 inches) or A4, extend the camera arm as shown. ■ For displaying small objects or to inspect documents close-up, lower the camera arm.
User's Guide
Page 12
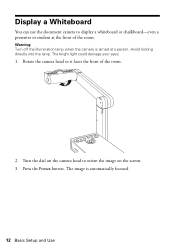
The bright light could damage your eyes. 1. Turn the dial on the camera head to display a whiteboard or chalkboard-even a presenter or student at a person. The image is aimed at the front of the room. 2. Display a Whiteboard You can use the document camera to orient the image on the screen. 3. Rotate the camera head so it faces the front of the room. Avoid looking directly into the lamp. Warning: Turn off the illumination lamp when the camera is automatically focused. 12 Basic Setup and Use Press the Focus button.
The bright light could damage your eyes. 1. Turn the dial on the camera head to display a whiteboard or chalkboard-even a presenter or student at a person. The image is aimed at the front of the room. 2. Display a Whiteboard You can use the document camera to orient the image on the screen. 3. Rotate the camera head so it faces the front of the room. Avoid looking directly into the lamp. Warning: Turn off the illumination lamp when the camera is automatically focused. 12 Basic Setup and Use Press the Focus button.
User's Guide
Page 13
... S-video port to this port Connect computer to display your computer and the camera image. 1. Using the Source button, you are using a desktop computer, disconnect the monitor from your computer's monitor-out port to the document camera's VGA in DC 12V Connect projector to this port 3. If you can connect a computer or laptop to the live...
... S-video port to this port Connect computer to display your computer and the camera image. 1. Using the Source button, you are using a desktop computer, disconnect the monitor from your computer's monitor-out port to the document camera's VGA in DC 12V Connect projector to this port 3. If you can connect a computer or laptop to the live...

User's Guide
Page 14
14 Basic Setup and Use
14 Basic Setup and Use
User's Guide
Page 15
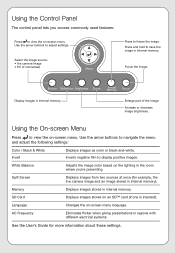
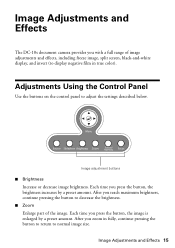
Adjustments Using the Control Panel Use the buttons on the control panel to decrease the brightness. ■ Zoom Enlarge part of image adjustments and effects, including freeze image, split screen, black-...). Image Adjustments and Effects 15 After you reach maximum brightness, continue pressing the button to adjust the settings described below. Image Adjustments and Effects The DC-10s document camera provides you with a full range of the image. Each time you press the button, the image is enlarged by a preset amount.
Adjustments Using the Control Panel Use the buttons on the control panel to decrease the brightness. ■ Zoom Enlarge part of image adjustments and effects, including freeze image, split screen, black-...). Image Adjustments and Effects 15 After you reach maximum brightness, continue pressing the button to adjust the settings described below. Image Adjustments and Effects The DC-10s document camera provides you with a full range of the image. Each time you press the button, the image is enlarged by a preset amount.
User's Guide
Page 16
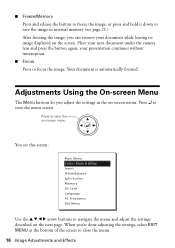
... can remove your document while leaving its image displayed on the screen. After freezing the image, you adjust the settings in internal memory (see this screen: Main Menu Color / Black & White Invert White Balance Split Screen Memory SD Card Language AC Frequency Exit Menu Use the u d ... EXIT MENU at the bottom of the screen to view the menu screen. Your document is automatically focused. Press to close the menu. 16 Image Adjustments and Effects your next document under the camera lens and press the button again; Place your presentation continues without interruption. ■...
... can remove your document while leaving its image displayed on the screen. After freezing the image, you adjust the settings in internal memory (see this screen: Main Menu Color / Black & White Invert White Balance Split Screen Memory SD Card Language AC Frequency Exit Menu Use the u d ... EXIT MENU at the bottom of the screen to view the menu screen. Your document is automatically focused. Press to close the menu. 16 Image Adjustments and Effects your next document under the camera lens and press the button again; Place your presentation continues without interruption. ■...
User's Guide
Page 17
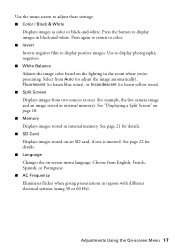
... On-screen Menu 17 Press the button to display positive images. Use the menu screen to lessen yellow tones). ■ Split Screen Displays images from two sources at once (for example, the live camera image and an image stored in internal memory). Select from Auto (to adjust the image ... Color / Black & White Displays images as color or black-and-white. See "Displaying a Split Screen" on an SD card, if one is inserted. Use to display photographic negatives. ■ White Balance Adjusts the image color based on -screen menu language. See page 21 for details. ■ Language Changes the...
... On-screen Menu 17 Press the button to display positive images. Use the menu screen to lessen yellow tones). ■ Split Screen Displays images from two sources at once (for example, the live camera image and an image stored in internal memory). Select from Auto (to adjust the image ... Color / Black & White Displays images as color or black-and-white. See "Displaying a Split Screen" on an SD card, if one is inserted. Use to display photographic negatives. ■ White Balance Adjusts the image color based on -screen menu language. See page 21 for details. ■ Language Changes the...


