Product Brochure
Page 1
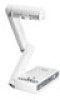
...-in LED light source • Share incredible detail with the 40x zoom (5x digital, 8x manual) • Simultaneously display live and captured images using the split-screen function • Rest easy with remarkable Epson reliability, backed by a three-year limited warranty • Get maximum display flexibility with VGA and S-video outputs • Easily switch between your PC and document camera with convenient VGA input Product Name Epson DC-10s Additional 2-year Document Camera Extended...
...-in LED light source • Share incredible detail with the 40x zoom (5x digital, 8x manual) • Simultaneously display live and captured images using the split-screen function • Rest easy with remarkable Epson reliability, backed by a three-year limited warranty • Get maximum display flexibility with VGA and S-video outputs • Easily switch between your PC and document camera with convenient VGA input Product Name Epson DC-10s Additional 2-year Document Camera Extended...
Product Brochure
Page 2
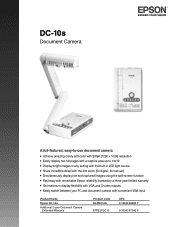
...-white selection Negative/positive conversion Slideshow Split-screen Power Operating Temperature 5 ˚C to 40 ˚C Power Supply Voltage 120 - 240 VAC Power Consumption 11 - 13 W Camera Specifications Imaging Element 1/3" CMOS, 1600 x 1200 pixels Output Signals 1280 x 1024 (SXGA) analog RGB,S-video Frame Rate 15 frames per second Lighting Source LED lamp x 2, built-in Optical Specifications Lens F3.5, f = 6.7 mm Capture Area Min. 1.6" x 2.0" Max. 14" x 19" Zooming 5x digital magnification, 8x manual zoom Focus Auto Iris Auto Dimensions (W x D x H) Open 5.5" x 10...
...-white selection Negative/positive conversion Slideshow Split-screen Power Operating Temperature 5 ˚C to 40 ˚C Power Supply Voltage 120 - 240 VAC Power Consumption 11 - 13 W Camera Specifications Imaging Element 1/3" CMOS, 1600 x 1200 pixels Output Signals 1280 x 1024 (SXGA) analog RGB,S-video Frame Rate 15 frames per second Lighting Source LED lamp x 2, built-in Optical Specifications Lens F3.5, f = 6.7 mm Capture Area Min. 1.6" x 2.0" Max. 14" x 19" Zooming 5x digital magnification, 8x manual zoom Focus Auto Iris Auto Dimensions (W x D x H) Open 5.5" x 10...
Quick Setup
Page 1
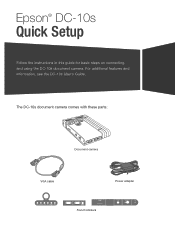
For additional features and information, see the DC-10s User's Guide. The DC-10s document camera comes with these parts: Document camera VGA cable Power adapter French stickers Epson® DC-10s Quick Setup Follow the instructions in this guide for basic steps on connecting and using the DC-10s document camera.
For additional features and information, see the DC-10s User's Guide. The DC-10s document camera comes with these parts: Document camera VGA cable Power adapter French stickers Epson® DC-10s Quick Setup Follow the instructions in this guide for basic steps on connecting and using the DC-10s document camera.
Quick Setup
Page 3
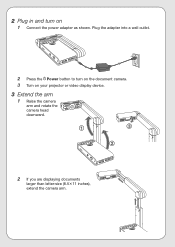
2 Plug in and turn on the document camera. 3 Turn on 1 Connect the power adapter as shown. Plug the adapter into a wall outlet. 2 Press the Power button to turn on your projector or video display device. 3 Extend the arm 1 Raise the camera arm and rotate the camera head downward. 1 3 2 2 If you are displaying documents larger than letter-size (8.5 11 inches), extend the camera arm.
2 Plug in and turn on the document camera. 3 Turn on 1 Connect the power adapter as shown. Plug the adapter into a wall outlet. 2 Press the Power button to turn on your projector or video display device. 3 Extend the arm 1 Raise the camera arm and rotate the camera head downward. 1 3 2 2 If you are displaying documents larger than letter-size (8.5 11 inches), extend the camera arm.
Quick Setup
Page 5
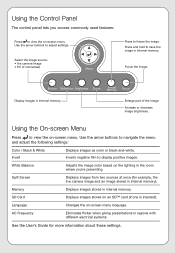
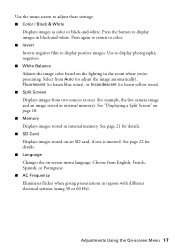
... two sources at once (for more information about these settings. Focus the image. Using the On-screen Menu Press to navigate the menu and adjust the following settings: Color / Black & White Invert Displays images as color or black-and-white. Use the arrow buttons to view the on the lighting in internal memory). AC Frequency Eliminates flicker when giving presentations in internal memory. Using the Control Panel The control panel lets you 're presenting. or on -screen menu. Enlarge part...
... two sources at once (for more information about these settings. Focus the image. Using the On-screen Menu Press to navigate the menu and adjust the following settings: Color / Black & White Invert Displays images as color or black-and-white. Use the arrow buttons to view the on the lighting in internal memory). AC Frequency Eliminates flicker when giving presentations in internal memory. Using the Control Panel The control panel lets you 're presenting. or on -screen menu. Enlarge part...

Quick Setup
Page 6
... information ready: • Product name (DC-10s document camera) • Product serial number (located on the Epson PrivateLine Support card that came with your product for identification purposes only and may apply. General Notice: Other product names used herein are subject to 6 PM, Pacific Time, Monday through Friday, for developing successful presentations. Where to Get Help Epson provides these numbers: • U.S.: (562) 276-4394...
... information ready: • Product name (DC-10s document camera) • Product serial number (located on the Epson PrivateLine Support card that came with your product for identification purposes only and may apply. General Notice: Other product names used herein are subject to 6 PM, Pacific Time, Monday through Friday, for developing successful presentations. Where to Get Help Epson provides these numbers: • U.S.: (562) 276-4394...
Supplemental / Late Breaking Information
Page 1
... distance. ■ Correcting a stretched image If the image appears stretched when using the document camera's S-video port, turn off the document camera, and then turn it back on your computer, they will be changed to a default value. Connect one is a registered trademark of their time stamp will not display a current time stamp. Product Update To make the best use of your Epson® DC-10s document camera, keep these points in mind and see your User's Guide for...
... distance. ■ Correcting a stretched image If the image appears stretched when using the document camera's S-video port, turn off the document camera, and then turn it back on your computer, they will be changed to a default value. Connect one is a registered trademark of their time stamp will not display a current time stamp. Product Update To make the best use of your Epson® DC-10s document camera, keep these points in mind and see your User's Guide for...
User's Guide
Page 3
... 5 Document Camera Parts 6 Basic Setup and Use 7 Connect the Document Camera 7 Plug In and Turn On 9 Extend the Camera Arm 10 Display a Document 11 Display a Whiteboard 12 Display a PowerPoint Presentation 13 Image Adjustments and Effects 15 Adjustments Using the Control Panel 15 Adjustments Using the On-screen Menu 16 Displaying a Split Screen 18 Saving Images and Giving Slideshows 21 Saving Images to the Internal Memory 21 Exporting Images to a Memory Card 22 Giving a Slideshow 23 Solving Problems 25 Problems and Solutions 25 Operation Problems...
... 5 Document Camera Parts 6 Basic Setup and Use 7 Connect the Document Camera 7 Plug In and Turn On 9 Extend the Camera Arm 10 Display a Document 11 Display a Whiteboard 12 Display a PowerPoint Presentation 13 Image Adjustments and Effects 15 Adjustments Using the Control Panel 15 Adjustments Using the On-screen Menu 16 Displaying a Split Screen 18 Saving Images and Giving Slideshows 21 Saving Images to the Internal Memory 21 Exporting Images to a Memory Card 22 Giving a Slideshow 23 Solving Problems 25 Problems and Solutions 25 Operation Problems...

User's Guide
Page 5
... even three-dimensional objects. When connected to a projector or other video display device, the document camera lets you connect to a computer or laptop to display negative film) Introduction 5 Introduction The Epson® DC-10s document camera captures color images of a button, you can easily switch between the camera image and your computer; with your digital camera ■ VGA port lets you display crisp, vivid images in a classroom, conference room, or other images from your computer ■ Folding...
... even three-dimensional objects. When connected to a projector or other video display device, the document camera lets you connect to a computer or laptop to display negative film) Introduction 5 Introduction The Epson® DC-10s document camera captures color images of a button, you can easily switch between the camera image and your computer; with your digital camera ■ VGA port lets you display crisp, vivid images in a classroom, conference room, or other images from your computer ■ Folding...
User's Guide
Page 7
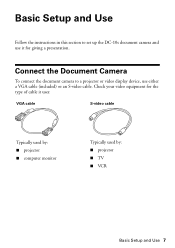
Connect the Document Camera To connect the document camera to set up the DC-10s document camera and use either a VGA cable (included) or an S-video cable. Check your video equipment for the type of cable it for giving a presentation. Basic Setup and Use Follow the instructions in this section to a projector or video display device, use it uses: VGA cable S-video cable Typically used by: ■ projector ■ computer monitor Typically used by: ■ projector ■ TV ■ VCR Basic Setup and Use 7
Connect the Document Camera To connect the document camera to set up the DC-10s document camera and use either a VGA cable (included) or an S-video cable. Check your video equipment for the type of cable it for giving a presentation. Basic Setup and Use Follow the instructions in this section to a projector or video display device, use it uses: VGA cable S-video cable Typically used by: ■ projector ■ computer monitor Typically used by: ■ projector ■ TV ■ VCR Basic Setup and Use 7

User's Guide
Page 9
Plug In and Turn On 1. Turn on the document camera. Press the P Power button to output an image. 3. Plug In and Turn On 9 It takes about 10 seconds for the document camera to turn it off, disconnect any cables, and fold down the camera arm. Plug the adapter into a wall outlet. Connect the power adapter as shown. Power button Power 2. Note: When you're done using the document camera, press and hold the P Power button to turn on your projector or video display device.
Plug In and Turn On 1. Turn on the document camera. Press the P Power button to output an image. 3. Plug In and Turn On 9 It takes about 10 seconds for the document camera to turn it off, disconnect any cables, and fold down the camera arm. Plug the adapter into a wall outlet. Connect the power adapter as shown. Power button Power 2. Note: When you're done using the document camera, press and hold the P Power button to turn on your projector or video display device.
User's Guide
Page 12
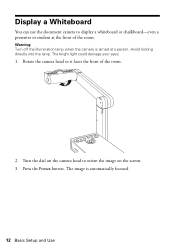
The bright light could damage your eyes. 1. Avoid looking directly into the lamp. Press the Focus button. Rotate the camera head so it faces the front of the room. Display a Whiteboard You can use the document camera to orient the image on the screen. 3. The image is aimed at the front of the room. 2. Turn the dial on the camera head to display a whiteboard or chalkboard-even a presenter or student at a person. Warning: Turn off the illumination lamp when the camera is automatically focused. 12 Basic Setup and Use
The bright light could damage your eyes. 1. Avoid looking directly into the lamp. Press the Focus button. Rotate the camera head so it faces the front of the room. Display a Whiteboard You can use the document camera to orient the image on the screen. 3. The image is aimed at the front of the room. 2. Turn the dial on the camera head to display a whiteboard or chalkboard-even a presenter or student at a person. Warning: Turn off the illumination lamp when the camera is automatically focused. 12 Basic Setup and Use
User's Guide
Page 13
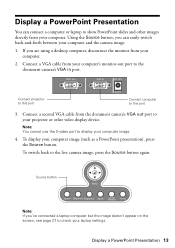
... video display device. To switch back to this port Connect computer to the live camera image, press the Source button again. To display your computer and the camera image. 1. Source button Menu Source Slideshow Brightness Zoom Freeze/ Memory Focus Note: If you are using a desktop computer, disconnect the monitor from your laptop settings. If you 've connected a laptop computer but the image doesn't appear on the screen, see page 27 to check your computer. VGA out VGA in port. Using...
... video display device. To switch back to this port Connect computer to the live camera image, press the Source button again. To display your computer and the camera image. 1. Source button Menu Source Slideshow Brightness Zoom Freeze/ Memory Focus Note: If you are using a desktop computer, disconnect the monitor from your laptop settings. If you 've connected a laptop computer but the image doesn't appear on the screen, see page 27 to check your computer. VGA out VGA in port. Using...
User's Guide
Page 15
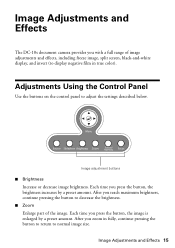
... the button to return to adjust the settings described below. After you press the button, the brightness increases by a preset amount. Menu Source Slideshow Brightness Zoom Freeze/ Memory Focus Image adjustment buttons ■ Brightness Increase or decrease image brightness. Image Adjustments and Effects 15 After you press the button, the image is enlarged by a preset amount. Adjustments Using the Control Panel Use the buttons on the control panel to normal image size. Each time you zoom in true color).
... the button to return to adjust the settings described below. After you press the button, the brightness increases by a preset amount. Menu Source Slideshow Brightness Zoom Freeze/ Memory Focus Image adjustment buttons ■ Brightness Increase or decrease image brightness. Image Adjustments and Effects 15 After you press the button, the image is enlarged by a preset amount. Adjustments Using the Control Panel Use the buttons on the control panel to normal image size. Each time you zoom in true color).
User's Guide
Page 17
... image color based on -screen menu language. Use the menu screen to display positive images. Press the button to lessen yellow tones). ■ Split Screen Displays images from English, French, Spanish, or Portuguese. ■ AC Frequency Eliminates flicker when giving presentations in black-and-white. See page 21 for example, the live camera image and an image stored in internal memory). Select from Auto (to adjust the image automatically), Fluorescent (to lessen blue...
... image color based on -screen menu language. Use the menu screen to display positive images. Press the button to lessen yellow tones). ■ Split Screen Displays images from English, French, Spanish, or Portuguese. ■ AC Frequency Eliminates flicker when giving presentations in black-and-white. See page 21 for example, the live camera image and an image stored in internal memory). Select from Auto (to adjust the image automatically), Fluorescent (to lessen blue...
User's Guide
Page 25
... correct source on the screen ■ After you press the P Power button, wait a few moments for about 10 seconds for the document camera to appear. The source is turned on . This resets the system. If you're using the document camera. Solving Problems 25 The green light turns on and not in . Document camera doesn't respond to which you've connected the video cable. No image appears on your projector or video display device is the port...
... correct source on the screen ■ After you press the P Power button, wait a few moments for about 10 seconds for the document camera to appear. The source is turned on . This resets the system. If you're using the document camera. Solving Problems 25 The green light turns on and not in . Document camera doesn't respond to which you've connected the video cable. No image appears on your projector or video display device is the port...
User's Guide
Page 26
... document camera. This resets the system and corrects the image. ■ For best results, use a distribution amplifier to focus properly. If necessary, set to a higher resolution such as SXGA+ or UXGA. you can purchase one from the object you're viewing. ■ If you're using the document camera's S-video port, press and hold the P Power button for the type of compressed air to remove dust. Image Quality Problems The image...
... document camera. This resets the system and corrects the image. ■ For best results, use a distribution amplifier to focus properly. If necessary, set to a higher resolution such as SXGA+ or UXGA. you can purchase one from the object you're viewing. ■ If you're using the document camera's S-video port, press and hold the P Power button for the type of compressed air to remove dust. Image Quality Problems The image...
User's Guide
Page 28
... common problems. You can download product documentation, view FAQs, or e-mail Epson with your document camera. Where To Get Help Internet Support Visit Epson's support website at www.epsonstore.com (U.S. Speak to a live representative, and it's free. This service is the fastest way of your warranty period. Or you call, please have this information ready: ■ Product name (DC-10s document camera) and serial number (located on the Epson PrivateLine Support card...
... common problems. You can download product documentation, view FAQs, or e-mail Epson with your document camera. Where To Get Help Internet Support Visit Epson's support website at www.epsonstore.com (U.S. Speak to a live representative, and it's free. This service is the fastest way of your warranty period. Or you call, please have this information ready: ■ Product name (DC-10s document camera) and serial number (located on the Epson PrivateLine Support card...
User's Guide
Page 29
... adhere to a properly grounded power outlet. The bright light could damage your eyes. ■ Never point the lens into the sun, as these safety instructions when setting up and using outlets on the same circuit as air control systems or other high-load devices that regularly switch on the document camera label. ■ Connect the document camera to all warnings in the documentation and on a flat, stable...
... adhere to a properly grounded power outlet. The bright light could damage your eyes. ■ Never point the lens into the sun, as these safety instructions when setting up and using outlets on the same circuit as air control systems or other high-load devices that regularly switch on the document camera label. ■ Connect the document camera to all warnings in the documentation and on a flat, stable...
User's Guide
Page 33
... product or part may be removed. What This Warranty Does Not Cover: This warranty covers only normal use an address in the United States and Canada. If a claimed defect cannot be free from defects in the United States or Canada, will provide telephone diagnostic service to Epson within five (5) working days of receipt of a part, the item replaced becomes Epson property. An Epson service technician...
... product or part may be removed. What This Warranty Does Not Cover: This warranty covers only normal use an address in the United States and Canada. If a claimed defect cannot be free from defects in the United States or Canada, will provide telephone diagnostic service to Epson within five (5) working days of receipt of a part, the item replaced becomes Epson property. An Epson service technician...


