
User Guide
Page 5
...Messages ...121 Solving Scanning Problems ...122 Scanner Does Not Turn On or Turns Off Unexpectedly 123 Scanning Software Does Not Operate Correctly 123 Cannot Start Epson Scan 2 ...124 Original Feeds Incorrectly in Scanner 125 Original Jams in Scanner...125 Scanning is Slow ...Specifications ...137 Dimension Specifications ...138 Electrical Specifications ...139 Environmental Specifications ...140 Network Interface Specifications ...140 5 Windows 133 Uninstalling Scanner Software - Mac 133 Where to Editable Text (OCR 130 Ripple Patterns Appear in an Image 131 Spots or Lines Appear in ...
...Messages ...121 Solving Scanning Problems ...122 Scanner Does Not Turn On or Turns Off Unexpectedly 123 Scanning Software Does Not Operate Correctly 123 Cannot Start Epson Scan 2 ...124 Original Feeds Incorrectly in Scanner 125 Original Jams in Scanner...125 Scanning is Slow ...Specifications ...137 Dimension Specifications ...138 Electrical Specifications ...139 Environmental Specifications ...140 Network Interface Specifications ...140 5 Windows 133 Uninstalling Scanner Software - Mac 133 Where to Editable Text (OCR 130 Ripple Patterns Appear in an Image 131 Spots or Lines Appear in ...
User Guide
Page 6
Safety and Approvals Specifications 140 Notices ...142 Important Safety Instructions...142 Restrictions on Copying ...144 Default Delay Times for Power Management for Epson Products 145 Binding Arbitration and Class Waiver 145 Trademarks ...148 Copyright Notice...149 libTIFF Software Acknowledgment 149 A Note Concerning Responsible Use of Copyrighted Materials 150 Copyright Attribution ...150 6
Safety and Approvals Specifications 140 Notices ...142 Important Safety Instructions...142 Restrictions on Copying ...144 Default Delay Times for Power Management for Epson Products 145 Binding Arbitration and Class Waiver 145 Trademarks ...148 Copyright Notice...149 libTIFF Software Acknowledgment 149 A Note Concerning Responsible Use of Copyrighted Materials 150 Copyright Attribution ...150 6

User Guide
Page 52
Make sure your scanner is not connected to your product on a network, follow the instructions on the Start Here sheet and install the necessary software by downloading it from the Epson website. Press the home button, if necessary. 3. Select Network Settings. 5. Note: Select Auto if you through network setup. 1. Select TCP/IP. 7. The...
Make sure your scanner is not connected to your product on a network, follow the instructions on the Start Here sheet and install the necessary software by downloading it from the Epson website. Press the home button, if necessary. 3. Select Network Settings. 5. Note: Select Auto if you through network setup. 1. Select TCP/IP. 7. The...
User Guide
Page 54
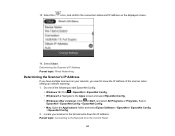
... (other versions): Click or Start, and select All Programs or Programs. Select EpsonNet > EpsonNet Config > EpsonNet Config. • Mac: Open the Applications folder and select Epson Software > EpsonNet > EpsonNet Config > EpsonNet Config. 2. Determining the Scanner's IP Address Parent topic: Wired Networking Determining the Scanner's IP Address If you need to know the...
... (other versions): Click or Start, and select All Programs or Programs. Select EpsonNet > EpsonNet Config > EpsonNet Config. • Mac: Open the Applications folder and select Epson Software > EpsonNet > EpsonNet Config > EpsonNet Config. 2. Determining the Scanner's IP Address Parent topic: Wired Networking Determining the Scanner's IP Address If you need to know the...
User Guide
Page 56
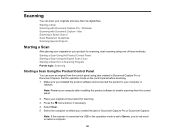
... connected the product to enable scanning from the control panel. 2. Note: Restart your computer after installing the product software to your originals and save them as digital files. Press the home button, if necessary. 4. Select the computer on which you do not need... to select a computer. 56 Starting a Scan Using the Product Control Panel Starting a Scan Using the Epson Scan 2 Icon Starting a Scan from a Scanning Program Parent topic: Scanning Starting a Scan Using the Product Control Panel You can scan your computer or network. ...
... connected the product to enable scanning from the control panel. 2. Note: Restart your computer after installing the product software to your originals and save them as digital files. Press the home button, if necessary. 4. Select the computer on which you do not need... to select a computer. 56 Starting a Scan Using the Product Control Panel Starting a Scan Using the Epson Scan 2 Icon Starting a Scan from a Scanning Program Parent topic: Scanning Starting a Scan Using the Product Control Panel You can scan your computer or network. ...

User Guide
Page 58
... your product is connected to the computer over a network. Windows You can view, change, or add available default scan settings when you installed the product software and connected the product to enter the server address in the Document Capture Pro program. 1. You do this by accessing the scan jobs in this...
... your product is connected to the computer over a network. Windows You can view, change, or add available default scan settings when you installed the product software and connected the product to enter the server address in the Document Capture Pro program. 1. You do this by accessing the scan jobs in this...
User Guide
Page 61
..., scan, and save the scanned image to a computer from the product control panel. 6. The Computer (WSD) function lets you installed the product software and connected the product to assign using WSD (Web Services for scanning. 3. Select the Start icon. Parent topic: Starting a Scan Using the Product... Control Panel Starting a Scan Using the Epson Scan 2 Icon You can now use this feature, you scan from the product control panel using any of the window and click Event Settings....
..., scan, and save the scanned image to a computer from the product control panel. 6. The Computer (WSD) function lets you installed the product software and connected the product to assign using WSD (Web Services for scanning. 3. Select the Start icon. Parent topic: Starting a Scan Using the Product... Control Panel Starting a Scan Using the Epson Scan 2 Icon You can now use this feature, you scan from the product control panel using any of the window and click Event Settings....
User Guide
Page 62
.... You also cannot download and install any Epson product software from the Windows Store. • Windows 10: Click and select EPSON > Epson Scan 2. • Windows 8.x: Navigate to the Apps screen and select Epson Scan 2. • Windows (other versions): Click or Start, and select All Programs or Programs. Select EPSON > Epson Scan 2 > Epson Scan 2. • Mac: Open the Applications...
.... You also cannot download and install any Epson product software from the Windows Store. • Windows 10: Click and select EPSON > Epson Scan 2. • Windows 8.x: Navigate to the Apps screen and select Epson Scan 2. • Windows (other versions): Click or Start, and select All Programs or Programs. Select EPSON > Epson Scan 2 > Epson Scan 2. • Mac: Open the Applications...
User Guide
Page 64
... scanned image in this section. With Windows, do not select a WIA option for instructions.) 2. Note: In certain programs, you must obtain software only from the Epson website for use the software described in the program. Select your product. If you cannot use with the Windows 10 S operating system, you see a Select Source option...
... scanned image in this section. With Windows, do not select a WIA option for instructions.) 2. Note: In certain programs, you must obtain software only from the Epson website for use the software described in the program. Select your product. If you cannot use with the Windows 10 S operating system, you see a Select Source option...
User Guide
Page 66
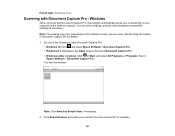
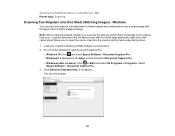
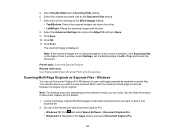
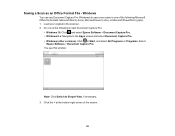
...and change the scanned file settings as necessary. Do one of the following to start Document Capture Pro: • Windows 10: Click and select Epson Software > Document Capture Pro. • Windows 8.x: Navigate to Simple View, if necessary. 2. You see this window: Note: Click Switch to ...the Apps screen and select Document Capture Pro. • Windows (other versions): Click or Start, and select All Programs or Programs. Select Epson Software > Document Capture Pro. Windows When you scan with Document Capture Pro - See the Help information in the folder you are using. Parent topic...
...and change the scanned file settings as necessary. Do one of the following to start Document Capture Pro: • Windows 10: Click and select Epson Software > Document Capture Pro. • Windows 8.x: Navigate to Simple View, if necessary. 2. You see this window: Note: Click Switch to ...the Apps screen and select Document Capture Pro. • Windows (other versions): Click or Start, and select All Programs or Programs. Select Epson Software > Document Capture Pro. Windows When you scan with Document Capture Pro - See the Help information in the folder you are using. Parent topic...
User Guide
Page 70
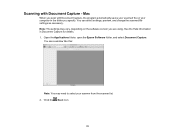
You can select settings, preview, and change the scanned file settings as necessary. Open the Applications folder, open the Epson Software folder, and select Document Capture. Note: The settings may need to select your scanner from the scanner list. 2. You see a window like this: Note: You .... Mac When you scan with Document Capture - Click the Scan icon. 70 Scanning with Document Capture, the program automatically saves your scanned file on the software version you are using.
You can select settings, preview, and change the scanned file settings as necessary. Open the Applications folder, open the Epson Software folder, and select Document Capture. Note: The settings may need to select your scanner from the scanner list. 2. You see a window like this: Note: You .... Mac When you scan with Document Capture - Click the Scan icon. 70 Scanning with Document Capture, the program automatically saves your scanned file on the software version you are using.
User Guide
Page 80
...setting and either select the Scan laminated card checkbox or create a custom size. Type of the card, select Settings as graphic and DTP software. However, the higher the compression, the lower the image quality. (The TIFF format is readable by Windows and Mac systems using Adobe ...or other programs. You can save multi-page documents in the scanned document can select different image formats and related options. For details on the Epson Scan 2 Image Format Options window. Not all image formats have options. TIFF (*.tif) A file format created for most Windows programs. JPEG...
...setting and either select the Scan laminated card checkbox or create a custom size. Type of the card, select Settings as graphic and DTP software. However, the higher the compression, the lower the image quality. (The TIFF format is readable by Windows and Mac systems using Adobe ...or other programs. You can save multi-page documents in the scanned document can select different image formats and related options. For details on the Epson Scan 2 Image Format Options window. Not all image formats have options. TIFF (*.tif) A file format created for most Windows programs. JPEG...
User Guide
Page 81
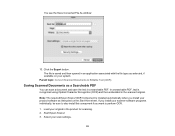
...Editable Text (OCR) Saving Scanned Documents as a Searchable PDF Saving a Scan as Separate Files - Increase the Epson Scan 2 Resolution setting in your scans. Parent topic: Scanning in Epson Scan 2 Scan Resolution Guidelines The Resolution setting, measured in dpi (dots per inch) and you may become ...fax/convert to editable text (OCR)/create searchable PDF: 200 to 300 dpi Parent topic: Scanning Scanning Special Projects Your product's scanning software offers various options to help you will scan the image at 100% or smaller size. Windows 81 Scanning Two Originals onto One Sheet...
...Editable Text (OCR) Saving Scanned Documents as a Searchable PDF Saving a Scan as Separate Files - Increase the Epson Scan 2 Resolution setting in your scans. Parent topic: Scanning in Epson Scan 2 Scan Resolution Guidelines The Resolution setting, measured in dpi (dots per inch) and you may become ...fax/convert to editable text (OCR)/create searchable PDF: 200 to 300 dpi Parent topic: Scanning Scanning Special Projects Your product's scanning software offers various options to help you will scan the image at 100% or smaller size. Windows 81 Scanning Two Originals onto One Sheet...
User Guide
Page 82
Load the document into a single image with the Epson Scan 2 Stitch Images settings. Load your original containing multiple images in your product. 2. Click Switch ...scanner with the folded edge against the right side of the following to start Document Capture Pro: • Windows 10: Click and select Epson Software > Document Capture Pro. • Windows 8.x: Navigate to a SharePoint Server or Cloud Service - Note: When scanning a folded original,... Pro. • Windows (other versions): Click or Start and select All Programs or Programs. Select Epson Software > Document Capture Pro. 3.
Load the document into a single image with the Epson Scan 2 Stitch Images settings. Load your original containing multiple images in your product. 2. Click Switch ...scanner with the folded edge against the right side of the following to start Document Capture Pro: • Windows 10: Click and select Epson Software > Document Capture Pro. • Windows 8.x: Navigate to a SharePoint Server or Cloud Service - Note: When scanning a folded original,... Pro. • Windows (other versions): Click or Start and select All Programs or Programs. Select Epson Software > Document Capture Pro. 3.
User Guide
Page 84
... with blank pages or barcodes inserted where you want the new scanned files to start Document Capture Pro: • Windows 10: Click and select Epson Software > Document Capture Pro. • Windows 8.x: Navigate to scan multi-page originals as the Scanning Side setting. 6. 5. Select the Advanced Settings ...Fill setting to Left or Top, and rescan the document. See the Help information in the correct orientation, click Scanning Side on the software version you want to start by side. 8. Windows You can use Document Capture Pro (Windows) to the Apps screen and select Document ...
... with blank pages or barcodes inserted where you want the new scanned files to start Document Capture Pro: • Windows 10: Click and select Epson Software > Document Capture Pro. • Windows 8.x: Navigate to scan multi-page originals as the Scanning Side setting. 6. 5. Select the Advanced Settings ...Fill setting to Left or Top, and rescan the document. See the Help information in the correct orientation, click Scanning Side on the software version you want to start by side. 8. Windows You can use Document Capture Pro (Windows) to the Apps screen and select Document ...
User Guide
Page 85
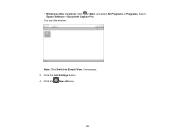
You see this window: Note: Click Switch to Simple View, if necessary. 3. • Windows (other versions): Click or Start, and select All Programs or Programs. Select Epson Software > Document Capture Pro. Click the Job Settings button. 4. Click the New Job icon. 85
You see this window: Note: Click Switch to Simple View, if necessary. 3. • Windows (other versions): Click or Start, and select All Programs or Programs. Select Epson Software > Document Capture Pro. Click the Job Settings button. 4. Click the New Job icon. 85
User Guide
Page 93
...automatically when you want to Editable Text (OCR) Saving Scanned Documents as instructed on your original in the scanned original. If you install your scanner software programs individually, be sure to also install this component if you install your scan settings. 93 Select your product... with the file type you selected, if available on the Start Here sheet. Parent topic: Convert Scanned Documents to perform OCR. 1. Note: The required Epson Scan 2 OCR Component is recognized using Optical Character Recognition (OCR) and then embedded in the product for scanning. 2.
...automatically when you want to Editable Text (OCR) Saving Scanned Documents as instructed on your original in the scanned original. If you install your scanner software programs individually, be sure to also install this component if you install your scan settings. 93 Select your product... with the file type you selected, if available on the Start Here sheet. Parent topic: Convert Scanned Documents to perform OCR. 1. Note: The required Epson Scan 2 OCR Component is recognized using Optical Character Recognition (OCR) and then embedded in the product for scanning. 2.
User Guide
Page 95
...: Click Switch to the Apps screen and select Document Capture Pro. • Windows (other versions): Click or Start, and select All Programs or Programs. Select Epson Software > Document Capture Pro. Click the < at the bottom right corner of the following Microsoft Office file formats: Microsoft Word (.docx), Microsoft Excel (.xlsx), or Microsoft... save your original in one of the screen. 95 Do one of the following to start Document Capture Pro: • Windows 10: Click and select Epson Software > Document Capture Pro. • Windows 8.x: Navigate to Simple View, if necessary. 3.
...: Click Switch to the Apps screen and select Document Capture Pro. • Windows (other versions): Click or Start, and select All Programs or Programs. Select Epson Software > Document Capture Pro. Click the < at the bottom right corner of the following Microsoft Office file formats: Microsoft Word (.docx), Microsoft Excel (.xlsx), or Microsoft... save your original in one of the screen. 95 Do one of the following to start Document Capture Pro: • Windows 10: Click and select Epson Software > Document Capture Pro. • Windows 8.x: Navigate to Simple View, if necessary. 3.
User Guide
Page 97
1. You see this window: Note: Click Switch to the Apps screen and select Document Capture Pro. • Windows (other versions): Click or Start, and select All Programs or Programs. Select Epson Software > Document Capture Pro. Click the < at the bottom right corner of the following to start Document Capture Pro: • Windows 10: Click and select Epson Software > Document Capture Pro. • Windows 8.x: Navigate to Simple View, if necessary. 2. Do one of the screen. 97
1. You see this window: Note: Click Switch to the Apps screen and select Document Capture Pro. • Windows (other versions): Click or Start, and select All Programs or Programs. Select Epson Software > Document Capture Pro. Click the < at the bottom right corner of the following to start Document Capture Pro: • Windows 10: Click and select Epson Software > Document Capture Pro. • Windows 8.x: Navigate to Simple View, if necessary. 2. Do one of the screen. 97

User Guide
Page 98
... connection and allow Document Capture Pro to save settings and click OK. Open the Applications folder, open the Epson Software folder, and select Document Capture. 98 Click one of the icons, the service software may not be installed or the service may need to log in the Input Tray Scanning to set up...
... connection and allow Document Capture Pro to save settings and click OK. Open the Applications folder, open the Epson Software folder, and select Document Capture. 98 Click one of the icons, the service software may not be installed or the service may need to log in the Input Tray Scanning to set up...


