
Warranty Statement
Page 1
... of the date of expiration of original purchase. dealer-added boards, chips or drives). 4) Damage caused by media other than Epson or an Epson Authorized Servicer. 7) Service where the printer label, logo, rating label, or serial number has been removed. 8) Any damage caused by using improper packaging materials or improper packaging and shipping. 9) Any...
... of the date of expiration of original purchase. dealer-added boards, chips or drives). 4) Damage caused by media other than Epson or an Epson Authorized Servicer. 7) Service where the printer label, logo, rating label, or serial number has been removed. 8) Any damage caused by using improper packaging materials or improper packaging and shipping. 9) Any...

Wristband Instruction Manual
Page 2
Insert 2 pins on the snap into 2 holes (in one or two ngers), close and x the snap rmly by inserting the pins on the snap into the holes. 8. Wrap the wristband around where you attach it to both sides. 6. Cut the printed wristband o from the edge by pulling it , and whlie leaving proper space (of about one end of the wristband) to direct sunlight and high humidity. Print necessary information on Storageʳ Do not store the wristbands in a cool dark place after opening. After closing the snap, check whether the snap is rmly xed by the closed skin patch test). ʲ...
Insert 2 pins on the snap into 2 holes (in one or two ngers), close and x the snap rmly by inserting the pins on the snap into the holes. 8. Wrap the wristband around where you attach it to both sides. 6. Cut the printed wristband o from the edge by pulling it , and whlie leaving proper space (of about one end of the wristband) to direct sunlight and high humidity. Print necessary information on Storageʳ Do not store the wristbands in a cool dark place after opening. After closing the snap, check whether the snap is rmly xed by the closed skin patch test). ʲ...

Start Here
Page 1
...Technical Reference Guide KO Standards and Approvals The following standards are applied only to the products that are so labeled. (EMC is tested using the Epson power supplies.) Europe: CE Marking The unit conforms to the following Directives and Norms: Directive 2004/108/EC...environment this product may not cause harmful interference, and (2) this device will not occur in accordance with Class B Personal Computers: We: EPSON AMERICA, INC. FR AVERTISSEMENT Cet appareil est un produit de classe A. In Wohnbereichen kann dieses Produkt Rundfunkstörungen verursachen; in Kullan...
...Technical Reference Guide KO Standards and Approvals The following standards are applied only to the products that are so labeled. (EMC is tested using the Epson power supplies.) Europe: CE Marking The unit conforms to the following Directives and Norms: Directive 2004/108/EC...environment this product may not cause harmful interference, and (2) this device will not occur in accordance with Class B Personal Computers: We: EPSON AMERICA, INC. FR AVERTISSEMENT Cet appareil est un produit de classe A. In Wohnbereichen kann dieses Produkt Rundfunkstörungen verursachen; in Kullan...

Technical Reference Guide
Page 9
... feeding media for printing from the first sheet 167 Media arrangement for printing on the last sheet 169 ■ Setting the label size and paper layout for borderless printing 172 Requirement...172 Setting example...172 ■ How to Make Media Settings 174 Application... Development Information 175 ■ Printer Control Method ...175 ■ Printer Driver ...176 ■ Using Epson Inkjet Label Printer SDK 177 Operating environment ...177 Where to download ...177 ■ Utilities and Manuals ...178 Download ...181 Maintenance 183 ■ ...
... feeding media for printing from the first sheet 167 Media arrangement for printing on the last sheet 169 ■ Setting the label size and paper layout for borderless printing 172 Requirement...172 Setting example...172 ■ How to Make Media Settings 174 Application... Development Information 175 ■ Printer Control Method ...175 ■ Printer Driver ...176 ■ Using Epson Inkjet Label Printer SDK 177 Operating environment ...177 Where to download ...177 ■ Utilities and Manuals ...178 Download ...181 Maintenance 183 ■ ...

Technical Reference Guide
Page 11
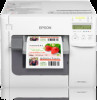
... done only by missing dots. Features The TM-C3500 series (TM-C3500/ TM-C3510/ TM-C3520) are a 4-color ink jet printer that offers high speed easy operability and high reliability required for on the backing paper of the printable area such as on -demand label printing. Chapter 1 Product Overview Product Overview This chapter...
... done only by missing dots. Features The TM-C3500 series (TM-C3500/ TM-C3510/ TM-C3520) are a 4-color ink jet printer that offers high speed easy operability and high reliability required for on the backing paper of the printable area such as on -demand label printing. Chapter 1 Product Overview Product Overview This chapter...

Technical Reference Guide
Page 12
... km Die-cut label (Plain Media): 150 km Die-cut label (Matte Media): 150 km Die-cut label (Synthetic Media): 100 km Die-cut label (Glossy Media): 100 km Continuous label paper (Plain Media): 100 km Continuous label paper (Matte Media): 50 ...cuts (Add extra 250,000 cuts with cleaning the cutter blade) Continuous label paper (Matte Media): 500,000 cuts Continuous label paper (Synthetic Media): 100,000 cuts Continuous label paper (Glossy Media): 300,000 cuts 6 million passes (3 million carriage returns...
... km Die-cut label (Plain Media): 150 km Die-cut label (Matte Media): 150 km Die-cut label (Synthetic Media): 100 km Die-cut label (Glossy Media): 100 km Continuous label paper (Plain Media): 100 km Continuous label paper (Matte Media): 50 ...cuts (Add extra 250,000 cuts with cleaning the cutter blade) Continuous label paper (Matte Media): 500,000 cuts Continuous label paper (Synthetic Media): 100,000 cuts Continuous label paper (Glossy Media): 300,000 cuts 6 million passes (3 million carriage returns...
Technical Reference Guide
Page 13
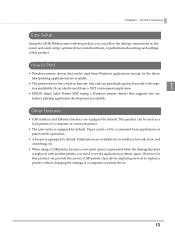
This product can be used from Windows applications (except for the above label printing applications) are available for this product. Chapter 1 Product Overview Easy Setup Using the CD-ROM that supports the customer's printing application development... printer class device replacing service) to Print • Windows printer drivers that can be cut by a command from a .NET environment application. 1 • EPSON Inkjet Label Printer SDK (using a USB printer, because a new print queue is generated when the damaged printer is equipped by default. However for no media or low...
This product can be used from Windows applications (except for the above label printing applications) are available for this product. Chapter 1 Product Overview Easy Setup Using the CD-ROM that supports the customer's printing application development... printer class device replacing service) to Print • Windows printer drivers that can be cut by a command from a .NET environment application. 1 • EPSON Inkjet Label Printer SDK (using a USB printer, because a new print queue is generated when the damaged printer is equipped by default. However for no media or low...

Technical Reference Guide
Page 16
... the rotation of the vacuum fan requires some time. Paper FEED button ❏ If "Media detection settings" is set to "Full-page label/Continuous paper/Transparent fullpage label", feeds the paper continuously. • The paper is fed by 15 mm if FEED button is pressed once. • If the FEED... button is held down, the paper is set to "Die-cut label (Blackmark)", "Continuous paper (Blackmark)", or "Die-cut label (Gap)/Transparent die-cut label", feeds the paper to the power supply. ❏ When DIP switch 1 is OFF: • Turns the power ...
... the rotation of the vacuum fan requires some time. Paper FEED button ❏ If "Media detection settings" is set to "Full-page label/Continuous paper/Transparent fullpage label", feeds the paper continuously. • The paper is fed by 15 mm if FEED button is pressed once. • If the FEED... button is held down, the paper is set to "Die-cut label (Blackmark)", "Continuous paper (Blackmark)", or "Die-cut label (Gap)/Transparent die-cut label", feeds the paper to the power supply. ❏ When DIP switch 1 is OFF: • Turns the power ...

Technical Reference Guide
Page 17
...pieces of the next page, and performs autocutting. ❏ If "Media detection settings" is set to "Die-cut label (Blackmark)", "Continuous paper (Blackmark)", or "Die-cut label (Gap)/Transparent die-cut label", feeds the paper to the autocutting position according to the black mark or the gap between...print the status sheet. Chapter 1 Product Overview CUT button ❏ If "Media detection settings" is set to "Full-page label/Continuous paper/Transparent fullpage label", feeds the paper to the autocutting position for the top of paper, even if you can return the LAN interface settings to...
...pieces of the next page, and performs autocutting. ❏ If "Media detection settings" is set to "Die-cut label (Blackmark)", "Continuous paper (Blackmark)", or "Die-cut label (Gap)/Transparent die-cut label", feeds the paper to the autocutting position according to the black mark or the gap between...print the status sheet. Chapter 1 Product Overview CUT button ❏ If "Media detection settings" is set to "Full-page label/Continuous paper/Transparent fullpage label", feeds the paper to the autocutting position for the top of paper, even if you can return the LAN interface settings to...

Technical Reference Guide
Page 26
...The following functions are available besides the print function: Checking the printer status (EPSON Status Monitor) Changing the printer settings (TM-C3500 PrinterSetting) This driver is included in the supplied CD-ROM. This utility is included in the supplied...PC. For details on how to system administrators and application developers. Drivers Category Windows Name TM-C35xx Printer Driver Epson Inkjet Label Printer SDK Description Driver for developing applications that carries out setting up this product. Performs the initial settings of the...
...The following functions are available besides the print function: Checking the printer status (EPSON Status Monitor) Changing the printer settings (TM-C3500 PrinterSetting) This driver is included in the supplied CD-ROM. This utility is included in the supplied...PC. For details on how to system administrators and application developers. Drivers Category Windows Name TM-C35xx Printer Driver Epson Inkjet Label Printer SDK Description Driver for developing applications that carries out setting up this product. Performs the initial settings of the...

Technical Reference Guide
Page 30
The items included in the package. Checking the Items Included in the Package When using the printer for the first time, check the items included in the package are as follows: A B C D E F G H User' s Manual I J K L A TM-C3500 Series D Ink cartridge G Paper ejection tray J Label roll paper B Dedicated AC adapter C AC cable *1 E Maintenance box F USB cable H Paper feed guide *2 I Power switch cover K User's Manual L CD-ROM *1 The AC cable may not be included with the product. *2 Attached on the rear of the fanfold paper cover. 30
The items included in the package. Checking the Items Included in the Package When using the printer for the first time, check the items included in the package are as follows: A B C D E F G H User' s Manual I J K L A TM-C3500 Series D Ink cartridge G Paper ejection tray J Label roll paper B Dedicated AC adapter C AC cable *1 E Maintenance box F USB cable H Paper feed guide *2 I Power switch cover K User's Manual L CD-ROM *1 The AC cable may not be included with the product. *2 Attached on the rear of the fanfold paper cover. 30

Technical Reference Guide
Page 37
When fanfold paper is selected, you can select [Die-cut label (Gap)], [Die-cut label (Blackmark)], [Continuous paper (Blackmark)], or [Transparent die-cut label (Gap)]. 2 37 Chapter 2 Setup 3 The following window appears. Select the media to be used and click [Next].
When fanfold paper is selected, you can select [Die-cut label (Gap)], [Die-cut label (Blackmark)], [Continuous paper (Blackmark)], or [Transparent die-cut label (Gap)]. 2 37 Chapter 2 Setup 3 The following window appears. Select the media to be used and click [Next].

Technical Reference Guide
Page 40
... printer OFF. 2 Press down the release lever, and pull it to the front to open the roll paper cover. 3 Refer to the shutter adjustment method label on the top of the printer, and open /close the shutters on the platen to match the width of the paper.
... printer OFF. 2 Press down the release lever, and pull it to the front to open the roll paper cover. 3 Refer to the shutter adjustment method label on the top of the printer, and open /close the shutters on the platen to match the width of the paper.

Technical Reference Guide
Page 44
... printer driver window. (See How to Display the Printer Driver on the defined media layout. 4 Select [Media Type]. 5 Enter the size of the paper/label. To extend the printable area, selecting [Borderless Printing] will be stored in [Favorite Setting] to use is User Defined Media. Registering the Media Layout If...
... printer driver window. (See How to Display the Printer Driver on the defined media layout. 4 Select [Media Type]. 5 Enter the size of the paper/label. To extend the printable area, selecting [Borderless Printing] will be stored in [Favorite Setting] to use is User Defined Media. Registering the Media Layout If...
Technical Reference Guide
Page 53
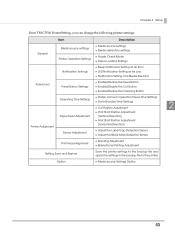
Option Media source Settings Option 53 Chapter 2 Setup From TM-C3500 PrinterSetting, you can change the following printer settings: Item Description General Media source settings Media source settings ...Position Adjustment (Vertical Direction) Printer Adjustment Print Start Position Adjustment (Horizontal Direction) Sensor Adjustment Adjust the Label Gap Detection Sensor Adjust the Black Mark Detection Sensor Print Head Alignment Banding Adjustment Bidirectional Printing Adjustment Setting Save and...
Option Media source Settings Option 53 Chapter 2 Setup From TM-C3500 PrinterSetting, you can change the following printer settings: Item Description General Media source settings Media source settings ...Position Adjustment (Vertical Direction) Printer Adjustment Print Start Position Adjustment (Horizontal Direction) Sensor Adjustment Adjust the Label Gap Detection Sensor Adjust the Black Mark Detection Sensor Print Head Alignment Banding Adjustment Bidirectional Printing Adjustment Setting Save and...

Technical Reference Guide
Page 62
... consumed each time cartridges are installed because the product automatically checks their reliability. ❏ Install all the ink colors are removed and reinstalled. 5 With the label facing upwards, insert the new ink cartridge, and push it in slowly until it up within six months after opening the package. Some ink is...
... consumed each time cartridges are installed because the product automatically checks their reliability. ❏ Install all the ink colors are removed and reinstalled. 5 With the label facing upwards, insert the new ink cartridge, and push it in slowly until it up within six months after opening the package. Some ink is...

Technical Reference Guide
Page 67
Then, click [Apply Settings]. After setting [Media source], set [Media detection settings]. 3 Media source Item Media detection settings Description Select [Fanfold paper]. Chapter 3 Handling 5 From TM-C3500 PrinterSetting, specify the media source and the media detection method. Select the media type. Die-cut label (Blackmark) Continuous paper (Blackmark) Die-cut label (Gap), Transparent die-cut label 67
Then, click [Apply Settings]. After setting [Media source], set [Media detection settings]. 3 Media source Item Media detection settings Description Select [Fanfold paper]. Chapter 3 Handling 5 From TM-C3500 PrinterSetting, specify the media source and the media detection method. Select the media type. Die-cut label (Blackmark) Continuous paper (Blackmark) Die-cut label (Gap), Transparent die-cut label 67

Technical Reference Guide
Page 71
Chapter 3 Handling 14Refer to match the width of the printer, and open /close the shutters on the platen to the shutter adjustment method label on the top of the roll paper. Close Open Paper/backing width (mm) Shutter open or close status 30 mm {1.18"} or more, less than ...
Chapter 3 Handling 14Refer to match the width of the printer, and open /close the shutters on the platen to the shutter adjustment method label on the top of the roll paper. Close Open Paper/backing width (mm) Shutter open or close status 30 mm {1.18"} or more, less than ...

Technical Reference Guide
Page 77
Chapter 3 Handling 6 From TM-C3500 PrinterSetting, specify the media source and the media detection method. After setting [Media source], set [Media detection settings]. Media source Item Media detection settings 3 Description Select [Roll paper]. Select the media type. Full-page label, Continuous paper, Transparent full-page label Die-cut label (Blackmark) Continuous paper (Blackmark) Die-cut label (Gap), Transparent die-cut label 77 Then, click [Apply Settings].
Chapter 3 Handling 6 From TM-C3500 PrinterSetting, specify the media source and the media detection method. After setting [Media source], set [Media detection settings]. Media source Item Media detection settings 3 Description Select [Roll paper]. Select the media type. Full-page label, Continuous paper, Transparent full-page label Die-cut label (Blackmark) Continuous paper (Blackmark) Die-cut label (Gap), Transparent die-cut label 77 Then, click [Apply Settings].

Technical Reference Guide
Page 82
... {4.41"} 112 mm {4.41"} Shutter open or close status Close all shutters. 18Release the lock of the roll paper. 17Refer to the shutter adjustment method label on the top of the printer, and open /close the shutters on the platen to match the width of the paper ejection guide with a fine...
... {4.41"} 112 mm {4.41"} Shutter open or close status Close all shutters. 18Release the lock of the roll paper. 17Refer to the shutter adjustment method label on the top of the printer, and open /close the shutters on the platen to match the width of the paper ejection guide with a fine...
