Product Information Guide
Page 1
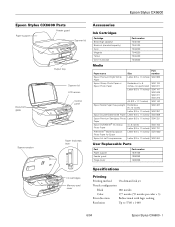
Epson Stylus CX6600 Epson Stylus CX6600 Parts Feeder guard Paper support Scanner lid Document glass Output tray Scanner lid LCD screen Control panel Scanner section Paper thickness lever Accessories Ink Cartridges Cartridge Black (high capacity) Black ink (standard capacity) Cyan Magenta Yellow Color multi-pack Part number T043120 T044120 T044220 T044320 T044420 T044520 Media Paper name Size Part number Epson Premium...
Epson Stylus CX6600 Epson Stylus CX6600 Parts Feeder guard Paper support Scanner lid Document glass Output tray Scanner lid LCD screen Control panel Scanner section Paper thickness lever Accessories Ink Cartridges Cartridge Black (high capacity) Black ink (standard capacity) Cyan Magenta Yellow Color multi-pack Part number T043120 T044120 T044220 T044320 T044420 T044520 Media Paper name Size Part number Epson Premium...

Product Information Guide
Page 3
... Technology Industries Association (JEITA) Note: You can't print images whose file names contain double-byte characters. Epson Stylus CX6600 Scanning Scanner type Photoelectric device Effective pixels Document size Scanning resolution Output resolution Image data Gamma correction Light source Flatbed color image... DCF standard is selectable with software 1200 dpi (main), 2400 dpi (sub) 50 to 4800 dpi (adjustable in shipping container 6/04 Epson Stylus CX6600 - 3 reading area is set by software 48 bits per pixel per color input 24 bits per pixel per color output User defined...
... Technology Industries Association (JEITA) Note: You can't print images whose file names contain double-byte characters. Epson Stylus CX6600 Scanning Scanner type Photoelectric device Effective pixels Document size Scanning resolution Output resolution Image data Gamma correction Light source Flatbed color image... DCF standard is selectable with software 1200 dpi (main), 2400 dpi (sub) 50 to 4800 dpi (adjustable in shipping container 6/04 Epson Stylus CX6600 - 3 reading area is set by software 48 bits per pixel per color input 24 bits per pixel per color output User defined...
Product Information Guide
Page 5
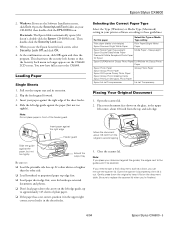
... Media Type setting Plain paper sheets or envelopes Epson Premium Bright White Paper Plain Paper/ Bright White Paper Epson Matte Paper Heavyweight Matte Paper - Epson Stylus CX6600 2. Slide the left edge guide, up . Heavyweight Epson Double-Sided Matte Paper PremierArt Matte Scrapbook Photo Paper for landscape-oriented documents and photos. ❏ Don't load paper above the arrow on...
... Media Type setting Plain paper sheets or envelopes Epson Premium Bright White Paper Plain Paper/ Bright White Paper Epson Matte Paper Heavyweight Matte Paper - Epson Stylus CX6600 2. Slide the left edge guide, up . Heavyweight Epson Double-Sided Matte Paper PremierArt Matte Scrapbook Photo Paper for landscape-oriented documents and photos. ❏ Don't load paper above the arrow on...
Product Information Guide
Page 6
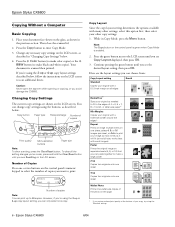
... x Color button (to make color copies) or the x B&W button (to make a large poster 2-up Copies two originals onto one sheet Wallet Photo Prints nine wallet-size copies of the photo on the page 8 123 4 5 6 7 8 9 10 11 12 13 14 15 16 17 18 19 20 21 22 23 24 25...: The Copy button on the glass, as described in Copy Mode, press the Menu button. Then close the scanner lid. 2. Continue pressing the green button until you can only select one sheet; Epson Stylus CX6600 Copying Without a Computer Basic Copying 1. Place your image as many other settings, select this option first, then ...
... x Color button (to make color copies) or the x B&W button (to make a large poster 2-up Copies two originals onto one sheet Wallet Photo Prints nine wallet-size copies of the photo on the page 8 123 4 5 6 7 8 9 10 11 12 13 14 15 16 17 18 19 20 21 22 23 24 25...: The Copy button on the glass, as described in Copy Mode, press the Menu button. Then close the scanner lid. 2. Continue pressing the green button until you can only select one sheet; Epson Stylus CX6600 Copying Without a Computer Basic Copying 1. Place your image as many other settings, select this option first, then ...
Product Information Guide
Page 8
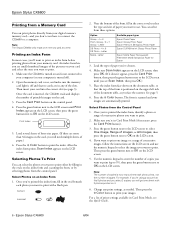
...screen. 5. You can select from the control panel. Letter DB Photo - 4 × 6 DB Photo - Place the index form face-down on the LCD screen. Once you face the scanner. Then press the green button next to OK on the document ... (or your images. Epson Stylus CX6600 Printing from a Memory Card You can print photos directly from the Control Panel 1. Select Photos on the control panel. 4. Letter Available paper types Epson Photo Paper Epson Glossy Photo Paper Epson Premium Semigloss Photo Paper Epson DURABrite Ink Glossy Photo Paper Epson Matte Paper Heavyweight PremierArt Matte...
...screen. 5. You can select from the control panel. Letter DB Photo - 4 × 6 DB Photo - Place the index form face-down on the LCD screen. Once you face the scanner. Then press the green button next to OK on the document ... (or your images. Epson Stylus CX6600 Printing from a Memory Card You can print photos directly from the Control Panel 1. Select Photos on the control panel. 4. Letter Available paper types Epson Photo Paper Epson Glossy Photo Paper Epson Premium Semigloss Photo Paper Epson DURABrite Ink Glossy Photo Paper Epson Matte Paper Heavyweight PremierArt Matte...
Product Information Guide
Page 10
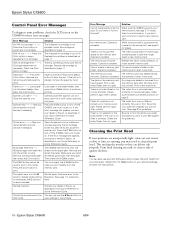
...described on page 5. The memory card is jammed. Operation canceled. Print a new Index Sheet, then try again. See page 8 for guidelines. Printer error - - - > See your computer. The adjust lever is not set correctly. Solution The indicated ink cartridge is something wrong with the.... Check of ink. Cleaning the Print Head If your card is recommended. Epson Stylus CX6600 Control Panel Error Messages To diagnose some problems, check the LCD screen on page 11. Scanner unit open - - - > Close the scanner unit Scanner error - - - > See your memory card; Make sure you may ...
...described on page 5. The memory card is jammed. Operation canceled. Print a new Index Sheet, then try again. See page 8 for guidelines. Printer error - - - > See your computer. The adjust lever is not set correctly. Solution The indicated ink cartridge is something wrong with the.... Check of ink. Cleaning the Print Head If your card is recommended. Epson Stylus CX6600 Control Panel Error Messages To diagnose some problems, check the LCD screen on page 11. Scanner unit open - - - > Close the scanner unit Scanner error - - - > See your memory card; Make sure you may ...

Product Information Guide
Page 12
...removed. you have replacement cartridges available. Press the Setup button to replace. 6. Removing and Installing Ink Cartridges Follow these steps: 1. Epson Stylus CX6600 If you need to replace. Ink levels C:50% M:50% Y:50% Note: To view ink levels for the ink cartridge ... button. Epson Stylus CX6600 Checking Ink Cartridge Levels To check ink levels, follow these steps to replace a cartridge: 1. When done, press the OK button. Then remove it gently four or five times. Identify the cartridge you need to enter Setup Mode. 2. Lift up the scanner. 4. Caution...
...removed. you have replacement cartridges available. Press the Setup button to replace. 6. Removing and Installing Ink Cartridges Follow these steps: 1. Epson Stylus CX6600 If you need to replace. Ink levels C:50% M:50% Y:50% Note: To view ink levels for the ink cartridge ... button. Epson Stylus CX6600 Checking Ink Cartridge Levels To check ink levels, follow these steps to replace a cartridge: 1. When done, press the OK button. Then remove it gently four or five times. Identify the cartridge you need to enter Setup Mode. 2. Lift up the scanner. 4. Caution...

Product Information Guide
Page 13
... it clicks into place. Carefully lower the scanner and press it down on the LCD screen. Wait for more than 5 minutes. Epson Stylus CX6600 8. Close the cartridge cover. Related Documentation CPD-18233 CPD-18234 CPD-18232 Epson Stylus CX6600 Start Here Epson Stylus CX6600 Quick Guide Epson Stylus CX6600 CD-ROM (includes online Reference Guide) 6/04 Epson Stylus CX6600 - 13 Do not attempt to close the...
... it clicks into place. Carefully lower the scanner and press it down on the LCD screen. Wait for more than 5 minutes. Epson Stylus CX6600 8. Close the cartridge cover. Related Documentation CPD-18233 CPD-18234 CPD-18232 Epson Stylus CX6600 Start Here Epson Stylus CX6600 Quick Guide Epson Stylus CX6600 CD-ROM (includes online Reference Guide) 6/04 Epson Stylus CX6600 - 13 Do not attempt to close the...

Quick Reference Guide
Page 2
...scanners, and ink jet printers, like conventional photocopiers and cameras, can be liable for use of any options or any damages or problems arising from the use with Seiko Epson Corporation's operating and maintenance instructions. Trademarks Epson and Epson Stylus are registered trademarks and EPSON Smart Panel is a trademark, and Epson Connection, Epson...copyright laws when using digital cameras, scanners, and ink jet printers. Epson encourages each user to the purchaser of this publication may be as broad as Original Epson Products or Epson Approved Products by any and all...
...scanners, and ink jet printers, like conventional photocopiers and cameras, can be liable for use of any options or any damages or problems arising from the use with Seiko Epson Corporation's operating and maintenance instructions. Trademarks Epson and Epson Stylus are registered trademarks and EPSON Smart Panel is a trademark, and Epson Connection, Epson...copyright laws when using digital cameras, scanners, and ink jet printers. Epson encourages each user to the purchaser of this publication may be as broad as Original Epson Products or Epson Approved Products by any and all...

Quick Reference Guide
Page 5
...Stylus CX6600 You can also print photos directly from your computer. You can use , and print. Please follow these guidelines throughout: Warning: Warnings must be observed to avoid damage to do is automatically placed on -screen Reference Guide. All you install the software. Note: Notes contain important information about your CX6600... copying, scanning, and printing. 5 To set up your CX6600. Tip: Tips contain hints for the CX6600 Reference Guide is place your original on your Epson Stylus® CX6600 to a computer. Caution: Cautions must be connected to make...
...Stylus CX6600 You can also print photos directly from your computer. You can use , and print. Please follow these guidelines throughout: Warning: Warnings must be observed to avoid damage to do is automatically placed on -screen Reference Guide. All you install the software. Note: Notes contain important information about your CX6600... copying, scanning, and printing. 5 To set up your CX6600. Tip: Tips contain hints for the CX6600 Reference Guide is place your original on your Epson Stylus® CX6600 to a computer. Caution: Cautions must be connected to make...

Start Here Card
Page 1
Caution: Do not remove the yellow sticker until instructed. 3 Lift up the scanner. 4 Peel off the tape from the printer. If any parts are missing, contact Epson® as described on the back of this sheet. Epson Stylus CX6600 Software CD-ROM Quick Guide Paper support Ink cartridges Feeder guard 2 Remove all the parts shown here. 4049498-00 XXX Start Here Epson Stylus® CX6600 1 Unpack 1 Make sure you have all the blue packing tape from the ink cartridge holder. 5 Close the scanner section.
Caution: Do not remove the yellow sticker until instructed. 3 Lift up the scanner. 4 Peel off the tape from the printer. If any parts are missing, contact Epson® as described on the back of this sheet. Epson Stylus CX6600 Software CD-ROM Quick Guide Paper support Ink cartridges Feeder guard 2 Remove all the parts shown here. 4049498-00 XXX Start Here Epson Stylus® CX6600 1 Unpack 1 Make sure you have all the blue packing tape from the ink cartridge holder. 5 Close the scanner section.

Start Here Card
Page 2
On button 2 Attach the Parts 1 Insert the paper support into the slots behind the printer, as shown. 2 Lower the feeder guard into the slots behind the scanner lid. (Insert the hinges on the feeder guard into the corresponding slots on the printer.) 3 Plug In and Turn On 1 Plug the Stylus CX into a grounded electrical outlet. 2 Press and hold the On button until the green lights come on.
On button 2 Attach the Parts 1 Insert the paper support into the slots behind the printer, as shown. 2 Lower the feeder guard into the slots behind the scanner lid. (Insert the hinges on the feeder guard into the corresponding slots on the printer.) 3 Plug In and Turn On 1 Plug the Stylus CX into a grounded electrical outlet. 2 Press and hold the On button until the green lights come on.

Start Here Card
Page 3
continue To avoid damaging the Stylus CX, never move the print head by hand. 4 Open the ink cartridge cover. 5 Place each cartridge, one at a time, in its holder. 6 Press down on each cartridge until you see "Initial Charge" displayed on the LCD screen. 2 Lift up the scanner. 3 Shake the package of printing. Then remove the cartridges from the package. Don't touch the green part Caution: You must install all the cartridges and leave them installed for all types of ink cartridges four or five times. 4 Install Ink Cartridges 1 Wait until it clicks into place.
continue To avoid damaging the Stylus CX, never move the print head by hand. 4 Open the ink cartridge cover. 5 Place each cartridge, one at a time, in its holder. 6 Press down on each cartridge until you see "Initial Charge" displayed on the LCD screen. 2 Lift up the scanner. 3 Shake the package of printing. Then remove the cartridges from the package. Don't touch the green part Caution: You must install all the cartridges and leave them installed for all types of ink cartridges four or five times. 4 Install Ink Cartridges 1 Wait until it clicks into place.

Start Here Card
Page 4
Charging takes about 2 minutes. Turn over Don't turn it in. The Stylus CX makes various sounds and "Charging . . ." appears on the LCD screen. 7 Close the ink cartridge cover, then close the scanner. appears, or you'll waste ink. 5 Load Paper 1 Extend the output tray. 2 Slide the edge guide to the left. 3 Place a stack of the sheet feeder, but don't push it off while "Charging . . ." Slide the edge guide against the right side of paper against the paper. The Stylus CX begins charging the ink delivery system.
Charging takes about 2 minutes. Turn over Don't turn it in. The Stylus CX makes various sounds and "Charging . . ." appears on the LCD screen. 7 Close the ink cartridge cover, then close the scanner. appears, or you'll waste ink. 5 Load Paper 1 Extend the output tray. 2 Slide the edge guide to the left. 3 Place a stack of the sheet feeder, but don't push it off while "Charging . . ." Slide the edge guide against the right side of paper against the paper. The Stylus CX begins charging the ink delivery system.

Start Here Card
Page 5
... program on your software CD-ROM that way. 2 Insert your Stylus CX software CD-ROM in the slot and the scanner is not routed correctly in your computer. Windows 1 Make sure the Stylus CX is turned on, then lift up the scanner. 6 Remove the yellow sticker and plug the square end of ... the Epson CD-ROM icon. Caution: Make sure the USB cable fits securely into the slot. Note: It will take several New Hardware Wizard screens, click Cancel for instructions on your screen. 5 When you prevent unauthorized use of your computer. 9 Click Next and follow the instructions on your CX6600. You...
... program on your software CD-ROM that way. 2 Insert your Stylus CX software CD-ROM in the slot and the scanner is not routed correctly in your computer. Windows 1 Make sure the Stylus CX is turned on, then lift up the scanner. 6 Remove the yellow sticker and plug the square end of ... the Epson CD-ROM icon. Caution: Make sure the USB cable fits securely into the slot. Note: It will take several New Hardware Wizard screens, click Cancel for instructions on your screen. 5 When you prevent unauthorized use of your computer. 9 Click Next and follow the instructions on your CX6600. You...

Start Here Card
Page 6
... Remove the yellow sticker and plug the square end of your Stylus CX as shown. Then route the cable in the slot and the scanner is turned on your computer. continue Then double-click the Epson installer icon. Note: If you see this screen: 3 Click Install. 4 Read ...Product Registration screen, register your software. 7 When the software finishes installing, you see this screen. For Macintosh OS 9: Follow any on -screen CX6600 Reference Guide for instructions. When done, click Exit. 12 When you 're installing on Macintosh OS X, enter your on -screen instructions, then continue...
... Remove the yellow sticker and plug the square end of your Stylus CX as shown. Then route the cable in the slot and the scanner is turned on your computer. continue Then double-click the Epson installer icon. Note: If you see this screen: 3 Click Install. 4 Read ...Product Registration screen, register your software. 7 When the software finishes installing, you see this screen. For Macintosh OS 9: Follow any on -screen CX6600 Reference Guide for instructions. When done, click Exit. 12 When you 're installing on Macintosh OS X, enter your on -screen instructions, then continue...


