Reference Manual
Page 6
...Network For Windows 159 Sharing the printer 159 Setting up your printer as a shared printer 160 Using an additional driver 162 Setting up a clients 168 Installing the printer driver from the CD-ROM 176 For Macintosh 178 Sharing the printer 178 Setting up your printer as a shared printer 178 Accessing the shared printer 179 For Mac OS X ... Removing the Adobe PostScript 3 ROM module 213 Interface Cards 216 Removing an interface card 219 Chapter 7 Replacing Consumable Products Replacement Messages 221 Toner Cartridge 222 Photoconductor unit 228 Fuser unit 234 Transfer unit 238 6
...Network For Windows 159 Sharing the printer 159 Setting up your printer as a shared printer 160 Using an additional driver 162 Setting up a clients 168 Installing the printer driver from the CD-ROM 176 For Macintosh 178 Sharing the printer 178 Setting up your printer as a shared printer 178 Accessing the shared printer 179 For Mac OS X ... Removing the Adobe PostScript 3 ROM module 213 Interface Cards 216 Removing an interface card 219 Chapter 7 Replacing Consumable Products Replacement Messages 221 Toner Cartridge 222 Photoconductor unit 228 Fuser unit 234 Transfer unit 238 6

Reference Manual
Page 9
... 349 I239X Menu 351 Appendix A Technical Specifications Paper 355 Available paper types 356 Paper that should not be used 356 Specifications 358 Printable area 360 Printer 361 General 361 Environmental 363 Mechanical 363 Electrical 363 Standard and approvals 364 Interfaces 366 Parallel interface 366 USB interface 366 Ethernet interface 366 Options...
... 349 I239X Menu 351 Appendix A Technical Specifications Paper 355 Available paper types 356 Paper that should not be used 356 Specifications 358 Printable area 360 Printer 361 General 361 Environmental 363 Mechanical 363 Electrical 363 Standard and approvals 364 Interfaces 366 Parallel interface 366 USB interface 366 Ethernet interface 366 Options...

Reference Manual
Page 17
...the fuser unit. 2. They cannot be sturdy, rough handling can explode and cause injury. Although the printer is spilled, use a vacuum cleaner. ❏ Wait at least one hour before using an imaging cartridge after moving it from a cool to a warm environment to be refilled. ❏ Do not touch...sharp and may cause injury. ❏ Avoid touching the components inside the printer unless instructed to do not use a broom and dustpan or a damp cloth with soap and water to clean it . ❏ When handling an imaging cartridge, always place them on a clean, smooth surface. ❏ Do ...
...the fuser unit. 2. They cannot be sturdy, rough handling can explode and cause injury. Although the printer is spilled, use a vacuum cleaner. ❏ Wait at least one hour before using an imaging cartridge after moving it from a cool to a warm environment to be refilled. ❏ Do not touch...sharp and may cause injury. ❏ Avoid touching the components inside the printer unless instructed to do not use a broom and dustpan or a damp cloth with soap and water to clean it . ❏ When handling an imaging cartridge, always place them on a clean, smooth surface. ❏ Do ...
Reference Manual
Page 27
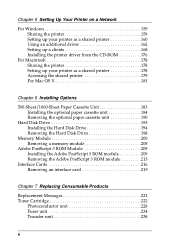
...) S041175 EPSON Color Laser Transparencies (Letter) S041174 1 c Caution: ❏ Do not use other EPSON media such as EPSON special 1 media for ink jet printers, as this can cause paper jams and damage the printer. ❏ Do not use the media listed above in other printers, except 1 when specified in the documentation. 1 1 Getting to Know Your Printer 27 Toner Cartridge (Yellow...
...) S041175 EPSON Color Laser Transparencies (Letter) S041174 1 c Caution: ❏ Do not use other EPSON media such as EPSON special 1 media for ink jet printers, as this can cause paper jams and damage the printer. ❏ Do not use the media listed above in other printers, except 1 when specified in the documentation. 1 1 Getting to Know Your Printer 27 Toner Cartridge (Yellow...
Reference Manual
Page 221
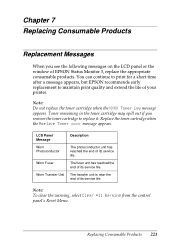
...appropriate consumable products. You can continue to print for a short time after a message appears, but EPSON recommends early replacement to replace it. Toner remaining in the toner cartridge may spill out if you see the following messages on the LCD panel or the 7 window of ... 7 Replacing Consumable Products 221 The fuser unit has reached the 7 end of your printer. 7 Note: 7 Do not replace the toner cartridge when the XXXX Toner Low message appears. Replace the toner cartridge when the Replace Toner xxxx message appears. 7 LCD Panel Description Message 7 Worn The ...
...appropriate consumable products. You can continue to print for a short time after a message appears, but EPSON recommends early replacement to replace it. Toner remaining in the toner cartridge may spill out if you see the following messages on the LCD panel or the 7 window of ... 7 Replacing Consumable Products 221 The fuser unit has reached the 7 end of your printer. 7 Note: 7 Do not replace the toner cartridge when the XXXX Toner Low message appears. Replace the toner cartridge when the Replace Toner xxxx message appears. 7 LCD Panel Description Message 7 Worn The ...

Reference Manual
Page 222
... happens, the printer cannot resume printing until you replace the depleted consumable products. Note: Messages appear for other consumable products. EPSON shall not be replaced. Toner Cartridge Handling precautions Always...cartridge may affect print quality. For example, the message Y Toner Low means that the amount of consumable products not manufactured or approved by EPSON. 222 Replacing Consumable Products After replacing a consumable product, check the LCD panel for replacement messages for one consumable product at a time. When this position, indicating the color of EPSON...
... happens, the printer cannot resume printing until you replace the depleted consumable products. Note: Messages appear for other consumable products. EPSON shall not be replaced. Toner Cartridge Handling precautions Always...cartridge may affect print quality. For example, the message Y Toner Low means that the amount of consumable products not manufactured or approved by EPSON. 222 Replacing Consumable Products After replacing a consumable product, check the LCD panel for replacement messages for one consumable product at a time. When this position, indicating the color of EPSON...

Reference Manual
Page 223
If toner gets on a clean smooth surface. 7 ❏ Do not install used toner cartridges in fire, as they come into the printer. ❏ If you have moved a toner cartridge from a cool to a warm 7 environment, wait for at least one hour before installing it..., do not use a vacuum cleaner. 7 Replacing a toner cartridge Follow these steps to replace a imaging cartridge. 7 1. Confirm the color of used toner cartridges into contact with soap and water to be replaced by checking the LCD panel or EPSON Status 7 Monitor 3. 7 7 Replacing Consumable Products 223 Dispose ...
If toner gets on a clean smooth surface. 7 ❏ Do not install used toner cartridges in fire, as they come into the printer. ❏ If you have moved a toner cartridge from a cool to a warm 7 environment, wait for at least one hour before installing it..., do not use a vacuum cleaner. 7 Replacing a toner cartridge Follow these steps to replace a imaging cartridge. 7 1. Confirm the color of used toner cartridges into contact with soap and water to be replaced by checking the LCD panel or EPSON Status 7 Monitor 3. 7 7 Replacing Consumable Products 223 Dispose ...

Reference Manual
Page 224
Turn the toner cartridge knobs to the unlocked position. Note: Hold the knobs with both hands. 224 Replacing Consumable Products Remove the top cover. 3. 2.
Turn the toner cartridge knobs to the unlocked position. Note: Hold the knobs with both hands. 224 Replacing Consumable Products Remove the top cover. 3. 2.

Reference Manual
Page 225
Lift the toner cartridge out of the slot. 7 7 7 7 7 Note: 7 ❏ A small amount of the toner may adhere to avoid spilling the toner. 7 ❏ Dispose of the cartridge. Be careful not to spill this toner or get it on your skin or clothes. ❏ Put the used cartridge on a flat surface with the toner spout 7 facing up to the bottom of the used toner cartridge by putting it into its disposal bag. 7 7 7 7 Replacing Consumable Products 225 4.
Lift the toner cartridge out of the slot. 7 7 7 7 7 Note: 7 ❏ A small amount of the toner may adhere to avoid spilling the toner. 7 ❏ Dispose of the cartridge. Be careful not to spill this toner or get it on your skin or clothes. ❏ Put the used cartridge on a flat surface with the toner spout 7 facing up to the bottom of the used toner cartridge by putting it into its disposal bag. 7 7 7 7 Replacing Consumable Products 225 4.

Reference Manual
Page 226
Take the new toner cartridge out of its package, and gently shake it into the slot. 226 Replacing Consumable Products 5. Hold the toner cartridge as shown below, and lower it from side to side and front to back to distribute the toner evenly. Note: Do not remove the protective tape yet. 6.
Take the new toner cartridge out of its package, and gently shake it into the slot. 226 Replacing Consumable Products 5. Hold the toner cartridge as shown below, and lower it from side to side and front to back to distribute the toner evenly. Note: Do not remove the protective tape yet. 6.

Reference Manual
Page 227
Otherwise, you may have toner problems or leakage. 7 8. 7. Remove the protective tape, pulling straight up from the toner cartridge. 7 7 7 7 7 Replacing Consumable Products 227 Turn the toner cartridge knobs to the locked position. 7 7 7 7 7 Note: Hold the knobs with both hands and turn them until they click. 7 c Caution: Be sure to turn the knob all the way to the locked position.
Otherwise, you may have toner problems or leakage. 7 8. 7. Remove the protective tape, pulling straight up from the toner cartridge. 7 7 7 7 7 Replacing Consumable Products 227 Turn the toner cartridge knobs to the locked position. 7 7 7 7 7 Note: Hold the knobs with both hands and turn them until they click. 7 c Caution: Be sure to turn the knob all the way to the locked position.

Reference Manual
Page 231
Then, grab the handle and remove the styrofoam insert and tear open the bag along the dotted line to expose the handle. Note: 7 Always keep the cartridge positioned as shown in the illustration. 7 7 7 7 7 7 7 7 7 7 Replacing Consumable Products 231 5. Take the new photoconductor unit and tear away the top 7 portion of the bag along the dotted line.
Then, grab the handle and remove the styrofoam insert and tear open the bag along the dotted line to expose the handle. Note: 7 Always keep the cartridge positioned as shown in the illustration. 7 7 7 7 7 7 7 7 7 7 Replacing Consumable Products 231 5. Take the new photoconductor unit and tear away the top 7 portion of the bag along the dotted line.

Reference Manual
Page 278
There may be a problem with Replace the photoconductor unit. "Photoconductor unit" on page 223. See the photoconductor unit. If the message on the LCD panel or in EPSON Status Monitor 3 indicates that the amount of toner left in the toner cartridge. There may be no toner left is low, see "Replacing a toner cartridge" on page 228. 278 Troubleshooting
There may be a problem with Replace the photoconductor unit. "Photoconductor unit" on page 223. See the photoconductor unit. If the message on the LCD panel or in EPSON Status Monitor 3 indicates that the amount of toner left in the toner cartridge. There may be no toner left is low, see "Replacing a toner cartridge" on page 228. 278 Troubleshooting

Reference Manual
Page 279
... be moist or Do not store paper in the printer small when printing graphics. recommended for 8 information on choosing paper. 8 Troubleshooting 279 Be sure to use paper that the amount of paper for your paper in 8 the imaging cartridge. See the photoconductor unit. EPSON special paper or smooth, 8 correct type of toner is...
... be moist or Do not store paper in the printer small when printing graphics. recommended for 8 information on choosing paper. 8 Troubleshooting 279 Be sure to use paper that the amount of paper for your paper in 8 the imaging cartridge. See the photoconductor unit. EPSON special paper or smooth, 8 correct type of toner is...

Reference Manual
Page 281
...on page 8 356 for best results. Tap 8 more than one sheet at a time. the EPSON Status Monitor 3 indicates that the amount of paper for your printed characters may be moist or This printer is ejected, the problem may be with your dealer. Status Sheet" on page 223. distorted ...and fan it on the LCD panel or in the paper, the lighter the printout. Turn off the printer 8 and contact your Print out a status sheet. The higher the 8 moisture content in the Toner cartridge. If a blank page is sensitive to moisture damp. See "Printing a 8 application or interface cable....
...on page 8 356 for best results. Tap 8 more than one sheet at a time. the EPSON Status Monitor 3 indicates that the amount of paper for your printed characters may be moist or This printer is ejected, the problem may be with your dealer. Status Sheet" on page 223. distorted ...and fan it on the LCD panel or in the paper, the lighter the printout. Turn off the printer 8 and contact your Print out a status sheet. The higher the 8 moisture content in the Toner cartridge. If a blank page is sensitive to moisture damp. See "Printing a 8 application or interface cable....

Reference Manual
Page 283
EPSON Status Monitor 3 indicates that 8 the amount of the page is low, see "Replacing a toner cartridge" on page 223. 8 There may be a problem with only one 8 character per page. 8 Memory Problems 8 8 Troubleshooting 283 printing three pages with Replace the photoconductor... by the paper feed path. printer driver or the printer's control 8 panel menus. The printed image is light or faint 8 Cause What to do Your paper may be moist or Do not store your paper in the toner cartridge. See the photoconductor unit. damp environment. 8 The Toner Save mode may ...
EPSON Status Monitor 3 indicates that 8 the amount of the page is low, see "Replacing a toner cartridge" on page 223. 8 There may be a problem with only one 8 character per page. 8 Memory Problems 8 8 Troubleshooting 283 printing three pages with Replace the photoconductor... by the paper feed path. printer driver or the printer's control 8 panel menus. The printed image is light or faint 8 Cause What to do Your paper may be moist or Do not store your paper in the toner cartridge. See the photoconductor unit. damp environment. 8 The Toner Save mode may ...

Reference Manual
Page 302
... installed optional interface card. Install xxxx TnrCart The indicated toner cartridges are not installed in place of XXXX and indicate the colors Cyan, Magenta, Yellow, and Black respectively.) Install the indicated cartridges. Turn off the printer, open cover A, and remove the transfer unit. See "Toner Cartridge" on again. The error clears automatically if the transfer...
... installed optional interface card. Install xxxx TnrCart The indicated toner cartridges are not installed in place of XXXX and indicate the colors Cyan, Magenta, Yellow, and Black respectively.) Install the indicated cartridges. Turn off the printer, open cover A, and remove the transfer unit. See "Toner Cartridge" on again. The error clears automatically if the transfer...

Reference Manual
Page 304
Installing a genuin toner cartridge is not an EPSON genuine toner cartridge. Press the N Start/Stop button on page 313 for information. Mem Overflow The printer has insufficient memory to resume printing. 304 Troubleshooting NonGenuine Toner xxxx The installed toner is recommended. Menus Locked This message appears if you try to ...
Installing a genuin toner cartridge is not an EPSON genuine toner cartridge. Press the N Start/Stop button on page 313 for information. Mem Overflow The printer has insufficient memory to resume printing. 304 Troubleshooting NonGenuine Toner xxxx The installed toner is recommended. Menus Locked This message appears if you try to ...

Reference Manual
Page 305
...control panel's Setup Menu. To clear this mode, the remaining amount of the toner cartridge for each color is no paper in the specified paper source (XXXXX) does not match the required paper size (YYYY). Offline The printer is not ready to process the print data exceeded the print 8 engine speed because ...job. Or press the q Cancel Job button to cancel the print job. 8 If you press the N Start/Stop button without replacing the paper, the printer will print on the loaded paper even though it with the correct size paper and press the N Start/Stop button to resume printing.
...control panel's Setup Menu. To clear this mode, the remaining amount of the toner cartridge for each color is no paper in the specified paper source (XXXXX) does not match the required paper size (YYYY). Offline The printer is not ready to process the print data exceeded the print 8 engine speed because ...job. Or press the q Cancel Job button to cancel the print job. 8 If you press the N Start/Stop button without replacing the paper, the printer will print on the loaded paper even though it with the correct size paper and press the N Start/Stop button to resume printing.

Reference Manual
Page 306
... has reached the end of fonts. In this mode, the remaining amount of the toner cartridge for each color is displayed in seven levels. The photoconductor service life counter is ready to receive data and print. Ready The printer is full. To clear this message when printing a particular page, try simplifying the page...
... has reached the end of fonts. In this mode, the remaining amount of the toner cartridge for each color is displayed in seven levels. The photoconductor service life counter is ready to receive data and print. Ready The printer is full. To clear this message when printing a particular page, try simplifying the page...

