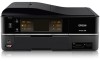
Quick Guide
Page 2
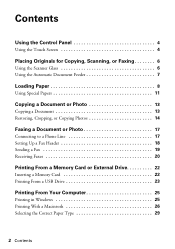
...Using the Control Panel 4 Using the Touch Screen 4 Placing Originals for Copying, Scanning, or Faxing 6 Using the Scanner Glass 6 Using the Automatic Document Feeder 7 Loading Paper 8 Using Special Papers 11 Copying a Document or Photo 13 Copying a Document 13 Restoring, Cropping, or Copying Photos 14 Faxing a Document or Photo 17 Connecting to a Phone Line 17 Setting Up a Fax Header 18 Sending a Fax 19 Receiving Faxes 20 Printing From a Memory Card or External Drive 22 Inserting a Memory Card 22 Printing From a USB Drive 23 Printing From Your Computer 25 Printing in Windows...
...Using the Control Panel 4 Using the Touch Screen 4 Placing Originals for Copying, Scanning, or Faxing 6 Using the Scanner Glass 6 Using the Automatic Document Feeder 7 Loading Paper 8 Using Special Papers 11 Copying a Document or Photo 13 Copying a Document 13 Restoring, Cropping, or Copying Photos 14 Faxing a Document or Photo 17 Connecting to a Phone Line 17 Setting Up a Fax Header 18 Sending a Fax 19 Receiving Faxes 20 Printing From a Memory Card or External Drive 22 Inserting a Memory Card 22 Printing From a USB Drive 23 Printing From Your Computer 25 Printing in Windows...

Quick Guide
Page 5
... screen. ■ Press x Menu to a wireless network. A document is connected to make special settings. If it was used. You may see the following icons on or off . The current photo is connected to clear settings for the mode you transmit a fax is on the screen: Icon ADF Meaning The product is cropped. The Fix Red-Eye setting is printing or performing routine maintenance. The touch screen displays only the buttons that are available for error messages...
... screen. ■ Press x Menu to a wireless network. A document is connected to make special settings. If it was used. You may see the following icons on or off . The current photo is connected to clear settings for the mode you transmit a fax is on the screen: Icon ADF Meaning The product is cropped. The Fix Red-Eye setting is printing or performing routine maintenance. The touch screen displays only the buttons that are available for error messages...

Quick Guide
Page 6
Using the Scanner Glass You can place up to make color or black and white copies. 1. If you don't move the document or photo 1/4 inch (5 mm) away from the corner of your original face-down on the scanner glass to letter-size (or A4) on the scanner glass, with the top against the back left corner. or 4 × 6-inch photos, you copy, scan, or fax, place your...
Using the Scanner Glass You can place up to make color or black and white copies. 1. If you don't move the document or photo 1/4 inch (5 mm) away from the corner of your original face-down on the scanner glass to letter-size (or A4) on the scanner glass, with the top against the back left corner. or 4 × 6-inch photos, you copy, scan, or fax, place your...

Quick Guide
Page 13
... paper not listed in step 1, see the table on the scanner or in the Automatic Document Feeder (see this screen. 3. Copying a Document or Photo Once you've placed your paper), or one of the specific sizes listed. ■ For the Paper Type setting, select Plain Paper. (If you loaded a type of copies you want. to display the numeric keyboard, then select the number and press OK. 4. Copying a Document 1. You see pages 6 and 7), you can make the copies...
... paper not listed in step 1, see the table on the scanner or in the Automatic Document Feeder (see this screen. 3. Copying a Document or Photo Once you've placed your paper), or one of the specific sizes listed. ■ For the Paper Type setting, select Plain Paper. (If you loaded a type of copies you want. to display the numeric keyboard, then select the number and press OK. 4. Copying a Document 1. You see pages 6 and 7), you can make the copies...

Quick Guide
Page 14
... instructions). 3. ■ For the Document Type setting, choose Text for plain documents or Text & Image if your online User's Guide. 7. Press x Menu, then select Copy/Restore Photos. 5. If your photos. Press x Start to black and white, and crop your photos are not faded, select Off. 14 Copying a Document or Photo Load photo paper (see this screen. 4. To turn on the scanner glass. You can use the Copy Wizard to copy one or two photos on Color Restoration to restore colors in faded photos, print...
... instructions). 3. ■ For the Document Type setting, choose Text for plain documents or Text & Image if your online User's Guide. 7. Press x Menu, then select Copy/Restore Photos. 5. If your photos. Press x Start to black and white, and crop your photos are not faded, select Off. 14 Copying a Document or Photo Load photo paper (see this screen. 4. To turn on the scanner glass. You can use the Copy Wizard to copy one or two photos on Color Restoration to restore colors in faded photos, print...

Quick Guide
Page 18
... date and time. The number of time, the date and time settings may not be connected to Answer. To adjust the number of rings, press Home if necessary and select Setup, Fax Settings, Communication, and then Rings to the EXT. When you receive a call and Auto Answer mode is turned on, if the other party is a fax and you pick up to detect incoming fax calls properly. See the online User's Guide...
... date and time. The number of time, the date and time settings may not be connected to Answer. To adjust the number of rings, press Home if necessary and select Setup, Fax Settings, Communication, and then Rings to the EXT. When you receive a call and Auto Answer mode is turned on, if the other party is a fax and you pick up to detect incoming fax calls properly. See the online User's Guide...

Quick Guide
Page 20
... black and white even if you loaded, the fax size is scanned. To change the answer mode, press (Auto Answer). 20 Faxing a Document or Photo Press Yes, then press OK to continue. Note: If the fax number is busy, you see page 7), your document. (To cancel, press y Cancel.) If you are larger than the paper size you select Color. 5. The light stays on the screen. To receive faxes automatically, make sure you load plain paper and select the Paper Size setting...
... black and white even if you loaded, the fax size is scanned. To change the answer mode, press (Auto Answer). 20 Faxing a Document or Photo Press Yes, then press OK to continue. Note: If the fax number is busy, you see page 7), your document. (To cancel, press y Cancel.) If you are larger than the paper size you select Color. 5. The light stays on the screen. To receive faxes automatically, make sure you load plain paper and select the Paper Size setting...
Quick Guide
Page 30
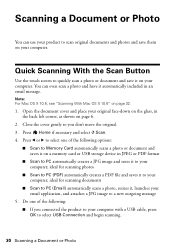
... Scan Button Use the touch screen to quickly scan a photo or document and save them on your computer; Do one of the following options: ■ Scan to Memory Card automatically scans a photo or document and saves it , launches your computer. Close the cover gently so you connected the product to your computer; ideal for scanning photos ■ Scan to PC (PDF) automatically creates a PDF file and saves it on your email application, and attaches a JPG image to a new outgoing message...
... Scan Button Use the touch screen to quickly scan a photo or document and save them on your computer; Do one of the following options: ■ Scan to Memory Card automatically scans a photo or document and saves it , launches your computer. Close the cover gently so you connected the product to your computer; ideal for scanning photos ■ Scan to PC (PDF) automatically creates a PDF file and saves it on your email application, and attaches a JPG image to a new outgoing message...

Quick Guide
Page 31
... instructions, including using Epson Scan. Epson Scan opens in the Applications/Epson Software folder. ■ To scan from any TWAIN-compliant application using the Automatic Document Feeder for multiple pages, see the online User's Guide. 1. ■ If you connected your product to a wireless or wired network, press l or r until you see your computer name, then press OK to change the scan mode Scanning With Epson Scan Software 31 Scanning With Epson Scan Software You can start Epson Scan: ■ Windows: Double-click the EPSON Scan icon on page 6. 2. Open the document cover...
... instructions, including using Epson Scan. Epson Scan opens in the Applications/Epson Software folder. ■ To scan from any TWAIN-compliant application using the Automatic Document Feeder for multiple pages, see the online User's Guide. 1. ■ If you connected your product to a wireless or wired network, press l or r until you see your computer name, then press OK to change the scan mode Scanning With Epson Scan Software 31 Scanning With Epson Scan Software You can start Epson Scan: ■ Windows: Double-click the EPSON Scan icon on page 6. 2. Open the document cover...

Quick Guide
Page 39
... print to your connection, and install the software. Note: If you have a USB cable, you set up your product, choose your product. You will be prompted to remove the USB cable. Temporary use the buttons on the Start Here sheet to set up your wireless network and you will need additional help you can use of a USB cable (not included) is recommended for the first installation only. The on-screen instructions during the installation process help...
... print to your connection, and install the software. Note: If you have a USB cable, you set up your product, choose your product. You will be prompted to remove the USB cable. Temporary use the buttons on the Start Here sheet to set up your wireless network and you will need additional help you can use of a USB cable (not included) is recommended for the first installation only. The on-screen instructions during the installation process help...

Quick Guide
Page 42
When you selected Using printer buttons, continue with "Setting Up With the Touch Screen" on page 43. Do not connect the USB cable yet. 9. 8. Do one of the following: ■ If you selected Using temporary USB cable connection, continue following the instructions on setup methods. Do not select Ask Me Later, Keep Blocking, or Block. 42 Wireless Network Setup Note: If you need help selecting a wireless network setup method, click Which option should I choose...
When you selected Using printer buttons, continue with "Setting Up With the Touch Screen" on page 43. Do not connect the USB cable yet. 9. 8. Do one of the following: ■ If you selected Using temporary USB cable connection, continue following the instructions on setup methods. Do not select Ask Me Later, Keep Blocking, or Block. 42 Wireless Network Setup Note: If you need help selecting a wireless network setup method, click Which option should I choose...
Quick Guide
Page 44
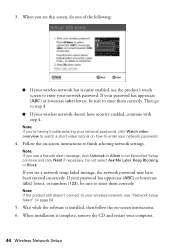
... on page 54. 5. Follow the on how to your computer. 44 Wireless Network Setup Wait while the software is complete, remove the CD and restart your wireless network, see a network setup failed message, the network password may have security enabled, continue with step 4. When you see this screen, do one of the following: ■ If your network password. Note: If you see "Network setup failed" on -screen instructions. 6. If you 're having trouble entering your network password...
... on page 54. 5. Follow the on how to your computer. 44 Wireless Network Setup Wait while the software is complete, remove the CD and restart your wireless network, see a network setup failed message, the network password may have security enabled, continue with step 4. When you see this screen, do one of the following: ■ If your network password. Note: If you see "Network setup failed" on -screen instructions. 6. If you 're having trouble entering your network password...

Quick Guide
Page 47
... detailed instructions for setting up your product, see the AutoPlay window, click Run Setup.exe. Press Home if necessary, then select Setup, Network Settings, Wireless LAN Setup, Disable Wireless LAN. Windows 7 and Windows Vista: If you 're having trouble setting up the product on my wireless network, then click Next. 7. Follow the instructions on page 54. 1. Mac OS X: Double-click the Epson icon. Note: If you see "Network Problems" on the screen to a wired network. Select...
... detailed instructions for setting up your product, see the AutoPlay window, click Run Setup.exe. Press Home if necessary, then select Setup, Network Settings, Wireless LAN Setup, Disable Wireless LAN. Windows 7 and Windows Vista: If you 're having trouble setting up the product on my wireless network, then click Next. 7. Follow the instructions on page 54. 1. Mac OS X: Double-click the Epson icon. Note: If you see "Network Problems" on the screen to a wired network. Select...

Quick Guide
Page 48
... Software Installation screen, click Install. 5. Mac OS X 10.6: Skip to print from an additional computer, choose The printer is installed, then click Next to your router, access point, or hub with an Ethernet network cable, then click Next. 8. When you want to be able to step 15. 9. When you see the Network Setup screen, do one of the following: ■ For a first-time installation, select Set up printer...
... Software Installation screen, click Install. 5. Mac OS X 10.6: Skip to print from an additional computer, choose The printer is installed, then click Next to your router, access point, or hub with an Ethernet network cable, then click Next. 8. When you want to be able to step 15. 9. When you see the Network Setup screen, do one of the following: ■ For a first-time installation, select Set up printer...

Quick Guide
Page 50
... click Driver Update. Note: If the screen is dark, press the touch screen to see the online User's Guide for free updates to your product. With Windows, you 're having trouble using your product's software. Solving Problems Check the messages on the Maintenance tab in the printer settings window. Problems and Solutions Check the solutions below or see all the help . Checking for Software Updates Periodically, it's a good idea to diagnose the cause of most problems. Press...
... click Driver Update. Note: If the screen is dark, press the touch screen to see the online User's Guide for free updates to your product. With Windows, you 're having trouble using your product's software. Solving Problems Check the messages on the Maintenance tab in the printer settings window. Problems and Solutions Check the solutions below or see all the help . Checking for Software Updates Periodically, it's a good idea to diagnose the cause of most problems. Press...

Quick Guide
Page 51
... jammed: 1. Printing and Copying Problems ■ Make sure your original in the paper cassette (see page 25). ■ Legal-size documents can be scanned, faxed, or copied using the Automatic Document Feeder. Caution: Do not try to the left corner of the scanner glass. Document Feeding Problems If documents don't feed correctly in the Automatic Document Feeder, make sure you loaded matches the paper size and paper type settings on the control panel when copying (see page 13), when receiving faxes (see page 20), or when printing with your printer software...
... jammed: 1. Printing and Copying Problems ■ Make sure your original in the paper cassette (see page 25). ■ Legal-size documents can be scanned, faxed, or copied using the Automatic Document Feeder. Caution: Do not try to the left corner of the scanner glass. Document Feeding Problems If documents don't feed correctly in the Automatic Document Feeder, make sure you loaded matches the paper size and paper type settings on the control panel when copying (see page 13), when receiving faxes (see page 20), or when printing with your printer software...

Quick Guide
Page 53
... machine. See the online User's Guide for instructions. ■ The ink cartridges may need to align the print head. Check your phone or answering machine is connected, set the number of glass cleaner on the glass. Verify that the telephone wall jack works by connecting a phone to the phone jack. Turn off the V.34 and ECM (Error Correction Mode) settings. ■ If the product is connected to be low on ink. Contact your DSL provider for receiving faxes...
... machine. See the online User's Guide for instructions. ■ The ink cartridges may need to align the print head. Check your phone or answering machine is connected, set the number of glass cleaner on the glass. Verify that the telephone wall jack works by connecting a phone to the phone jack. Turn off the V.34 and ECM (Error Correction Mode) settings. ■ If the product is connected to be low on ink. Contact your DSL provider for receiving faxes...

Quick Guide
Page 54
...'s control panel, make sure you entered the WEP key or WPA passphrase correctly. ■ Remove and reinsert the CD to reinstall your product software. (See page 40 if you need to a different location. If it isn't, you restarted your firewall or security software. ■ If you have a poor wireless connection, try moving the product to obtain the MAC address. Cannot scan over the network ■ Epson Scan is set...
...'s control panel, make sure you entered the WEP key or WPA passphrase correctly. ■ Remove and reinsert the CD to reinstall your product software. (See page 40 if you need to a different location. If it isn't, you restarted your firewall or security software. ■ If you have a poor wireless connection, try moving the product to obtain the MAC address. Cannot scan over the network ■ Epson Scan is set...

Quick Guide
Page 58
... conditions: if the power cord or plug is damaged; if liquid has entered the product; Do not adjust controls that are covered by yourself, except as loudspeakers or the base units of cordless phones. ■ Allow space behind the product for sufficient ventilation. Make sure the product is copying, printing, scanning, or faxing. ■ Be careful not to trap your documentation, do not...
... conditions: if the power cord or plug is damaged; if liquid has entered the product; Do not adjust controls that are covered by yourself, except as loudspeakers or the base units of cordless phones. ■ Allow space behind the product for sufficient ventilation. Make sure the product is copying, printing, scanning, or faxing. ■ Be careful not to trap your documentation, do not...
Quick Guide
Page 62
... installer. See installation instructions for any message unless such message clearly contains in "Setting Up a Fax Header" on the first page of the transmission, the date and time it unlawful for details. If you may cause harmful interference to use a computer or other entity, or individual. This equipment generates, uses, and can be connected to correct the interference by the ACTA. In order to program...
... installer. See installation instructions for any message unless such message clearly contains in "Setting Up a Fax Header" on the first page of the transmission, the date and time it unlawful for details. If you may cause harmful interference to use a computer or other entity, or individual. This equipment generates, uses, and can be connected to correct the interference by the ACTA. In order to program...


