Quick Guide
Page 1
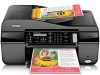
Epson WorkForce® 310 Series Quick Guide Installing on a Network Basic Printing, Copying, Scanning, and Faxing Maintaining Your All-in-One Solving Problems
Epson WorkForce® 310 Series Quick Guide Installing on a Network Basic Printing, Copying, Scanning, and Faxing Maintaining Your All-in-One Solving Problems
Quick Guide
Page 2
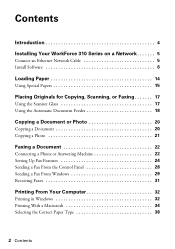
... Your WorkForce 310 Series on a Network 5 Connect an Ethernet Network Cable 5 Install Software 6 Loading Paper 14 Using Special Papers 15 Placing Originals for Copying, Scanning, or Faxing 17 Using the Scanner Glass 17 Using the Automatic Document Feeder 18 Copying a Document or Photo 20 Copying a Document 20 Copying a Photo 21 Faxing a Document 22 Connecting a Phone or Answering Machine 22 Setting Up Fax Features 24 Sending a Fax From the Control Panel 28 Sending a Fax From Windows 29 Receiving Faxes 31 Printing From Your Computer 32 Printing in Windows 32 Printing With...
... Your WorkForce 310 Series on a Network 5 Connect an Ethernet Network Cable 5 Install Software 6 Loading Paper 14 Using Special Papers 15 Placing Originals for Copying, Scanning, or Faxing 17 Using the Scanner Glass 17 Using the Automatic Document Feeder 18 Copying a Document or Photo 20 Copying a Document 20 Copying a Photo 21 Faxing a Document 22 Connecting a Phone or Answering Machine 22 Setting Up Fax Features 24 Sending a Fax From the Control Panel 28 Sending a Fax From Windows 29 Receiving Faxes 31 Printing From Your Computer 32 Printing in Windows 32 Printing With...
Quick Guide
Page 3
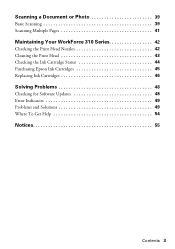
Scanning a Document or Photo 39 Basic Scanning 39 Scanning Multiple Pages 41 Maintaining Your WorkForce 310 Series 42 Checking the Print Head Nozzles 42 Cleaning the Print Head 43 Checking the Ink Cartridge Status 44 Purchasing Epson Ink Cartridges 45 Replacing Ink Cartridges 46 Solving Problems 48 Checking for Software Updates 48 Error Indicators 49 Problems and Solutions 49 Where To Get Help 54 Notices 55 Contents 3
Scanning a Document or Photo 39 Basic Scanning 39 Scanning Multiple Pages 41 Maintaining Your WorkForce 310 Series 42 Checking the Print Head Nozzles 42 Cleaning the Print Head 43 Checking the Ink Cartridge Status 44 Purchasing Epson Ink Cartridges 45 Replacing Ink Cartridges 46 Solving Problems 48 Checking for Software Updates 48 Error Indicators 49 Problems and Solutions 49 Where To Get Help 54 Notices 55 Contents 3
Quick Guide
Page 4
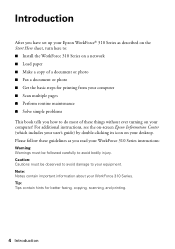
... ■ Scan multiple pages ■ Perform routine maintenance ■ Solve simple problems This book tells you read your desktop. Introduction After you have set up your Epson WorkForce® 310 Series as described on the Start Here sheet, turn here to: ■ Install the WorkForce 310 Series on a network ■ Load paper ■ Make a copy of these guidelines as you how to do most of a document or photo ■ Fax a document or photo ■...
... ■ Scan multiple pages ■ Perform routine maintenance ■ Solve simple problems This book tells you read your desktop. Introduction After you have set up your Epson WorkForce® 310 Series as described on the Start Here sheet, turn here to: ■ Install the WorkForce 310 Series on a network ■ Load paper ■ Make a copy of these guidelines as you how to do most of a document or photo ■ Fax a document or photo ■...
Quick Guide
Page 14
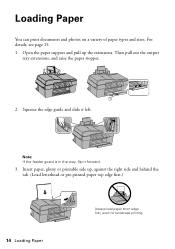
For details, see page 15. 1. Note: If the feeder guard is in the way, flip it left. Insert paper, glossy or printable side up the extensions. Then pull out the output tray extensions, and raise the paper stopper. 2. Squeeze the edge guide and slide it forward. 3. Loading Paper You can print documents and photos on a variety of paper types and sizes. Open the paper support and pull up , against the right side and behind the tab. (Load letterhead or pre-printed paper top edge first.) FPO 14 Loading Paper Always load paper short edge first, even for landscape printing.
For details, see page 15. 1. Note: If the feeder guard is in the way, flip it left. Insert paper, glossy or printable side up the extensions. Then pull out the output tray extensions, and raise the paper stopper. 2. Squeeze the edge guide and slide it forward. 3. Loading Paper You can print documents and photos on a variety of paper types and sizes. Open the paper support and pull up , against the right side and behind the tab. (Load letterhead or pre-printed paper top edge first.) FPO 14 Loading Paper Always load paper short edge first, even for landscape printing.

Quick Guide
Page 17
... Originals for Copying, Scanning, or Faxing 17 1/4 inch (5 mm) If you can place a photo or a document up to make color or black-and-white copies. 1. Open the document cover and place your documents or photos on the scanner glass. Using the Scanner Glass You can place up to letter-size (or A4-size) on the scanner glass, with the top against the back left corner. Place them at a time on the scanner glass...
... Originals for Copying, Scanning, or Faxing 17 1/4 inch (5 mm) If you can place a photo or a document up to make color or black-and-white copies. 1. Open the document cover and place your documents or photos on the scanner glass. Using the Scanner Glass You can place up to letter-size (or A4-size) on the scanner glass, with the top against the back left corner. Place them at a time on the scanner glass...
Quick Guide
Page 20
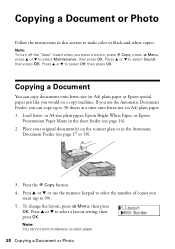
... make color or black-and-white copies. or A4-size plain paper, Epson Bright White Paper, or Epson Presentation Paper Matte in the Automatic Document Feeder (see page 14). 2. Note: You cannot print borderless on a copy machine. Copying a Document You can copy up to select Sound, then press OK. Place your original document(s) on the scanner glass or in the sheet feeder (see page 17 or 18). 3. Press u or d to select Maintenance, then press OK. Note: To turn...
... make color or black-and-white copies. or A4-size plain paper, Epson Bright White Paper, or Epson Presentation Paper Matte in the Automatic Document Feeder (see page 14). 2. Note: You cannot print borderless on a copy machine. Copying a Document You can copy up to select Sound, then press OK. Place your original document(s) on the scanner glass or in the sheet feeder (see page 17 or 18). 3. Press u or d to select Maintenance, then press OK. Note: To turn...

Quick Guide
Page 24
... name and phone number in the fax header before sending faxes so that recipients can enter up fax features using the Epson FAX Utility (Windows only), see page 25). Setting Up Fax Features Before sending faxes, you leave the WorkForce 310 Series unplugged for instructions on -screen Epson Information Center. When you're done, press OK to return to select Fax Setting, then press OK. 3. Press u or d to the Fax Header screen. 24 Faxing a Document Press u or...
... name and phone number in the fax header before sending faxes so that recipients can enter up fax features using the Epson FAX Utility (Windows only), see page 25). Setting Up Fax Features Before sending faxes, you leave the WorkForce 310 Series unplugged for instructions on -screen Epson Information Center. When you're done, press OK to return to select Fax Setting, then press OK. 3. Press u or d to the Fax Header screen. 24 Faxing a Document Press u or...
Quick Guide
Page 26
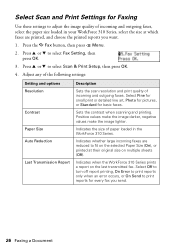
Select Scan and Print Settings for Faxing Use these settings to adjust the image quality of incoming and outgoing faxes. Adjust any of the following settings: Setting and options Resolution Contrast Paper Size Auto Reduction Last Transmission Report Description Sets the scan resolution and print quality of incoming and outgoing faxes, select the paper size loaded in the WorkForce 310 Series. Sets the contrast when scanning and printing. Press u or d to select Scan & Print Setup, then press OK. 4. Positive values make the image darker...
Select Scan and Print Settings for Faxing Use these settings to adjust the image quality of incoming and outgoing faxes. Adjust any of the following settings: Setting and options Resolution Contrast Paper Size Auto Reduction Last Transmission Report Description Sets the scan resolution and print quality of incoming and outgoing faxes, select the paper size loaded in the WorkForce 310 Series. Sets the contrast when scanning and printing. Press u or d to select Scan & Print Setup, then press OK. 4. Positive values make the image darker...

Quick Guide
Page 28
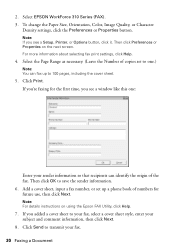
... to send your fax. You can send a fax by selecting from your document on the scanner glass or in the Automatic Document Feeder. Note: To dial the number using the Epson FAX Utility, see a redialing message and the WorkForce 310 Series redials after the first page is scanned: If you need to fax another page, press 2. To cancel faxing, press y Stop/Clear Settings at any time. 28 Faxing a Document Note: If the recipient's fax machine prints only in black and white, your fax...
... to send your fax. You can send a fax by selecting from your document on the scanner glass or in the Automatic Document Feeder. Note: To dial the number using the Epson FAX Utility, see a redialing message and the WorkForce 310 Series redials after the first page is scanned: If you need to fax another page, press 2. To cancel faxing, press y Stop/Clear Settings at any time. 28 Faxing a Document Note: If the recipient's fax machine prints only in black and white, your fax...
Quick Guide
Page 30
... selecting fax print settings, click Help. 4. If you're faxing for future use, then click Next. Click Send to transmit your sender information so that recipients can fax up a phone book of the fax. If you see a window like this one .) Note: You can identify the origin of numbers for the first time, you see a Setup, Printer, or Options button, click it. Select EPSON WorkForce 310 Series (FAX). 3. Note: For details instructions...
... selecting fax print settings, click Help. 4. If you're faxing for future use, then click Next. Click Send to transmit your sender information so that recipients can fax up a phone book of the fax. If you see a window like this one .) Note: You can identify the origin of numbers for the first time, you see a Setup, Printer, or Options button, click it. Select EPSON WorkForce 310 Series (FAX). 3. Note: For details instructions...
Quick Guide
Page 31
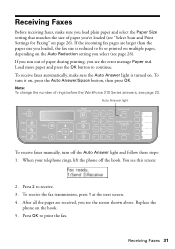
... loaded (see "Select Scan and Print Settings for Faxing" on page 26). To turn off the hook. You see this screen: 2. Press OK to receive. 3. To receive faxes automatically, make sure you load plain paper and select the Paper Size setting that matches the size of paper during printing, you see page 23. After all the pages are larger than the paper size you loaded, the fax size is turned on. Receiving Faxes 31 Replace the phone on , press the Auto Answer/Space button...
... loaded (see "Select Scan and Print Settings for Faxing" on page 26). To turn off the hook. You see this screen: 2. Press OK to receive. 3. To receive faxes automatically, make sure you load plain paper and select the Paper Size setting that matches the size of paper during printing, you see page 23. After all the pages are larger than the paper size you loaded, the fax size is turned on. Receiving Faxes 31 Replace the phone on , press the Auto Answer/Space button...

Quick Guide
Page 35
... Media Type (see the settings shown below.) Copy and page settings Application settings 5. Note: If the setting you see page 38) Select Color or Black/ Grayscale output Select higher quality or faster printing (if available) Select Automatic mode Printing With a Macintosh 35 4. For borderless photos, choose a Paper Size setting with a Sheet Feeder - Borderless option. Select basic copy and page settings. Or check for it in the settings for your application at the bottom of this window. (If...
... Media Type (see the settings shown below.) Copy and page settings Application settings 5. Note: If the setting you see page 38) Select Color or Black/ Grayscale output Select higher quality or faster printing (if available) Select Automatic mode Printing With a Macintosh 35 4. For borderless photos, choose a Paper Size setting with a Sheet Feeder - Borderless option. Select basic copy and page settings. Or check for it in the settings for your application at the bottom of this window. (If...
Quick Guide
Page 48
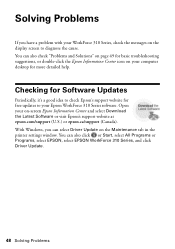
... All Programs or Programs, select EPSON, select EPSON WorkForce 310 Series, and click Driver Update. 48 Solving Problems Open your WorkForce 310 Series, check the messages on the display screen to your computer desktop for basic troubleshooting suggestions, or double-click the Epson Information Center icon on -screen Epson Information Center and select Download the Latest Software or visit Epson's support website at epson.com/support (U.S.) or epson.ca/support (Canada). Checking for Software Updates Periodically, it's a good idea to check Epson's support website for free updates...
... All Programs or Programs, select EPSON, select EPSON WorkForce 310 Series, and click Driver Update. 48 Solving Problems Open your WorkForce 310 Series, check the messages on the display screen to your computer desktop for basic troubleshooting suggestions, or double-click the Epson Information Center icon on -screen Epson Information Center and select Download the Latest Software or visit Epson's support website at epson.com/support (U.S.) or epson.ca/support (Canada). Checking for Software Updates Periodically, it's a good idea to check Epson's support website for free updates...
Quick Guide
Page 49
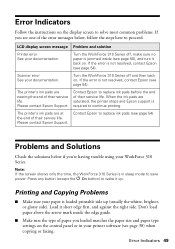
... copying or faxing. Turn the WorkForce 310 Series off , make sure no paper is in your WorkForce 310 Series. Please contact Epson Support. Press any button (except the P On button) to save power. LCD display screen message Problem and solution Printer error See your documentation. Note: If the screen shows only the time, the WorkForce 310 Series is jammed inside the edge guide. ■ Make sure the type of the error messages below if you loaded matches the paper size and paper type settings on...
... copying or faxing. Turn the WorkForce 310 Series off , make sure no paper is in your WorkForce 310 Series. Please contact Epson Support. Press any button (except the P On button) to save power. LCD display screen message Problem and solution Printer error See your documentation. Note: If the screen shows only the time, the WorkForce 310 Series is jammed inside the edge guide. ■ Make sure the type of the error messages below if you loaded matches the paper size and paper type settings on...
Quick Guide
Page 51
... been removed. The message on ink. Verify that the telephone wall jack works by connecting a phone to it. ■ If the line has static, press Fax, press Menu, select Fax Setting, select Communication, and turn off the V.34 and ECM (Error Correction Mode) settings. ■ If the WorkForce 310 Series is connected to align the print head. Check your printouts or they are not recommended), or use Epson papers (see page 15) and genuine Epson ink cartridges...
... been removed. The message on ink. Verify that the telephone wall jack works by connecting a phone to it. ■ If the line has static, press Fax, press Menu, select Fax Setting, select Communication, and turn off the V.34 and ECM (Error Correction Mode) settings. ■ If the WorkForce 310 Series is connected to align the print head. Check your printouts or they are not recommended), or use Epson papers (see page 15) and genuine Epson ink cartridges...
Quick Guide
Page 52
... network settings are configured correctly. If the Network Status is Disconnected, check your Ethernet cable connections and try turning the printer off , try the following: ■ Make sure the Ethernet cable is connected to reinstall the printer software. Click Next to your network (see "Connect an Ethernet Network Cable" on page 5). Then continue with step 9 on your router, access point, switch, or hub. 52 Solving Problems The printer does not appear in the Add Printer window (Mac OS X) Make...
... network settings are configured correctly. If the Network Status is Disconnected, check your Ethernet cable connections and try turning the printer off , try the following: ■ Make sure the Ethernet cable is connected to reinstall the printer software. Click Next to your network (see "Connect an Ethernet Network Cable" on page 5). Then continue with step 9 on your router, access point, switch, or hub. 52 Solving Problems The printer does not appear in the Add Printer window (Mac OS X) Make...

Quick Guide
Page 53
... seconds. Try connecting to the Internet using a LAN connection or set your router, access point, switch, or hub with EpsonNet Print If you use a dial-up connection for Internet access, you will see the Epson Scan Help. ■ If you print. Print a Network Status Sheet 1. Press the x Color button to Copy mode. If Epson Scan cannot restart, turn the printer off and back on, and then try restarting Epson Scan. A dial-up connection to select Print Network Status Sheet. 4. Press the r Copy button. 2. Press u or d to dial manually (Never dial a connection).
... seconds. Try connecting to the Internet using a LAN connection or set your router, access point, switch, or hub with EpsonNet Print If you use a dial-up connection for Internet access, you will see the Epson Scan Help. ■ If you print. Print a Network Status Sheet 1. Press the x Color button to Copy mode. If Epson Scan cannot restart, turn the printer off and back on, and then try restarting Epson Scan. A dial-up connection to select Print Network Status Sheet. 4. Press the r Copy button. 2. Press u or d to dial manually (Never dial a connection).

Quick Guide
Page 56
... touch the ink cartridge ink supply port or surrounding area. ■ Do not use aerosol products that are covered by the operating instructions. Doing so may prevent the product from printing. ■ If you remove an ink cartridge for later use, protect the ink supply area from staining items that the cartridge touches. If you handle used ink cartridges; Note that there is needed to clean the LCD screen. if...
... touch the ink cartridge ink supply port or surrounding area. ■ Do not use aerosol products that are covered by the operating instructions. Doing so may prevent the product from printing. ■ If you remove an ink cartridge for later use, protect the ink supply area from staining items that the cartridge touches. If you handle used ink cartridges; Note that there is needed to clean the LCD screen. if...
Quick Guide
Page 57
... the date of the replacement printer in the event that the Epson printer covered by this limited warranty statement, if purchased and operated only in the United States or Canada, will ship a replacement printer to you, freight prepaid, so long as you to send your printer to Epson or its option, exchange or repair the printer without charge for warranty repair instructions and return authorization. The replacement printer or part may...
... the date of the replacement printer in the event that the Epson printer covered by this limited warranty statement, if purchased and operated only in the United States or Canada, will ship a replacement printer to you, freight prepaid, so long as you to send your printer to Epson or its option, exchange or repair the printer without charge for warranty repair instructions and return authorization. The replacement printer or part may...


