Quick Guide
Page 3
Maintaining Your Printer 30 Checking the Print Head Nozzles 30 Cleaning the Print Head 31 Checking Ink Levels 32 Purchasing Epson Ink Cartridges 32 Replacing Ink Cartridges 33 Solving Problems 36 Checking for Software Updates 36 Error Indicators 37 Problems and Solutions 38 Where to Get Help 40 Notices 41 Contents 3
Maintaining Your Printer 30 Checking the Print Head Nozzles 30 Cleaning the Print Head 31 Checking Ink Levels 32 Purchasing Epson Ink Cartridges 32 Replacing Ink Cartridges 33 Solving Problems 36 Checking for Software Updates 36 Error Indicators 37 Problems and Solutions 38 Where to Get Help 40 Notices 41 Contents 3
Quick Guide
Page 4
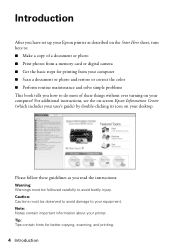
... turning on your computer! For additional instructions, see the on-screen Epson Information Center (which includes your user's guide) by double-clicking its icon on your printer. Introduction After you have set up your Epson printer as you how to do most of a document or photo ■ Print photos from your computer ■ Scan a document or photo and restore or correct the color ■ Perform routine maintenance and solve simple problems This book...
... turning on your computer! For additional instructions, see the on-screen Epson Information Center (which includes your user's guide) by double-clicking its icon on your printer. Introduction After you have set up your Epson printer as you how to do most of a document or photo ■ Print photos from your computer ■ Scan a document or photo and restore or correct the color ■ Perform routine maintenance and solve simple problems This book...
Quick Guide
Page 6
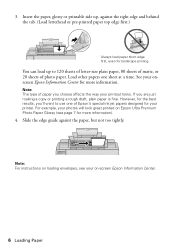
...-size plain paper, 80 sheets of matte, or 20 sheets of photo paper. Note: For instructions on loading envelopes, see your photos will look great printed on -screen Epson Information Center. 6 Loading Paper Insert the paper, glossy or printable side up to use one sheet at a time. You can load up , against the paper, but not too tightly. However, for more information. Note: The type of Epson's special ink jet papers designed for landscape printing. Slide the edge guide...
...-size plain paper, 80 sheets of matte, or 20 sheets of photo paper. Note: For instructions on loading envelopes, see your photos will look great printed on -screen Epson Information Center. 6 Loading Paper Insert the paper, glossy or printable side up to use one sheet at a time. You can load up , against the paper, but not too tightly. However, for more information. Note: The type of Epson's special ink jet papers designed for landscape printing. Slide the edge guide...
Quick Guide
Page 10
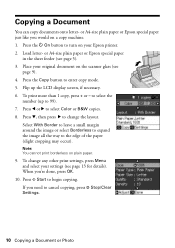
... select Color or B&W copies. 8. When you need to select the number (up the LCD display screen, if necessary. 6. to cancel copying, press y Stop/Clear Settings. 10 Copying a Document or Photo Press d, then press r to 99). 7. Load letter- Flip up to change any other print settings, press Menu and select your original document on a copy machine. 1. or A4-size plain paper or Epson special paper just like you would on the scanner glass (see page 5). 3. To print more than 1 copy...
... select Color or B&W copies. 8. When you need to select the number (up the LCD display screen, if necessary. 6. to cancel copying, press y Stop/Clear Settings. 10 Copying a Document or Photo Press d, then press r to 99). 7. Load letter- Flip up to change any other print settings, press Menu and select your original document on a copy machine. 1. or A4-size plain paper or Epson special paper just like you would on the scanner glass (see page 5). 3. To print more than 1 copy...
Quick Guide
Page 11
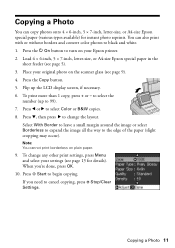
... r to black and white. 1. Note: You cannot print borderless on the scanner glass (see page 9). 4. Copying a Photo You can also print with or without borders and convert color photos to change any other print settings, press Menu and select your settings (see page 5). 3. You can copy photos onto 4 × 6-inch, 5 × 7-inch, letter-size, or A4-size Epson special paper (various types available) for details). Press the P On button to cancel copying, press y Stop/Clear Settings. To change the layout...
... r to black and white. 1. Note: You cannot print borderless on the scanner glass (see page 9). 4. Copying a Photo You can also print with or without borders and convert color photos to change any other print settings, press Menu and select your settings (see page 5). 3. You can copy photos onto 4 × 6-inch, 5 × 7-inch, letter-size, or A4-size Epson special paper (various types available) for details). Press the P On button to cancel copying, press y Stop/Clear Settings. To change the layout...

Quick Guide
Page 12
... Color Restoration.) 6. Press x Start to turn on the subject. Restoring and Cropping Photos You can also crop your photos to cancel copying, press y Stop/ Clear Settings. 12 Copying a Document or Photo Place your photo, press OK. 9. To print more than 5 × 7 inches, use the arrow buttons. ■ To check the zoomed image, press OK. After you want to crop your computer. 1. Load 4 × 6-inch, 5 × 7-inch, letter-size, or A4-size Epson special paper...
... Color Restoration.) 6. Press x Start to turn on the subject. Restoring and Cropping Photos You can also crop your photos to cancel copying, press y Stop/ Clear Settings. 12 Copying a Document or Photo Place your photo, press OK. 9. To print more than 5 × 7 inches, use the arrow buttons. ■ To check the zoomed image, press OK. After you want to crop your computer. 1. Load 4 × 6-inch, 5 × 7-inch, letter-size, or A4-size Epson special paper...
Quick Guide
Page 13
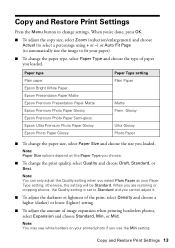
.... Copy and Restore Print Settings Press the Menu button to fit your Paper Type setting; Copy and Restore Print Settings 13 Glossy Ultra Glossy Photo Paper ■ To change the paper size, select Paper Size and choose the size you cannot adjust it. ■ To adjust the darkness or lightness of the print, select Density and choose a higher (darker) or lower (lighter) setting. ■ To adjust the amount of paper you loaded. When you choose. ■ To change settings...
.... Copy and Restore Print Settings Press the Menu button to fit your Paper Type setting; Copy and Restore Print Settings 13 Glossy Ultra Glossy Photo Paper ■ To change the paper size, select Paper Size and choose the size you cannot adjust it. ■ To adjust the darkness or lightness of the print, select Density and choose a higher (darker) or lower (lighter) setting. ■ To adjust the amount of paper you loaded. When you choose. ■ To change settings...
Quick Guide
Page 14
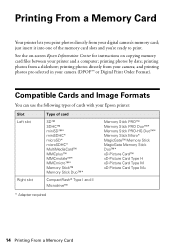
...-screen Epson Information Center for instructions on copying memory card files between your camera; just insert it into one of the memory card slots and you print photos directly from a slideshow; and printing photos pre-selected in your Epson printer: Slot Left slot Right slot Type of cards with your camera (DPOF™ or Digital Print Order Format). Printing From a Memory Card Your printer lets you 're ready to print. printing photos from your digital camera's memory card...
...-screen Epson Information Center for instructions on copying memory card files between your camera; just insert it into one of the memory card slots and you print photos directly from a slideshow; and printing photos pre-selected in your Epson printer: Slot Left slot Right slot Type of cards with your camera (DPOF™ or Digital Print Order Format). Printing From a Memory Card Your printer lets you 're ready to print. printing photos from your digital camera's memory card...
Quick Guide
Page 16
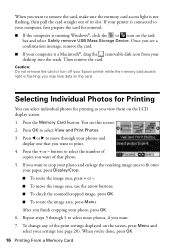
... trash. You see page 20). button to select more photos, if you want. 7. After you finish cropping your settings (see this screen: 2. When you want to move the image area, use the arrow buttons. ■ To check the zoomed/cropped image, press OK. ■ To rotate the image area, press Menu. Press l or r to remove the card, make sure the memory card access light is running Windows®, click the...
... trash. You see page 20). button to select more photos, if you want. 7. After you finish cropping your settings (see this screen: 2. When you want to move the image area, use the arrow buttons. ■ To check the zoomed/cropped image, press OK. ■ To rotate the image area, press Menu. Press l or r to remove the card, make sure the memory card access light is running Windows®, click the...
Quick Guide
Page 18
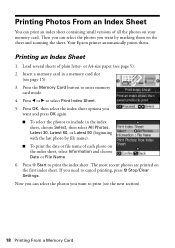
... the photos on your memory card. Load several sheets of plain letter- Press l or r to print (see the next section). 18 Printing From a Memory Card The most recent photos are printed on the sheet and scanning the sheet. Press x Start to enter memory card mode. 4. or A4-size paper (see page 15). 3. Press the Memory Card button to print the index sheet. If you want and press OK again. ■ To select the photos to cancel printing, press y Stop/Clear Settings. Your Epson printer automatically prints...
... the photos on your memory card. Load several sheets of plain letter- Press l or r to print (see the next section). 18 Printing From a Memory Card The most recent photos are printed on the sheet and scanning the sheet. Press x Start to enter memory card mode. 4. or A4-size paper (see page 15). 3. Press the Memory Card button to print the index sheet. If you want and press OK again. ■ To select the photos to cancel printing, press y Stop/Clear Settings. Your Epson printer automatically prints...
Quick Guide
Page 20
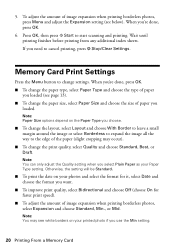
..., select Bidirectional and choose Off (choose On for faster print speed). ■ To adjust the amount of image expansion when printing borderless photos, press Menu and adjust the Expansion setting (see white borders on your Paper Type setting. Press OK, then press x Start to cancel printing, press y Stop/Clear Settings. Memory Card Print Settings Press the Menu button to the edge of paper you choose. ■ To change the layout, select Layout and choose With Border to...
..., select Bidirectional and choose Off (choose On for faster print speed). ■ To adjust the amount of image expansion when printing borderless photos, press Menu and adjust the Expansion setting (see white borders on your Paper Type setting. Press OK, then press x Start to cancel printing, press y Stop/Clear Settings. Memory Card Print Settings Press the Menu button to the edge of paper you choose. ■ To change the layout, select Layout and choose With Border to...

Quick Guide
Page 24
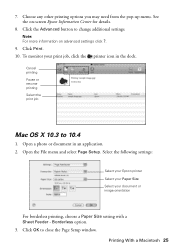
... printing, choose a Paper Size setting with a Sheet Feeder - Copy and page settings Application settings 6. Choose Print Settings from the pop-up menu, and select the following print settings: 24 Printing From Your Computer Choose Print Settings Select your application before printing. 5. Note: If the setting you want isn't shown (for example, Scale), check for your application at the bottom of this window. Or check for it in the settings for it in your Media Type...
... printing, choose a Paper Size setting with a Sheet Feeder - Copy and page settings Application settings 6. Choose Print Settings from the pop-up menu, and select the following print settings: 24 Printing From Your Computer Choose Print Settings Select your application before printing. 5. Note: If the setting you want isn't shown (for example, Scale), check for your application at the bottom of this window. Or check for it in the settings for it in your Media Type...
Quick Guide
Page 25
... borderless printing, choose a Paper Size setting with a Sheet Feeder - See the on advanced settings click ?. 9. Borderless option. 3. Click Print. 10. Select the following settings: Select your Epson printer Select your Paper Size Select your print job, click the printer icon in an application. 2. Note: For more information on -screen Epson Information Center for details. 8. Open the File menu and select Page Setup. Open a photo or document in the dock. Click OK to change additional settings. Cancel printing Pause or resume printing Select the print job Mac...
... borderless printing, choose a Paper Size setting with a Sheet Feeder - See the on advanced settings click ?. 9. Borderless option. 3. Click Print. 10. Select the following settings: Select your Epson printer Select your Paper Size Select your print job, click the printer icon in an application. 2. Note: For more information on -screen Epson Information Center for details. 8. Open the File menu and select Page Setup. Open a photo or document in the dock. Click OK to change additional settings. Cancel printing Pause or resume printing Select the print job Mac...
Quick Guide
Page 28
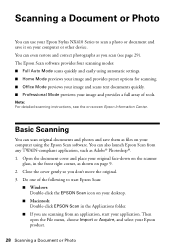
... of tools. Open the document cover and place your application. Basic Scanning You can use your Epson Stylus NX410 Series to start your original face-down on the scanner glass, in the Applications folder. ■ If you are scanning from any TWAIN-compliant application, such as shown on -screen Epson Information Center. The Epson Scan software provides four scanning modes: ■ Full Auto Mode scans quickly and easily using the Epson Scan software. Then open the File menu, choose Import...
... of tools. Open the document cover and place your application. Basic Scanning You can use your Epson Stylus NX410 Series to start your original face-down on the scanner glass, in the Applications folder. ■ If you are scanning from any TWAIN-compliant application, such as shown on -screen Epson Information Center. The Epson Scan software provides four scanning modes: ■ Full Auto Mode scans quickly and easily using the Epson Scan software. Then open the File menu, choose Import...
Quick Guide
Page 36
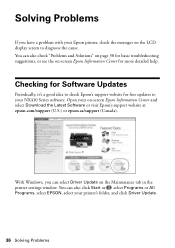
... Series software. Open your printer's folder, and click Driver Update. 36 Solving Problems You can also check "Problems and Solutions" on page 38 for basic troubleshooting suggestions, or see the on-screen Epson Information Center for free updates to your Epson printer, check the messages on the LCD display screen to diagnose the cause. You can also click Start or , select Programs or All Programs, select EPSON, select your on-screen Epson Information Center and select Download the Latest Software or visit Epson's support...
... Series software. Open your printer's folder, and click Driver Update. 36 Solving Problems You can also check "Problems and Solutions" on page 38 for basic troubleshooting suggestions, or see the on-screen Epson Information Center for free updates to your Epson printer, check the messages on the LCD display screen to diagnose the cause. You can also click Start or , select Programs or All Programs, select EPSON, select your on-screen Epson Information Center and select Download the Latest Software or visit Epson's support...
Quick Guide
Page 37
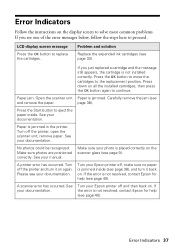
... photos could be recognized. Carefully remove the jam (see page 33). LCD display screen message Press the OK button to the replacement position. Turn off and then back on the scanner glass (see page 40). Turn off , make sure no paper is jammed inside . Make sure your Epson printer off the printer and turn it on all the installed cartridges, then press the OK button again to proceed. See your documentation. Problem and solution Replace the expended ink cartridges...
... photos could be recognized. Carefully remove the jam (see page 33). LCD display screen message Press the OK button to the replacement position. Turn off and then back on the scanner glass (see page 40). Turn off , make sure no paper is jammed inside . Make sure your Epson printer off the printer and turn it on all the installed cartridges, then press the OK button again to proceed. See your documentation. Problem and solution Replace the expended ink cartridges...
Quick Guide
Page 38
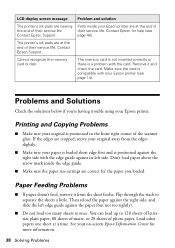
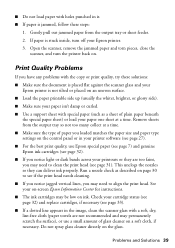
... printer's ink pads are at the end of their service life. Paper Feeding Problems ■ If paper doesn't feed, remove it and check the card. Then reload the paper against the right side, and slide the left edge guide against its left side. Parts inside the edge guide. ■ Make sure the paper size settings are cropped, move your original away from the sheet feeder. Cannot recognize the memory card or disk. See your paper is loaded...
... printer's ink pads are at the end of their service life. Paper Feeding Problems ■ If paper doesn't feed, remove it and check the card. Then reload the paper against the right side, and slide the left edge guide against its left side. Parts inside the edge guide. ■ Make sure the paper size settings are cropped, move your original away from the sheet feeder. Cannot recognize the memory card or disk. See your paper is loaded...
Quick Guide
Page 39
Remove sheets from the output tray or sheet feeder. 2. See your on-screen Epson Information Center for instructions. ■ The ink cartridges may need to clean the print head (see if the print head needs cleaning. ■ If you notice jagged vertical lines, you loaded matches the paper size and paper type settings on the control panel or in your printer software (see page 27). ■ For the best print quality, use a small amount of plain paper beneath the special paper sheet) or load your...
Remove sheets from the output tray or sheet feeder. 2. See your on-screen Epson Information Center for instructions. ■ The ink cartridges may need to clean the print head (see if the print head needs cleaning. ■ If you notice jagged vertical lines, you loaded matches the paper size and paper type settings on the control panel or in your printer software (see page 27). ■ For the best print quality, use a small amount of plain paper beneath the special paper sheet) or load your...

Quick Guide
Page 41
... printer using the P On button, and wait until the P On light stops flashing before unplugging the printer or cutting off power to rapid changes in heat or humidity, shocks or vibrations, or dust. ■ Leave enough room around the printer for a long period, unplug the power cord from the wall. ■ Do not open the scanner section while the NX410 Series is copying, printing, or scanning...
... printer using the P On button, and wait until the P On light stops flashing before unplugging the printer or cutting off power to rapid changes in heat or humidity, shocks or vibrations, or dust. ■ Leave enough room around the printer for a long period, unplug the power cord from the wall. ■ Do not open the scanner section while the NX410 Series is copying, printing, or scanning...
Quick Guide
Page 45
... normal use will , at Epson's option, may be new or refurbished to other locations will be properly maintained or fail to return the defective one (1) year from the Epson authorized service center. Shipments to the Epson standard of quality, and, at its option, exchange or repair the printer without charge for warranty service should the Epson label or logo or the rating label or serial number be removed...
... normal use will , at Epson's option, may be new or refurbished to other locations will be properly maintained or fail to return the defective one (1) year from the Epson authorized service center. Shipments to the Epson standard of quality, and, at its option, exchange or repair the printer without charge for warranty service should the Epson label or logo or the rating label or serial number be removed...


