Start Here Card
Page 1
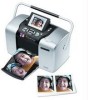
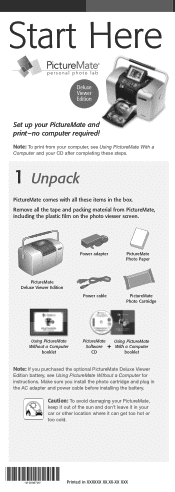
... PictureMate Deluxe Viewer Edition battery, see Using PictureMate With a Computer and your computer, see Using PictureMate Without a Computer for instructions. Caution: To avoid damaging your PictureMate, keep it out of the sun and don't leave it in your PictureMate and print -no computer required! Power adapter PictureMate Photo Paper PictureMate Deluxe Viewer Edition Power cable PictureMate Photo Cartridge Using PictureMate Without a Computer booklet PictureMate Using PictureMate...
... PictureMate Deluxe Viewer Edition battery, see Using PictureMate With a Computer and your computer, see Using PictureMate Without a Computer for instructions. Caution: To avoid damaging your PictureMate, keep it out of the sun and don't leave it in your PictureMate and print -no computer required! Power adapter PictureMate Photo Paper PictureMate Deluxe Viewer Edition Power cable PictureMate Photo Cartridge Using PictureMate Without a Computer booklet PictureMate Using PictureMate...
Start Here Card
Page 2
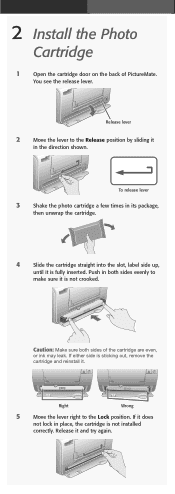
... it is fully inserted. You see the release lever. To release lever 3 Shake the photo cartridge a few times in both sides of PictureMate. 2 Install the Photo Cartridge 1 Open the cartridge door on the back of the cartridge are even, or ink may leak. Right Wrong 5 Move the lever right to the Release ... it does not lock in the direction shown. Release it . If either side is not installed correctly. If it in place, the cartridge is sticking out, remove the cartridge and reinstall it and try again. Release lever 2 Move the lever to the Lock position.
... it is fully inserted. You see the release lever. To release lever 3 Shake the photo cartridge a few times in both sides of PictureMate. 2 Install the Photo Cartridge 1 Open the cartridge door on the back of the cartridge are even, or ink may leak. Right Wrong 5 Move the lever right to the Release ... it does not lock in the direction shown. Release it . If either side is not installed correctly. If it in place, the cartridge is sticking out, remove the cartridge and reinstall it and try again. Release lever 2 Move the lever to the Lock position.
Start Here Card
Page 3
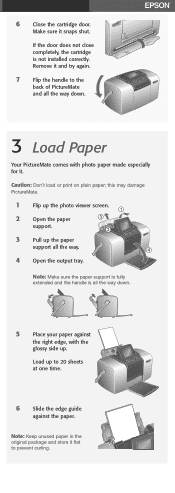
... fully extended and the handle is not installed correctly. Note: Keep unused paper in the original package and store it . this may damage PictureMate. 1 Flip up the photo viewer screen. 2 Open the paper support. 3 Pull up to 20 sheets at one time. 6 Slide the edge guide against the right edge, ... especially for it flat to the back of PictureMate and all the way down . 3 Load Paper Your PictureMate comes with the glossy side up. Load up the paper support all the way. 4 4 Open the output tray. If the door does not close completely, the cartridge is all the way down . 5 Place ...
... fully extended and the handle is not installed correctly. Note: Keep unused paper in the original package and store it . this may damage PictureMate. 1 Flip up the photo viewer screen. 2 Open the paper support. 3 Pull up to 20 sheets at one time. 6 Slide the edge guide against the right edge, ... especially for it flat to the back of PictureMate and all the way down . 3 Load Paper Your PictureMate comes with the glossy side up. Load up the paper support all the way. 4 4 Open the output tray. If the door does not close completely, the cartridge is all the way down . 5 Place ...
Start Here Card
Page 4
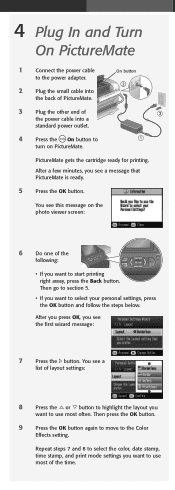
PictureMate gets the cartridge ready for printing. You see a list of the following: • If you see a message that PictureMate is ready. 5 Press the OK button. After you press OK, you want to use most of the power cable into the back of PictureMate. 3 Plug the other end of the time. Then press the... 5. • If you want to start printing right away, press the Back button. On button 4 Press the On button to turn on the photo viewer screen: 6 Do one of layout settings: 8 Press the or button to select your personal settings, press the OK button and follow the steps below. ...
PictureMate gets the cartridge ready for printing. You see a list of the following: • If you see a message that PictureMate is ready. 5 Press the OK button. After you press OK, you want to use most of the power cable into the back of PictureMate. 3 Plug the other end of the time. Then press the... 5. • If you want to start printing right away, press the Back button. On button 4 Press the On button to turn on the photo viewer screen: 6 Do one of layout settings: 8 Press the or button to select your personal settings, press the OK button and follow the steps below. ...


