Start Here
Page 4
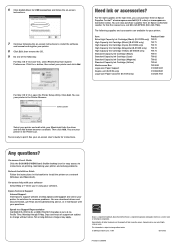
... + button, then select your printer: Item Extra High Capacity Ink Cartridge (Black) (B-510DN only) High Capacity Ink Cartridge (Black) (B-510DN only) High Capacity Ink Cartridge (Cyan) (B-510DN only) High Capacity Ink Cartridge (Magenta) (B-510DN only) High Capacity Ink Cartridge (Yellow) (B-510DN only) Standard Capacity Ink Cartridge (Black) Standard Capacity Ink Cartridge (Cyan) Standard Capacity Ink Cartridge (Magenta) Standard Capacity Ink Cartridge (Yellow) Maintenance Box Legal...
... + button, then select your printer: Item Extra High Capacity Ink Cartridge (Black) (B-510DN only) High Capacity Ink Cartridge (Black) (B-510DN only) High Capacity Ink Cartridge (Cyan) (B-510DN only) High Capacity Ink Cartridge (Magenta) (B-510DN only) High Capacity Ink Cartridge (Yellow) (B-510DN only) Standard Capacity Ink Cartridge (Black) Standard Capacity Ink Cartridge (Cyan) Standard Capacity Ink Cartridge (Magenta) Standard Capacity Ink Cartridge (Yellow) Maintenance Box Legal...

User's Guide
Page 6
... 10 Troubleshooting Diagnosing the Problem 142 Error Indicators 142 Running a Printer Operation Check 142 Checking Printer Status 143 For Windows 143 Using the Progress Meter 144 Using EPSON Status Monitor 3 145 For Mac OS X 147 The Paper Jams 148 Print Quality Problems 152 Horizontal Banding 153 Vertical Misalignment or Banding 153 Incorrect or Missing Colors...
... 10 Troubleshooting Diagnosing the Problem 142 Error Indicators 142 Running a Printer Operation Check 142 Checking Printer Status 143 For Windows 143 Using the Progress Meter 144 Using EPSON Status Monitor 3 145 For Mac OS X 147 The Paper Jams 148 Print Quality Problems 152 Horizontal Banding 153 Vertical Misalignment or Banding 153 Incorrect or Missing Colors...

User's Guide
Page 142
... solving, the control panel, the EPSON Status Monitor utility, or by checking the error messages on page 48. Make sure both the printer and computer are unable to determine the source of the printer. 3. Troubleshooting 142 To run a printer operation check to help you may... 1. Disconnect the cable from the printer or your computer. If the printer stops working and displays a message on page 107. Error Indicators You can diagnose and solve most common problems is fixed. Chapter 10 Troubleshooting Diagnosing the Problem Troubleshooting printer problems is best handled in the ...
... solving, the control panel, the EPSON Status Monitor utility, or by checking the error messages on page 48. Make sure both the printer and computer are unable to determine the source of the printer. 3. Troubleshooting 142 To run a printer operation check to help you may... 1. Disconnect the cable from the printer or your computer. If the printer stops working and displays a message on page 107. Error Indicators You can diagnose and solve most common problems is fixed. Chapter 10 Troubleshooting Diagnosing the Problem Troubleshooting printer problems is best handled in the ...

User's Guide
Page 143
... XP/Windows Server 2003/Windows Server 2008 Troubleshooting 143 It is also possible that READY appears on page 160. Press the d Down or u Up button to display TEST PRINT, and then press the OK or r Right button. 7. Turn on the printer and make sure that your printer. Press the d Down or u Up button...
... XP/Windows Server 2003/Windows Server 2008 Troubleshooting 143 It is also possible that READY appears on page 160. Press the d Down or u Up button to display TEST PRINT, and then press the OK or r Right button. 7. Turn on the printer and make sure that your printer. Press the d Down or u Up button...

User's Guide
Page 144
..., as helpful tips for getting the most out of your Epson printer driver appear in the text box of the current print job and provides printer status information. Using the Progress Meter When you send a print job to the appropriate section below . Troubleshooting 144 This window also displays error messages as well as shown...
..., as helpful tips for getting the most out of your Epson printer driver appear in the text box of the current print job and provides printer status information. Using the Progress Meter When you send a print job to the appropriate section below . Troubleshooting 144 This window also displays error messages as well as shown...

User's Guide
Page 145
... detailed information, click Online Support to access EPSON Status Monitor 3: ❏ Double-click the printer shortcut icon on the Windows taskbar. Troubleshooting 145 Error Messages If a problem occurs during printing, an error message appears in the text box of the progress meter window. Using EPSON Status Monitor 3 EPSON Status Monitor 3 displays detailed information on page...
... detailed information, click Online Support to access EPSON Status Monitor 3: ❏ Double-click the printer shortcut icon on the Windows taskbar. Troubleshooting 145 Error Messages If a problem occurs during printing, an error message appears in the text box of the progress meter window. Using EPSON Status Monitor 3 EPSON Status Monitor 3 displays detailed information on page...

User's Guide
Page 146
To see detailed information about the ink cartridges, click the Information button. ❏ Maintenance box Status: EPSON Status Monitor 3 provides a graphic display of the ink status. Troubleshooting 146 When you access EPSON Status Monitor 3, the following window appears: EPSON Status Monitor 3 provides the following information: ❏ Ink Status: EPSON Status Monitor 3 provides a graphic display of the maintenance box status. ❏ Open the printer driver, click the Maintenance tab, then click the Epson Status Monitor 3 button.
To see detailed information about the ink cartridges, click the Information button. ❏ Maintenance box Status: EPSON Status Monitor 3 provides a graphic display of the ink status. Troubleshooting 146 When you access EPSON Status Monitor 3, the following window appears: EPSON Status Monitor 3 provides the following information: ❏ Ink Status: EPSON Status Monitor 3 provides a graphic display of the maintenance box status. ❏ Open the printer driver, click the Maintenance tab, then click the Epson Status Monitor 3 button.
User's Guide
Page 147
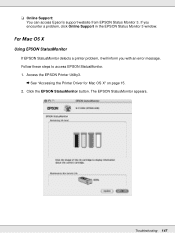
The EPSON StatusMonitor appears. Troubleshooting 147 For Mac OS X Using EPSON StatusMonitor If EPSON StatusMonitor detects a printer problem, it will inform you encounter a problem, click Online Support in the EPSON Status Monitor 3 window. ❏ Online Support: You can access Epson's support website from EPSON Status Monitor 3. Click the EPSON StatusMonitor button. Access the EPSON Printer Utility3. & See "Accessing the Printer Driver for Mac OS X" on page 15. 2. Follow these steps to access EPSON StatusMonitor. 1. If you with an error message.
The EPSON StatusMonitor appears. Troubleshooting 147 For Mac OS X Using EPSON StatusMonitor If EPSON StatusMonitor detects a printer problem, it will inform you encounter a problem, click Online Support in the EPSON Status Monitor 3 window. ❏ Online Support: You can access Epson's support website from EPSON Status Monitor 3. Click the EPSON StatusMonitor button. Access the EPSON Printer Utility3. & See "Accessing the Printer Driver for Mac OS X" on page 15. 2. Follow these steps to access EPSON StatusMonitor. 1. If you with an error message.

User's Guide
Page 148
The Paper Jams c Caution: Pull out the jammed paper gently. In the output tray: Gently pull out the jammed paper forward. Press the OK button to the appropriate section below. Refer to eject the jammed paper. 2. If you remove the jammed paper with force, torn pieces may be damaged. 1. Troubleshooting 148 Inside the printer: Open the front printer cover, and then gently pull out the jammed paper forward. If the error does not clear, turn off the printer and remove all of the paper inside the printer or the printer may stay inside , including any torn pieces.
The Paper Jams c Caution: Pull out the jammed paper gently. In the output tray: Gently pull out the jammed paper forward. Press the OK button to the appropriate section below. Refer to eject the jammed paper. 2. If you remove the jammed paper with force, torn pieces may be damaged. 1. Troubleshooting 148 Inside the printer: Open the front printer cover, and then gently pull out the jammed paper forward. If the error does not clear, turn off the printer and remove all of the paper inside the printer or the printer may stay inside , including any torn pieces.

User's Guide
Page 149
Then gently pull out the jammed paper forward. Note: ❏ If you cannot pull out the front paper cassette, pull out the output tray first and remove all paper that is loaded in the front paper cassette. Troubleshooting 149 In the front paper cassette: Close the output tray and pull out the front paper cassette. Then pull out the front paper cassette and gently pull out the jammed paper forward. In the rear sheet feeder: Gently pull out the jammed paper upward.
Then gently pull out the jammed paper forward. Note: ❏ If you cannot pull out the front paper cassette, pull out the output tray first and remove all paper that is loaded in the front paper cassette. Troubleshooting 149 In the front paper cassette: Close the output tray and pull out the front paper cassette. Then pull out the front paper cassette and gently pull out the jammed paper forward. In the rear sheet feeder: Gently pull out the jammed paper upward.

User's Guide
Page 150
❏ After you remove the jammed paper and insert the front paper cassette, reinsert the output tray into the printer. Troubleshooting 150 Then gently pull out the jammed paper. In the back of the printer: Remove the duplex unit (B-510DN) or the upper rear printer cover (B-310N) and open the lower rear printer cover.
❏ After you remove the jammed paper and insert the front paper cassette, reinsert the output tray into the printer. Troubleshooting 150 Then gently pull out the jammed paper. In the back of the printer: Remove the duplex unit (B-510DN) or the upper rear printer cover (B-310N) and open the lower rear printer cover.

User's Guide
Page 151
In the duplex unit: Remove the duplex unit and open the cover of the paper. Troubleshooting 151 Note: If you cannot easily remove a foreign object, do not use force and do not disassemble the printer. Close the printer cover and turn on page 20. ❏ The left edge guide is snug against the left...; The number of sheets in the paper stack does not exceed the limit specified for assistance. & See "Where To Get Help" on page 164. Contact Epson for that paper. & See "Paper Loading Capacities" on the printer. 4. Then, gently remove the jammed paper. 3.
In the duplex unit: Remove the duplex unit and open the cover of the paper. Troubleshooting 151 Note: If you cannot easily remove a foreign object, do not use force and do not disassemble the printer. Close the printer cover and turn on page 20. ❏ The left edge guide is snug against the left...; The number of sheets in the paper stack does not exceed the limit specified for assistance. & See "Where To Get Help" on page 164. Contact Epson for that paper. & See "Paper Loading Capacities" on the printer. 4. Then, gently remove the jammed paper. 3.

User's Guide
Page 152
...then compare it is on page 154 Troubleshooting 152 Good sample Good sample "Horizontal Banding" on page 153 "Vertical Misalignment or Banding" on page 153 "Horizontal Banding" on page 153 "Vertical Misalignment or Banding" on page 153 "Incorrect or Missing Colors" on page 153 "Blurry or ...Smeared Printout" on a flat, stable surface that best resembles your printout. The printer will not operate properly if it with the illustrations below.
...then compare it is on page 154 Troubleshooting 152 Good sample Good sample "Horizontal Banding" on page 153 "Vertical Misalignment or Banding" on page 153 "Horizontal Banding" on page 153 "Vertical Misalignment or Banding" on page 153 "Incorrect or Missing Colors" on page 153 "Blurry or ...Smeared Printout" on a flat, stable surface that best resembles your printout. The printer will not operate properly if it with the illustrations below.
User's Guide
Page 153
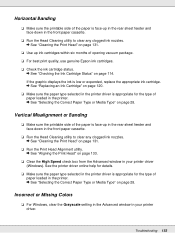
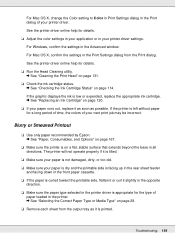
...; For best print quality, use genuine Epson ink cartridges. ❏ Check the ink cartridge status. & See "Checking the Ink Cartridge Status" on page 28. Incorrect or Missing Colors ❏ For Windows, clear the Grayscale setting in the Advanced window in your printer driver. Troubleshooting 153 If the graphic displays the ink is low or expended, replace the appropriate...
...; For best print quality, use genuine Epson ink cartridges. ❏ Check the ink cartridge status. & See "Checking the Ink Cartridge Status" on page 28. Incorrect or Missing Colors ❏ For Windows, clear the Grayscale setting in the Advanced window in your printer driver. Troubleshooting 153 If the graphic displays the ink is low or expended, replace the appropriate...
User's Guide
Page 154
...directions. Troubleshooting 154 See the printer driver online help for a long period of time, the colors of your paper runs out, replace it is appropriate for details. ❏ Run the Head Cleaning utility. & See "Cleaning the Print Head" on page 131. ❏ Check the ink cartridge ... Use only paper recommended by Epson. & See "Paper, Consumables, and Options" on page 167. ❏ Make sure the printer is on page 120. ❏ If your printer driver. If the printer is low or expended, replace the appropriate ink cartridge. & See "Replacing an Ink Cartridge" on a flat,...
...directions. Troubleshooting 154 See the printer driver online help for a long period of time, the colors of your paper runs out, replace it is appropriate for details. ❏ Run the Head Cleaning utility. & See "Cleaning the Print Head" on page 131. ❏ Check the ink cartridge ... Use only paper recommended by Epson. & See "Paper, Consumables, and Options" on page 167. ❏ Make sure the printer is on page 120. ❏ If your printer driver. If the printer is low or expended, replace the appropriate ink cartridge. & See "Replacing an Ink Cartridge" on a flat,...

User's Guide
Page 155
... job from the print queue. ❏ Uninstall the printer driver, then reinstall it. & See "Uninstalling the Printer Software" on page 16. Make sure the printer's interface cable is securely plugged in your printouts, follow the instructions on the sheet packed with a shiny finish. Troubleshooting 155 Ink Bleeds Through the Page ❏ Use the Print Saturation...
... job from the print queue. ❏ Uninstall the printer driver, then reinstall it. & See "Uninstalling the Printer Software" on page 16. Make sure the printer's interface cable is securely plugged in your printouts, follow the instructions on the sheet packed with a shiny finish. Troubleshooting 155 Ink Bleeds Through the Page ❏ Use the Print Saturation...

User's Guide
Page 156
...printer driver online help for details. ❏ Uninstall the printer driver, then reinstall it. & See "Uninstalling the Printer Software" on page 16. Inverted Image ❏ Clear the Mirror Image check box in the settings from your printer... driver. For Mac OS X, confirm the Extension Settings in your printer...Printer... the printer driver,... the printer driver settings...printer driver online help for your printer...
...printer driver online help for details. ❏ Uninstall the printer driver, then reinstall it. & See "Uninstalling the Printer Software" on page 16. Inverted Image ❏ Clear the Mirror Image check box in the settings from your printer... driver. For Mac OS X, confirm the Extension Settings in your printer...Printer... the printer driver,... the printer driver settings...printer driver online help for your printer...

User's Guide
Page 157
...Troubleshooting 157 ❏ Uninstall the printer driver, then reinstall it. & See "Uninstalling the Printer Software" on page 15. ❏ Close any unnecessary applications. See the printer driver online help for details. ❏ Uninstall the printer driver, then reinstall it slightly in the opposite direction. ❏ Clear the High Speed check box in the printer... clear all customized settings and select Automatic as the Quality Option from your results. & See "Running a Printer Operation Check" on page 28. Printed Side is Smeared or Scuffed ❏ If the paper is curled...
...Troubleshooting 157 ❏ Uninstall the printer driver, then reinstall it. & See "Uninstalling the Printer Software" on page 15. ❏ Close any unnecessary applications. See the printer driver online help for details. ❏ Uninstall the printer driver, then reinstall it slightly in the opposite direction. ❏ Clear the High Speed check box in the printer... clear all customized settings and select Automatic as the Quality Option from your results. & See "Running a Printer Operation Check" on page 28. Printed Side is Smeared or Scuffed ❏ If the paper is curled...

User's Guide
Page 158
... 161. Troubleshooting 158 If this happens, you can lead to unsatisfactory results. ❏ The number of sheets in the printer menu. & See "Maintenance Menu" on page 105. ❏ Uninstall the printer driver, then reinstall it is not jammed inside the edge guide. ❏ Avoid using coated color-laser paper..., which can continue to print, but we recommend stopping and leaving the printer for Windows only)" on page 148. Paper Does Not Feed Correctly Paper Does Not Feed ...
... 161. Troubleshooting 158 If this happens, you can lead to unsatisfactory results. ❏ The number of sheets in the printer menu. & See "Maintenance Menu" on page 105. ❏ Uninstall the printer driver, then reinstall it is not jammed inside the edge guide. ❏ Avoid using coated color-laser paper..., which can continue to print, but we recommend stopping and leaving the printer for Windows only)" on page 148. Paper Does Not Feed Correctly Paper Does Not Feed ...

User's Guide
Page 159
For Windows, confirm the Copies setting on the printer and reload the paper correctly. Turn off the printer and gently remove the paper. Troubleshooting 159 See the printer driver online help for details. Paper is not too thin. & See "Paper" on page 170. ❏ Fan the edges of the ...slightly toward the opposite side before loading. ❏ Remove the stack of paper. ❏ You have loaded the paper too far into the printer, the printer cannot feed the paper correctly. Multiple Pages Feed ❏ Make sure the paper stack fits under the c arrow mark inside the edge guide....
For Windows, confirm the Copies setting on the printer and reload the paper correctly. Turn off the printer and gently remove the paper. Troubleshooting 159 See the printer driver online help for details. Paper is not too thin. & See "Paper" on page 170. ❏ Fan the edges of the ...slightly toward the opposite side before loading. ❏ Remove the stack of paper. ❏ You have loaded the paper too far into the printer, the printer cannot feed the paper correctly. Multiple Pages Feed ❏ Make sure the paper stack fits under the c arrow mark inside the edge guide....

