Start Here
Page 3
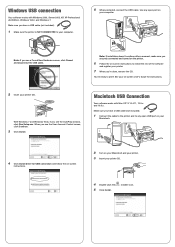
...® and Windows 7. installer icon. Windows USB connection Your software works with Mac OS® X 10.4.11, 10.5.x and 10.6.x. You're ready to install the rest of the software and register your printer. 7 When you're done, remove the CD. With Windows 7 and Windows... on your computer. 5 When prompted, connect the USB cable. Make sure you securely connected and turned on the printer. 6 Follow the on your Macintosh. 4 Click Install driver for instructions. 2 Insert your printer CD. 4 Double-click the 5 Click Install. When you have a USB cable (not included). 1 Connect the...
...® and Windows 7. installer icon. Windows USB connection Your software works with Mac OS® X 10.4.11, 10.5.x and 10.6.x. You're ready to install the rest of the software and register your printer. 7 When you're done, remove the CD. With Windows 7 and Windows... on your computer. 5 When prompted, connect the USB cable. Make sure you securely connected and turned on the printer. 6 Follow the on your Macintosh. 4 Click Install driver for instructions. 2 Insert your printer CD. 4 Double-click the 5 Click Install. When you have a USB cable (not included). 1 Connect the...
Start Here
Page 4
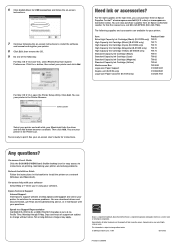
... drivers and documentation, get FAQs and troubleshooting advice, or e-mail Epson with your software. The following : For Mac OS X 10.5 and 10.6, select Print & Fax from an Epson authorized reseller. You see your printer: Item Extra High Capacity Ink Cartridge (Black) (B-510DN only) High Capacity Ink Cartridge (Black) (B-510DN only) High Capacity Ink Cartridge (Cyan) (B-510DN only) High Capacity Ink Cartridge (Magenta) (B-510DN...
... drivers and documentation, get FAQs and troubleshooting advice, or e-mail Epson with your software. The following : For Mac OS X 10.5 and 10.6, select Print & Fax from an Epson authorized reseller. You see your printer: Item Extra High Capacity Ink Cartridge (Black) (B-510DN only) High Capacity Ink Cartridge (Black) (B-510DN only) High Capacity Ink Cartridge (Cyan) (B-510DN only) High Capacity Ink Cartridge (Magenta) (B-510DN...
User's Guide
Page 3
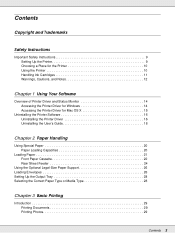
... Instructions 9 Setting Up the Printer 9 Choosing a Place for the Printer 10 Using the Printer 10 Handling Ink Cartridges 11 Warnings, Cautions, and Notes 12 Chapter 1 Using Your Software Overview of Printer Driver and Status Monitor 14 Accessing the Printer Driver for Windows 14 Accessing the Printer Driver for Mac OS X 15 Uninstalling the Printer Software 16 Uninstalling the Printer Driver 16 Uninstalling the User...
... Instructions 9 Setting Up the Printer 9 Choosing a Place for the Printer 10 Using the Printer 10 Handling Ink Cartridges 11 Warnings, Cautions, and Notes 12 Chapter 1 Using Your Software Overview of Printer Driver and Status Monitor 14 Accessing the Printer Driver for Windows 14 Accessing the Printer Driver for Mac OS X 15 Uninstalling the Printer Software 16 Uninstalling the Printer Driver 16 Uninstalling the User...

User's Guide
Page 15
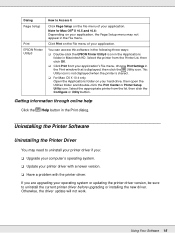
...In the Monitoring Preferences window, select the Select Shortcut Icon check box. To add a shortcut icon to Settings, then click Printers. 2. Using Your Software 15 In the printer driver window, try one of the following procedures: ❏ Right-click the item, then click Help. ❏ Click the button... at the top right of the window, then click the item (for Mac OS X The table below describes how to access the printer driver dialog. Accessing the Printer Driver for Windows XP and 2000 only). Windows XP, Server 2003, and 2000: Select the...
...In the Monitoring Preferences window, select the Select Shortcut Icon check box. To add a shortcut icon to Settings, then click Printers. 2. Using Your Software 15 In the printer driver window, try one of the following procedures: ❏ Right-click the item, then click Help. ❏ Click the button... at the top right of the window, then click the item (for Mac OS X The table below describes how to access the printer driver dialog. Accessing the Printer Driver for Windows XP and 2000 only). Windows XP, Server 2003, and 2000: Select the...
User's Guide
Page 16
... Applications folder in the Print dialog. Note for Mac OS® X 10.5 and 10.6: Depending on your operating system or updating the printer driver version, be sure to uninstall the current printer driver before upgrading or installing the new driver. Using Your Software 16 Dialog Page Setup Print EPSON Printer Utility3 How to Access It Click Page Setup...
... Applications folder in the Print dialog. Note for Mac OS® X 10.5 and 10.6: Depending on your operating system or updating the printer driver version, be sure to uninstall the current printer driver before upgrading or installing the new driver. Using Your Software 16 Dialog Page Setup Print EPSON Printer Utility3 How to Access It Click Page Setup...

User's Guide
Page 17
...7 and Windows Vista and Server 2008: Click the Start button and select Control Panel. Windows 2000: Click Start, point to uninstall the printer driver. Click OK to Settings, and select Control Panel. 3. You cannot uninstall programs if you must log on as a user with administrative ... and 2000: Click Change/Remove. 5. For Mac OS X Note: To uninstall the programs, you log on as a Limited account user. 1. Windows 7 and Windows Vista and Server 2008: Click Uninstall a program from the Programs category, and then select EPSON Printer Software from the list. 4. Select the icon...
...7 and Windows Vista and Server 2008: Click the Start button and select Control Panel. Windows 2000: Click Start, point to uninstall the printer driver. Click OK to Settings, and select Control Panel. 3. You cannot uninstall programs if you must log on as a user with administrative ... and 2000: Click Change/Remove. 5. For Mac OS X Note: To uninstall the programs, you log on as a Limited account user. 1. Windows 7 and Windows Vista and Server 2008: Click Uninstall a program from the Programs category, and then select EPSON Printer Software from the list. 4. Select the icon...

User's Guide
Page 18
...Windows Vista, you need an administrator account and the password if you log on as a user with administrative privileges (belonging to uninstall the printer driver. Click Custom Install. 4. Windows 7 and Windows Vista and Server 2008: Click the Start button and select Control Panel. The CD Installer...a program from the menu in the Epson folder. Windows 2000: Click Start, point to a Computer Administrator account. ❏ To uninstall programs in the Print Center or Printer Setup Utility, select the name from Printer List and click Delete. Note for Mac OS X 10.4: If the name of...
...Windows Vista, you need an administrator account and the password if you log on as a user with administrative privileges (belonging to uninstall the printer driver. Click Custom Install. 4. Windows 7 and Windows Vista and Server 2008: Click the Start button and select Control Panel. The CD Installer...a program from the menu in the Epson folder. Windows 2000: Click Start, point to a Computer Administrator account. ❏ To uninstall programs in the Print Center or Printer Setup Utility, select the name from Printer List and click Delete. Note for Mac OS X 10.4: If the name of...
User's Guide
Page 32
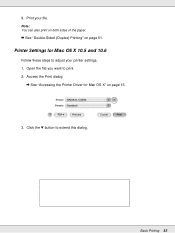
Basic Printing 32 Open the file you want to extend this dialog. Note: You can also print on both sides of the paper. & See "Double-Sided (Duplex) Printing" on page 15. 3. Access the Print dialog. & See "Accessing the Printer Driver for Mac OS X 10.5 and 10.6 Follow these steps to adjust your file. Print your printer settings. 1. Click the d button to print. 2. Printer Settings for Mac OS X" on page 51. 9.
Basic Printing 32 Open the file you want to extend this dialog. Note: You can also print on both sides of the paper. & See "Double-Sided (Duplex) Printing" on page 15. 3. Access the Print dialog. & See "Accessing the Printer Driver for Mac OS X 10.5 and 10.6 Follow these steps to adjust your file. Print your printer settings. 1. Click the d button to print. 2. Printer Settings for Mac OS X" on page 51. 9.
User's Guide
Page 35
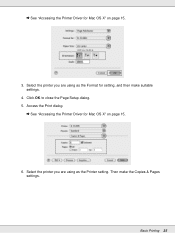
& See "Accessing the Printer Driver for Mac OS X" on page 15. 6. Basic Printing 35 Select the printer you are using as the Printer setting. Click OK to close the Page Setup dialog. 5. Then make suitable settings. 4. Access the Print dialog. & See "Accessing the Printer Driver for setting, and then make the Copies & Pages settings. Select the printer you are using as the Format for Mac OS X" on page 15. 3.
& See "Accessing the Printer Driver for Mac OS X" on page 15. 6. Basic Printing 35 Select the printer you are using as the Printer setting. Click OK to close the Page Setup dialog. 5. Then make suitable settings. 4. Access the Print dialog. & See "Accessing the Printer Driver for setting, and then make the Copies & Pages settings. Select the printer you are using as the Format for Mac OS X" on page 15. 3.

User's Guide
Page 38
...test copy and examine the results before printing an entire job. Select Portrait (tall) or Landscape (wide) to adjust your printout. 7. Printer Settings for Mac OS X" on page 28. 5. Basic Printing 38 Select the appropriate Size setting. Click OK to extend this dialog. Click the d button... to close the printer settings window. You can also define a custom paper size. For details, see the online help. 6. 3. Select the paper source as the Source setting. 4. Access the Print dialog. & See "Accessing the Printer Driver for Mac OS X 10.5 and 10.6 Follow these...
...test copy and examine the results before printing an entire job. Select Portrait (tall) or Landscape (wide) to adjust your printout. 7. Printer Settings for Mac OS X" on page 28. 5. Basic Printing 38 Select the appropriate Size setting. Click OK to extend this dialog. Click the d button... to close the printer settings window. You can also define a custom paper size. For details, see the online help. 6. 3. Select the paper source as the Source setting. 4. Access the Print dialog. & See "Accessing the Printer Driver for Mac OS X 10.5 and 10.6 Follow these...
User's Guide
Page 41
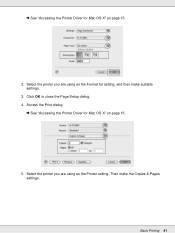
& See "Accessing the Printer Driver for Mac OS X" on page 15. 2. Select the printer you are using as the Format for setting, and then make the Copies & Pages settings. Access the Print dialog. & See "Accessing the Printer Driver for Mac OS X" on page 15. 5. Basic Printing 41 Then make suitable settings. 3. Click OK to close the Page Setup dialog. 4. Select the printer you are using as the Printer setting.
& See "Accessing the Printer Driver for Mac OS X" on page 15. 2. Select the printer you are using as the Format for setting, and then make the Copies & Pages settings. Access the Print dialog. & See "Accessing the Printer Driver for Mac OS X" on page 15. 5. Basic Printing 41 Then make suitable settings. 3. Click OK to close the Page Setup dialog. 4. Select the printer you are using as the Printer setting.

User's Guide
Page 44
... X" on page 15. 2. For details, see the online help . Access the Print dialog. & See "Accessing the Printer Driver for Mac OS X 10.5 and 10.6 Follow these steps to adjust your envelope. 5. For details, see the online help . 6. You can also define a custom size. Basic ...size. Select Landscape as the Paper Size setting. Select the appropriate envelope size from the available Size settings. Click the d button to close the printer settings window. 8. Select the printer you are using as the Printer setting, and then select a suitable envelope size as the Orientation setting. 7.
... X" on page 15. 2. For details, see the online help . Access the Print dialog. & See "Accessing the Printer Driver for Mac OS X 10.5 and 10.6 Follow these steps to adjust your envelope. 5. For details, see the online help . 6. You can also define a custom size. Basic ...size. Select Landscape as the Paper Size setting. Select the appropriate envelope size from the available Size settings. Click the d button to close the printer settings window. 8. Select the printer you are using as the Printer setting, and then select a suitable envelope size as the Orientation setting. 7.
User's Guide
Page 47
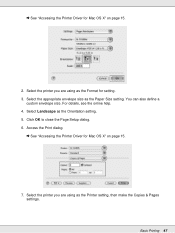
... the online help. 4. Access the Print dialog. & See "Accessing the Printer Driver for Mac OS X" on page 15. 7. Click OK to close the Page Setup dialog. 6. Select the printer you are using as the Printer setting, then make the Copies & Pages settings. Basic Printing 47 Select Landscape... as the Paper Size setting. & See "Accessing the Printer Driver for Mac OS X" on page 15. 2. Select the appropriate ...
... the online help. 4. Access the Print dialog. & See "Accessing the Printer Driver for Mac OS X" on page 15. 7. Click OK to close the Page Setup dialog. 6. Select the printer you are using as the Printer setting, then make the Copies & Pages settings. Basic Printing 47 Select Landscape... as the Paper Size setting. & See "Accessing the Printer Driver for Mac OS X" on page 15. 2. Select the appropriate ...

User's Guide
Page 62
1. Printing with Special Layout Options 62 Access the EPSON Printer Utility3 dialog. & See "Accessing the Printer Driver for Mac OS X" on page 15. 2. Click the Printer and Option Information button.
1. Printing with Special Layout Options 62 Access the EPSON Printer Utility3 dialog. & See "Accessing the Printer Driver for Mac OS X" on page 15. 2. Click the Printer and Option Information button.

User's Guide
Page 63
Make sure that Duplexer Installed is displayed in the Auto Duplex Printing Information section, and then click OK. 4. Close the EPSON Printer Utility3 dialog. 5. Printing with Special Layout Options 63 Click the d button to extend this dialog. 3. Access the Print dialog. & See "Accessing the Printer Driver for Mac OS X" on page 15. 6.
Make sure that Duplexer Installed is displayed in the Auto Duplex Printing Information section, and then click OK. 4. Close the EPSON Printer Utility3 dialog. 5. Printing with Special Layout Options 63 Click the d button to extend this dialog. 3. Access the Print dialog. & See "Accessing the Printer Driver for Mac OS X" on page 15. 6.

User's Guide
Page 67
... setting. 8. Printing with Special Layout Options 67 Select A4, Letter, or B5 as the Format for setting. 7. Close the EPSON Printer Utility3 dialog. 5. Access the Page Setup dialog. & See "Accessing the Printer Driver for Mac OS X 10.4 Automatic Double-sided Printing (Using the Duplex Unit) Follow the steps below to close the Page Setup dialog...
... setting. 8. Printing with Special Layout Options 67 Select A4, Letter, or B5 as the Format for setting. 7. Close the EPSON Printer Utility3 dialog. 5. Access the Page Setup dialog. & See "Accessing the Printer Driver for Mac OS X 10.4 Automatic Double-sided Printing (Using the Duplex Unit) Follow the steps below to close the Page Setup dialog...

User's Guide
Page 68
9. Select Print Settings from the pop-up menu. 11. Printing with Special Layout Options 68 Access the Print dialog. & See "Accessing the Printer Driver for details of Print Settings. See online help for Mac OS X" on page 15. 10. Make the settings that you want to use to print. Select Plain Paper / Bright White Paper as the Media Type setting. 12.
9. Select Print Settings from the pop-up menu. 11. Printing with Special Layout Options 68 Access the Print dialog. & See "Accessing the Printer Driver for details of Print Settings. See online help for Mac OS X" on page 15. 10. Make the settings that you want to use to print. Select Plain Paper / Bright White Paper as the Media Type setting. 12.

User's Guide
Page 76
Select the printer you may not be able to extend this dialog. Note: Depending on page 15. 2. Printing with Special Layout Options 76 & See "Accessing the Printer Driver for Mac OS X" on your application, and then make suitable settings. Click the d button to select some of your application, you are using as the Printer setting, and then make suitable settings. If so, click Page Setup on the File menu of the items in this dialog. 3.
Select the printer you may not be able to extend this dialog. Note: Depending on page 15. 2. Printing with Special Layout Options 76 & See "Accessing the Printer Driver for Mac OS X" on your application, and then make suitable settings. Click the d button to select some of your application, you are using as the Printer setting, and then make suitable settings. If so, click Page Setup on the File menu of the items in this dialog. 3.

User's Guide
Page 79
& See "Accessing the Printer Driver for Mac OS X" on page 15. 2. Select the printer you are using as the Printer setting, then make suitable settings. 3. Select the printer you are using as the Format for setting and then make the Copies & Pages settings. Printing with Special Layout Options 79 Click OK to close the Page Setup dialog. 4. Access the Print dialog. & See "Accessing the Printer Driver for Mac OS X" on page 15. 5.
& See "Accessing the Printer Driver for Mac OS X" on page 15. 2. Select the printer you are using as the Printer setting, then make suitable settings. 3. Select the printer you are using as the Format for setting and then make the Copies & Pages settings. Printing with Special Layout Options 79 Click OK to close the Page Setup dialog. 4. Access the Print dialog. & See "Accessing the Printer Driver for Mac OS X" on page 15. 5.

User's Guide
Page 84
Printing with Special Layout Options 84 Click the d button to select some of your application, you are using as the Printer setting, and then make suitable settings. Printer Settings for Mac OS X" on page 15. 2. Note: Depending on the File menu of the items in this dialog. 3. Access the Print dialog. & See "Accessing the Printer Driver for Mac OS X 10.5 and 10.6 1. Select the printer you may not be able to extend this dialog. If so, click Page Setup on your application, and then make suitable settings.
Printing with Special Layout Options 84 Click the d button to select some of your application, you are using as the Printer setting, and then make suitable settings. Printer Settings for Mac OS X" on page 15. 2. Note: Depending on the File menu of the items in this dialog. 3. Access the Print dialog. & See "Accessing the Printer Driver for Mac OS X 10.5 and 10.6 1. Select the printer you may not be able to extend this dialog. If so, click Page Setup on your application, and then make suitable settings.


