Network Guide
Page 5
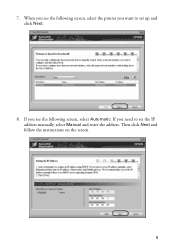
7. If you need to set the IP address manually, select Manual and enter the address. When you see the following screen, select the printer you see the following screen, select Automatic. If you want to set up and click Next. 8. Then click Next and follow the instructions on the screen. 5
7. If you need to set the IP address manually, select Manual and enter the address. When you see the following screen, select the printer you see the following screen, select Automatic. If you want to set up and click Next. 8. Then click Next and follow the instructions on the screen. 5
Start Here
Page 4
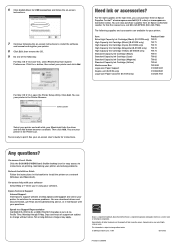
... to install the software and manual and register your printer. 8 Click Exit, then remove the CD. 9 Do one , call 800-GO-EPSON (800-463-7766). Click the + button, then select your software. Need ink or accessories? For the right supplies at www.epson.com/ink3 (U.S. You can purchase them at Epson Supplies CentralSM at the right...
... to install the software and manual and register your printer. 8 Click Exit, then remove the CD. 9 Do one , call 800-GO-EPSON (800-463-7766). Click the + button, then select your software. Need ink or accessories? For the right supplies at www.epson.com/ink3 (U.S. You can purchase them at Epson Supplies CentralSM at the right...

User's Guide
Page 19
.... 6. Follow the on to uninstall the User's Guide. Double-click the Mac OS X icon in the upper left and click Uninstall. 6. Select this printer's Manual from the menu in the Epson folder. For Mac OS X Note: To uninstall the programs, you log on as a Limited account user. 1. Quit all running applications. 2. The CD... Your Software 19 You cannot uninstall programs if you must log on -screen instructions to a Computer Administrator account. Select User's Guide. 5. Click OK. Insert the Epson printer software CD-ROM into your Macintosh. 3. Click Custom Install. 4. 4.
.... 6. Follow the on to uninstall the User's Guide. Double-click the Mac OS X icon in the upper left and click Uninstall. 6. Select this printer's Manual from the menu in the Epson folder. For Mac OS X Note: To uninstall the programs, you log on as a Limited account user. 1. Quit all running applications. 2. The CD... Your Software 19 You cannot uninstall programs if you must log on -screen instructions to a Computer Administrator account. Select User's Guide. 5. Click OK. Insert the Epson printer software CD-ROM into your Macintosh. 3. Click Custom Install. 4. 4.
User's Guide
Page 21
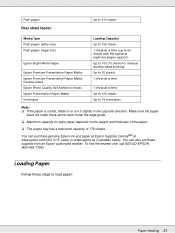
You can purchase genuine Epson ink and paper at Epson Supplies CentralSM at a time Up to 100 sheets Up to load paper: Paper Handling 21 Make sure the paper stack fits under the c arrow mark inside the edge guide. ❏ Maximum capacity for manual double-sided printing) Up to 20 sheets 1 sheet at a ...time 1 sheet at www.epson.com/ink3 (U.S. To find the nearest one, call 800-GO-EPSON (800-463-7766). Plain paper Rear sheet feeder: Up to 510 sheets ...
You can purchase genuine Epson ink and paper at Epson Supplies CentralSM at a time Up to 100 sheets Up to load paper: Paper Handling 21 Make sure the paper stack fits under the c arrow mark inside the edge guide. ❏ Maximum capacity for manual double-sided printing) Up to 20 sheets 1 sheet at a ...time 1 sheet at www.epson.com/ink3 (U.S. To find the nearest one, call 800-GO-EPSON (800-463-7766). Plain paper Rear sheet feeder: Up to 510 sheets ...
User's Guide
Page 58
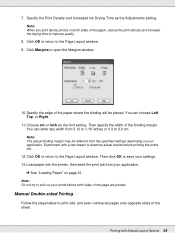
...time to save your application. Click OK to return to print odd- Then click OK to improve quality. 8. Manual Double-sided Printing Follow the steps below to the Page Layout window. Note: When you print dense photos on ...from your application. & See "Loading Paper" on your settings. 13. Experiment with Special Layout Options 58 Load paper into the printer, then send the print job from 0.12 to 1.18 inches or 0.3 to examine actual results before both sides of the .... 9. Specify the edge of the sheet. Specify the Print Density and Increased Ink Drying Time as the Unit setting.
...time to save your application. Click OK to return to print odd- Then click OK to improve quality. 8. Manual Double-sided Printing Follow the steps below to the Page Layout window. Note: When you print dense photos on ...from your application. & See "Loading Paper" on your settings. 13. Experiment with Special Layout Options 58 Load paper into the printer, then send the print job from 0.12 to 1.18 inches or 0.3 to examine actual results before both sides of the .... 9. Specify the edge of the sheet. Specify the Print Density and Increased Ink Drying Time as the Unit setting.

User's Guide
Page 60
Printing with Special Layout Options 60 Select Portrait (tall) or Landscape (wide) to open the Margins window. Click Margins to change the orientation of your printout. 7. Select the appropriate Size setting. 6. Select Manual under 2-sided printing to use manual double-sided printing function. 9. Click the Page Layout tab. 8. 5.
Printing with Special Layout Options 60 Select Portrait (tall) or Landscape (wide) to open the Margins window. Click Margins to change the orientation of your printout. 7. Select the appropriate Size setting. 6. Select Manual under 2-sided printing to use manual double-sided printing function. 9. Click the Page Layout tab. 8. 5.
User's Guide
Page 69
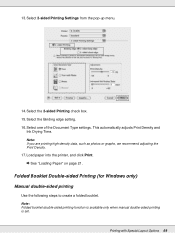
...following steps to create a folded booklet. Note: Folded booklet double-sided printing function is available only when manual double-sided printing is set. This automatically adjusts Print Density and Ink Drying Time. Note: If you are printing high-density data, such as photos or graphs, we ...recommend adjusting the Print Density. 17. Printing with Special Layout Options 69 13. Load paper into the printer, and click Print. & See "Loading...
...following steps to create a folded booklet. Note: Folded booklet double-sided printing function is available only when manual double-sided printing is set. This automatically adjusts Print Density and Ink Drying Time. Note: If you are printing high-density data, such as photos or graphs, we ...recommend adjusting the Print Density. 17. Printing with Special Layout Options 69 13. Load paper into the printer, and click Print. & See "Loading...

User's Guide
Page 71
Printing with Special Layout Options 71 Select the appropriate Size setting. 6. Then select the Folded Booklet check box. 8. 5. Click the Page Layout tab and select Manual under 2-sided Printing. Select Portrait (tall) or Landscape (wide) to open the Margins window. Click Margins to change the orientation of your printout. 7.
Printing with Special Layout Options 71 Select the appropriate Size setting. 6. Then select the Folded Booklet check box. 8. 5. Click the Page Layout tab and select Manual under 2-sided Printing. Select Portrait (tall) or Landscape (wide) to open the Margins window. Click Margins to change the orientation of your printout. 7.

User's Guide
Page 73
... Once the paper is complete, fold the sheets and bind them together using a stapler or other binding method. Printer Settings for example, a letter size document on page 148. 14. You can use the Fit to Page printing function when ...you select. Access the printer settings. ❏ Follow the instructions provided when reloading the printouts. Fit to print, for Windows 1. Once printing is...Printing with Special Layout Options 73 Fit to Page printing automatically resizes your page manually.
... Once the paper is complete, fold the sheets and bind them together using a stapler or other binding method. Printer Settings for example, a letter size document on page 148. 14. You can use the Fit to Page printing function when ...you select. Access the printer settings. ❏ Follow the instructions provided when reloading the printouts. Fit to print, for Windows 1. Once printing is...Printing with Special Layout Options 73 Fit to Page printing automatically resizes your page manually.
User's Guide
Page 140
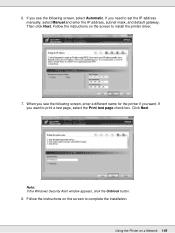
...If you need to print a test page, select the Print test page check box. When you see the following screen, enter a different name for the printer if you see the following screen, select Automatic. Follow the instructions on a Network 140 Note: If the Windows Security Alert window appears, click the Unblock... button. 8. Then click Next. If you want to set the IP address manually, select Manual and enter the IP address, subnet mask, and default gateway. Follow the instructions on the screen to install the...
...If you need to print a test page, select the Print test page check box. When you see the following screen, enter a different name for the printer if you see the following screen, select Automatic. Follow the instructions on a Network 140 Note: If the Windows Security Alert window appears, click the Unblock... button. 8. Then click Next. If you want to set the IP address manually, select Manual and enter the IP address, subnet mask, and default gateway. Follow the instructions on the screen to install the...

User's Guide
Page 186
... manual, the following abbreviations are used. Windows refers to Windows 7, Windows Vista, XP, Server 2003, Server 2008, and 2000. ❏ Windows 7 refers to Windows 7 Home Premium Edition, Windows 7 Professional Edition, and Windows 7 Ultimate Edition. ❏ Windows Vista refers to Windows Vista Home Basic Edition, Windows Vista Home Premium Edition, Windows Vista Business...
... manual, the following abbreviations are used. Windows refers to Windows 7, Windows Vista, XP, Server 2003, Server 2008, and 2000. ❏ Windows 7 refers to Windows 7 Home Premium Edition, Windows 7 Professional Edition, and Windows 7 Ultimate Edition. ❏ Windows Vista refers to Windows Vista Home Basic Edition, Windows Vista Home Premium Edition, Windows Vista Business...


