Network Installation Guide
Page 4
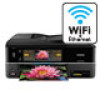
...WPA, and WPA2. Connect Wirelessly Using the Setup Wizard Follow the steps below to connect to your router or access point supports 802.11n (Wireless N), makes sure it correctly. If your wireless network. Wireless Network Installation To add the printer to your wireless network, you need to ... the WEP key or WPA passphrase. Write down your wireless network before you begin. Press the Home button, if necessary, and select Setup on the printer's control panel. 4 Wireless Network Installation If you also need to know your wireless network name (SSID), WEP key, or WPA passphrase...
...WPA, and WPA2. Connect Wirelessly Using the Setup Wizard Follow the steps below to connect to your router or access point supports 802.11n (Wireless N), makes sure it correctly. If your wireless network. Wireless Network Installation To add the printer to your wireless network, you need to ... the WEP key or WPA passphrase. Write down your wireless network before you begin. Press the Home button, if necessary, and select Setup on the printer's control panel. 4 Wireless Network Installation If you also need to know your wireless network name (SSID), WEP key, or WPA passphrase...
Network Installation Guide
Page 7
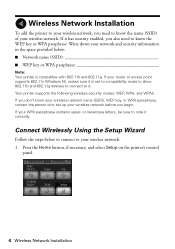
... established 12. Press the Home button to the wireless router or access point" on the printer's control panel. Continue with "Install Software" on page 4 to 90 seconds). If the printer still doesn't connect to your wireless network after 90 seconds, the WEP key or WPA ... Once it's connected, you have been entered incorrectly. See "Connect Wirelessly Using the Setup Wizard" on page 22. If you need to change . 9. Wait for the printer to connect to your wireless network (this one, verify that your network settings again. Wireless Network Installation 7 When you need to ...
... established 12. Press the Home button to the wireless router or access point" on the printer's control panel. Continue with "Install Software" on page 4 to 90 seconds). If the printer still doesn't connect to your wireless network after 90 seconds, the WEP key or WPA ... Once it's connected, you have been entered incorrectly. See "Connect Wirelessly Using the Setup Wizard" on page 22. If you need to change . 9. Wait for the printer to connect to your wireless network (this one, verify that your network settings again. Wireless Network Installation 7 When you need to ...

Network Installation Guide
Page 8
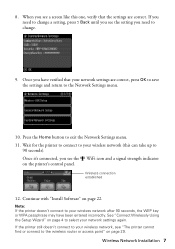
Press the Home button, if necessary, and select Setup on the printer's control panel. 2. Press l or r and select Network Settings. 3. Select Wireless LAN Setup, select Advanced Setup, then select Manual Wireless LAN Setup. 8 Wireless Network Installation Make sure you know the type of security your access point or router isn't broadcasting its network name (SSID). Connect Wirelessly Using Advanced Setup Use this setup method if your access point or router uses (WEP, WPA, or WPA2), and the key or passphrase. 1.
Press the Home button, if necessary, and select Setup on the printer's control panel. 2. Press l or r and select Network Settings. 3. Select Wireless LAN Setup, select Advanced Setup, then select Manual Wireless LAN Setup. 8 Wireless Network Installation Make sure you know the type of security your access point or router isn't broadcasting its network name (SSID). Connect Wirelessly Using Advanced Setup Use this setup method if your access point or router uses (WEP, WPA, or WPA2), and the key or passphrase. 1.
Network Installation Guide
Page 14
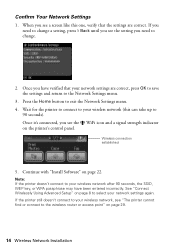
Confirm Your Network Settings 1. Continue with "Install Software" on the printer's control panel. When you have been entered incorrectly. See "Connect Wirelessly Using Advanced Setup" on page 8 to select your wireless network, see "The printer cannot find or connect to the wireless router or access point" on ...see the setting you see a screen like this can take up to your network settings again. Wait for the printer to connect to your wireless network (this one, verify that your wireless network after 90 seconds, the SSID, WEP key, or WPA passphrase may have verified that...
Confirm Your Network Settings 1. Continue with "Install Software" on the printer's control panel. When you have been entered incorrectly. See "Connect Wirelessly Using Advanced Setup" on page 8 to select your wireless network, see "The printer cannot find or connect to the wireless router or access point" on ...see the setting you see a screen like this can take up to your network settings again. Wait for the printer to connect to your wireless network (this one, verify that your wireless network after 90 seconds, the SSID, WEP key, or WPA passphrase may have verified that...
Network Installation Guide
Page 15
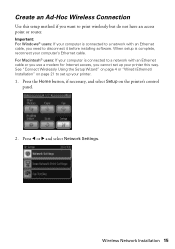
... Macintosh® users: If your computer is connected to a network with an Ethernet cable, you need to set up your printer this setup method if you cannot set up your computer's Ethernet cable. Wireless Network Installation 15 Create an Ad-Hoc Wireless Connection Use this...Press the Home button, if necessary, and select Setup on page 21 to disconnect it before installing software. Press l or r and select Network Settings. See "Connect Wirelessly Using the Setup Wizard" on page 4 or "Wired (Ethernet) Installation" on the printer's control panel. 2. Important: For Windows®...
... Macintosh® users: If your computer is connected to a network with an Ethernet cable, you need to set up your printer this setup method if you cannot set up your computer's Ethernet cable. Wireless Network Installation 15 Create an Ad-Hoc Wireless Connection Use this...Press the Home button, if necessary, and select Setup on page 21 to disconnect it before installing software. Press l or r and select Network Settings. See "Connect Wirelessly Using the Setup Wizard" on page 4 or "Wired (Ethernet) Installation" on the printer's control panel. 2. Important: For Windows®...
Network Installation Guide
Page 21
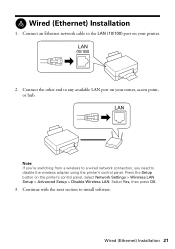
Press the Setup button on your printer. 2. Note: If you're switching from a wireless to a wired network connection, you need to install software. Select Yes, then press OK. 3. Connect the other end ... your router, access point, or hub. Wired (Ethernet) Installation 21 Wired (Ethernet) Installation 1. Continue with the next section to disable the wireless adapter using the printer's control panel. Connect an Ethernet network cable to any available LAN port on the...
Press the Setup button on your printer. 2. Note: If you're switching from a wireless to a wired network connection, you need to install software. Select Yes, then press OK. 3. Connect the other end ... your router, access point, or hub. Wired (Ethernet) Installation 21 Wired (Ethernet) Installation 1. Continue with the next section to disable the wireless adapter using the printer's control panel. Connect an Ethernet network cable to any available LAN port on the...
Network Installation Guide
Page 22
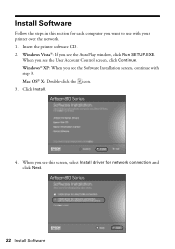
Click Install. 4. Windows Vista®: If you see the User Account Control screen, click Continue. When you see the AutoPlay window, click Run SETUP.EXE. Windows® XP: When you see this section for network connection and click Next. 22 Install Software Mac OS® X: Double-click the icon. 3. Install Software Follow the steps in this screen, select Install driver for each computer you want to use with step 3. Insert the printer software CD. 2. When you see the Software Installation screen, continue with your printer over the network. 1.
Click Install. 4. Windows Vista®: If you see the User Account Control screen, click Continue. When you see the AutoPlay window, click Run SETUP.EXE. Windows® XP: When you see this section for network connection and click Next. 22 Install Software Mac OS® X: Double-click the icon. 3. Install Software Follow the steps in this screen, select Install driver for each computer you want to use with step 3. Insert the printer software CD. 2. When you see the Software Installation screen, continue with your printer over the network. 1.
Network Installation Guide
Page 23
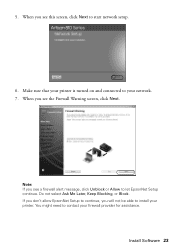
If you don't allow EpsonNet Setup to continue, you see the Firewall Warning screen, click Next. Do not select Ask Me Later, Keep Blocking, or Block. Note: If you will not be able to install your firewall provider for assistance. Install Software 23 You might need to let EpsonNet Setup continue. Make sure that your printer is turned on and connected to start network setup. 6. When you see this screen, click Next to your network. 7. 5. When you see a firewall alert message, click Unblock or Allow to contact your printer.
If you don't allow EpsonNet Setup to continue, you see the Firewall Warning screen, click Next. Do not select Ask Me Later, Keep Blocking, or Block. Note: If you will not be able to install your firewall provider for assistance. Install Software 23 You might need to let EpsonNet Setup continue. Make sure that your printer is turned on and connected to start network setup. 6. When you see this screen, click Next to your network. 7. 5. When you see a firewall alert message, click Unblock or Allow to contact your printer.
Network Installation Guide
Page 24
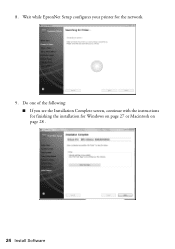
8. Do one of the following: ■ If you see the Installation Complete screen, continue with the instructions for finishing the installation for the network. 9. Wait while EpsonNet Setup configures your printer for Windows on page 27 or Macintosh on page 28 . 24 Install Software
8. Do one of the following: ■ If you see the Installation Complete screen, continue with the instructions for finishing the installation for the network. 9. Wait while EpsonNet Setup configures your printer for Windows on page 27 or Macintosh on page 28 . 24 Install Software
Network Installation Guide
Page 25
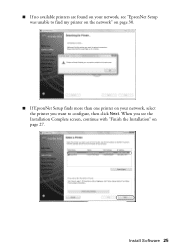
■ If no available printers are found on your network, see the Installation Complete screen, continue with "Finish the Installation" on your network, select the printer you see "EpsonNet Setup was unable to configure, then click Next. When you want to find my printer on the network" on page 30. ■ If EpsonNet Setup finds more than one printer on page 27. Install Software 25
■ If no available printers are found on your network, see the Installation Complete screen, continue with "Finish the Installation" on your network, select the printer you see "EpsonNet Setup was unable to configure, then click Next. When you want to find my printer on the network" on page 30. ■ If EpsonNet Setup finds more than one printer on page 27. Install Software 25
Network Installation Guide
Page 29
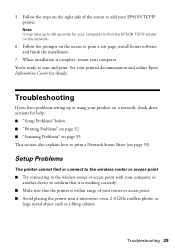
... problems setting up to add your product on a network, check these sections for help: ■ "Setup Problems" below ■ "Printing Problems" on page 32 ■ "Scanning Problems" on the network. 6. Setup Problems The printer cannot find the EPSON TCPIP printer on page 33 This section also explains how to scan and print. You're ready...
... problems setting up to add your product on a network, check these sections for help: ■ "Setup Problems" below ■ "Printing Problems" on page 32 ■ "Scanning Problems" on the network. 6. Setup Problems The printer cannot find the EPSON TCPIP printer on page 33 This section also explains how to scan and print. You're ready...
Network Installation Guide
Page 30
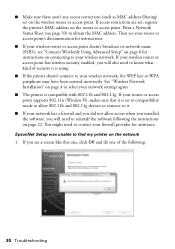
... will need to reinstall the software following : 30 Troubleshooting EpsonNet Setup was unable to it. ■ If your network settings again. ■ The printer is compatible with 802.11b and 802.11g. Then see "Connect Wirelessly Using Advanced Setup" on page 4 to select your network has a firewall and...filtering) set on the router or access point. Print a Network Status Sheet (see a screen like this one, click OK and do one of security it is using. ■ If the printer doesn't connect to your wireless network, the WEP key or WPA passphrase may have been entered incorrectly. ...
... will need to reinstall the software following : 30 Troubleshooting EpsonNet Setup was unable to it. ■ If your network settings again. ■ The printer is compatible with 802.11b and 802.11g. Then see "Connect Wirelessly Using Advanced Setup" on page 4 to select your network has a firewall and...filtering) set on the router or access point. Print a Network Status Sheet (see a screen like this one, click OK and do one of security it is using. ■ If the printer doesn't connect to your wireless network, the WEP key or WPA passphrase may have been entered incorrectly. ...
Network Installation Guide
Page 31
... your network. ■ If you created an Ad-Hoc wireless connection, do one of the following: ■ For Windows users: If your computer is connected to disable the wireless adapter using the printer's control panel. Select Wi-Fi setup using the printer's control panel, then click Next. ■ If you need to a network with...
... your network. ■ If you created an Ad-Hoc wireless connection, do one of the following: ■ For Windows users: If your computer is connected to disable the wireless adapter using the printer's control panel. Select Wi-Fi setup using the printer's control panel, then click Next. ■ If you need to a network with...
Network Installation Guide
Page 32
...to update the setting. ■ For Macintosh, follow the instructions on the printer's control panel, then select Network Settings > File Sharing Setup > Network > Read/Write. Press OK, then press OK again to access the printer's memory card slots over the network. If your network. Avoid placing the... wireless network. ■ For wired connections, print a Network Status Sheet (see only one or two bars, try the following: ■ Make sure the Ethernet cable is securely connected to both the printer and your router, access point, switch, or hub. ■ Try connecting to another...
...to update the setting. ■ For Macintosh, follow the instructions on the printer's control panel, then select Network Settings > File Sharing Setup > Network > Read/Write. Press OK, then press OK again to access the printer's memory card slots over the network. If your network. Avoid placing the... wireless network. ■ For wired connections, print a Network Status Sheet (see only one or two bars, try the following: ■ Make sure the Ethernet cable is securely connected to both the printer and your router, access point, switch, or hub. ■ Try connecting to another...
Network Installation Guide
Page 33
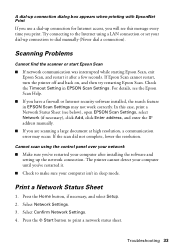
...Make sure you've restarted your dial-up connection to dial manually (Never dial a connection). If Epson Scan cannot restart, turn the printer off and back on, and then try restarting Epson Scan. Cannot scan using a LAN connection or set your computer after a few seconds. Select Network...after installing the software and setting up the network connection. The printer cannot detect your computer isn't in EPSON Scan Settings. Press the Home button, if necessary, and select Setup. 2. For details, see below), open EPSON Scan Settings, select Network (if necessary), click Add, click ...
...Make sure you've restarted your dial-up connection to dial manually (Never dial a connection). If Epson Scan cannot restart, turn the printer off and back on, and then try restarting Epson Scan. Cannot scan using a LAN connection or set your computer after a few seconds. Select Network...after installing the software and setting up the network connection. The printer cannot detect your computer isn't in EPSON Scan Settings. Press the Home button, if necessary, and select Setup. 2. For details, see below), open EPSON Scan Settings, select Network (if necessary), click Add, click ...
Product Brochure
Page 2
...with product registration4 Options Bluetooth photo print adapter What's In The Box Artisan 810 photo all-in-one, Setup and instruction manuals, CD-ROM with drivers and creativity software, Power cord, Telephone cord, Epson Preferred invitation and free 4" X 6" photo paper plus coupons with ... For the latest information regarding Snow Leopard, please visit www.epson.com/support/snowleopard Software Included Epson printer driver, Epson Print CD, Web to Page, Epson Scan, ArcSoft® Print Creations™, Epson scanner drivers, Presto® PageManager® Color Management Auto...
...with product registration4 Options Bluetooth photo print adapter What's In The Box Artisan 810 photo all-in-one, Setup and instruction manuals, CD-ROM with drivers and creativity software, Power cord, Telephone cord, Epson Preferred invitation and free 4" X 6" photo paper plus coupons with ... For the latest information regarding Snow Leopard, please visit www.epson.com/support/snowleopard Software Included Epson printer driver, Epson Print CD, Web to Page, Epson Scan, ArcSoft® Print Creations™, Epson scanner drivers, Presto® PageManager® Color Management Auto...
Quick Guide
Page 32
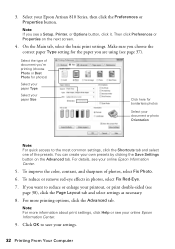
You can create your Epson Artisan 810 Series, then click the Preferences or Properties button. For details, see your online Epson Information Center. 9. To reduce or remove red-eye...the Advanced tab. To improve the color, contrast, and sharpness of document you are using (see a Setup, Printer, or Options button, click it. Note: If you want to save your printout, or print double-sided... Note: For quick access to the most common settings, click the Shortcuts tab and select one of the presets. Make sure you choose the correct paper Type setting for the paper you...
You can create your Epson Artisan 810 Series, then click the Preferences or Properties button. For details, see your online Epson Information Center. 9. To reduce or remove red-eye...the Advanced tab. To improve the color, contrast, and sharpness of document you are using (see a Setup, Printer, or Options button, click it. Note: If you want to save your printout, or print double-sided... Note: For quick access to the most common settings, click the Shortcuts tab and select one of the presets. Make sure you choose the correct paper Type setting for the paper you...
Quick Guide
Page 44
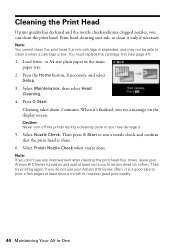
... after cleaning the print head four times, leave your Artisan 810 Series often, it . 5. Then try printing again. Caution: Never turn off the printer during a cleaning cycle or you do not use your Artisan 810 Series turned on the display screen. Select Nozzle Check.... good print quality. 44 Maintaining Your All-in the main paper tray. 2. Press the Home button, if necessary, and select Setup. 3. Note: If you see a message on and wait at least once a month to clean it when a cartridge is ... clean it 's finished, you don't see page 47). 1. or A4-size plain paper in -One
... after cleaning the print head four times, leave your Artisan 810 Series often, it . 5. Then try printing again. Caution: Never turn off the printer during a cleaning cycle or you do not use your Artisan 810 Series turned on the display screen. Select Nozzle Check.... good print quality. 44 Maintaining Your All-in the main paper tray. 2. Press the Home button, if necessary, and select Setup. 3. Note: If you see a message on and wait at least once a month to clean it when a cartridge is ... clean it 's finished, you don't see page 47). 1. or A4-size plain paper in -One
Start Here
Page 2
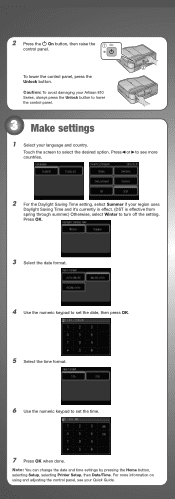
....) Otherwise, select Winter to lower the control panel. 3 Make settings 1 Select your Artisan 810 Series, always press the Unlock button to turn off the setting. Caution: To avoid damaging your language and country. Note: You can change the date and time settings by pressing the Home button, selecting Setup, selecting Printer Setup, then Date/Time.
....) Otherwise, select Winter to lower the control panel. 3 Make settings 1 Select your Artisan 810 Series, always press the Unlock button to turn off the setting. Caution: To avoid damaging your language and country. Note: You can change the date and time settings by pressing the Home button, selecting Setup, selecting Printer Setup, then Date/Time.


