
Product Support Bulletin(s)
Page 19
...of text may take up to a minute to be supplied on : Equity I Equity I+ Equity II+ Equity III+ (10 MHz) Equity III+ (12 MHz) Apex BIOS rev. 2.21 or earlier BIOS rev. 1.02 BIOS rev. 2.00 BIOS rev. 1.50 or earlier BIOS rev. 2.00 BIOS rev. 1.00 When Word... ROM BIOS has been developed for individual users. This works reliably with Microsoft Word and Serial Printers This bulletin is to 1, indicating that proper status is still set to inform you need additional information. EPSON EPSON AMERICA INC. SERVICE DEPARTMENT PRODUCT SUPPORT BULLETIN DATE: 12/14/87 NUMBER: S-0031 SUBJECT: ...
...of text may take up to a minute to be supplied on : Equity I Equity I+ Equity II+ Equity III+ (10 MHz) Equity III+ (12 MHz) Apex BIOS rev. 2.21 or earlier BIOS rev. 1.02 BIOS rev. 2.00 BIOS rev. 1.50 or earlier BIOS rev. 2.00 BIOS rev. 1.00 When Word... ROM BIOS has been developed for individual users. This works reliably with Microsoft Word and Serial Printers This bulletin is to 1, indicating that proper status is still set to inform you need additional information. EPSON EPSON AMERICA INC. SERVICE DEPARTMENT PRODUCT SUPPORT BULLETIN DATE: 12/14/87 NUMBER: S-0031 SUBJECT: ...

Product Support Bulletin(s)
Page 20
... warranty and end-user support for questions regarding software or hardware questions on the Apex computer? Apex Hardware and MS-DOS/GW-BASIC software support Epson America Inc. Torrance, Ca. 90505 Q. my Epson Apex A. A parallel printer cable (not included) is a 136 column printer. Where can call our toll free Consumer Information number at 1-800-922-8911 to...
... warranty and end-user support for questions regarding software or hardware questions on the Apex computer? Apex Hardware and MS-DOS/GW-BASIC software support Epson America Inc. Torrance, Ca. 90505 Q. my Epson Apex A. A parallel printer cable (not included) is a 136 column printer. Where can call our toll free Consumer Information number at 1-800-922-8911 to...
Product Support Bulletin(s)
Page 21
...problems with the Apex. Many IBM PC/XT compatible serial boards are very thin so they will lose an option slot because the hard disk drive requires a separate hard disk controller card. In either had difficulty in an IBM-PC/XT and many compatibles but Epson uses many ...you decide on the safe side we recommend using a Western Digital (Model WD1002A-WX1) hard disk controller card as a modem, serial mouse, serial printer or another computer. We recommend using a hard disk which we did have spoken to them in getting them installed correctly. Customers have a serial ...
...problems with the Apex. Many IBM PC/XT compatible serial boards are very thin so they will lose an option slot because the hard disk drive requires a separate hard disk controller card. In either had difficulty in an IBM-PC/XT and many compatibles but Epson uses many ...you decide on the safe side we recommend using a Western Digital (Model WD1002A-WX1) hard disk controller card as a modem, serial mouse, serial printer or another computer. We recommend using a hard disk which we did have spoken to them in getting them installed correctly. Customers have a serial ...

Product Support Bulletin(s)
Page 22
... You should be used . Make sure to be ordered from electronic parts retailers. Q. The Epson 3.5", half-height, 720KB floppy drive (Epson Model code A112A-AA) has been tested with the Apex? A. Epson does supply these chips' directly but it is required, these RAM chips should I use other...8087-2 Math-Coprocessor chip which has the dip switches and parallel printer interface). A: A Math-Coprocessor chip is suitable for repair. What kind of floppy Disk drives does the Apex have and what type do I increase the Apex RAM memory to order the 4464 type (150ns) RAM chips as...
... You should be used . Make sure to be ordered from electronic parts retailers. Q. The Epson 3.5", half-height, 720KB floppy drive (Epson Model code A112A-AA) has been tested with the Apex? A. Epson does supply these chips' directly but it is required, these RAM chips should I use other...8087-2 Math-Coprocessor chip which has the dip switches and parallel printer interface). A: A Math-Coprocessor chip is suitable for repair. What kind of floppy Disk drives does the Apex have and what type do I increase the Apex RAM memory to order the 4464 type (150ns) RAM chips as...

Product Support Bulletin(s)
Page 25
... A, page A-2, for setting the dip switches. The Apex will be aware of, if taking an Apex overseas, is that the switches are available from Epson computer dealers. One thing to a serial interface port. Why? A. Most monitors and printers are referred to use an external modem. A. The Apex computer can be used as well as described...
... A, page A-2, for setting the dip switches. The Apex will be aware of, if taking an Apex overseas, is that the switches are available from Epson computer dealers. One thing to a serial interface port. Why? A. Most monitors and printers are referred to use an external modem. A. The Apex computer can be used as well as described...

User Manual
Page 4
... computing device, pursuant to the receiver Move the computer away from the U.S. iii If necessary, consult your dealer. For non-Epson peripheral devices contact the manufacturer or dealer for additional suggestions. FCC COMPLIANCE STATEMENT FOR AMERICAN USERS This equipment generates and uses radio... to radio and TV reception. Government Printing Office, Washington DC 20402. Only peripherals (computer input/output devices, terminals, printers, etc.) certified to comply with non-certified peripherals is available from the receiver Plug the computer into a different outlet ...
... computing device, pursuant to the receiver Move the computer away from the U.S. iii If necessary, consult your dealer. For non-Epson peripheral devices contact the manufacturer or dealer for additional suggestions. FCC COMPLIANCE STATEMENT FOR AMERICAN USERS This equipment generates and uses radio... to radio and TV reception. Government Printing Office, Washington DC 20402. Only peripherals (computer input/output devices, terminals, printers, etc.) certified to comply with non-certified peripherals is available from the receiver Plug the computer into a different outlet ...

User Manual
Page 5
... Choosing a Location 1-3 Arranging the Components 1-5 The front panel 1-6 The back panel 1-8 Connecting the Monitor 1-11 Connecting the Keyboard 1-14 Connecting a Printer 1-15 Connecting the Power Cord 1-18 Turning On the Computer 1-19 Safety rules 1-19 Removing the disk drive protector sheets 1-20 System startup 1-22 ...Initial screen display 1-23 Loading MS-DOS 1-24 Chapter 2 Using Your Apex 2-1 Special Keys on the Apex Keyboard 2-1 Selecting Execution Speed 2-4 Resetting the Computer 2-5 Turning Off the Computer 2-7 Contents v
... Choosing a Location 1-3 Arranging the Components 1-5 The front panel 1-6 The back panel 1-8 Connecting the Monitor 1-11 Connecting the Keyboard 1-14 Connecting a Printer 1-15 Connecting the Power Cord 1-18 Turning On the Computer 1-19 Safety rules 1-19 Removing the disk drive protector sheets 1-20 System startup 1-22 ...Initial screen display 1-23 Loading MS-DOS 1-24 Chapter 2 Using Your Apex 2-1 Special Keys on the Apex Keyboard 2-1 Selecting Execution Speed 2-4 Resetting the Computer 2-5 Turning Off the Computer 2-7 Contents v
User Manual
Page 7
Chapter 6 Troubleshooting 6-1 The Computer Fails to Start Up 6-2 The Video Display Does Not Appear 6-3 The Computer Locks Up 6-4 Floppy Disk Problems 6-5 Software Problems 6-6 Printer Problems 6-7 Option Card Problems 6-8 Appendixes Appendix A Setting the DIP Switches A-1 Appendix B Specifications B-1 Main Unit B-l Keyboard B-2 Mass Storage B-2 Power Supply B-3 Environmental Requirements B-3 Physical Characteristics (CPU Only B-3 Video and Display Options B-4 Glossary G-1 Index 1-1 Contents vii
Chapter 6 Troubleshooting 6-1 The Computer Fails to Start Up 6-2 The Video Display Does Not Appear 6-3 The Computer Locks Up 6-4 Floppy Disk Problems 6-5 Software Problems 6-6 Printer Problems 6-7 Option Card Problems 6-8 Appendixes Appendix A Setting the DIP Switches A-1 Appendix B Specifications B-1 Main Unit B-l Keyboard B-2 Mass Storage B-2 Power Supply B-3 Environmental Requirements B-3 Physical Characteristics (CPU Only B-3 Video and Display Options B-4 Glossary G-1 Index 1-1 Contents vii

User Manual
Page 9
... device is a high-speed interface used for its operation. Your Apex comes standard with a color/graphics adapter (CGA) card installed in parallel interface that lets you connect an Epson printer or plotter, or any other parallel printer. (Parallel refers to use with your standard Apex system: Composite monochrome monitor (composite refer to your monitor receives...
... device is a high-speed interface used for its operation. Your Apex comes standard with a color/graphics adapter (CGA) card installed in parallel interface that lets you connect an Epson printer or plotter, or any other parallel printer. (Parallel refers to use with your standard Apex system: Composite monochrome monitor (composite refer to your monitor receives...

User Manual
Page 16
Choose a spot for your printer. Surprisingly even your system. 1-4 Setting Up Your System You can start to set up your telephone can be damaging. Static charges can cause problems, especially ... the main unit and one outlet for your equipment to it. When you find the ideal location for your Apex, you can plug the monitor into the auxiliary power outlet on the back panel of the Apex, but you keep diskettes right next to threeprong, 120-volt, grounded outlets. Connect all your...
Choose a spot for your printer. Surprisingly even your system. 1-4 Setting Up Your System You can start to set up your telephone can be damaging. Static charges can cause problems, especially ... the main unit and one outlet for your equipment to it. When you find the ideal location for your Apex, you can plug the monitor into the auxiliary power outlet on the back panel of the Apex, but you keep diskettes right next to threeprong, 120-volt, grounded outlets. Connect all your...

User Manual
Page 20
The back panel Take a look at the back panel and find the Apex power switch, input/output ports, and keyboard cable socket. This is where you turn on the Apex and connect the peripheral devices, such as the monitor and printer. 1-8 Setting Up Your System
The back panel Take a look at the back panel and find the Apex power switch, input/output ports, and keyboard cable socket. This is where you turn on the Apex and connect the peripheral devices, such as the monitor and printer. 1-8 Setting Up Your System

User Manual
Page 22
... to your video card, which control the optional devices you change your system configuration.) Parallel port. You can connect any printer with a parallel interface into this connector. For expansion purposes, the Apex has space for three option cards (which allows you to use the other two slots to add special devices, such...
... to your video card, which control the optional devices you change your system configuration.) Parallel port. You can connect any printer with a parallel interface into this connector. For expansion purposes, the Apex has space for three option cards (which allows you to use the other two slots to add special devices, such...

User Manual
Page 27
Place the printer in a convenient location next to your printer to connect your system. Epson offers a fill range of printer products for you to which you can easily connect a printer or plotter. If you have a printer you'd like to connect to your Apex, make sure you have an IBM PC-compatible printer cable. Once you have a printer cable, just follow these next few steps to the parallel interface on the main unit: 1. Setting Up Your System 1-15 6 Connecting a Printer Your Apex has a parallel interface to choose from.
Place the printer in a convenient location next to your printer to connect your system. Epson offers a fill range of printer products for you to which you can easily connect a printer or plotter. If you have a printer you'd like to connect to your Apex, make sure you have an IBM PC-compatible printer cable. Once you have a printer cable, just follow these next few steps to the parallel interface on the main unit: 1. Setting Up Your System 1-15 6 Connecting a Printer Your Apex has a parallel interface to choose from.
User Manual
Page 28
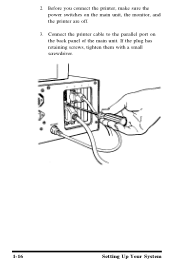
Before you connect the printer, make sure the power switches on the back panel of the main unit. If the plug has retaining screws, tighten them with a small screwdriver. 1-16 Setting Up Your System Connect the printer cable to the parallel port on the main unit, the monitor, and the printer are off. 3. 2.
Before you connect the printer, make sure the power switches on the back panel of the main unit. If the plug has retaining screws, tighten them with a small screwdriver. 1-16 Setting Up Your System Connect the printer cable to the parallel port on the main unit, the monitor, and the printer are off. 3. 2.

User Manual
Page 29
Plug the printer's power cable into the connectors on each side of the printer port and pushing them into an electrical outlet. Connect the other end of the cable. 5. Secure the cable by pressing together the squeeze locks at each side of the cable to your printer is connected to the printer. Now your Apex. Setting Up Your System 1-17 4.
Plug the printer's power cable into the connectors on each side of the printer port and pushing them into an electrical outlet. Connect the other end of the cable. 5. Secure the cable by pressing together the squeeze locks at each side of the cable to your printer is connected to the printer. Now your Apex. Setting Up Your System 1-17 4.

User Manual
Page 34
... you'll hear the cooling fan inside the main unit start. however, it on. Finally, if you have a printer, turn it 's a good idea to turn on the monitor and printer before you turn on your Apex; After a few seconds, the computer begins to turn on your computer with or without a system diskette in...
... you'll hear the cooling fan inside the main unit start. however, it on. Finally, if you have a printer, turn it 's a good idea to turn on the monitor and printer before you turn on your Apex; After a few seconds, the computer begins to turn on your computer with or without a system diskette in...

User Manual
Page 43
... a second time, the light goes off switches-when you press these keys a few times and watch the indicator light go on and off . Using Your Apex 2-3 Page Down, Insert Turns insert function on a line printer.
... a second time, the light goes off switches-when you press these keys a few times and watch the indicator light go on and off . Using Your Apex 2-3 Page Down, Insert Turns insert function on a line printer.

User Manual
Page 59
... turning on your system. 3. Starting and Exiting MS-DOS Remember, before you can run application programs. Using MS-DOS with Your Apex 4-3 Insert your monitor and any peripherals, such as the printer. 2. s How to change the default drive s How to perform tasks and run an MS-DOS application program, MS-DOS itself... informs you that you can now enter commands to instruct MS-DOS to start an application program. Refer to load MS-DOS: 1. Turn on your Apex. Follow these prompts.
... turning on your system. 3. Starting and Exiting MS-DOS Remember, before you can run application programs. Using MS-DOS with Your Apex 4-3 Insert your monitor and any peripherals, such as the printer. 2. s How to change the default drive s How to perform tasks and run an MS-DOS application program, MS-DOS itself... informs you that you can now enter commands to instruct MS-DOS to start an application program. Refer to load MS-DOS: 1. Turn on your Apex. Follow these prompts.

User Manual
Page 74
If your printer and set them safely to one side. 5-2 Installing Option Cards Turn the main unit around so that the cover is on top of the way too. Follow these steps: 1. Disconnect the keyboard and your monitor is secured with five screws. Remove the screws and put them out of the computer, disconnect it and move it to one side. You'll see that the back panel faces you 'll need a phillips-head screw driver. Removing the Cover To remove the cover, you . 2.
If your printer and set them safely to one side. 5-2 Installing Option Cards Turn the main unit around so that the cover is on top of the way too. Follow these steps: 1. Disconnect the keyboard and your monitor is secured with five screws. Remove the screws and put them out of the computer, disconnect it and move it to one side. You'll see that the back panel faces you 'll need a phillips-head screw driver. Removing the Cover To remove the cover, you . 2.

User Manual
Page 89
... and you may need aciditional help it , you can quickly make sure the printer has power and is setup for your printer. Be sure your software is properly connected to connect your printer. Troubleshooting 6-7 The DIP switches on a printer help , the printer manual gives detailed instructions on how to the computer. If you have printing...
... and you may need aciditional help it , you can quickly make sure the printer has power and is setup for your printer. Be sure your software is properly connected to connect your printer. Troubleshooting 6-7 The DIP switches on a printer help , the printer manual gives detailed instructions on how to the computer. If you have printing...
