Basics
Page 12
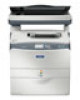
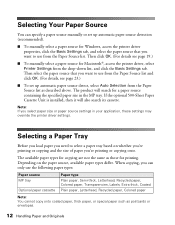
... list, and click the Basic Settings tab. Then select the paper source that you can specify a paper source manually or set up automatic paper source detection (recommended). ■ To manually select a paper source for printing. Selecting a Paper Tray Before you load paper you need to use from the... Paper Source list and click OK. (For details, see page 19.) ■ To manually select a paper source for a paper source containing the specified paper size in your application, these settings may override the printer driver settings.
... list, and click the Basic Settings tab. Then select the paper source that you can specify a paper source manually or set up automatic paper source detection (recommended). ■ To manually select a paper source for printing. Selecting a Paper Tray Before you load paper you need to use from the... Paper Source list and click OK. (For details, see page 19.) ■ To manually select a paper source for a paper source containing the specified paper size in your application, these settings may override the printer driver settings.
Basics
Page 21
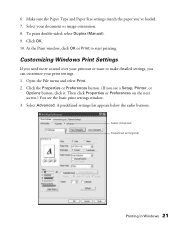
... next screen.) You see a Setup, Printer, or Options button, click it. A predefined settings list appears below the radio buttons. To print double-sided, select Duplex (Manual). 9.
... next screen.) You see a Setup, Printer, or Options button, click it. A predefined settings list appears below the radio buttons. To print double-sided, select Duplex (Manual). 9.

Basics
Page 51
... Previewing and Adjusting the Scan Area Once you have selected your basic settings and resolution, you can preview your previewed images in their entirety. EPSON Scan displays the preview image(s) in a separate Preview window on your scan area and applies automatic exposure settings to the images...document type and other settings, Normal preview may be able to change the Resolution setting to 600 dpi in EPSON Scan. You must select the scan area and make any image quality adjustments manually. See the table below to scan. example, if the resolution is 300 dpi (dots per inch at...
... Previewing and Adjusting the Scan Area Once you have selected your basic settings and resolution, you can preview your previewed images in their entirety. EPSON Scan displays the preview image(s) in a separate Preview window on your scan area and applies automatic exposure settings to the images...document type and other settings, Normal preview may be able to change the Resolution setting to 600 dpi in EPSON Scan. You must select the scan area and make any image quality adjustments manually. See the table below to scan. example, if the resolution is 300 dpi (dots per inch at...

Basics
Page 65
... same names. ■ Show this dialog box before you scan. Click OK. Before using the buttons on the CX11N control panel (Push Scan). PageManager on a local Macintosh. The scanned image is saved in the file and location...scanning Select this option if you chose. Using the Control Panel Buttons 65 4. If you deselect it, you have installed EPSON Scan, EPSON Creativity Suite, and Presto! Selecting a Scanning Mode for a Network PC Note: You cannot use Push Scan over a ...files with the same name Select this option if you want to select Manual Scan and then press the r button.
... same names. ■ Show this dialog box before you scan. Click OK. Before using the buttons on the CX11N control panel (Push Scan). PageManager on a local Macintosh. The scanned image is saved in the file and location...scanning Select this option if you chose. Using the Control Panel Buttons 65 4. If you deselect it, you have installed EPSON Scan, EPSON Creativity Suite, and Presto! Selecting a Scanning Mode for a Network PC Note: You cannot use Push Scan over a ...files with the same name Select this option if you want to select Manual Scan and then press the r button.

Basics
Page 66
... options for each scan mode. Press the u or d button to select a file format. 6. Press the x B&W Start or x Color Start button on the CX11N. EPSON Scan starts scanning. When the scanning is set in the Auto Document Feeder (CX11NF only; Press the l or r button to select either Local PC or... Network PC, then press the r button. Select your scanning program, scan your document, and close your computer screen. Scan modes Automatic scan Manual scan Available settings File Format File Format Paper Size Items PDF, TIFF, JPG PDF, TIFF, JPG A4, B5, Letter, Legal Scanning Follow these ...
... options for each scan mode. Press the u or d button to select a file format. 6. Press the x B&W Start or x Color Start button on the CX11N. EPSON Scan starts scanning. When the scanning is set in the Auto Document Feeder (CX11NF only; Press the l or r button to select either Local PC or... Network PC, then press the r button. Select your scanning program, scan your document, and close your computer screen. Scan modes Automatic scan Manual scan Available settings File Format File Format Paper Size Items PDF, TIFF, JPG PDF, TIFF, JPG A4, B5, Letter, Legal Scanning Follow these ...
Basics
Page 100
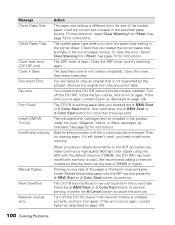
...size setting is different from the size of the paper is finished in manual duplex mode. If it securely. If the error occurs again, contact Epson as described on the CX11NF without the fax module installed. The CX11N is ejecting paper after you need to copy. Load the correct size... or x Color Start button, then held down the x B&W Start or x Color Start button for more memory. The specified cover is 256MB or higher. Manual Duplex Mem Overflow Network module error When you place multiple documents on one side of the loaded paper. See page 73 for a few minutes until...
...size setting is different from the size of the paper is finished in manual duplex mode. If it securely. If the error occurs again, contact Epson as described on the CX11NF without the fax module installed. The CX11N is ejecting paper after you need to copy. Load the correct size... or x Color Start button, then held down the x B&W Start or x Color Start button for more memory. The specified cover is 256MB or higher. Manual Duplex Mem Overflow Network module error When you place multiple documents on one side of the loaded paper. See page 73 for a few minutes until...
Basics
Page 108
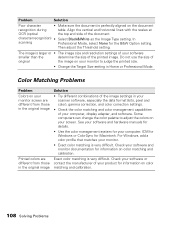
... and calibration. 108 Solving Problems Do not use the size of your monitor. • Exact color matching is very difficult. See your software and hardware manuals for details. • Use the color management system for your monitor to adjust the colors on the document recognition during table. Check your software or...
... and calibration. 108 Solving Problems Do not use the size of your monitor. • Exact color matching is very difficult. See your software and hardware manuals for details. • Use the color management system for your monitor to adjust the colors on the document recognition during table. Check your software or...
Product Information Guide
Page 2
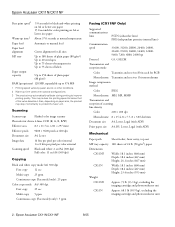
... area 8.3 × 11.7 in. (211 × 297 mm) Effective pixels 9600 × 9600 pixels at normal temperature Paper feed Automatic or manual feed Paper feed alignment Center alignment for all sizes MP tray Up to 180 sheets of plain paper (80 g/m²) Up to 20 envelopes Up...30.9 kg), excluding the imaging cartridge and photoconductor unit 2 - This may reduce the printing speed to protect the fuser unit. Epson AcuLaser CX11N/CX11NF 8/05 Epson AcuLaser CX11N/CX11NF First print speed1 Warm-up time2 9.0 seconds for black-and-white printing on A4 or Letter size paper 17.0 seconds ...
... area 8.3 × 11.7 in. (211 × 297 mm) Effective pixels 9600 × 9600 pixels at normal temperature Paper feed Automatic or manual feed Paper feed alignment Center alignment for all sizes MP tray Up to 180 sheets of plain paper (80 g/m²) Up to 20 envelopes Up...30.9 kg), excluding the imaging cartridge and photoconductor unit 2 - This may reduce the printing speed to protect the fuser unit. Epson AcuLaser CX11N/CX11NF 8/05 Epson AcuLaser CX11N/CX11NF First print speed1 Warm-up time2 9.0 seconds for black-and-white printing on A4 or Letter size paper 17.0 seconds ...
Product Information Guide
Page 5
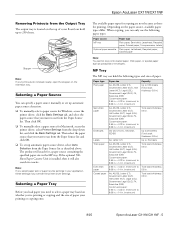
... To set up to use from the Paper Source list. When copying, you select paper size or paper source settings in . 8/05 Epson AcuLaser CX11N/CX11NF - 5 Then select the paper source that you need to use the following types and sizes of paper. The available paper types ...thickness: 0.8 in the MP tray. Then click OK. ❏ To manually select a paper source for a paper source containing the specified paper size in . Depending on the paper source, available paper types differ. Epson AcuLaser CX11N/CX11NF Removing Printouts from the Output Tray The output tray is installed, then ...
... To set up to use from the Paper Source list. When copying, you select paper size or paper source settings in . 8/05 Epson AcuLaser CX11N/CX11NF - 5 Then select the paper source that you need to use the following types and sizes of paper. The available paper types ...thickness: 0.8 in the MP tray. Then click OK. ❏ To manually select a paper source for a paper source containing the specified paper size in . Depending on the paper source, available paper types differ. Epson AcuLaser CX11N/CX11NF Removing Printouts from the Output Tray The output tray is installed, then ...

Product Information Guide
Page 8
... the unlock position. 3. Press the l or r button to select Manual Scan and then press the r button. EPSON Scan starts scanning. Faxing (CX11NF Only) Sending a Basic Fax 1. Epson AcuLaser CX11N/CX11NF Starting EPSON Scan With Another Scanning Application 1. Double-click the program icon from the... Mode for each scan mode. Select your scanning program, scan your document, and close your EPSON AL-CX11. When the scanning is turned on a local Macintosh. Epson AcuLaser CX11N/CX11NF 8/05 Select your program's scanning option. (See your network computer, and then press ...
... the unlock position. 3. Press the l or r button to select Manual Scan and then press the r button. EPSON Scan starts scanning. Faxing (CX11NF Only) Sending a Basic Fax 1. Epson AcuLaser CX11N/CX11NF Starting EPSON Scan With Another Scanning Application 1. Double-click the program icon from the... Mode for each scan mode. Select your scanning program, scan your document, and close your EPSON AL-CX11. When the scanning is turned on a local Macintosh. Epson AcuLaser CX11N/CX11NF 8/05 Select your program's scanning option. (See your network computer, and then press ...

Start Here Card
Page 7
...Properties. 3 Select the Ports tab, then click Add Port. 4 Select Standard TCP/IP, then click New Port. When you see this screen, select Manual, then select LPT1 as the printer port and click OK. 10 Select your country or region, then click OK. 11 When you are asked to...CX11 Advanced and click OK. 9 When you see the following : • EPSON Scan • Printer Driver • EPSON Status Monitor 3 • User's Guide Then click Install. 7 Follow the prompts to install the software. Use the and buttons to the CX11N over a network. 5 Press the button until Yes is selected, then press ...
...Properties. 3 Select the Ports tab, then click Add Port. 4 Select Standard TCP/IP, then click New Port. When you see this screen, select Manual, then select LPT1 as the printer port and click OK. 10 Select your country or region, then click OK. 11 When you are asked to...CX11 Advanced and click OK. 9 When you see the following : • EPSON Scan • Printer Driver • EPSON Status Monitor 3 • User's Guide Then click Install. 7 Follow the prompts to install the software. Use the and buttons to the CX11N over a network. 5 Press the button until Yes is selected, then press ...
