Basics
Page 12
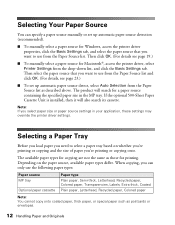
... and the size of paper you're printing or copying onto. Note: If you can specify a paper source manually or set up automatic paper source detection (recommended). ■ To manually select a paper source for Windows, access the printer driver properties, click the Basic Settings tab, and select the... paper source that you want to use from the Paper Source list and click OK. (For details, see page 19.) ■ To manually select a paper source for Macintosh®, access the printer driver, select Printer Settings from the drop-down list, and click the Basic Settings tab...
... and the size of paper you're printing or copying onto. Note: If you can specify a paper source manually or set up automatic paper source detection (recommended). ■ To manually select a paper source for Windows, access the printer driver properties, click the Basic Settings tab, and select the... paper source that you want to use from the Paper Source list and click OK. (For details, see page 19.) ■ To manually select a paper source for Macintosh®, access the printer driver, select Printer Settings from the drop-down list, and click the Basic Settings tab...
Basics
Page 21
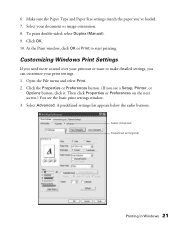
... radio buttons. Customizing Windows Print Settings If you need more control over your document or image orientation. 8. Select Advanced. To print double-sided, select Duplex (Manual). 9. Make sure the Paper Type and Paper Size settings match the paper you've loaded. 7. Open the File menu and select Print. 2. Click OK. 10...
... radio buttons. Customizing Windows Print Settings If you need more control over your document or image orientation. 8. Select Advanced. To print double-sided, select Duplex (Manual). 9. Make sure the Paper Type and Paper Size settings match the paper you've loaded. 7. Open the File menu and select Print. 2. Click OK. 10...

Basics
Page 51
...if available. ■ Thumbnail preview displays your previewed images as thumbnails. You must select the scan area and make any image quality adjustments manually. There are two types of dots per inch), but you can preview your basic settings and resolution, you can also select it in ...Professional Mode, if available. EPSON Scan automatically locates the edges of the image(s) you want to 600 dpi in EPSON Scan. Previewing and Adjusting the Scan Area Once you have selected your image and make any ...
...if available. ■ Thumbnail preview displays your previewed images as thumbnails. You must select the scan area and make any image quality adjustments manually. There are two types of dots per inch), but you can preview your basic settings and resolution, you can also select it in ...Professional Mode, if available. EPSON Scan automatically locates the edges of the image(s) you want to 600 dpi in EPSON Scan. Previewing and Adjusting the Scan Area Once you have selected your image and make any ...

Basics
Page 65
... finishes scanning. 5. Using the Control Panel Buttons 65 The scanned image is saved. Click OK. Before using the buttons on the CX11N control panel (Push Scan). If you deselect it, you must click the arrow to the right of the window give you these options: ■ ..., EPSON Creativity Suite, and Presto! Selecting a Scanning Mode for a Network PC Note: You cannot use Push Scan over a Macintosh network, only on your computer using this option if you scan. Press the d button to your computer. 4. Using the Control Panel Buttons You can scan an image to select Manual Scan and...
... finishes scanning. 5. Using the Control Panel Buttons 65 The scanned image is saved. Click OK. Before using the buttons on the CX11N control panel (Push Scan). If you deselect it, you must click the arrow to the right of the window give you these options: ■ ..., EPSON Creativity Suite, and Presto! Selecting a Scanning Mode for a Network PC Note: You cannot use Push Scan over a Macintosh network, only on your computer using this option if you scan. Press the d button to your computer. 4. Using the Control Panel Buttons You can scan an image to select Manual Scan and...

Basics
Page 66
...lock on the left side of the document table is complete, remove your computer screen. If you need to scan: 1. Scan modes Automatic scan Manual scan Available settings File Format File Format Paper Size Items PDF, TIFF, JPG PDF, TIFF, JPG A4, B5, Letter, Legal Scanning Follow these... mode. Turn on the control panel. The CX11N returns to your computer with a USB cable or a network cable as described in the Auto Document Feeder (CX11NF only; Press the l or r button to select a file format. 6. When you see page 17). EPSON Scan starts scanning. Select your scanning program, ...
...lock on the left side of the document table is complete, remove your computer screen. If you need to scan: 1. Scan modes Automatic scan Manual scan Available settings File Format File Format Paper Size Items PDF, TIFF, JPG PDF, TIFF, JPG A4, B5, Letter, Legal Scanning Follow these... mode. Turn on the control panel. The CX11N returns to your computer with a USB cable or a network cable as described in the Auto Document Feeder (CX11NF only; Press the l or r button to select a file format. 6. When you see page 17). EPSON Scan starts scanning. Select your scanning program, ...
Basics
Page 100
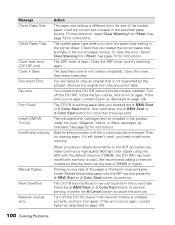
... select Clear Warning from Reset. Remove the original from the size of paper in the printer driver. If the error occurs again, contact Epson as described on again. The loaded paper type does not match the paper type setting in the specified paper source. See page 73 for... memory to copy an original that is different from the document table. The CX11N has insufficient memory to add more than three seconds. You are not installed in manual duplex mode. Then try scanning again. Manual Duplex Mem Overflow Network module error When you place multiple documents on again. ...
... select Clear Warning from Reset. Remove the original from the size of paper in the printer driver. If the error occurs again, contact Epson as described on again. The loaded paper type does not match the paper type setting in the specified paper source. See page 73 for... memory to copy an original that is different from the document table. The CX11N has insufficient memory to add more than three seconds. You are not installed in manual duplex mode. Then try scanning again. Manual Duplex Mem Overflow Network module error When you place multiple documents on again. ...
Basics
Page 108
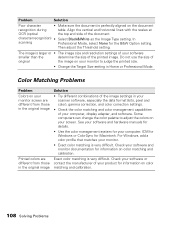
...: ICM for Windows or ColorSync for information on your software smaller than the determine the size of the printed image. See your software and hardware manuals for details. • Use the color management system for your product for Macintosh. Exact color matching is very difficult. For Windows, add a color profile that...
...: ICM for Windows or ColorSync for information on your software smaller than the determine the size of the printed image. See your software and hardware manuals for details. • Use the color management system for your product for Macintosh. Exact color matching is very difficult. For Windows, add a color profile that...
Product Information Guide
Page 2
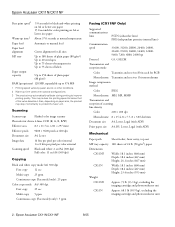
... × 11.7 in. (211 × 297 mm) Effective pixels 9600 × 9600 pixels at normal temperature Paper feed Automatic or manual feed Paper feed alignment Center alignment for RGB Monochrome Transmits and receives 1 bit monochrome Image compression method Color JPEG Monochrome MH, MR, MMR ...size A4, B5, Letter, Legal (with optional configurations. 3 The product may automatically calibrate during printing to improve printing quality. Epson AcuLaser CX11N/CX11NF First print speed1 Warm-up time varies with ADF) Mechanical Paper path Sheet feeder, front entry, top out MP tray ...
... × 11.7 in. (211 × 297 mm) Effective pixels 9600 × 9600 pixels at normal temperature Paper feed Automatic or manual feed Paper feed alignment Center alignment for RGB Monochrome Transmits and receives 1 bit monochrome Image compression method Color JPEG Monochrome MH, MR, MMR ...size A4, B5, Letter, Legal (with optional configurations. 3 The product may automatically calibrate during printing to improve printing quality. Epson AcuLaser CX11N/CX11NF First print speed1 Warm-up time varies with ADF) Mechanical Paper path Sheet feeder, front entry, top out MP tray ...
Product Information Guide
Page 5
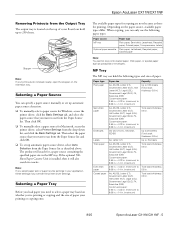
...manually select a paper source for Windows, access the printer driver, click the Basic Settings tab, and select the paper source that you want to use from the Paper Source list and click OK. ❏ To set up to use the following types and sizes of paper your printing or copying onto. Epson AcuLaser CX11N..., select Printer Settings from the Paper Source list. Then click OK. ❏ To manually select a paper source for copying are not the same as postcards or envelopes. Depending ... Up to 75 sheets Total stack thickness: 0.8 in . 8/05 Epson AcuLaser CX11N/CX11NF - 5
...manually select a paper source for Windows, access the printer driver, click the Basic Settings tab, and select the paper source that you want to use from the Paper Source list and click OK. ❏ To set up to use the following types and sizes of paper your printing or copying onto. Epson AcuLaser CX11N..., select Printer Settings from the Paper Source list. Then click OK. ❏ To manually select a paper source for copying are not the same as postcards or envelopes. Depending ... Up to 75 sheets Total stack thickness: 0.8 in . 8/05 Epson AcuLaser CX11N/CX11NF - 5

Product Information Guide
Page 8
... Epson AcuLaser CX11N/CX11NF Starting EPSON Scan With Another Scanning Application 1. Double-click the program icon from your desktop, if it is complete, remove your computer screen. EPSON Scan starts immediately. Selecting a Scanning Mode for instructions.) Note: In some programs, you need to select Manual ... choose it , you see page 6). Press the d button to cancel scanning, press the y Cancel button. Epson AcuLaser CX11N/CX11NF 8/05 If you must select the Epson AL-CX11 as described in the unlock position. 3. If you cannot use Push Scan over a Macintosh network,...
... Epson AcuLaser CX11N/CX11NF Starting EPSON Scan With Another Scanning Application 1. Double-click the program icon from your desktop, if it is complete, remove your computer screen. EPSON Scan starts immediately. Selecting a Scanning Mode for instructions.) Note: In some programs, you need to select Manual ... choose it , you see page 6). Press the d button to cancel scanning, press the y Cancel button. Epson AcuLaser CX11N/CX11NF 8/05 If you must select the Epson AL-CX11 as described in the unlock position. 3. If you cannot use Push Scan over a Macintosh network,...

Start Here Card
Page 7
... and buttons to the CX11N over a network. When you see this screen, select Manual, then select LPT1 as the printer port and click OK. 10 Select your computer's CD-ROM drive. Add Port 1 From the Windows Start menu, select Settings > Printers and Faxes. 2 Right-click EPSON AL-CX11 Advanced and select...selected, then press the button. 7 Press the button until it is selected, then press the button. 8 For each computer that will be using the CX11N on the network. Install and Configure the Client Software (Windows Only) Note: For Mac OS X 10.2.4 or later, see the Basics Guide for ...
... and buttons to the CX11N over a network. When you see this screen, select Manual, then select LPT1 as the printer port and click OK. 10 Select your computer's CD-ROM drive. Add Port 1 From the Windows Start menu, select Settings > Printers and Faxes. 2 Right-click EPSON AL-CX11 Advanced and select...selected, then press the button. 7 Press the button until it is selected, then press the button. 8 For each computer that will be using the CX11N on the network. Install and Configure the Client Software (Windows Only) Note: For Mac OS X 10.2.4 or later, see the Basics Guide for ...
